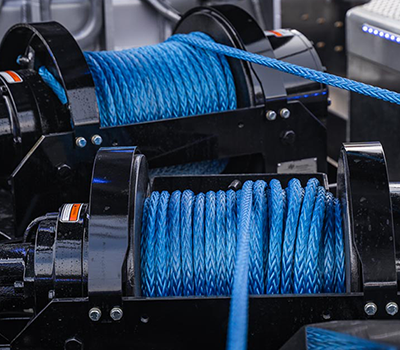
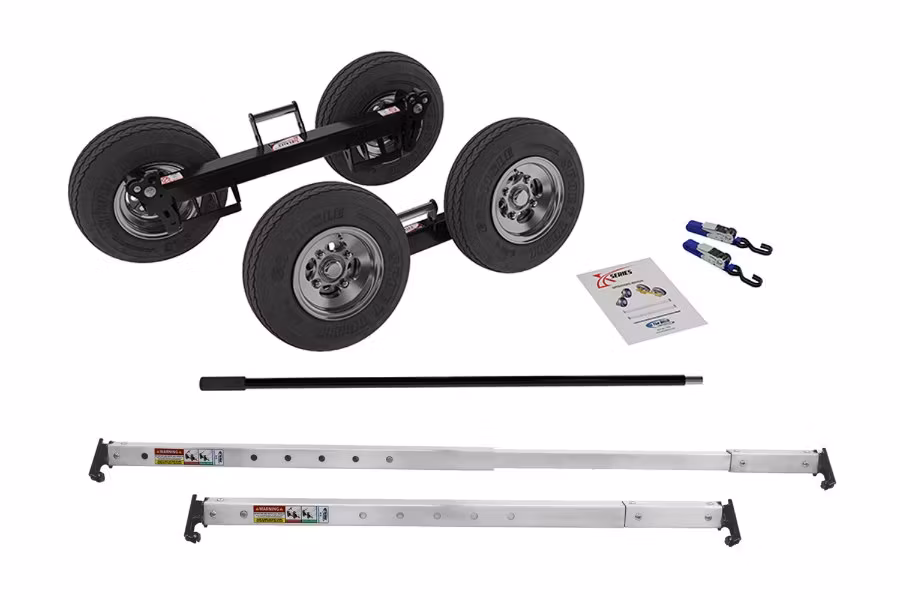
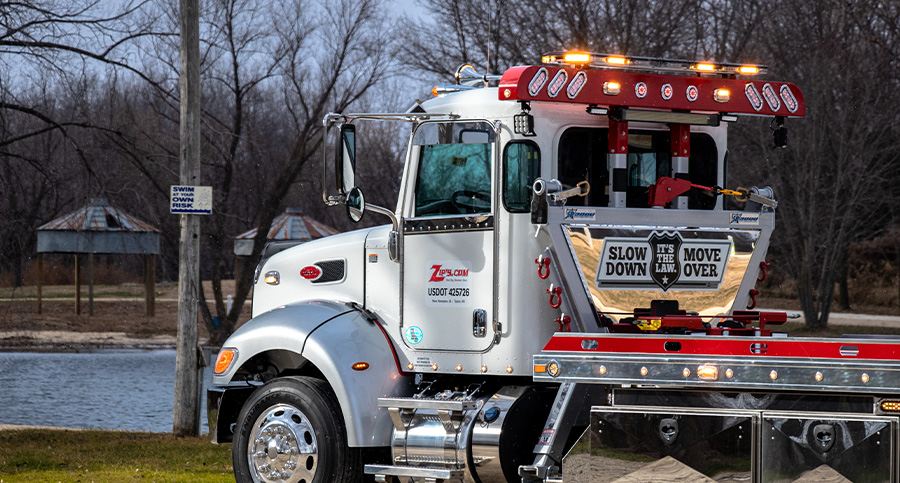
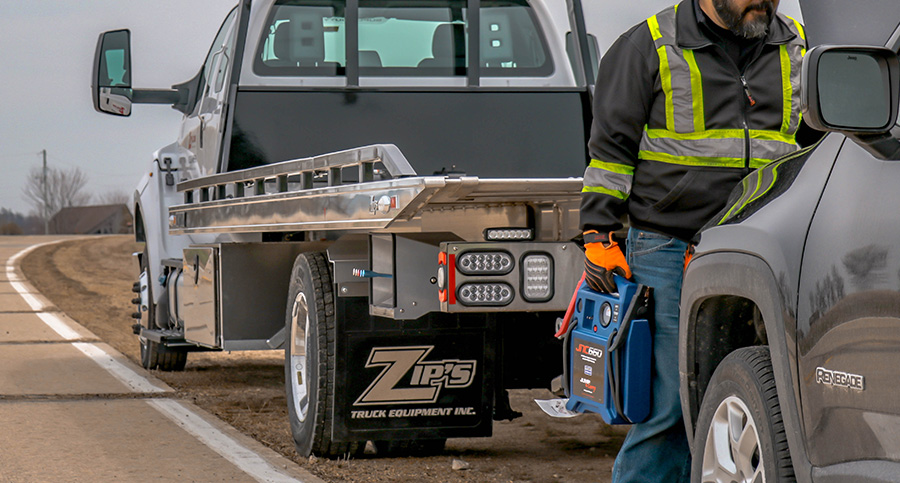
Free Shipping!

BLOG

Trending Topics

NEW Zip’s AW Direct Welcomes Johnnie Manier to Equipment Sales Team

NEW HAMPTON, Iowa – Zip's AW Direct, a leading provider of heavy-duty wreckers, rotators, car carriers, service bodies and industrial trailers, proudly announces the addition of Johnnie Manier to its ...
Read more
Zip’s AW Direct Welcomes Johnnie Manier to Equipment Sales Team
Kevin Andera - Sales Rep.

NEW Kevin Andera - Sales Rep.

Cameron Hanson | Jan 29, 2026 3:54:57 PM
Zip’s Truck Equipment Welcomes Kevin Andera as New Equipment Sales Specialist for Wisconsin
Read more
Top 5 mistakes when buying a car carrier

Top 5 Mistakes When Buying a New Car Carrier

You have a lot to consider when purchasing a new car carrier for your business. Bed length, truck ...
Read more
Zip's Top 10 Accessories for Your Service Truck

Zip's Top 10 Accessories for Your Service Truck

Providing top-tier roadside service begins with having the right tools for the job. With so many ...
Read more
Lockout kit assortment

Best Vehicle Lockout Kits

Doesn’t matter who locked the keys inside the car. What matters is what you’re going to do to get ...
Read more
GUNI products

Zip's AW Direct Acquires GUNI Products

NEW HAMPTON, Iowa–Zip’s AW Direct, a leading distributor of trucks, parts and accessories to the ...
Read more
How To Choose & Use a Vehicle Jack

How To Choose & Use a Vehicle Jack

Whether you get a flat tire on the road or you want to perform basic car maintenance in your shop, ...
Read more
How to Maintain Your Winch

How to Maintain Your Winch

Proper care can save your equipment and save you money. With the right maintenance, you can ensure ...
Read more
How to Fix or Change a Tire

How to Fix or Change a Tire

When on the road, anything is possible. One of the most common issues is when you’re driving down ...
Read more
Best Automotive Lockout Kits of 2022

Best Automotive Lockout Kits of 2022

Doesn’t matter who locked the keys inside the car. What matters is what you’re going to do to get ...
Read more
truck with clean lightbar

Explore Lightbar Cleaning Methods & Tips

Keeping wreckers clean and professional looking is part of maintaining a good business reputation. ...
Read more
Snatch Blocks: A Better Way to Winch

Snatch Blocks: A Better Way to Winch

Snatch blocks are a common tool on almost every tow truck for good reason. Snatch blocks are useful ...
Read more
Choosing & Caring for Winch Lines

Choosing & Caring for Winch Lines

Understand the different pros and cons of different types of winch lines. Additionally, know how to ...
Read more
Make your Jump-Start Pack Last!

Make your Jump-Start Pack Last!

Tips for Preserving the Life of Jump-Start Packs
Read more
Make the switch to synthetics with Zip's

Make the switch to synthetics with Zip's

The use of this recovery rope will drastically cut down on the overall weight of any truck.
Read more
Portable Power Boosts

Portable Power Boosts

A dead car battery can leave you stranded. A dead phone battery can leave you without a way to call ...
Read more
","rss_summary":"

NEW HAMPTON, Iowa – Zip's AW Direct, a leading provider of heavy-duty wreckers, rotators, car carriers, service bodies and industrial trailers, proudly announces the addition of Johnnie Manier to its equipment sales team. This strategic hire strengthens Zip’s ability to deliver knowledgeable, hands-on consultation to customers across Michigan.

\n","rss_body":"

NEW HAMPTON, Iowa – Zip's AW Direct, a leading provider of heavy-duty wreckers, rotators, car carriers, service bodies and industrial trailers, proudly announces the addition of Johnnie Manier to its equipment sales team. This strategic hire strengthens Zip’s ability to deliver knowledgeable, hands-on consultation to customers across Michigan.

\n

Based out of our location in the Detroit suburb of Taylor, Johnnie brings to his new position more than a decade of professional experience in the trucking industry. No stranger to coast-to-coast industrial hauling, he offers firsthand knowledge of equipment operation, real-world road conditions and the day-to-day demands professional operators face.

\n

“We’re excited to officially welcome Johnnie to our sales team,” said Eric Albertson, Executive Director of Equipment Sales at Zip’s. “From the moment he walked in the door, it was clear he brings great energy, strong people skills and a passion for the towing industry. With his background in the trucking industry, Johnnie brings valuable knowledge of over-the-road operations, weight laws and axle limits.”

\n

As an Equipment Sales Specialist, Johnnie will guide customers toward equipment solutions that enhance performance, safety and profitability. A Detroit native, he understands the work ethic and values that define the operators he serves. He is family-oriented, married with a daughter and deeply connected to his community.

\n

“Johnnie will be the face of our Michigan storefront, supporting our loyal local customers while also playing a key role on our national sales team, helping customers across the country find the right trucks for their needs,” Albertson said. “We’re thrilled to have Johnnie on board and look forward to the impact he’ll make. Be sure to stop in and meet him!”

\n

With Johnnie’s addition, Zip’s AW Direct continues to invest in experienced professionals who understand the industry from the ground up and are dedicated to supporting customers with expertise, integrity and service. Johnnie can be reached in the office at 800-222-6047, ext. 70008, by email at or by cell at 313-720-8440.

\n","enable_google_amp_output_override":false,"generate_json_ld_enabled":true,"blog_post_schedule_task_uid":null,"blog_publish_to_social_media_task":"DONE_NOT_SENT","blog_publish_instant_email_task_uid":null,"blog_publish_instant_email_campaign_id":null,"blog_publish_instant_email_retry_count":null,"keywords":[],"composition_id":0,"is_crawlable_by_bots":false,"html_title":"Zip’s AW Direct Welcomes Johnnie Manier to Equipment Sales Team","public_access_rules":[],"public_access_rules_enabled":false,"use_featured_image":true,"published_at":1771538217195,"layout_sections":{},"past_mab_experiment_ids":[],"deleted_by":null,"featured_image_alt_text":"","enable_layout_stylesheets":null,"tweet":null,"tweet_at":null,"campaign_name":null,"campaign_utm":null,"meta_keywords":null,"meta_description":"Zip’s AW Direct Welcomes Johnnie Manier to Equipment Sales Team","tweet_immediately":false,"publish_immediately":true,"security_state":"NONE","scheduled_update_date":0,"placement_guids":[],"header_template_path":null,"header_variant_name":null,"footer_template_path":null,"footer_variant_name":null,"global_block_overrides":{},"property_for_dynamic_page_title":null,"property_for_dynamic_page_slug":null,"property_for_dynamic_page_meta_description":null,"property_for_dynamic_page_featured_image":null,"property_for_dynamic_page_canonical_url":null,"preview_image_src":null,"legacy_blog_tabid":null,"legacy_post_guid":null,"performable_variation_letter":null,"style_override_id":null,"has_user_changes":true,"css":{},"css_text":"","unpublished_at":0,"published_by_id":76755706,"allowed_slug_conflict":false,"ai_features":null,"link_rel_canonical_url":"","page_redirected":false,"page_expiry_enabled":null,"page_expiry_date":null,"page_expiry_redirect_id":null,"page_expiry_redirect_url":null,"deleted_by_id":null,"state_when_deleted":null,"cloned_from":null,"staged_from":null,"personas":[],"compose_body":null,"featured_image":"https://48463649.fs1.hubspotusercontent-na1.net/hubfs/48463649/johnnie-manier-header.jpg","featured_image_width":800,"featured_image_height":300,"publish_timezone_offset":null,"theme_settings_values":null,"head_html":"","footer_html":null,"attached_stylesheets":[],"enable_domain_stylesheets":null,"include_default_custom_css":null,"header":null,"password":null,"last_edit_session_id":null,"last_edit_update_id":null,"created_by_agent":null},"metaDescription":"Zip’s AW Direct Welcomes Johnnie Manier to Equipment Sales Team","metaKeywords":null,"name":"Zip’s AW Direct Welcomes Johnnie Manier to Equipment Sales Team","nextPostFeaturedImage":"https://48463649.fs1.hubspotusercontent-na1.net/hubfs/48463649/kevin-andera-header.jpg","nextPostFeaturedImageAltText":"","nextPostName":"Kevin Andera - Sales Rep.","nextPostSlug":"blog/kevin-andera-sales-rep","pageExpiryDate":null,"pageExpiryEnabled":null,"pageExpiryRedirectId":null,"pageExpiryRedirectUrl":null,"pageRedirected":false,"pageTitle":"Zip’s AW Direct Welcomes Johnnie Manier to Equipment Sales Team","parentBlog":{"absoluteUrl":"/blog","allowComments":true,"ampBodyColor":"#404040","ampBodyFont":"'Helvetica Neue', Helvetica, Arial, sans-serif","ampBodyFontSize":"18","ampCustomCss":"","ampHeaderBackgroundColor":"#ffffff","ampHeaderColor":"#1e1e1e","ampHeaderFont":"'Helvetica Neue', Helvetica, Arial, sans-serif","ampHeaderFontSize":"36","ampLinkColor":"#416bb3","ampLogoAlt":"","ampLogoHeight":0,"ampLogoSrc":"","ampLogoWidth":0,"analyticsPageId":190096341139,"attachedStylesheets":[],"audienceAccess":"PUBLIC","businessUnitId":null,"captchaAfterDays":7,"captchaAlways":false,"categoryId":3,"cdnPurgeEmbargoTime":null,"closeCommentsOlder":0,"commentDateFormat":"medium","commentFormGuid":"a4128401-39db-4c54-a62b-88ff335d3a69","commentMaxThreadDepth":1,"commentModeration":false,"commentNotificationEmails":[],"commentShouldCreateContact":false,"commentVerificationText":"","cosObjectType":"BLOG","created":1747163443999,"createdDateTime":1747163443999,"dailyNotificationEmailId":null,"dateFormattingLanguage":null,"defaultGroupStyleId":"","defaultNotificationFromName":"","defaultNotificationReplyTo":"","deletedAt":0,"description":"","domain":"","domainWhenPublished":"www.zips.com","emailApiSubscriptionId":null,"enableGoogleAmpOutput":true,"enableSocialAutoPublishing":false,"generateJsonLdEnabled":true,"header":null,"htmlFooter":"","htmlFooterIsShared":true,"htmlHead":"","htmlHeadIsShared":true,"htmlKeywords":[],"htmlTitle":"blog","id":190096341139,"ilsSubscriptionListsByType":{},"instantNotificationEmailId":null,"itemLayoutId":null,"itemTemplateIsShared":false,"itemTemplatePath":"zips-basic-theme/templates/blog-post.html","label":"blog","language":"en","legacyGuid":null,"legacyModuleId":null,"legacyTabId":null,"listingLayoutId":null,"listingPageId":190096341141,"listingTemplatePath":"","liveDomain":"www.zips.com","monthFilterFormat":"MMMM yyyy","monthlyNotificationEmailId":null,"name":"blog","parentBlogUpdateTaskId":null,"portalId":48463649,"postHtmlFooter":"","postHtmlHead":"","postsPerListingPage":111,"postsPerRssFeed":10,"publicAccessRules":[],"publicAccessRulesEnabled":false,"publicTitle":"blog","publishDateFormat":"medium","resolvedDomain":"www.zips.com","rootUrl":"/blog","rssCustomFeed":null,"rssDescription":null,"rssItemFooter":null,"rssItemHeader":null,"settingsOverrides":{"itemLayoutId":false,"itemTemplatePath":false,"itemTemplateIsShared":false,"listingLayoutId":false,"listingTemplatePath":false,"postsPerListingPage":false,"showSummaryInListing":false,"useFeaturedImageInSummary":false,"htmlHead":false,"postHtmlHead":false,"htmlHeadIsShared":false,"htmlFooter":false,"listingPageHtmlFooter":false,"postHtmlFooter":false,"htmlFooterIsShared":false,"attachedStylesheets":false,"postsPerRssFeed":false,"showSummaryInRss":false,"showSummaryInEmails":false,"showSummariesInEmails":false,"allowComments":false,"commentShouldCreateContact":false,"commentModeration":false,"closeCommentsOlder":false,"commentNotificationEmails":false,"commentMaxThreadDepth":false,"commentVerificationText":false,"socialAccountTwitter":false,"showSocialLinkTwitter":false,"showSocialLinkLinkedin":false,"showSocialLinkFacebook":false,"enableGoogleAmpOutput":false,"ampLogoSrc":false,"ampLogoHeight":false,"ampLogoWidth":false,"ampLogoAlt":false,"ampHeaderFont":false,"ampHeaderFontSize":false,"ampHeaderColor":false,"ampHeaderBackgroundColor":false,"ampBodyFont":false,"ampBodyFontSize":false,"ampBodyColor":false,"ampLinkColor":false,"generateJsonLdEnabled":false},"showSocialLinkFacebook":true,"showSocialLinkLinkedin":true,"showSocialLinkTwitter":true,"showSummaryInEmails":true,"showSummaryInListing":true,"showSummaryInRss":true,"siteId":null,"slug":"blog","socialAccountTwitter":"","state":null,"subscriptionContactsProperty":null,"subscriptionEmailType":null,"subscriptionFormGuid":null,"subscriptionListsByType":{},"title":null,"translatedFromId":null,"translations":{},"updated":1755110916417,"updatedDateTime":1755110916417,"urlBase":"www.zips.com/blog","urlSegments":{"all":"all","archive":"archive","author":"author","page":"page","tag":"tag"},"useFeaturedImageInSummary":true,"usesDefaultTemplate":false,"weeklyNotificationEmailId":null},"password":null,"pastMabExperimentIds":[],"performableGuid":null,"performableVariationLetter":null,"personalizationStrategyId":null,"personalizationVariantStatus":null,"personas":[],"placementGuids":[],"portableKey":null,"portalId":48463649,"position":null,"postBody":"

NEW HAMPTON, Iowa – Zip's AW Direct, a leading provider of heavy-duty wreckers, rotators, car carriers, service bodies and industrial trailers, proudly announces the addition of Johnnie Manier to its equipment sales team. This strategic hire strengthens Zip’s ability to deliver knowledgeable, hands-on consultation to customers across Michigan.

\n

Based out of our location in the Detroit suburb of Taylor, Johnnie brings to his new position more than a decade of professional experience in the trucking industry. No stranger to coast-to-coast industrial hauling, he offers firsthand knowledge of equipment operation, real-world road conditions and the day-to-day demands professional operators face.

\n

“We’re excited to officially welcome Johnnie to our sales team,” said Eric Albertson, Executive Director of Equipment Sales at Zip’s. “From the moment he walked in the door, it was clear he brings great energy, strong people skills and a passion for the towing industry. With his background in the trucking industry, Johnnie brings valuable knowledge of over-the-road operations, weight laws and axle limits.”

\n

As an Equipment Sales Specialist, Johnnie will guide customers toward equipment solutions that enhance performance, safety and profitability. A Detroit native, he understands the work ethic and values that define the operators he serves. He is family-oriented, married with a daughter and deeply connected to his community.

\n

“Johnnie will be the face of our Michigan storefront, supporting our loyal local customers while also playing a key role on our national sales team, helping customers across the country find the right trucks for their needs,” Albertson said. “We’re thrilled to have Johnnie on board and look forward to the impact he’ll make. Be sure to stop in and meet him!”

\n

With Johnnie’s addition, Zip’s AW Direct continues to invest in experienced professionals who understand the industry from the ground up and are dedicated to supporting customers with expertise, integrity and service. Johnnie can be reached in the office at 800-222-6047, ext. 70008, by email at or by cell at 313-720-8440.

\n","postBodyRss":"

NEW HAMPTON, Iowa – Zip's AW Direct, a leading provider of heavy-duty wreckers, rotators, car carriers, service bodies and industrial trailers, proudly announces the addition of Johnnie Manier to its equipment sales team. This strategic hire strengthens Zip’s ability to deliver knowledgeable, hands-on consultation to customers across Michigan.

\n

Based out of our location in the Detroit suburb of Taylor, Johnnie brings to his new position more than a decade of professional experience in the trucking industry. No stranger to coast-to-coast industrial hauling, he offers firsthand knowledge of equipment operation, real-world road conditions and the day-to-day demands professional operators face.

\n

“We’re excited to officially welcome Johnnie to our sales team,” said Eric Albertson, Executive Director of Equipment Sales at Zip’s. “From the moment he walked in the door, it was clear he brings great energy, strong people skills and a passion for the towing industry. With his background in the trucking industry, Johnnie brings valuable knowledge of over-the-road operations, weight laws and axle limits.”

\n

As an Equipment Sales Specialist, Johnnie will guide customers toward equipment solutions that enhance performance, safety and profitability. A Detroit native, he understands the work ethic and values that define the operators he serves. He is family-oriented, married with a daughter and deeply connected to his community.

\n

“Johnnie will be the face of our Michigan storefront, supporting our loyal local customers while also playing a key role on our national sales team, helping customers across the country find the right trucks for their needs,” Albertson said. “We’re thrilled to have Johnnie on board and look forward to the impact he’ll make. Be sure to stop in and meet him!”

\n

With Johnnie’s addition, Zip’s AW Direct continues to invest in experienced professionals who understand the industry from the ground up and are dedicated to supporting customers with expertise, integrity and service. Johnnie can be reached in the office at 800-222-6047, ext. 70008, by email at or by cell at 313-720-8440.

\n","postEmailContent":"

NEW HAMPTON, Iowa – Zip's AW Direct, a leading provider of heavy-duty wreckers, rotators, car carriers, service bodies and industrial trailers, proudly announces the addition of Johnnie Manier to its equipment sales team. This strategic hire strengthens Zip’s ability to deliver knowledgeable, hands-on consultation to customers across Michigan.

","postFeaturedImageIfEnabled":"https://48463649.fs1.hubspotusercontent-na1.net/hubfs/48463649/johnnie-manier-header.jpg","postListContent":"

NEW HAMPTON, Iowa – Zip's AW Direct, a leading provider of heavy-duty wreckers, rotators, car carriers, service bodies and industrial trailers, proudly announces the addition of Johnnie Manier to its equipment sales team. This strategic hire strengthens Zip’s ability to deliver knowledgeable, hands-on consultation to customers across Michigan.

","postListSummaryFeaturedImage":"https://48463649.fs1.hubspotusercontent-na1.net/hubfs/48463649/johnnie-manier-header.jpg","postRssContent":"

NEW HAMPTON, Iowa – Zip's AW Direct, a leading provider of heavy-duty wreckers, rotators, car carriers, service bodies and industrial trailers, proudly announces the addition of Johnnie Manier to its equipment sales team. This strategic hire strengthens Zip’s ability to deliver knowledgeable, hands-on consultation to customers across Michigan.

","postRssSummaryFeaturedImage":"https://48463649.fs1.hubspotusercontent-na1.net/hubfs/48463649/johnnie-manier-header.jpg","postSummary":"

NEW HAMPTON, Iowa – Zip's AW Direct, a leading provider of heavy-duty wreckers, rotators, car carriers, service bodies and industrial trailers, proudly announces the addition of Johnnie Manier to its equipment sales team. This strategic hire strengthens Zip’s ability to deliver knowledgeable, hands-on consultation to customers across Michigan.

\n","postSummaryRss":"

NEW HAMPTON, Iowa – Zip's AW Direct, a leading provider of heavy-duty wreckers, rotators, car carriers, service bodies and industrial trailers, proudly announces the addition of Johnnie Manier to its equipment sales team. This strategic hire strengthens Zip’s ability to deliver knowledgeable, hands-on consultation to customers across Michigan.

","postTemplate":"zips-basic-theme/templates/blog-post.html","previewImageSrc":null,"previewKey":"BYcLmjGc","previousPostFeaturedImage":"https://48463649.fs1.hubspotusercontent-na1.net/hubfs/48463649/kevin-andera-header.jpg","previousPostFeaturedImageAltText":"","previousPostName":"Kevin Andera - Sales Rep.","previousPostSlug":"blog/kevin-andera-sales-rep","processingStatus":"PUBLISHED","propertyForDynamicPageCanonicalUrl":null,"propertyForDynamicPageFeaturedImage":null,"propertyForDynamicPageMetaDescription":null,"propertyForDynamicPageSlug":null,"propertyForDynamicPageTitle":null,"publicAccessRules":[],"publicAccessRulesEnabled":false,"publishDate":1771538217000,"publishDateLocalTime":1771538217000,"publishDateLocalized":{"date":1771538217000,"format":"medium","language":null},"publishImmediately":true,"publishTimezoneOffset":null,"publishedAt":1771538217195,"publishedByEmail":null,"publishedById":76755706,"publishedByName":null,"publishedUrl":"/blog/johnnie-manier-equipment-sales-team","resolvedDomain":"www.zips.com","resolvedLanguage":null,"rssBody":"

NEW HAMPTON, Iowa – Zip's AW Direct, a leading provider of heavy-duty wreckers, rotators, car carriers, service bodies and industrial trailers, proudly announces the addition of Johnnie Manier to its equipment sales team. This strategic hire strengthens Zip’s ability to deliver knowledgeable, hands-on consultation to customers across Michigan.

\n

Based out of our location in the Detroit suburb of Taylor, Johnnie brings to his new position more than a decade of professional experience in the trucking industry. No stranger to coast-to-coast industrial hauling, he offers firsthand knowledge of equipment operation, real-world road conditions and the day-to-day demands professional operators face.

\n

“We’re excited to officially welcome Johnnie to our sales team,” said Eric Albertson, Executive Director of Equipment Sales at Zip’s. “From the moment he walked in the door, it was clear he brings great energy, strong people skills and a passion for the towing industry. With his background in the trucking industry, Johnnie brings valuable knowledge of over-the-road operations, weight laws and axle limits.”

\n

As an Equipment Sales Specialist, Johnnie will guide customers toward equipment solutions that enhance performance, safety and profitability. A Detroit native, he understands the work ethic and values that define the operators he serves. He is family-oriented, married with a daughter and deeply connected to his community.

\n

“Johnnie will be the face of our Michigan storefront, supporting our loyal local customers while also playing a key role on our national sales team, helping customers across the country find the right trucks for their needs,” Albertson said. “We’re thrilled to have Johnnie on board and look forward to the impact he’ll make. Be sure to stop in and meet him!”

\n

With Johnnie’s addition, Zip’s AW Direct continues to invest in experienced professionals who understand the industry from the ground up and are dedicated to supporting customers with expertise, integrity and service. Johnnie can be reached in the office at 800-222-6047, ext. 70008, by email at or by cell at 313-720-8440.

\n","rssSummary":"

NEW HAMPTON, Iowa – Zip's AW Direct, a leading provider of heavy-duty wreckers, rotators, car carriers, service bodies and industrial trailers, proudly announces the addition of Johnnie Manier to its equipment sales team. This strategic hire strengthens Zip’s ability to deliver knowledgeable, hands-on consultation to customers across Michigan.

\n","rssSummaryFeaturedImage":"https://48463649.fs1.hubspotusercontent-na1.net/hubfs/48463649/johnnie-manier-header.jpg","scheduledUpdateDate":0,"screenshotPreviewTakenAt":1771538217564,"screenshotPreviewUrl":"https://cdn1.hubspot.net/hubshotv3/prod/e/0/677d4e78-7a05-499f-9241-08180e4df346.png","sections":{},"securityState":"NONE","siteId":null,"slug":"blog/johnnie-manier-equipment-sales-team","stagedFrom":null,"state":"PUBLISHED","stateWhenDeleted":null,"structuredContentPageType":null,"structuredContentType":null,"styleOverrideId":null,"subcategory":"normal_blog_post","syncedWithBlogRoot":true,"tagIds":[192169769098,192169769490,192174528148,192174529697,192174572390,194719179273,194719586584],"tagList":[{"categoryId":3,"cdnPurgeEmbargoTime":null,"contentIds":[],"cosObjectType":"TAG","created":1751598252099,"deletedAt":0,"description":"","id":192169769098,"label":"Over the Road","language":null,"name":"Over the Road","portalId":48463649,"slug":"over-the-road","translatedFromId":null,"translations":{},"updated":1751598252099},{"categoryId":3,"cdnPurgeEmbargoTime":null,"contentIds":[],"cosObjectType":"TAG","created":1751598346713,"deletedAt":0,"description":"","id":192169769490,"label":"Towing & Recovery","language":null,"name":"Towing & Recovery","portalId":48463649,"slug":"towing-recovery","translatedFromId":null,"translations":{},"updated":1751598346713},{"categoryId":3,"cdnPurgeEmbargoTime":null,"contentIds":[],"cosObjectType":"TAG","created":1751601475164,"deletedAt":0,"description":"","id":192174528148,"label":"Automotive","language":null,"name":"Automotive","portalId":48463649,"slug":"automotive","translatedFromId":null,"translations":{},"updated":1751601475164},{"categoryId":3,"cdnPurgeEmbargoTime":null,"contentIds":[],"cosObjectType":"TAG","created":1751602285139,"deletedAt":0,"description":"","id":192174529697,"label":"Construction","language":null,"name":"Construction","portalId":48463649,"slug":"construction","translatedFromId":null,"translations":{},"updated":1751602285139},{"categoryId":3,"cdnPurgeEmbargoTime":null,"contentIds":[],"cosObjectType":"TAG","created":1751602285335,"deletedAt":0,"description":"","id":192174572390,"label":"Agriculture","language":null,"name":"Agriculture","portalId":48463649,"slug":"agriculture","translatedFromId":null,"translations":{},"updated":1751602285335},{"categoryId":3,"cdnPurgeEmbargoTime":null,"contentIds":[],"cosObjectType":"TAG","created":1755545199638,"deletedAt":0,"description":"","id":194719179273,"label":"News & Insights","language":null,"name":"News & Insights","portalId":48463649,"slug":"news-insights","translatedFromId":null,"translations":{},"updated":1755545199638},{"categoryId":3,"cdnPurgeEmbargoTime":null,"contentIds":[],"cosObjectType":"TAG","created":1755545289731,"deletedAt":0,"description":"","id":194719586584,"label":"Press Release","language":null,"name":"Press Release","portalId":48463649,"slug":"press-release","translatedFromId":null,"translations":{},"updated":1755545289731}],"tagNames":["Over the Road","Towing & Recovery","Automotive","Construction","Agriculture","News & Insights","Press Release"],"teamPerms":[],"templatePath":"","templatePathForRender":"zips-basic-theme/templates/blog-post.html","textToAudioFileId":null,"textToAudioGenerationRequestId":null,"themePath":null,"themeSettingsValues":null,"title":"Zip’s AW Direct Welcomes Johnnie Manier to Equipment Sales Team","tmsId":null,"topicIds":[192169769098,192169769490,192174528148,192174529697,192174572390,194719179273,194719586584],"topicList":[{"categoryId":3,"cdnPurgeEmbargoTime":null,"contentIds":[],"cosObjectType":"TAG","created":1751598252099,"deletedAt":0,"description":"","id":192169769098,"label":"Over the Road","language":null,"name":"Over the Road","portalId":48463649,"slug":"over-the-road","translatedFromId":null,"translations":{},"updated":1751598252099},{"categoryId":3,"cdnPurgeEmbargoTime":null,"contentIds":[],"cosObjectType":"TAG","created":1751598346713,"deletedAt":0,"description":"","id":192169769490,"label":"Towing & Recovery","language":null,"name":"Towing & Recovery","portalId":48463649,"slug":"towing-recovery","translatedFromId":null,"translations":{},"updated":1751598346713},{"categoryId":3,"cdnPurgeEmbargoTime":null,"contentIds":[],"cosObjectType":"TAG","created":1751601475164,"deletedAt":0,"description":"","id":192174528148,"label":"Automotive","language":null,"name":"Automotive","portalId":48463649,"slug":"automotive","translatedFromId":null,"translations":{},"updated":1751601475164},{"categoryId":3,"cdnPurgeEmbargoTime":null,"contentIds":[],"cosObjectType":"TAG","created":1751602285139,"deletedAt":0,"description":"","id":192174529697,"label":"Construction","language":null,"name":"Construction","portalId":48463649,"slug":"construction","translatedFromId":null,"translations":{},"updated":1751602285139},{"categoryId":3,"cdnPurgeEmbargoTime":null,"contentIds":[],"cosObjectType":"TAG","created":1751602285335,"deletedAt":0,"description":"","id":192174572390,"label":"Agriculture","language":null,"name":"Agriculture","portalId":48463649,"slug":"agriculture","translatedFromId":null,"translations":{},"updated":1751602285335},{"categoryId":3,"cdnPurgeEmbargoTime":null,"contentIds":[],"cosObjectType":"TAG","created":1755545199638,"deletedAt":0,"description":"","id":194719179273,"label":"News & Insights","language":null,"name":"News & Insights","portalId":48463649,"slug":"news-insights","translatedFromId":null,"translations":{},"updated":1755545199638},{"categoryId":3,"cdnPurgeEmbargoTime":null,"contentIds":[],"cosObjectType":"TAG","created":1755545289731,"deletedAt":0,"description":"","id":194719586584,"label":"Press Release","language":null,"name":"Press Release","portalId":48463649,"slug":"press-release","translatedFromId":null,"translations":{},"updated":1755545289731}],"topicNames":["Over the Road","Towing & Recovery","Automotive","Construction","Agriculture","News & Insights","Press Release"],"topics":[192169769098,192169769490,192174528148,192174529697,192174572390,194719179273,194719586584],"translatedContent":{},"translatedFromId":null,"translations":{},"tweet":null,"tweetAt":null,"tweetImmediately":false,"unpublishedAt":0,"updated":1771538217199,"updatedById":76755706,"upsizeFeaturedImage":false,"url":"/blog/johnnie-manier-equipment-sales-team","useFeaturedImage":true,"userPerms":[],"views":null,"visibleToAll":null,"widgetContainers":{},"widgetcontainers":{},"widgets":{}},{"ab":false,"abStatus":null,"abTestId":null,"abVariation":false,"abVariationAutomated":false,"absoluteUrl":"/blog/kevin-andera-sales-rep","afterPostBody":null,"aifeatures":null,"allowedSlugConflict":false,"analytics":null,"analyticsPageId":"206326302853","analyticsPageType":"blog-post","approvalStatus":null,"archived":false,"archivedAt":0,"archivedInDashboard":false,"areCommentsAllowed":true,"attachedStylesheets":[],"audienceAccess":"PUBLIC","author":null,"authorName":null,"authorUsername":null,"blogAuthor":{"avatar":"","bio":"","cdnPurgeEmbargoTime":null,"cosObjectType":"BLOG_AUTHOR","created":1755187092136,"deletedAt":0,"displayName":"Cameron Hanson","email":null,"facebook":"","fullName":"Cameron Hanson","gravatarUrl":null,"hasSocialProfiles":false,"id":194499322288,"label":"Cameron Hanson","language":"en","linkedin":"","name":" Cameron Hanson","portalId":48463649,"slug":"cameron-hanson","translatedFromId":null,"translations":{},"twitter":"","twitterUsername":"","updated":1755187092136,"userId":null,"username":null,"website":""},"blogAuthorId":194499322288,"blogAuthorIdList":[194499322288],"blogAuthorList":[{"avatar":"","bio":"","cdnPurgeEmbargoTime":null,"cosObjectType":"BLOG_AUTHOR","created":1755187092136,"deletedAt":0,"displayName":"Cameron Hanson","email":null,"facebook":"","fullName":"Cameron Hanson","gravatarUrl":null,"hasSocialProfiles":false,"id":194499322288,"label":"Cameron Hanson","language":"en","linkedin":"","name":" Cameron Hanson","portalId":48463649,"slug":"cameron-hanson","translatedFromId":null,"translations":{},"twitter":"","twitterUsername":"","updated":1755187092136,"userId":null,"username":null,"website":""}],"blogPostAuthor":{"avatar":"","bio":"","cdnPurgeEmbargoTime":null,"cosObjectType":"BLOG_AUTHOR","created":1755187092136,"deletedAt":0,"displayName":"Cameron Hanson","email":null,"facebook":"","fullName":"Cameron Hanson","gravatarUrl":null,"hasSocialProfiles":false,"id":194499322288,"label":"Cameron Hanson","language":"en","linkedin":"","name":" Cameron Hanson","portalId":48463649,"slug":"cameron-hanson","translatedFromId":null,"translations":{},"twitter":"","twitterUsername":"","updated":1755187092136,"userId":null,"username":null,"website":""},"blogPostScheduleTaskUid":null,"blogPublishInstantEmailCampaignId":null,"blogPublishInstantEmailRetryCount":null,"blogPublishInstantEmailTaskUid":null,"blogPublishToSocialMediaTask":"DONE_NOT_SENT","blueprintTypeId":0,"businessUnitId":null,"campaign":null,"campaignName":null,"campaignUtm":null,"category":3,"categoryId":3,"cdnPurgeEmbargoTime":null,"checkPostLevelAudienceAccessFirst":true,"clonedFrom":null,"composeBody":null,"compositionId":0,"contentAccessRuleIds":[],"contentAccessRuleTypes":[],"contentGroup":190096341139,"contentGroupId":190096341139,"contentTypeCategory":3,"contentTypeCategoryId":3,"contentTypeId":null,"created":1769719246821,"createdByAgent":null,"createdById":76755706,"createdTime":1769719246821,"crmObjectId":null,"css":{},"cssText":"","ctaClicks":null,"ctaViews":null,"currentState":"PUBLISHED","currentlyPublished":true,"deletedAt":0,"deletedBy":null,"deletedByEmail":null,"deletedById":null,"domain":"","dynamicPageDataSourceId":null,"dynamicPageDataSourceType":null,"dynamicPageHubDbTableId":null,"enableDomainStylesheets":null,"enableGoogleAmpOutputOverride":false,"enableLayoutStylesheets":null,"errors":[],"featuredImage":"https://48463649.fs1.hubspotusercontent-na1.net/hubfs/48463649/kevin-andera-header.jpg","featuredImageAltText":"","featuredImageHeight":300,"featuredImageLength":0,"featuredImageWidth":800,"flexAreas":{},"folderId":null,"footerHtml":null,"footerTemplatePath":null,"footerVariantName":null,"freezeDate":1769723697000,"generateJsonLdEnabledOverride":true,"globalBlockOverrides":{},"hasContentAccessRules":false,"hasUserChanges":true,"headHtml":null,"header":null,"headerTemplatePath":null,"headerVariantName":null,"htmlTitle":"Kevin Andera - Sales Rep.","id":206326302853,"includeDefaultCustomCss":null,"isCaptchaRequired":true,"isCrawlableByBots":false,"isDraft":false,"isInstantEmailEnabled":false,"isPublished":true,"isSocialPublishingEnabled":false,"keywords":[],"label":"Kevin Andera - Sales Rep.","language":"en","lastEditSessionId":null,"lastEditUpdateId":null,"layoutSections":{},"legacyBlogTabid":null,"legacyId":null,"legacyPostGuid":null,"linkRelCanonicalUrl":"","listTemplate":"","liveDomain":"www.zips.com","mab":false,"mabExperimentId":null,"mabMaster":false,"mabVariant":false,"marketingCampaignGuids":[],"meta":{"tag_ids":[192169769490,192169769491,192174528148,194719179273,194719586584],"topic_ids":[192169769490,192169769491,192174528148,194719179273,194719586584],"post_summary":"

Zip’s Truck Equipment Welcomes Kevin Andera as New Equipment Sales Specialist for Wisconsin

\n","post_body":"

Zip’s Truck Equipment Welcomes Kevin Andera as New Equipment Sales Specialist for Wisconsin

\n\n

NEW HAMPTON, IA—Zip’s Truck Equipment is proud to announce the addition of Kevin Andera to its equipment sales team, reinforcing the company’s ongoing commitment to delivering expert, relationship-driven service to customers across Wisconsin.

\n

This strategic hire reflects Zip’s belief that investing in the best people in the industry is just as critical as investing in the equipment it builds. Offering a rare blend of hands-on mechanical aptitude and proven sales expertise, Kevin brings a level of practical knowledge that ensures customers receive more than a truck. They also gain a trusted partner who will learn and understand their business and match the equipment which fits their operation best.

\n

Kevin’s background as a mechanic definitely gives him an in-depth understanding of the “nuts and bolts” behind the equipment he now represents. That technical foundation allows him to consult with customers from a real-world perspective, helping operators select solutions that fit their applications, budgets and long-term operational goals. Combined with years of professional sales experience, Kevin is uniquely positioned to support Wisconsin customers with honest guidance and accountability.

\n

“Kevin is going to be a great fit for our company,” said Eric Albertson, Executive Director of Equipment Sales at Zip’s. “He brings over 15 years of customer service experience and five years in sales. He also has a strong mechanical background, and I believe he’ll pick up the towing and equipment side of the business very quickly. Kevin is a hunter and fisherman in his spare time, which makes him a natural fit with many of our Wisconsin core customers that we’ve proudly been serving for over 50 years. We’re excited to have him on board and look forward to watching him grow with the team.”

\n

A family-oriented father of three boys, Kevin said he understands the values that matter most to the customers he will now serve. As an avid outdoorsman, he shares the same “work hard, play hard” mentality common among operators throughout the Wisconsin region. That relatability will allow him to connect naturally with customers, earning trust through shared experiences and a genuine understanding of local needs.

\n

By placing a dedicated, down-to-earth expert in the Wisconsin territory, Zip’s is reaffirming its long-term commitment to the region. Kevin’s presence ensures customers have direct access to a knowledgeable sales representative who understands their equipment, their businesses and the communities they operate in.

\n

For more information or to connect with Kevin Andera, please reach him at Zip’s at 800-222-6047, extension 252, or his cell phone at 641-229-0899.

","rss_summary":"

Zip’s Truck Equipment Welcomes Kevin Andera as New Equipment Sales Specialist for Wisconsin

\n","rss_body":"

Zip’s Truck Equipment Welcomes Kevin Andera as New Equipment Sales Specialist for Wisconsin

\n\n

NEW HAMPTON, IA—Zip’s Truck Equipment is proud to announce the addition of Kevin Andera to its equipment sales team, reinforcing the company’s ongoing commitment to delivering expert, relationship-driven service to customers across Wisconsin.

\n

This strategic hire reflects Zip’s belief that investing in the best people in the industry is just as critical as investing in the equipment it builds. Offering a rare blend of hands-on mechanical aptitude and proven sales expertise, Kevin brings a level of practical knowledge that ensures customers receive more than a truck. They also gain a trusted partner who will learn and understand their business and match the equipment which fits their operation best.

\n

Kevin’s background as a mechanic definitely gives him an in-depth understanding of the “nuts and bolts” behind the equipment he now represents. That technical foundation allows him to consult with customers from a real-world perspective, helping operators select solutions that fit their applications, budgets and long-term operational goals. Combined with years of professional sales experience, Kevin is uniquely positioned to support Wisconsin customers with honest guidance and accountability.

\n

“Kevin is going to be a great fit for our company,” said Eric Albertson, Executive Director of Equipment Sales at Zip’s. “He brings over 15 years of customer service experience and five years in sales. He also has a strong mechanical background, and I believe he’ll pick up the towing and equipment side of the business very quickly. Kevin is a hunter and fisherman in his spare time, which makes him a natural fit with many of our Wisconsin core customers that we’ve proudly been serving for over 50 years. We’re excited to have him on board and look forward to watching him grow with the team.”

\n

A family-oriented father of three boys, Kevin said he understands the values that matter most to the customers he will now serve. As an avid outdoorsman, he shares the same “work hard, play hard” mentality common among operators throughout the Wisconsin region. That relatability will allow him to connect naturally with customers, earning trust through shared experiences and a genuine understanding of local needs.

\n

By placing a dedicated, down-to-earth expert in the Wisconsin territory, Zip’s is reaffirming its long-term commitment to the region. Kevin’s presence ensures customers have direct access to a knowledgeable sales representative who understands their equipment, their businesses and the communities they operate in.

\n

For more information or to connect with Kevin Andera, please reach him at Zip’s at 800-222-6047, extension 252, or his cell phone at 641-229-0899.

","enable_google_amp_output_override":false,"generate_json_ld_enabled":true,"blog_post_schedule_task_uid":null,"blog_publish_to_social_media_task":"DONE_NOT_SENT","blog_publish_instant_email_task_uid":null,"blog_publish_instant_email_campaign_id":null,"blog_publish_instant_email_retry_count":null,"keywords":[],"composition_id":0,"is_crawlable_by_bots":false,"html_title":"Kevin Andera - Sales Rep.","public_access_rules":[],"public_access_rules_enabled":false,"use_featured_image":true,"published_at":1770151557176,"layout_sections":{},"past_mab_experiment_ids":[],"deleted_by":null,"featured_image_alt_text":"","enable_layout_stylesheets":null,"tweet":null,"tweet_at":null,"campaign_name":null,"campaign_utm":null,"meta_keywords":null,"meta_description":"Zip’s Truck Equipment Welcomes Kevin Andera as New Equipment Sales Representative for Wisconsin","tweet_immediately":false,"publish_immediately":true,"security_state":"NONE","scheduled_update_date":0,"placement_guids":[],"header_template_path":null,"header_variant_name":null,"footer_template_path":null,"footer_variant_name":null,"global_block_overrides":{},"property_for_dynamic_page_title":null,"property_for_dynamic_page_slug":null,"property_for_dynamic_page_meta_description":null,"property_for_dynamic_page_featured_image":null,"property_for_dynamic_page_canonical_url":null,"preview_image_src":null,"legacy_blog_tabid":null,"legacy_post_guid":null,"performable_variation_letter":null,"style_override_id":null,"has_user_changes":true,"css":{},"css_text":"","unpublished_at":0,"published_by_id":76755706,"allowed_slug_conflict":false,"ai_features":null,"link_rel_canonical_url":"","page_redirected":false,"page_expiry_enabled":null,"page_expiry_date":null,"page_expiry_redirect_id":null,"page_expiry_redirect_url":null,"deleted_by_id":null,"state_when_deleted":null,"cloned_from":null,"staged_from":null,"personas":[],"compose_body":null,"featured_image":"https://48463649.fs1.hubspotusercontent-na1.net/hubfs/48463649/kevin-andera-header.jpg","featured_image_width":800,"featured_image_height":300,"publish_timezone_offset":null,"theme_settings_values":null,"head_html":null,"footer_html":null,"attached_stylesheets":[],"enable_domain_stylesheets":null,"include_default_custom_css":null,"header":null,"password":null,"last_edit_session_id":null,"last_edit_update_id":null,"created_by_agent":null},"metaDescription":"Zip’s Truck Equipment Welcomes Kevin Andera as New Equipment Sales Representative for Wisconsin","metaKeywords":null,"name":"Kevin Andera - Sales Rep.","nextPostFeaturedImage":"https://48463649.fs1.hubspotusercontent-na1.net/hubfs/48463649/firebox-west-lot-nov2025-01-800x300-landing-page.jpg","nextPostFeaturedImageAltText":"","nextPostName":"Compliance Is the Answer: Billing with Confidence When Using the Firebox","nextPostSlug":"blog/ev-firebox-billing-compliance-guide","pageExpiryDate":null,"pageExpiryEnabled":null,"pageExpiryRedirectId":null,"pageExpiryRedirectUrl":null,"pageRedirected":false,"pageTitle":"Kevin Andera - Sales Rep.","parentBlog":{"absoluteUrl":"/blog","allowComments":true,"ampBodyColor":"#404040","ampBodyFont":"'Helvetica Neue', Helvetica, Arial, sans-serif","ampBodyFontSize":"18","ampCustomCss":"","ampHeaderBackgroundColor":"#ffffff","ampHeaderColor":"#1e1e1e","ampHeaderFont":"'Helvetica Neue', Helvetica, Arial, sans-serif","ampHeaderFontSize":"36","ampLinkColor":"#416bb3","ampLogoAlt":"","ampLogoHeight":0,"ampLogoSrc":"","ampLogoWidth":0,"analyticsPageId":190096341139,"attachedStylesheets":[],"audienceAccess":"PUBLIC","businessUnitId":null,"captchaAfterDays":7,"captchaAlways":false,"categoryId":3,"cdnPurgeEmbargoTime":null,"closeCommentsOlder":0,"commentDateFormat":"medium","commentFormGuid":"a4128401-39db-4c54-a62b-88ff335d3a69","commentMaxThreadDepth":1,"commentModeration":false,"commentNotificationEmails":[],"commentShouldCreateContact":false,"commentVerificationText":"","cosObjectType":"BLOG","created":1747163443999,"createdDateTime":1747163443999,"dailyNotificationEmailId":null,"dateFormattingLanguage":null,"defaultGroupStyleId":"","defaultNotificationFromName":"","defaultNotificationReplyTo":"","deletedAt":0,"description":"","domain":"","domainWhenPublished":"www.zips.com","emailApiSubscriptionId":null,"enableGoogleAmpOutput":true,"enableSocialAutoPublishing":false,"generateJsonLdEnabled":true,"header":null,"htmlFooter":"","htmlFooterIsShared":true,"htmlHead":"","htmlHeadIsShared":true,"htmlKeywords":[],"htmlTitle":"blog","id":190096341139,"ilsSubscriptionListsByType":{},"instantNotificationEmailId":null,"itemLayoutId":null,"itemTemplateIsShared":false,"itemTemplatePath":"zips-basic-theme/templates/blog-post.html","label":"blog","language":"en","legacyGuid":null,"legacyModuleId":null,"legacyTabId":null,"listingLayoutId":null,"listingPageId":190096341141,"listingTemplatePath":"","liveDomain":"www.zips.com","monthFilterFormat":"MMMM yyyy","monthlyNotificationEmailId":null,"name":"blog","parentBlogUpdateTaskId":null,"portalId":48463649,"postHtmlFooter":"","postHtmlHead":"","postsPerListingPage":111,"postsPerRssFeed":10,"publicAccessRules":[],"publicAccessRulesEnabled":false,"publicTitle":"blog","publishDateFormat":"medium","resolvedDomain":"www.zips.com","rootUrl":"/blog","rssCustomFeed":null,"rssDescription":null,"rssItemFooter":null,"rssItemHeader":null,"settingsOverrides":{"itemLayoutId":false,"itemTemplatePath":false,"itemTemplateIsShared":false,"listingLayoutId":false,"listingTemplatePath":false,"postsPerListingPage":false,"showSummaryInListing":false,"useFeaturedImageInSummary":false,"htmlHead":false,"postHtmlHead":false,"htmlHeadIsShared":false,"htmlFooter":false,"listingPageHtmlFooter":false,"postHtmlFooter":false,"htmlFooterIsShared":false,"attachedStylesheets":false,"postsPerRssFeed":false,"showSummaryInRss":false,"showSummaryInEmails":false,"showSummariesInEmails":false,"allowComments":false,"commentShouldCreateContact":false,"commentModeration":false,"closeCommentsOlder":false,"commentNotificationEmails":false,"commentMaxThreadDepth":false,"commentVerificationText":false,"socialAccountTwitter":false,"showSocialLinkTwitter":false,"showSocialLinkLinkedin":false,"showSocialLinkFacebook":false,"enableGoogleAmpOutput":false,"ampLogoSrc":false,"ampLogoHeight":false,"ampLogoWidth":false,"ampLogoAlt":false,"ampHeaderFont":false,"ampHeaderFontSize":false,"ampHeaderColor":false,"ampHeaderBackgroundColor":false,"ampBodyFont":false,"ampBodyFontSize":false,"ampBodyColor":false,"ampLinkColor":false,"generateJsonLdEnabled":false},"showSocialLinkFacebook":true,"showSocialLinkLinkedin":true,"showSocialLinkTwitter":true,"showSummaryInEmails":true,"showSummaryInListing":true,"showSummaryInRss":true,"siteId":null,"slug":"blog","socialAccountTwitter":"","state":null,"subscriptionContactsProperty":null,"subscriptionEmailType":null,"subscriptionFormGuid":null,"subscriptionListsByType":{},"title":null,"translatedFromId":null,"translations":{},"updated":1755110916417,"updatedDateTime":1755110916417,"urlBase":"www.zips.com/blog","urlSegments":{"all":"all","archive":"archive","author":"author","page":"page","tag":"tag"},"useFeaturedImageInSummary":true,"usesDefaultTemplate":false,"weeklyNotificationEmailId":null},"password":null,"pastMabExperimentIds":[],"performableGuid":null,"performableVariationLetter":null,"personalizationStrategyId":null,"personalizationVariantStatus":null,"personas":[],"placementGuids":[],"portableKey":null,"portalId":48463649,"position":null,"postBody":"

Zip’s Truck Equipment Welcomes Kevin Andera as New Equipment Sales Specialist for Wisconsin

\n\n

NEW HAMPTON, IA—Zip’s Truck Equipment is proud to announce the addition of Kevin Andera to its equipment sales team, reinforcing the company’s ongoing commitment to delivering expert, relationship-driven service to customers across Wisconsin.

\n

This strategic hire reflects Zip’s belief that investing in the best people in the industry is just as critical as investing in the equipment it builds. Offering a rare blend of hands-on mechanical aptitude and proven sales expertise, Kevin brings a level of practical knowledge that ensures customers receive more than a truck. They also gain a trusted partner who will learn and understand their business and match the equipment which fits their operation best.

\n

Kevin’s background as a mechanic definitely gives him an in-depth understanding of the “nuts and bolts” behind the equipment he now represents. That technical foundation allows him to consult with customers from a real-world perspective, helping operators select solutions that fit their applications, budgets and long-term operational goals. Combined with years of professional sales experience, Kevin is uniquely positioned to support Wisconsin customers with honest guidance and accountability.

\n

“Kevin is going to be a great fit for our company,” said Eric Albertson, Executive Director of Equipment Sales at Zip’s. “He brings over 15 years of customer service experience and five years in sales. He also has a strong mechanical background, and I believe he’ll pick up the towing and equipment side of the business very quickly. Kevin is a hunter and fisherman in his spare time, which makes him a natural fit with many of our Wisconsin core customers that we’ve proudly been serving for over 50 years. We’re excited to have him on board and look forward to watching him grow with the team.”

\n

A family-oriented father of three boys, Kevin said he understands the values that matter most to the customers he will now serve. As an avid outdoorsman, he shares the same “work hard, play hard” mentality common among operators throughout the Wisconsin region. That relatability will allow him to connect naturally with customers, earning trust through shared experiences and a genuine understanding of local needs.

\n

By placing a dedicated, down-to-earth expert in the Wisconsin territory, Zip’s is reaffirming its long-term commitment to the region. Kevin’s presence ensures customers have direct access to a knowledgeable sales representative who understands their equipment, their businesses and the communities they operate in.

\n

For more information or to connect with Kevin Andera, please reach him at Zip’s at 800-222-6047, extension 252, or his cell phone at 641-229-0899.

","postBodyRss":"

Zip’s Truck Equipment Welcomes Kevin Andera as New Equipment Sales Specialist for Wisconsin

\n\n

NEW HAMPTON, IA—Zip’s Truck Equipment is proud to announce the addition of Kevin Andera to its equipment sales team, reinforcing the company’s ongoing commitment to delivering expert, relationship-driven service to customers across Wisconsin.

\n

This strategic hire reflects Zip’s belief that investing in the best people in the industry is just as critical as investing in the equipment it builds. Offering a rare blend of hands-on mechanical aptitude and proven sales expertise, Kevin brings a level of practical knowledge that ensures customers receive more than a truck. They also gain a trusted partner who will learn and understand their business and match the equipment which fits their operation best.

\n

Kevin’s background as a mechanic definitely gives him an in-depth understanding of the “nuts and bolts” behind the equipment he now represents. That technical foundation allows him to consult with customers from a real-world perspective, helping operators select solutions that fit their applications, budgets and long-term operational goals. Combined with years of professional sales experience, Kevin is uniquely positioned to support Wisconsin customers with honest guidance and accountability.

\n

“Kevin is going to be a great fit for our company,” said Eric Albertson, Executive Director of Equipment Sales at Zip’s. “He brings over 15 years of customer service experience and five years in sales. He also has a strong mechanical background, and I believe he’ll pick up the towing and equipment side of the business very quickly. Kevin is a hunter and fisherman in his spare time, which makes him a natural fit with many of our Wisconsin core customers that we’ve proudly been serving for over 50 years. We’re excited to have him on board and look forward to watching him grow with the team.”

\n

A family-oriented father of three boys, Kevin said he understands the values that matter most to the customers he will now serve. As an avid outdoorsman, he shares the same “work hard, play hard” mentality common among operators throughout the Wisconsin region. That relatability will allow him to connect naturally with customers, earning trust through shared experiences and a genuine understanding of local needs.

\n

By placing a dedicated, down-to-earth expert in the Wisconsin territory, Zip’s is reaffirming its long-term commitment to the region. Kevin’s presence ensures customers have direct access to a knowledgeable sales representative who understands their equipment, their businesses and the communities they operate in.

\n

For more information or to connect with Kevin Andera, please reach him at Zip’s at 800-222-6047, extension 252, or his cell phone at 641-229-0899.

","postEmailContent":"

Zip’s Truck Equipment Welcomes Kevin Andera as New Equipment Sales Specialist for Wisconsin

","postFeaturedImageIfEnabled":"https://48463649.fs1.hubspotusercontent-na1.net/hubfs/48463649/kevin-andera-header.jpg","postListContent":"

Zip’s Truck Equipment Welcomes Kevin Andera as New Equipment Sales Specialist for Wisconsin

","postListSummaryFeaturedImage":"https://48463649.fs1.hubspotusercontent-na1.net/hubfs/48463649/kevin-andera-header.jpg","postRssContent":"

Zip’s Truck Equipment Welcomes Kevin Andera as New Equipment Sales Specialist for Wisconsin

","postRssSummaryFeaturedImage":"https://48463649.fs1.hubspotusercontent-na1.net/hubfs/48463649/kevin-andera-header.jpg","postSummary":"

Zip’s Truck Equipment Welcomes Kevin Andera as New Equipment Sales Specialist for Wisconsin

\n","postSummaryRss":"

Zip’s Truck Equipment Welcomes Kevin Andera as New Equipment Sales Specialist for Wisconsin

","postTemplate":"zips-basic-theme/templates/blog-post.html","previewImageSrc":null,"previewKey":"mgrDDpyD","previousPostFeaturedImage":"https://48463649.fs1.hubspotusercontent-na1.net/hubfs/48463649/johnnie-manier-header.jpg","previousPostFeaturedImageAltText":"","previousPostName":"Zip’s AW Direct Welcomes Johnnie Manier to Equipment Sales Team","previousPostSlug":"blog/johnnie-manier-equipment-sales-team","processingStatus":"PUBLISHED","propertyForDynamicPageCanonicalUrl":null,"propertyForDynamicPageFeaturedImage":null,"propertyForDynamicPageMetaDescription":null,"propertyForDynamicPageSlug":null,"propertyForDynamicPageTitle":null,"publicAccessRules":[],"publicAccessRulesEnabled":false,"publishDate":1769723697000,"publishDateLocalTime":1769723697000,"publishDateLocalized":{"date":1769723697000,"format":"medium","language":null},"publishImmediately":true,"publishTimezoneOffset":null,"publishedAt":1770151557176,"publishedByEmail":null,"publishedById":76755706,"publishedByName":null,"publishedUrl":"/blog/kevin-andera-sales-rep","resolvedDomain":"www.zips.com","resolvedLanguage":null,"rssBody":"

Zip’s Truck Equipment Welcomes Kevin Andera as New Equipment Sales Specialist for Wisconsin

\n\n

NEW HAMPTON, IA—Zip’s Truck Equipment is proud to announce the addition of Kevin Andera to its equipment sales team, reinforcing the company’s ongoing commitment to delivering expert, relationship-driven service to customers across Wisconsin.

\n

This strategic hire reflects Zip’s belief that investing in the best people in the industry is just as critical as investing in the equipment it builds. Offering a rare blend of hands-on mechanical aptitude and proven sales expertise, Kevin brings a level of practical knowledge that ensures customers receive more than a truck. They also gain a trusted partner who will learn and understand their business and match the equipment which fits their operation best.

\n

Kevin’s background as a mechanic definitely gives him an in-depth understanding of the “nuts and bolts” behind the equipment he now represents. That technical foundation allows him to consult with customers from a real-world perspective, helping operators select solutions that fit their applications, budgets and long-term operational goals. Combined with years of professional sales experience, Kevin is uniquely positioned to support Wisconsin customers with honest guidance and accountability.

\n

“Kevin is going to be a great fit for our company,” said Eric Albertson, Executive Director of Equipment Sales at Zip’s. “He brings over 15 years of customer service experience and five years in sales. He also has a strong mechanical background, and I believe he’ll pick up the towing and equipment side of the business very quickly. Kevin is a hunter and fisherman in his spare time, which makes him a natural fit with many of our Wisconsin core customers that we’ve proudly been serving for over 50 years. We’re excited to have him on board and look forward to watching him grow with the team.”

\n

A family-oriented father of three boys, Kevin said he understands the values that matter most to the customers he will now serve. As an avid outdoorsman, he shares the same “work hard, play hard” mentality common among operators throughout the Wisconsin region. That relatability will allow him to connect naturally with customers, earning trust through shared experiences and a genuine understanding of local needs.

\n

By placing a dedicated, down-to-earth expert in the Wisconsin territory, Zip’s is reaffirming its long-term commitment to the region. Kevin’s presence ensures customers have direct access to a knowledgeable sales representative who understands their equipment, their businesses and the communities they operate in.

\n

For more information or to connect with Kevin Andera, please reach him at Zip’s at 800-222-6047, extension 252, or his cell phone at 641-229-0899.

","rssSummary":"

Zip’s Truck Equipment Welcomes Kevin Andera as New Equipment Sales Specialist for Wisconsin

\n","rssSummaryFeaturedImage":"https://48463649.fs1.hubspotusercontent-na1.net/hubfs/48463649/kevin-andera-header.jpg","scheduledUpdateDate":0,"screenshotPreviewTakenAt":1770151557500,"screenshotPreviewUrl":"https://cdn1.hubspot.net/hubshotv3/prod/e/0/e3a12163-d379-4596-bffa-2fda720b025a.png","sections":{},"securityState":"NONE","siteId":null,"slug":"blog/kevin-andera-sales-rep","stagedFrom":null,"state":"PUBLISHED","stateWhenDeleted":null,"structuredContentPageType":null,"structuredContentType":null,"styleOverrideId":null,"subcategory":"normal_blog_post","syncedWithBlogRoot":true,"tagIds":[192169769490,192169769491,192174528148,194719179273,194719586584],"tagList":[{"categoryId":3,"cdnPurgeEmbargoTime":null,"contentIds":[],"cosObjectType":"TAG","created":1751598346713,"deletedAt":0,"description":"","id":192169769490,"label":"Towing & Recovery","language":null,"name":"Towing & Recovery","portalId":48463649,"slug":"towing-recovery","translatedFromId":null,"translations":{},"updated":1751598346713},{"categoryId":3,"cdnPurgeEmbargoTime":null,"contentIds":[],"cosObjectType":"TAG","created":1751598346811,"deletedAt":0,"description":"","id":192169769491,"label":"Roadside Assistance","language":null,"name":"Roadside Assistance","portalId":48463649,"slug":"roadside-assistance","translatedFromId":null,"translations":{},"updated":1751598346811},{"categoryId":3,"cdnPurgeEmbargoTime":null,"contentIds":[],"cosObjectType":"TAG","created":1751601475164,"deletedAt":0,"description":"","id":192174528148,"label":"Automotive","language":null,"name":"Automotive","portalId":48463649,"slug":"automotive","translatedFromId":null,"translations":{},"updated":1751601475164},{"categoryId":3,"cdnPurgeEmbargoTime":null,"contentIds":[],"cosObjectType":"TAG","created":1755545199638,"deletedAt":0,"description":"","id":194719179273,"label":"News & Insights","language":null,"name":"News & Insights","portalId":48463649,"slug":"news-insights","translatedFromId":null,"translations":{},"updated":1755545199638},{"categoryId":3,"cdnPurgeEmbargoTime":null,"contentIds":[],"cosObjectType":"TAG","created":1755545289731,"deletedAt":0,"description":"","id":194719586584,"label":"Press Release","language":null,"name":"Press Release","portalId":48463649,"slug":"press-release","translatedFromId":null,"translations":{},"updated":1755545289731}],"tagNames":["Towing & Recovery","Roadside Assistance","Automotive","News & Insights","Press Release"],"teamPerms":[],"templatePath":"","templatePathForRender":"zips-basic-theme/templates/blog-post.html","textToAudioFileId":null,"textToAudioGenerationRequestId":null,"themePath":null,"themeSettingsValues":null,"title":"Kevin Andera - Sales Rep.","tmsId":null,"topicIds":[192169769490,192169769491,192174528148,194719179273,194719586584],"topicList":[{"categoryId":3,"cdnPurgeEmbargoTime":null,"contentIds":[],"cosObjectType":"TAG","created":1751598346713,"deletedAt":0,"description":"","id":192169769490,"label":"Towing & Recovery","language":null,"name":"Towing & Recovery","portalId":48463649,"slug":"towing-recovery","translatedFromId":null,"translations":{},"updated":1751598346713},{"categoryId":3,"cdnPurgeEmbargoTime":null,"contentIds":[],"cosObjectType":"TAG","created":1751598346811,"deletedAt":0,"description":"","id":192169769491,"label":"Roadside Assistance","language":null,"name":"Roadside Assistance","portalId":48463649,"slug":"roadside-assistance","translatedFromId":null,"translations":{},"updated":1751598346811},{"categoryId":3,"cdnPurgeEmbargoTime":null,"contentIds":[],"cosObjectType":"TAG","created":1751601475164,"deletedAt":0,"description":"","id":192174528148,"label":"Automotive","language":null,"name":"Automotive","portalId":48463649,"slug":"automotive","translatedFromId":null,"translations":{},"updated":1751601475164},{"categoryId":3,"cdnPurgeEmbargoTime":null,"contentIds":[],"cosObjectType":"TAG","created":1755545199638,"deletedAt":0,"description":"","id":194719179273,"label":"News & Insights","language":null,"name":"News & Insights","portalId":48463649,"slug":"news-insights","translatedFromId":null,"translations":{},"updated":1755545199638},{"categoryId":3,"cdnPurgeEmbargoTime":null,"contentIds":[],"cosObjectType":"TAG","created":1755545289731,"deletedAt":0,"description":"","id":194719586584,"label":"Press Release","language":null,"name":"Press Release","portalId":48463649,"slug":"press-release","translatedFromId":null,"translations":{},"updated":1755545289731}],"topicNames":["Towing & Recovery","Roadside Assistance","Automotive","News & Insights","Press Release"],"topics":[192169769490,192169769491,192174528148,194719179273,194719586584],"translatedContent":{},"translatedFromId":null,"translations":{},"tweet":null,"tweetAt":null,"tweetImmediately":false,"unpublishedAt":0,"updated":1770151557180,"updatedById":76755706,"upsizeFeaturedImage":false,"url":"/blog/kevin-andera-sales-rep","useFeaturedImage":true,"userPerms":[],"views":null,"visibleToAll":null,"widgetContainers":{},"widgetcontainers":{},"widgets":{}},{"ab":false,"abStatus":null,"abTestId":null,"abVariation":false,"abVariationAutomated":false,"absoluteUrl":"/blog/ev-firebox-billing-compliance-guide","afterPostBody":null,"aifeatures":null,"allowedSlugConflict":false,"analytics":null,"analyticsPageId":"195609242942","analyticsPageType":"blog-post","approvalStatus":null,"archived":false,"archivedAt":0,"archivedInDashboard":false,"areCommentsAllowed":true,"attachedStylesheets":[],"audienceAccess":"PUBLIC","author":null,"authorName":null,"authorUsername":null,"blogAuthor":{"avatar":"","bio":"","cdnPurgeEmbargoTime":null,"cosObjectType":"BLOG_AUTHOR","created":1757088282410,"deletedAt":0,"displayName":"David Rottinghaus","email":null,"facebook":"","fullName":"David Rottinghaus","gravatarUrl":null,"hasSocialProfiles":false,"id":195610529697,"label":"David Rottinghaus","language":"en","linkedin":"","name":"David Rottinghaus","portalId":48463649,"slug":"david-rottinghaus","translatedFromId":null,"translations":{},"twitter":"","twitterUsername":"","updated":1757088282410,"userId":null,"username":null,"website":""},"blogAuthorId":195610529697,"blogAuthorIdList":[195610529697],"blogAuthorList":[{"avatar":"","bio":"","cdnPurgeEmbargoTime":null,"cosObjectType":"BLOG_AUTHOR","created":1757088282410,"deletedAt":0,"displayName":"David Rottinghaus","email":null,"facebook":"","fullName":"David Rottinghaus","gravatarUrl":null,"hasSocialProfiles":false,"id":195610529697,"label":"David Rottinghaus","language":"en","linkedin":"","name":"David Rottinghaus","portalId":48463649,"slug":"david-rottinghaus","translatedFromId":null,"translations":{},"twitter":"","twitterUsername":"","updated":1757088282410,"userId":null,"username":null,"website":""}],"blogPostAuthor":{"avatar":"","bio":"","cdnPurgeEmbargoTime":null,"cosObjectType":"BLOG_AUTHOR","created":1757088282410,"deletedAt":0,"displayName":"David Rottinghaus","email":null,"facebook":"","fullName":"David Rottinghaus","gravatarUrl":null,"hasSocialProfiles":false,"id":195610529697,"label":"David Rottinghaus","language":"en","linkedin":"","name":"David Rottinghaus","portalId":48463649,"slug":"david-rottinghaus","translatedFromId":null,"translations":{},"twitter":"","twitterUsername":"","updated":1757088282410,"userId":null,"username":null,"website":""},"blogPostScheduleTaskUid":null,"blogPublishInstantEmailCampaignId":null,"blogPublishInstantEmailRetryCount":null,"blogPublishInstantEmailTaskUid":null,"blogPublishToSocialMediaTask":"DONE_NOT_SENT","blueprintTypeId":0,"businessUnitId":null,"campaign":null,"campaignName":null,"campaignUtm":null,"category":3,"categoryId":3,"cdnPurgeEmbargoTime":null,"checkPostLevelAudienceAccessFirst":true,"clonedFrom":null,"composeBody":null,"compositionId":0,"contentAccessRuleIds":[],"contentAccessRuleTypes":[],"contentGroup":190096341139,"contentGroupId":190096341139,"contentTypeCategory":3,"contentTypeCategoryId":3,"contentTypeId":null,"created":1757087974425,"createdByAgent":null,"createdById":76755706,"createdTime":1757087974425,"crmObjectId":null,"css":{},"cssText":"","ctaClicks":null,"ctaViews":null,"currentState":"PUBLISHED","currentlyPublished":true,"deletedAt":0,"deletedBy":null,"deletedByEmail":null,"deletedById":null,"domain":"","dynamicPageDataSourceId":null,"dynamicPageDataSourceType":null,"dynamicPageHubDbTableId":null,"enableDomainStylesheets":null,"enableGoogleAmpOutputOverride":false,"enableLayoutStylesheets":null,"errors":[],"featuredImage":"https://48463649.fs1.hubspotusercontent-na1.net/hubfs/48463649/firebox-west-lot-nov2025-01-800x300-landing-page.jpg","featuredImageAltText":"","featuredImageHeight":300,"featuredImageLength":0,"featuredImageWidth":800,"flexAreas":{},"folderId":null,"footerHtml":null,"footerTemplatePath":null,"footerVariantName":null,"freezeDate":1757192400000,"generateJsonLdEnabledOverride":true,"globalBlockOverrides":{},"hasContentAccessRules":false,"hasUserChanges":true,"headHtml":"","header":null,"headerTemplatePath":null,"headerVariantName":null,"htmlTitle":"Compliance Is the Answer: Billing with Confidence When Using the Firebox","id":195609242942,"includeDefaultCustomCss":null,"isCaptchaRequired":true,"isCrawlableByBots":false,"isDraft":false,"isInstantEmailEnabled":false,"isPublished":true,"isSocialPublishingEnabled":false,"keywords":[],"label":"Compliance Is the Answer: Billing with Confidence When Using the Firebox","language":"en","lastEditSessionId":null,"lastEditUpdateId":null,"layoutSections":{},"legacyBlogTabid":null,"legacyId":null,"legacyPostGuid":null,"linkRelCanonicalUrl":"","listTemplate":"","liveDomain":"www.zips.com","mab":false,"mabExperimentId":null,"mabMaster":false,"mabVariant":false,"marketingCampaignGuids":[],"meta":{"html_title":"Compliance Is the Answer: Billing with Confidence When Using the Firebox","public_access_rules":[],"public_access_rules_enabled":false,"use_featured_image":true,"tag_ids":[192169769490,192174528148,192174572389,194719179289,194719586666],"topic_ids":[192169769490,192174528148,192174572389,194719179289,194719586666],"post_summary":"

As towing professionals, you operate in one of the most dynamic and demanding industries in transportation. And now, with the rise of electric vehicles (EVs), you’re being asked to manage new levels of risk — specifically the fire hazards and containment needs of compromised EVs.

\n","post_body":"

As towing professionals, you operate in one of the most dynamic and demanding industries in transportation. And now, with the rise of electric vehicles (EVs), you’re being asked to manage new levels of risk — specifically the fire hazards and containment needs of compromised EVs.

\n\n

The reality is simple: A damaged EV poses a very real threat to your yard, your employees and your business. These vehicles can enter thermal runaway hours, days or even months after an incident. Traditional storage methods are no longer enough.

\n

That’s why the Firebox exists and why billing for its use is not only justified, but essential to recouping what is ultimately a smart, safety-driven investment in your business.

\n

The Firebox is the only true solution on the market designed specifically to isolate, contain and safely store compromised EVs. It’s not a retrofit. It’s not a workaround. It’s a purpose-built containment system engineered to mitigate the growing risk of EV-related fires. For tow companies , it’s more than a safety tool…it’s a liability shield and a revenue opportunity!

\n

And yet, some tow operators are still unsure how to bill for the service the Firebox provides. Whether they’re concerned about insurance pushback or believe their city or state’s capped storage rates prevent additional billing, the hesitation is understandable, but misplaced.

\n

It’s important to understand, this isn’t just storage. It’s a specialty safety and mitigation service, and it’s absolutely billable.

\n

If you receive any pushback or resistance on your invoice — from an adjuster, customer or agency — redirect the conversation to compliance. You’re not inflating costs; you’re following industry-recognized safety standards. That’s where the Energy Security Agency (ESA) becomes your most important ally.

\n

ESA is the national authority on EV fire risk and compromised EV handling. They offer FREE, on-scene safety support to towing, recovery and fire & rescue first responders, providing protocols for how these vehicles should be properly handled, transported and stored. When your bill is challenged, your answer should be simple and direct:

\n

“We are following ESA-recommended safety and compliance procedures for handling a compromised EV.”

\n

And you should bill accordingly. Here are the three primary line items that can and should be reflected on your invoice when using the Firebox:

\n
    \n
  1. Standard Vehicle Storage: Your regular daily storage rate still applies, just as with any vehicle in your care.
  2. \n
  3. Isolation and Containment: A separate line item reflecting the use of the Firebox as a specialty safety device. This isn’t general storage; it’s a risk-control solution that ensures safe containment.
  4. \n
  5. Additional Mitigation Measures: If additional precautions are used, such as thermal imaging, smoke detection or live video monitoring, these measures are directly tied to the Firebox’s purpose and can be billed individually or as a bundled charge.
  6. \n
\n

Beyond additional revenue generation, the Firebox delivers two additional benefits that are critical for any operator to understand. First, it preserves your storage capacity. Without a Firebox, a compromised EV may require a 50-foot safety perimeter, rendering numerous nearby spaces unusable. With the Firebox, you maintain those spaces, and the revenue that comes along with them. Second, and perhaps most importantly, it builds your company’s reputation. Using the Firebox shows your community, public safety partners and insurance providers that you prioritize safety, take the EV fire threat seriously and are leading the way in best practices for the industry.

\n

As compromised EVs become more common, the question isn’t if you’ll need a safe containment solution, it’s when. Don’t wait for a catastrophic event to force the decision. Making the mitigation investment now is a proactive move that protects your people, your property and your bottom line. The Firebox provides the only truly compliant, scalable and effective answer on the market. It’s time the industry recognizes its value and not just in terms of safety, but in billing terms, too. Learn more about how the Firebox delivers that value by viewing the complete product details here.

\n

For those who haven’t already familiarized themselves with ESA’s services, standards and protocols, we strongly encourage you to reach out to them directly. You can review their website here.

","rss_summary":"

As towing professionals, you operate in one of the most dynamic and demanding industries in transportation. And now, with the rise of electric vehicles (EVs), you’re being asked to manage new levels of risk — specifically the fire hazards and containment needs of compromised EVs.

\n","rss_body":"

As towing professionals, you operate in one of the most dynamic and demanding industries in transportation. And now, with the rise of electric vehicles (EVs), you’re being asked to manage new levels of risk — specifically the fire hazards and containment needs of compromised EVs.

\n\n

The reality is simple: A damaged EV poses a very real threat to your yard, your employees and your business. These vehicles can enter thermal runaway hours, days or even months after an incident. Traditional storage methods are no longer enough.

\n

That’s why the Firebox exists and why billing for its use is not only justified, but essential to recouping what is ultimately a smart, safety-driven investment in your business.

\n

The Firebox is the only true solution on the market designed specifically to isolate, contain and safely store compromised EVs. It’s not a retrofit. It’s not a workaround. It’s a purpose-built containment system engineered to mitigate the growing risk of EV-related fires. For tow companies , it’s more than a safety tool…it’s a liability shield and a revenue opportunity!

\n

And yet, some tow operators are still unsure how to bill for the service the Firebox provides. Whether they’re concerned about insurance pushback or believe their city or state’s capped storage rates prevent additional billing, the hesitation is understandable, but misplaced.

\n

It’s important to understand, this isn’t just storage. It’s a specialty safety and mitigation service, and it’s absolutely billable.

\n

If you receive any pushback or resistance on your invoice — from an adjuster, customer or agency — redirect the conversation to compliance. You’re not inflating costs; you’re following industry-recognized safety standards. That’s where the Energy Security Agency (ESA) becomes your most important ally.

\n

ESA is the national authority on EV fire risk and compromised EV handling. They offer FREE, on-scene safety support to towing, recovery and fire & rescue first responders, providing protocols for how these vehicles should be properly handled, transported and stored. When your bill is challenged, your answer should be simple and direct:

\n

“We are following ESA-recommended safety and compliance procedures for handling a compromised EV.”

\n

And you should bill accordingly. Here are the three primary line items that can and should be reflected on your invoice when using the Firebox:

\n
    \n
  1. Standard Vehicle Storage: Your regular daily storage rate still applies, just as with any vehicle in your care.
  2. \n
  3. Isolation and Containment: A separate line item reflecting the use of the Firebox as a specialty safety device. This isn’t general storage; it’s a risk-control solution that ensures safe containment.
  4. \n
  5. Additional Mitigation Measures: If additional precautions are used, such as thermal imaging, smoke detection or live video monitoring, these measures are directly tied to the Firebox’s purpose and can be billed individually or as a bundled charge.
  6. \n
\n

Beyond additional revenue generation, the Firebox delivers two additional benefits that are critical for any operator to understand. First, it preserves your storage capacity. Without a Firebox, a compromised EV may require a 50-foot safety perimeter, rendering numerous nearby spaces unusable. With the Firebox, you maintain those spaces, and the revenue that comes along with them. Second, and perhaps most importantly, it builds your company’s reputation. Using the Firebox shows your community, public safety partners and insurance providers that you prioritize safety, take the EV fire threat seriously and are leading the way in best practices for the industry.

\n

As compromised EVs become more common, the question isn’t if you’ll need a safe containment solution, it’s when. Don’t wait for a catastrophic event to force the decision. Making the mitigation investment now is a proactive move that protects your people, your property and your bottom line. The Firebox provides the only truly compliant, scalable and effective answer on the market. It’s time the industry recognizes its value and not just in terms of safety, but in billing terms, too. Learn more about how the Firebox delivers that value by viewing the complete product details here.

\n

For those who haven’t already familiarized themselves with ESA’s services, standards and protocols, we strongly encourage you to reach out to them directly. You can review their website here.

","enable_google_amp_output_override":false,"generate_json_ld_enabled":true,"blog_post_schedule_task_uid":null,"blog_publish_to_social_media_task":"DONE_NOT_SENT","blog_publish_instant_email_task_uid":null,"blog_publish_instant_email_campaign_id":null,"blog_publish_instant_email_retry_count":null,"keywords":[],"composition_id":0,"is_crawlable_by_bots":false,"header":null,"published_at":1762380707571,"head_html":"","footer_html":null,"attached_stylesheets":[],"enable_domain_stylesheets":null,"include_default_custom_css":null,"layout_sections":{},"past_mab_experiment_ids":[],"deleted_by":null,"featured_image_alt_text":"","enable_layout_stylesheets":null,"tweet":null,"tweet_at":null,"campaign_name":null,"campaign_utm":null,"meta_keywords":null,"meta_description":"Learn how towing companies can safely store compromised EVs with the Firebox and bill confidently using ESA approved compliance standards.","tweet_immediately":false,"publish_immediately":true,"security_state":"NONE","scheduled_update_date":0,"placement_guids":[],"header_template_path":null,"header_variant_name":null,"footer_template_path":null,"footer_variant_name":null,"global_block_overrides":{},"property_for_dynamic_page_title":null,"property_for_dynamic_page_slug":null,"property_for_dynamic_page_meta_description":null,"property_for_dynamic_page_featured_image":null,"property_for_dynamic_page_canonical_url":null,"preview_image_src":null,"legacy_blog_tabid":null,"legacy_post_guid":null,"performable_variation_letter":null,"style_override_id":null,"has_user_changes":true,"css":{},"css_text":"","unpublished_at":0,"published_by_id":76755706,"allowed_slug_conflict":false,"ai_features":null,"link_rel_canonical_url":"","page_redirected":false,"page_expiry_enabled":null,"page_expiry_date":null,"page_expiry_redirect_id":null,"page_expiry_redirect_url":null,"deleted_by_id":null,"state_when_deleted":null,"cloned_from":null,"staged_from":null,"personas":[],"compose_body":null,"featured_image":"https://48463649.fs1.hubspotusercontent-na1.net/hubfs/48463649/firebox-west-lot-nov2025-01-800x300-landing-page.jpg","featured_image_width":800,"featured_image_height":300,"publish_timezone_offset":null,"theme_settings_values":null,"password":null,"last_edit_session_id":null,"last_edit_update_id":null,"created_by_agent":null},"metaDescription":"Learn how towing companies can safely store compromised EVs with the Firebox and bill confidently using ESA approved compliance standards.","metaKeywords":null,"name":"Compliance Is the Answer: Billing with Confidence When Using the Firebox","nextPostFeaturedImage":"https://48463649.fs1.hubspotusercontent-na1.net/hubfs/48463649/top-5-mistakes-buying-car-carrier.png","nextPostFeaturedImageAltText":"Top 5 mistakes when buying a car carrier","nextPostName":"Top 5 Mistakes When Buying a New Car Carrier","nextPostSlug":"blog/top-5-mistakes-when-buying-a-new-car-carrier","pageExpiryDate":null,"pageExpiryEnabled":null,"pageExpiryRedirectId":null,"pageExpiryRedirectUrl":null,"pageRedirected":false,"pageTitle":"Compliance Is the Answer: Billing with Confidence When Using the Firebox","parentBlog":{"absoluteUrl":"/blog","allowComments":true,"ampBodyColor":"#404040","ampBodyFont":"'Helvetica Neue', Helvetica, Arial, sans-serif","ampBodyFontSize":"18","ampCustomCss":"","ampHeaderBackgroundColor":"#ffffff","ampHeaderColor":"#1e1e1e","ampHeaderFont":"'Helvetica Neue', Helvetica, Arial, sans-serif","ampHeaderFontSize":"36","ampLinkColor":"#416bb3","ampLogoAlt":"","ampLogoHeight":0,"ampLogoSrc":"","ampLogoWidth":0,"analyticsPageId":190096341139,"attachedStylesheets":[],"audienceAccess":"PUBLIC","businessUnitId":null,"captchaAfterDays":7,"captchaAlways":false,"categoryId":3,"cdnPurgeEmbargoTime":null,"closeCommentsOlder":0,"commentDateFormat":"medium","commentFormGuid":"a4128401-39db-4c54-a62b-88ff335d3a69","commentMaxThreadDepth":1,"commentModeration":false,"commentNotificationEmails":[],"commentShouldCreateContact":false,"commentVerificationText":"","cosObjectType":"BLOG","created":1747163443999,"createdDateTime":1747163443999,"dailyNotificationEmailId":null,"dateFormattingLanguage":null,"defaultGroupStyleId":"","defaultNotificationFromName":"","defaultNotificationReplyTo":"","deletedAt":0,"description":"","domain":"","domainWhenPublished":"www.zips.com","emailApiSubscriptionId":null,"enableGoogleAmpOutput":true,"enableSocialAutoPublishing":false,"generateJsonLdEnabled":true,"header":null,"htmlFooter":"","htmlFooterIsShared":true,"htmlHead":"","htmlHeadIsShared":true,"htmlKeywords":[],"htmlTitle":"blog","id":190096341139,"ilsSubscriptionListsByType":{},"instantNotificationEmailId":null,"itemLayoutId":null,"itemTemplateIsShared":false,"itemTemplatePath":"zips-basic-theme/templates/blog-post.html","label":"blog","language":"en","legacyGuid":null,"legacyModuleId":null,"legacyTabId":null,"listingLayoutId":null,"listingPageId":190096341141,"listingTemplatePath":"","liveDomain":"www.zips.com","monthFilterFormat":"MMMM yyyy","monthlyNotificationEmailId":null,"name":"blog","parentBlogUpdateTaskId":null,"portalId":48463649,"postHtmlFooter":"","postHtmlHead":"","postsPerListingPage":111,"postsPerRssFeed":10,"publicAccessRules":[],"publicAccessRulesEnabled":false,"publicTitle":"blog","publishDateFormat":"medium","resolvedDomain":"www.zips.com","rootUrl":"/blog","rssCustomFeed":null,"rssDescription":null,"rssItemFooter":null,"rssItemHeader":null,"settingsOverrides":{"itemLayoutId":false,"itemTemplatePath":false,"itemTemplateIsShared":false,"listingLayoutId":false,"listingTemplatePath":false,"postsPerListingPage":false,"showSummaryInListing":false,"useFeaturedImageInSummary":false,"htmlHead":false,"postHtmlHead":false,"htmlHeadIsShared":false,"htmlFooter":false,"listingPageHtmlFooter":false,"postHtmlFooter":false,"htmlFooterIsShared":false,"attachedStylesheets":false,"postsPerRssFeed":false,"showSummaryInRss":false,"showSummaryInEmails":false,"showSummariesInEmails":false,"allowComments":false,"commentShouldCreateContact":false,"commentModeration":false,"closeCommentsOlder":false,"commentNotificationEmails":false,"commentMaxThreadDepth":false,"commentVerificationText":false,"socialAccountTwitter":false,"showSocialLinkTwitter":false,"showSocialLinkLinkedin":false,"showSocialLinkFacebook":false,"enableGoogleAmpOutput":false,"ampLogoSrc":false,"ampLogoHeight":false,"ampLogoWidth":false,"ampLogoAlt":false,"ampHeaderFont":false,"ampHeaderFontSize":false,"ampHeaderColor":false,"ampHeaderBackgroundColor":false,"ampBodyFont":false,"ampBodyFontSize":false,"ampBodyColor":false,"ampLinkColor":false,"generateJsonLdEnabled":false},"showSocialLinkFacebook":true,"showSocialLinkLinkedin":true,"showSocialLinkTwitter":true,"showSummaryInEmails":true,"showSummaryInListing":true,"showSummaryInRss":true,"siteId":null,"slug":"blog","socialAccountTwitter":"","state":null,"subscriptionContactsProperty":null,"subscriptionEmailType":null,"subscriptionFormGuid":null,"subscriptionListsByType":{},"title":null,"translatedFromId":null,"translations":{},"updated":1755110916417,"updatedDateTime":1755110916417,"urlBase":"www.zips.com/blog","urlSegments":{"all":"all","archive":"archive","author":"author","page":"page","tag":"tag"},"useFeaturedImageInSummary":true,"usesDefaultTemplate":false,"weeklyNotificationEmailId":null},"password":null,"pastMabExperimentIds":[],"performableGuid":null,"performableVariationLetter":null,"personalizationStrategyId":null,"personalizationVariantStatus":null,"personas":[],"placementGuids":[],"portableKey":null,"portalId":48463649,"position":null,"postBody":"

As towing professionals, you operate in one of the most dynamic and demanding industries in transportation. And now, with the rise of electric vehicles (EVs), you’re being asked to manage new levels of risk — specifically the fire hazards and containment needs of compromised EVs.

\n\n

The reality is simple: A damaged EV poses a very real threat to your yard, your employees and your business. These vehicles can enter thermal runaway hours, days or even months after an incident. Traditional storage methods are no longer enough.

\n

That’s why the Firebox exists and why billing for its use is not only justified, but essential to recouping what is ultimately a smart, safety-driven investment in your business.

\n

The Firebox is the only true solution on the market designed specifically to isolate, contain and safely store compromised EVs. It’s not a retrofit. It’s not a workaround. It’s a purpose-built containment system engineered to mitigate the growing risk of EV-related fires. For tow companies , it’s more than a safety tool…it’s a liability shield and a revenue opportunity!

\n

And yet, some tow operators are still unsure how to bill for the service the Firebox provides. Whether they’re concerned about insurance pushback or believe their city or state’s capped storage rates prevent additional billing, the hesitation is understandable, but misplaced.

\n

It’s important to understand, this isn’t just storage. It’s a specialty safety and mitigation service, and it’s absolutely billable.

\n

If you receive any pushback or resistance on your invoice — from an adjuster, customer or agency — redirect the conversation to compliance. You’re not inflating costs; you’re following industry-recognized safety standards. That’s where the Energy Security Agency (ESA) becomes your most important ally.

\n

ESA is the national authority on EV fire risk and compromised EV handling. They offer FREE, on-scene safety support to towing, recovery and fire & rescue first responders, providing protocols for how these vehicles should be properly handled, transported and stored. When your bill is challenged, your answer should be simple and direct:

\n

“We are following ESA-recommended safety and compliance procedures for handling a compromised EV.”

\n

And you should bill accordingly. Here are the three primary line items that can and should be reflected on your invoice when using the Firebox:

\n
    \n
  1. Standard Vehicle Storage: Your regular daily storage rate still applies, just as with any vehicle in your care.
  2. \n
  3. Isolation and Containment: A separate line item reflecting the use of the Firebox as a specialty safety device. This isn’t general storage; it’s a risk-control solution that ensures safe containment.
  4. \n
  5. Additional Mitigation Measures: If additional precautions are used, such as thermal imaging, smoke detection or live video monitoring, these measures are directly tied to the Firebox’s purpose and can be billed individually or as a bundled charge.
  6. \n
\n

Beyond additional revenue generation, the Firebox delivers two additional benefits that are critical for any operator to understand. First, it preserves your storage capacity. Without a Firebox, a compromised EV may require a 50-foot safety perimeter, rendering numerous nearby spaces unusable. With the Firebox, you maintain those spaces, and the revenue that comes along with them. Second, and perhaps most importantly, it builds your company’s reputation. Using the Firebox shows your community, public safety partners and insurance providers that you prioritize safety, take the EV fire threat seriously and are leading the way in best practices for the industry.

\n

As compromised EVs become more common, the question isn’t if you’ll need a safe containment solution, it’s when. Don’t wait for a catastrophic event to force the decision. Making the mitigation investment now is a proactive move that protects your people, your property and your bottom line. The Firebox provides the only truly compliant, scalable and effective answer on the market. It’s time the industry recognizes its value and not just in terms of safety, but in billing terms, too. Learn more about how the Firebox delivers that value by viewing the complete product details here.

\n

For those who haven’t already familiarized themselves with ESA’s services, standards and protocols, we strongly encourage you to reach out to them directly. You can review their website here.

","postBodyRss":"

As towing professionals, you operate in one of the most dynamic and demanding industries in transportation. And now, with the rise of electric vehicles (EVs), you’re being asked to manage new levels of risk — specifically the fire hazards and containment needs of compromised EVs.

\n\n

The reality is simple: A damaged EV poses a very real threat to your yard, your employees and your business. These vehicles can enter thermal runaway hours, days or even months after an incident. Traditional storage methods are no longer enough.

\n

That’s why the Firebox exists and why billing for its use is not only justified, but essential to recouping what is ultimately a smart, safety-driven investment in your business.

\n

The Firebox is the only true solution on the market designed specifically to isolate, contain and safely store compromised EVs. It’s not a retrofit. It’s not a workaround. It’s a purpose-built containment system engineered to mitigate the growing risk of EV-related fires. For tow companies , it’s more than a safety tool…it’s a liability shield and a revenue opportunity!

\n

And yet, some tow operators are still unsure how to bill for the service the Firebox provides. Whether they’re concerned about insurance pushback or believe their city or state’s capped storage rates prevent additional billing, the hesitation is understandable, but misplaced.

\n

It’s important to understand, this isn’t just storage. It’s a specialty safety and mitigation service, and it’s absolutely billable.

\n

If you receive any pushback or resistance on your invoice — from an adjuster, customer or agency — redirect the conversation to compliance. You’re not inflating costs; you’re following industry-recognized safety standards. That’s where the Energy Security Agency (ESA) becomes your most important ally.

\n

ESA is the national authority on EV fire risk and compromised EV handling. They offer FREE, on-scene safety support to towing, recovery and fire & rescue first responders, providing protocols for how these vehicles should be properly handled, transported and stored. When your bill is challenged, your answer should be simple and direct:

\n

“We are following ESA-recommended safety and compliance procedures for handling a compromised EV.”

\n

And you should bill accordingly. Here are the three primary line items that can and should be reflected on your invoice when using the Firebox:

\n
    \n
  1. Standard Vehicle Storage: Your regular daily storage rate still applies, just as with any vehicle in your care.
  2. \n
  3. Isolation and Containment: A separate line item reflecting the use of the Firebox as a specialty safety device. This isn’t general storage; it’s a risk-control solution that ensures safe containment.
  4. \n
  5. Additional Mitigation Measures: If additional precautions are used, such as thermal imaging, smoke detection or live video monitoring, these measures are directly tied to the Firebox’s purpose and can be billed individually or as a bundled charge.
  6. \n
\n

Beyond additional revenue generation, the Firebox delivers two additional benefits that are critical for any operator to understand. First, it preserves your storage capacity. Without a Firebox, a compromised EV may require a 50-foot safety perimeter, rendering numerous nearby spaces unusable. With the Firebox, you maintain those spaces, and the revenue that comes along with them. Second, and perhaps most importantly, it builds your company’s reputation. Using the Firebox shows your community, public safety partners and insurance providers that you prioritize safety, take the EV fire threat seriously and are leading the way in best practices for the industry.

\n

As compromised EVs become more common, the question isn’t if you’ll need a safe containment solution, it’s when. Don’t wait for a catastrophic event to force the decision. Making the mitigation investment now is a proactive move that protects your people, your property and your bottom line. The Firebox provides the only truly compliant, scalable and effective answer on the market. It’s time the industry recognizes its value and not just in terms of safety, but in billing terms, too. Learn more about how the Firebox delivers that value by viewing the complete product details here.

\n

For those who haven’t already familiarized themselves with ESA’s services, standards and protocols, we strongly encourage you to reach out to them directly. You can review their website here.

","postEmailContent":"

As towing professionals, you operate in one of the most dynamic and demanding industries in transportation. And now, with the rise of electric vehicles (EVs), you’re being asked to manage new levels of risk — specifically the fire hazards and containment needs of compromised EVs.

","postFeaturedImageIfEnabled":"https://48463649.fs1.hubspotusercontent-na1.net/hubfs/48463649/firebox-west-lot-nov2025-01-800x300-landing-page.jpg","postListContent":"

As towing professionals, you operate in one of the most dynamic and demanding industries in transportation. And now, with the rise of electric vehicles (EVs), you’re being asked to manage new levels of risk — specifically the fire hazards and containment needs of compromised EVs.

","postListSummaryFeaturedImage":"https://48463649.fs1.hubspotusercontent-na1.net/hubfs/48463649/firebox-west-lot-nov2025-01-800x300-landing-page.jpg","postRssContent":"

As towing professionals, you operate in one of the most dynamic and demanding industries in transportation. And now, with the rise of electric vehicles (EVs), you’re being asked to manage new levels of risk — specifically the fire hazards and containment needs of compromised EVs.

","postRssSummaryFeaturedImage":"https://48463649.fs1.hubspotusercontent-na1.net/hubfs/48463649/firebox-west-lot-nov2025-01-800x300-landing-page.jpg","postSummary":"

As towing professionals, you operate in one of the most dynamic and demanding industries in transportation. And now, with the rise of electric vehicles (EVs), you’re being asked to manage new levels of risk — specifically the fire hazards and containment needs of compromised EVs.

\n","postSummaryRss":"

As towing professionals, you operate in one of the most dynamic and demanding industries in transportation. And now, with the rise of electric vehicles (EVs), you’re being asked to manage new levels of risk — specifically the fire hazards and containment needs of compromised EVs.

","postTemplate":"zips-basic-theme/templates/blog-post.html","previewImageSrc":null,"previewKey":"ZrSMGOQi","previousPostFeaturedImage":"https://48463649.fs1.hubspotusercontent-na1.net/hubfs/48463649/kevin-andera-header.jpg","previousPostFeaturedImageAltText":"","previousPostName":"Kevin Andera - Sales Rep.","previousPostSlug":"blog/kevin-andera-sales-rep","processingStatus":"PUBLISHED","propertyForDynamicPageCanonicalUrl":null,"propertyForDynamicPageFeaturedImage":null,"propertyForDynamicPageMetaDescription":null,"propertyForDynamicPageSlug":null,"propertyForDynamicPageTitle":null,"publicAccessRules":[],"publicAccessRulesEnabled":false,"publishDate":1757192400000,"publishDateLocalTime":1757192400000,"publishDateLocalized":{"date":1757192400000,"format":"medium","language":null},"publishImmediately":true,"publishTimezoneOffset":null,"publishedAt":1762380707571,"publishedByEmail":null,"publishedById":76755706,"publishedByName":null,"publishedUrl":"/blog/ev-firebox-billing-compliance-guide","resolvedDomain":"www.zips.com","resolvedLanguage":null,"rssBody":"

As towing professionals, you operate in one of the most dynamic and demanding industries in transportation. And now, with the rise of electric vehicles (EVs), you’re being asked to manage new levels of risk — specifically the fire hazards and containment needs of compromised EVs.

\n\n

The reality is simple: A damaged EV poses a very real threat to your yard, your employees and your business. These vehicles can enter thermal runaway hours, days or even months after an incident. Traditional storage methods are no longer enough.

\n

That’s why the Firebox exists and why billing for its use is not only justified, but essential to recouping what is ultimately a smart, safety-driven investment in your business.

\n

The Firebox is the only true solution on the market designed specifically to isolate, contain and safely store compromised EVs. It’s not a retrofit. It’s not a workaround. It’s a purpose-built containment system engineered to mitigate the growing risk of EV-related fires. For tow companies , it’s more than a safety tool…it’s a liability shield and a revenue opportunity!

\n

And yet, some tow operators are still unsure how to bill for the service the Firebox provides. Whether they’re concerned about insurance pushback or believe their city or state’s capped storage rates prevent additional billing, the hesitation is understandable, but misplaced.

\n

It’s important to understand, this isn’t just storage. It’s a specialty safety and mitigation service, and it’s absolutely billable.

\n

If you receive any pushback or resistance on your invoice — from an adjuster, customer or agency — redirect the conversation to compliance. You’re not inflating costs; you’re following industry-recognized safety standards. That’s where the Energy Security Agency (ESA) becomes your most important ally.

\n

ESA is the national authority on EV fire risk and compromised EV handling. They offer FREE, on-scene safety support to towing, recovery and fire & rescue first responders, providing protocols for how these vehicles should be properly handled, transported and stored. When your bill is challenged, your answer should be simple and direct:

\n

“We are following ESA-recommended safety and compliance procedures for handling a compromised EV.”

\n

And you should bill accordingly. Here are the three primary line items that can and should be reflected on your invoice when using the Firebox:

\n
    \n
  1. Standard Vehicle Storage: Your regular daily storage rate still applies, just as with any vehicle in your care.
  2. \n
  3. Isolation and Containment: A separate line item reflecting the use of the Firebox as a specialty safety device. This isn’t general storage; it’s a risk-control solution that ensures safe containment.
  4. \n
  5. Additional Mitigation Measures: If additional precautions are used, such as thermal imaging, smoke detection or live video monitoring, these measures are directly tied to the Firebox’s purpose and can be billed individually or as a bundled charge.
  6. \n
\n

Beyond additional revenue generation, the Firebox delivers two additional benefits that are critical for any operator to understand. First, it preserves your storage capacity. Without a Firebox, a compromised EV may require a 50-foot safety perimeter, rendering numerous nearby spaces unusable. With the Firebox, you maintain those spaces, and the revenue that comes along with them. Second, and perhaps most importantly, it builds your company’s reputation. Using the Firebox shows your community, public safety partners and insurance providers that you prioritize safety, take the EV fire threat seriously and are leading the way in best practices for the industry.

\n

As compromised EVs become more common, the question isn’t if you’ll need a safe containment solution, it’s when. Don’t wait for a catastrophic event to force the decision. Making the mitigation investment now is a proactive move that protects your people, your property and your bottom line. The Firebox provides the only truly compliant, scalable and effective answer on the market. It’s time the industry recognizes its value and not just in terms of safety, but in billing terms, too. Learn more about how the Firebox delivers that value by viewing the complete product details here.

\n

For those who haven’t already familiarized themselves with ESA’s services, standards and protocols, we strongly encourage you to reach out to them directly. You can review their website here.

","rssSummary":"

As towing professionals, you operate in one of the most dynamic and demanding industries in transportation. And now, with the rise of electric vehicles (EVs), you’re being asked to manage new levels of risk — specifically the fire hazards and containment needs of compromised EVs.

\n","rssSummaryFeaturedImage":"https://48463649.fs1.hubspotusercontent-na1.net/hubfs/48463649/firebox-west-lot-nov2025-01-800x300-landing-page.jpg","scheduledUpdateDate":0,"screenshotPreviewTakenAt":1769551907850,"screenshotPreviewUrl":"https://cdn1.hubspot.net/hubshotv3/prod/e/0/484fd48b-3498-4e91-b552-1c3d9de55962.png","sections":{},"securityState":"NONE","siteId":null,"slug":"blog/ev-firebox-billing-compliance-guide","stagedFrom":null,"state":"PUBLISHED","stateWhenDeleted":null,"structuredContentPageType":null,"structuredContentType":null,"styleOverrideId":null,"subcategory":"normal_blog_post","syncedWithBlogRoot":true,"tagIds":[192169769490,192174528148,192174572389,194719179289,194719586666],"tagList":[{"categoryId":3,"cdnPurgeEmbargoTime":null,"contentIds":[],"cosObjectType":"TAG","created":1751598346713,"deletedAt":0,"description":"","id":192169769490,"label":"Towing & Recovery","language":null,"name":"Towing & Recovery","portalId":48463649,"slug":"towing-recovery","translatedFromId":null,"translations":{},"updated":1751598346713},{"categoryId":3,"cdnPurgeEmbargoTime":null,"contentIds":[],"cosObjectType":"TAG","created":1751601475164,"deletedAt":0,"description":"","id":192174528148,"label":"Automotive","language":null,"name":"Automotive","portalId":48463649,"slug":"automotive","translatedFromId":null,"translations":{},"updated":1751601475164},{"categoryId":3,"cdnPurgeEmbargoTime":null,"contentIds":[],"cosObjectType":"TAG","created":1751602285235,"deletedAt":0,"description":"","id":192174572389,"label":"Municipalities","language":null,"name":"Municipalities","portalId":48463649,"slug":"municipalities","translatedFromId":null,"translations":{},"updated":1751602285235},{"categoryId":3,"cdnPurgeEmbargoTime":null,"contentIds":[],"cosObjectType":"TAG","created":1755545213046,"deletedAt":0,"description":"","id":194719179289,"label":"Industry Knowledge & Updates","language":null,"name":"Industry Knowledge & Updates","portalId":48463649,"slug":"industry-knowledge-updates","translatedFromId":null,"translations":{},"updated":1755545213046},{"categoryId":3,"cdnPurgeEmbargoTime":null,"contentIds":[],"cosObjectType":"TAG","created":1755545331471,"deletedAt":0,"description":"","id":194719586666,"label":"Product Guides","language":null,"name":"Product Guides","portalId":48463649,"slug":"product-guides","translatedFromId":null,"translations":{},"updated":1755545331471}],"tagNames":["Towing & Recovery","Automotive","Municipalities","Industry Knowledge & Updates","Product Guides"],"teamPerms":[],"templatePath":"","templatePathForRender":"zips-basic-theme/templates/blog-post.html","textToAudioFileId":null,"textToAudioGenerationRequestId":null,"themePath":null,"themeSettingsValues":null,"title":"Compliance Is the Answer: Billing with Confidence When Using the Firebox","tmsId":null,"topicIds":[192169769490,192174528148,192174572389,194719179289,194719586666],"topicList":[{"categoryId":3,"cdnPurgeEmbargoTime":null,"contentIds":[],"cosObjectType":"TAG","created":1751598346713,"deletedAt":0,"description":"","id":192169769490,"label":"Towing & Recovery","language":null,"name":"Towing & Recovery","portalId":48463649,"slug":"towing-recovery","translatedFromId":null,"translations":{},"updated":1751598346713},{"categoryId":3,"cdnPurgeEmbargoTime":null,"contentIds":[],"cosObjectType":"TAG","created":1751601475164,"deletedAt":0,"description":"","id":192174528148,"label":"Automotive","language":null,"name":"Automotive","portalId":48463649,"slug":"automotive","translatedFromId":null,"translations":{},"updated":1751601475164},{"categoryId":3,"cdnPurgeEmbargoTime":null,"contentIds":[],"cosObjectType":"TAG","created":1751602285235,"deletedAt":0,"description":"","id":192174572389,"label":"Municipalities","language":null,"name":"Municipalities","portalId":48463649,"slug":"municipalities","translatedFromId":null,"translations":{},"updated":1751602285235},{"categoryId":3,"cdnPurgeEmbargoTime":null,"contentIds":[],"cosObjectType":"TAG","created":1755545213046,"deletedAt":0,"description":"","id":194719179289,"label":"Industry Knowledge & Updates","language":null,"name":"Industry Knowledge & Updates","portalId":48463649,"slug":"industry-knowledge-updates","translatedFromId":null,"translations":{},"updated":1755545213046},{"categoryId":3,"cdnPurgeEmbargoTime":null,"contentIds":[],"cosObjectType":"TAG","created":1755545331471,"deletedAt":0,"description":"","id":194719586666,"label":"Product Guides","language":null,"name":"Product Guides","portalId":48463649,"slug":"product-guides","translatedFromId":null,"translations":{},"updated":1755545331471}],"topicNames":["Towing & Recovery","Automotive","Municipalities","Industry Knowledge & Updates","Product Guides"],"topics":[192169769490,192174528148,192174572389,194719179289,194719586666],"translatedContent":{},"translatedFromId":null,"translations":{},"tweet":null,"tweetAt":null,"tweetImmediately":false,"unpublishedAt":0,"updated":1762380707575,"updatedById":76755706,"upsizeFeaturedImage":false,"url":"/blog/ev-firebox-billing-compliance-guide","useFeaturedImage":true,"userPerms":[],"views":null,"visibleToAll":null,"widgetContainers":{},"widgetcontainers":{},"widgets":{}},{"ab":false,"abStatus":null,"abTestId":null,"abVariation":false,"abVariationAutomated":false,"absoluteUrl":"/blog/top-5-mistakes-when-buying-a-new-car-carrier","afterPostBody":null,"aifeatures":null,"allowedSlugConflict":false,"analytics":null,"analyticsPageId":"194504267109","analyticsPageType":"blog-post","approvalStatus":null,"archived":false,"archivedAt":0,"archivedInDashboard":false,"areCommentsAllowed":true,"attachedStylesheets":[],"audienceAccess":"PUBLIC","author":null,"authorName":null,"authorUsername":null,"blogAuthor":{"avatar":"","bio":"","cdnPurgeEmbargoTime":null,"cosObjectType":"BLOG_AUTHOR","created":1755187092136,"deletedAt":0,"displayName":"Cameron Hanson","email":null,"facebook":"","fullName":"Cameron Hanson","gravatarUrl":null,"hasSocialProfiles":false,"id":194499322288,"label":"Cameron Hanson","language":"en","linkedin":"","name":" Cameron Hanson","portalId":48463649,"slug":"cameron-hanson","translatedFromId":null,"translations":{},"twitter":"","twitterUsername":"","updated":1755187092136,"userId":null,"username":null,"website":""},"blogAuthorId":194499322288,"blogAuthorIdList":[194499322288],"blogAuthorList":[{"avatar":"","bio":"","cdnPurgeEmbargoTime":null,"cosObjectType":"BLOG_AUTHOR","created":1755187092136,"deletedAt":0,"displayName":"Cameron Hanson","email":null,"facebook":"","fullName":"Cameron Hanson","gravatarUrl":null,"hasSocialProfiles":false,"id":194499322288,"label":"Cameron Hanson","language":"en","linkedin":"","name":" Cameron Hanson","portalId":48463649,"slug":"cameron-hanson","translatedFromId":null,"translations":{},"twitter":"","twitterUsername":"","updated":1755187092136,"userId":null,"username":null,"website":""}],"blogPostAuthor":{"avatar":"","bio":"","cdnPurgeEmbargoTime":null,"cosObjectType":"BLOG_AUTHOR","created":1755187092136,"deletedAt":0,"displayName":"Cameron Hanson","email":null,"facebook":"","fullName":"Cameron Hanson","gravatarUrl":null,"hasSocialProfiles":false,"id":194499322288,"label":"Cameron Hanson","language":"en","linkedin":"","name":" Cameron Hanson","portalId":48463649,"slug":"cameron-hanson","translatedFromId":null,"translations":{},"twitter":"","twitterUsername":"","updated":1755187092136,"userId":null,"username":null,"website":""},"blogPostScheduleTaskUid":null,"blogPublishInstantEmailCampaignId":null,"blogPublishInstantEmailRetryCount":null,"blogPublishInstantEmailTaskUid":null,"blogPublishToSocialMediaTask":"DONE_NOT_SENT","blueprintTypeId":0,"businessUnitId":null,"campaign":null,"campaignName":null,"campaignUtm":null,"category":3,"categoryId":3,"cdnPurgeEmbargoTime":null,"checkPostLevelAudienceAccessFirst":true,"clonedFrom":null,"composeBody":null,"compositionId":0,"contentAccessRuleIds":[],"contentAccessRuleTypes":[],"contentGroup":190096341139,"contentGroupId":190096341139,"contentTypeCategory":3,"contentTypeCategoryId":3,"contentTypeId":null,"created":1755204615709,"createdByAgent":null,"createdById":82246321,"createdTime":1755204615709,"crmObjectId":null,"css":{},"cssText":"","ctaClicks":null,"ctaViews":null,"currentState":"PUBLISHED","currentlyPublished":true,"deletedAt":0,"deletedBy":null,"deletedByEmail":null,"deletedById":null,"domain":"","dynamicPageDataSourceId":null,"dynamicPageDataSourceType":null,"dynamicPageHubDbTableId":null,"enableDomainStylesheets":null,"enableGoogleAmpOutputOverride":false,"enableLayoutStylesheets":null,"errors":[],"featuredImage":"https://48463649.fs1.hubspotusercontent-na1.net/hubfs/48463649/top-5-mistakes-buying-car-carrier.png","featuredImageAltText":"Top 5 mistakes when buying a car carrier","featuredImageHeight":984,"featuredImageLength":0,"featuredImageWidth":1811,"flexAreas":{},"folderId":null,"footerHtml":null,"footerTemplatePath":null,"footerVariantName":null,"freezeDate":1751029200000,"generateJsonLdEnabledOverride":true,"globalBlockOverrides":{},"hasContentAccessRules":false,"hasUserChanges":true,"headHtml":null,"header":null,"headerTemplatePath":null,"headerVariantName":null,"htmlTitle":"Top 5 Mistakes When Buying a New Car Carrier","id":194504267109,"includeDefaultCustomCss":null,"isCaptchaRequired":true,"isCrawlableByBots":false,"isDraft":false,"isInstantEmailEnabled":false,"isPublished":true,"isSocialPublishingEnabled":false,"keywords":[],"label":"Top 5 Mistakes When Buying a New Car Carrier","language":"en","lastEditSessionId":null,"lastEditUpdateId":null,"layoutSections":{},"legacyBlogTabid":null,"legacyId":null,"legacyPostGuid":null,"linkRelCanonicalUrl":"","listTemplate":"","liveDomain":"www.zips.com","mab":false,"mabExperimentId":null,"mabMaster":false,"mabVariant":false,"marketingCampaignGuids":[],"meta":{"html_title":"Top 5 Mistakes When Buying a New Car Carrier","public_access_rules":[],"public_access_rules_enabled":false,"use_featured_image":true,"tag_ids":[192169769490,192174528148,194718191195,194719179289],"topic_ids":[192169769490,192174528148,194718191195,194719179289],"post_summary":"
\n
\n

You have a lot to consider when purchasing a new car carrier for your business. Bed length, truck capacity, bed material and equipment upgrades all weigh into the decision-making process.

\n

Whether it's your first purchase or you're looking to upgrade or expand your fleet, the equipment experts at Zip's have taken a moment here to review the Top 5 common mistakes customers overlook when buying a new rollback.

\n

Even seasoned owners and operators can forget simple considerations. Learn from their missteps and make the right decision for your operation based on your workload, customer base, geography and climate.

\n

Our experienced sales staff is here to help. If you have additional questions regarding a new rollback or want to learn more about the capacity rating of the one you already own, don't hesitate to reach out to us at 800-222-6047.

\n

Let's get started now on what to consider when buying a new car carrier.

\n
\n","post_body":"
\n
\n

You have a lot to consider when purchasing a new car carrier for your business. Bed length, truck capacity, bed material and equipment upgrades all weigh into the decision-making process.

\n

Whether it's your first purchase or you're looking to upgrade or expand your fleet, the equipment experts at Zip's have taken a moment here to review the Top 5 common mistakes customers overlook when buying a new rollback.

\n

Even seasoned owners and operators can forget simple considerations. Learn from their missteps and make the right decision for your operation based on your workload, customer base, geography and climate.

\n

Our experienced sales staff is here to help. If you have additional questions regarding a new rollback or want to learn more about the capacity rating of the one you already own, don't hesitate to reach out to us at 800-222-6047.

\n

Let's get started now on what to consider when buying a new car carrier.

\n
\n\n
\n
\n
\n
\"num-1-red-circle\"\n

Underestimating GVWR and Payload Capacity

\n
\n

MISTAKE: If your carrier is routinely maxed out, you're risking DOT compliance issues, excessive wear on your truck and reduced braking and handling performance. This often happens when operators only factor in the vehicle being hauled and overlook key contributors to total weight.

\n
\n
\"car-carriers-mistake-1\"
\n
\n

Common oversights include the weight of diesel fuel, DEF tanks, co-workers and passengers, toolboxes and rigging gear and the growing trend of heavier vehicles like EVs, AWD’s, SUVs and cargo vans. Towed loads, especially underlifted, can also transfer significant weight onto the rear axle, pushing it over its rating even when overall GVWR appears within limits. Over time, running at or near max capacity can shorten the lifespan of your truck and compromise safety.

\n
\"zips-tips-new\"
\n

Don’t spec your unit based solely on your average load—plan for your heaviest. Account for both payload on the bed and axle load from towed vehicles. A longer bed or strategic weight placement may help balance axle distribution. Talk with your Zip’s rep about chassis options, axle ratings and suspension upgrades if your hauls and tows run heavy day-to-day.

\n
\n
\n
\n
\n
\n
\"num-2-red-circle\"\n

Choosing the Wrong Bed Length & Material

\n
\n

MISTAKE: Choosing the wrong bed size or material can limit the carrier’s capability and performance. Shorter beds (e.g., 19') might come at a lower upfront cost, but they restrict your ability to haul longer vehicles and negatively affect load distribution. This can lead to improper winch angles (which may drag or damage vehicles), increased risk of bottoming out low-clearance vehicles and the inability to legally or safely load extended SUVs, trucks or specialty vehicles.

\n
\n
\"car-carriers-mistake-2\"
\n
\n

Deck material also matters. Steel offers durability but adds more weight, while aluminum is lighter and corrosion-resistant but can come at a higher cost. Choosing the wrong material for your climate or use case can lead to premature wear or unnecessary maintenance.

\n
\"zips-tips-new\"
\n

Think beyond today’s loads. Choose a longer bed, 21 feet or more, if you anticipate hauling extended vehicles or want more flexibility with load placement. For materials, go with aluminum for corrosion resistance and weight savings, or steel for added toughness. To extend the life of your carrier, consider upgrading to a galvanized sub-frame—especially if you operate in snowy or coastal environments where rust is a concern.

\n
\n
\n
\n
\n
\n
\"num-3-red-circle\"\n

Disregarding Tilt and Load Angle Requirements

\n
\n

MISTAKE: If you're towing low-clearance vehicles like EVs, sports cars, or custom builds, steep load angles can lead to serious front-end damage. This often results from overlooking how bed length, carrier height or tilt mechanisms impact loading geometry. Poor load angles can also make the loading process more difficult and hazardous in tight or uneven spaces.

\n
\n
\"car-carriers-mistake-3\"
\n
\n
\"zips-tips-new\"
\n

If you frequently haul low-clearance vehicles, you have several smart options to improve loading safety and efficiency. A Low Center of Gravity (LCG) carrier offers a naturally lower deck height and better load angles by design. You can also consider a dual angle bed or a right approach bed, both engineered to significantly reduce the approach angle during loading. Pair any of these with a longer bed to further minimize drag points and make the loading process safer and smoother.

\n
\n
\n
\n
\n
\n
\"num-4-red-circle\"\n

Ignore Lighting and Visibility Upgrades

\n
\n

MISTAKE: Most standard builds only come with the minimum DOT lighting required to be road legal—and that’s it. But for real-world recovery and roadside work, especially at night or in low-visibility conditions, that’s not nearly enough. Relying on standard lights puts your operators—and your equipment—at unnecessary risk.

\n
\n
\"car-carriers-mistake-4\"
\n
\n
\"zips-tips-new\"
\n

Zip’s Tip: Don’t settle for the base package. Additional safety lighting like a Traffic Commander, LED strobes and side-facing scene lights dramatically improve roadside visibility and operator safety. When added during the build, these upgrades are cleaner, better integrated and often more cost-effective than aftermarket installs.

\n
\n
\n
\n
\"num-5-red-circle\"\n

Skipping Expert Guidance and After-Sale Support

\n
\n

MISTAKE: Buying a car carrier based solely on a spec sheet, online listing or price tag can lead to costly mismatches—like underpowered chassis, poor load distribution or missing safety upgrades. Worse yet, many buyers don’t consider what happens after the sale. Without strong after-sale support, you're on your own when something breaks or when your fleet needs to evolve.

\n
\n
\n
\"zips-tips-new\"
\n

Don’t go it alone. Work with a Zip’s sales rep expert who understands your region, operating style and long-term fleet goals. Our team doesn’t just sell you a truck—we support it for the life of your business. From custom spec consultations to dependable after-sale support and warranty service, we’re here to keep your fleet rolling.

\n
\n
\"car-carriers-mistake-5\"
\n
\n
\n","rss_summary":"
\n
\n

You have a lot to consider when purchasing a new car carrier for your business. Bed length, truck capacity, bed material and equipment upgrades all weigh into the decision-making process.

\n

Whether it's your first purchase or you're looking to upgrade or expand your fleet, the equipment experts at Zip's have taken a moment here to review the Top 5 common mistakes customers overlook when buying a new rollback.

\n

Even seasoned owners and operators can forget simple considerations. Learn from their missteps and make the right decision for your operation based on your workload, customer base, geography and climate.

\n

Our experienced sales staff is here to help. If you have additional questions regarding a new rollback or want to learn more about the capacity rating of the one you already own, don't hesitate to reach out to us at 800-222-6047.

\n

Let's get started now on what to consider when buying a new car carrier.

\n
\n","rss_body":"
\n
\n

You have a lot to consider when purchasing a new car carrier for your business. Bed length, truck capacity, bed material and equipment upgrades all weigh into the decision-making process.

\n

Whether it's your first purchase or you're looking to upgrade or expand your fleet, the equipment experts at Zip's have taken a moment here to review the Top 5 common mistakes customers overlook when buying a new rollback.

\n

Even seasoned owners and operators can forget simple considerations. Learn from their missteps and make the right decision for your operation based on your workload, customer base, geography and climate.

\n

Our experienced sales staff is here to help. If you have additional questions regarding a new rollback or want to learn more about the capacity rating of the one you already own, don't hesitate to reach out to us at 800-222-6047.

\n

Let's get started now on what to consider when buying a new car carrier.

\n
\n\n
\n
\n
\n
\"num-1-red-circle\"\n

Underestimating GVWR and Payload Capacity

\n
\n

MISTAKE: If your carrier is routinely maxed out, you're risking DOT compliance issues, excessive wear on your truck and reduced braking and handling performance. This often happens when operators only factor in the vehicle being hauled and overlook key contributors to total weight.

\n
\n
\"car-carriers-mistake-1\"
\n
\n

Common oversights include the weight of diesel fuel, DEF tanks, co-workers and passengers, toolboxes and rigging gear and the growing trend of heavier vehicles like EVs, AWD’s, SUVs and cargo vans. Towed loads, especially underlifted, can also transfer significant weight onto the rear axle, pushing it over its rating even when overall GVWR appears within limits. Over time, running at or near max capacity can shorten the lifespan of your truck and compromise safety.

\n
\"zips-tips-new\"
\n

Don’t spec your unit based solely on your average load—plan for your heaviest. Account for both payload on the bed and axle load from towed vehicles. A longer bed or strategic weight placement may help balance axle distribution. Talk with your Zip’s rep about chassis options, axle ratings and suspension upgrades if your hauls and tows run heavy day-to-day.

\n
\n
\n
\n
\n
\n
\"num-2-red-circle\"\n

Choosing the Wrong Bed Length & Material

\n
\n

MISTAKE: Choosing the wrong bed size or material can limit the carrier’s capability and performance. Shorter beds (e.g., 19') might come at a lower upfront cost, but they restrict your ability to haul longer vehicles and negatively affect load distribution. This can lead to improper winch angles (which may drag or damage vehicles), increased risk of bottoming out low-clearance vehicles and the inability to legally or safely load extended SUVs, trucks or specialty vehicles.

\n
\n
\"car-carriers-mistake-2\"
\n
\n

Deck material also matters. Steel offers durability but adds more weight, while aluminum is lighter and corrosion-resistant but can come at a higher cost. Choosing the wrong material for your climate or use case can lead to premature wear or unnecessary maintenance.

\n
\"zips-tips-new\"
\n

Think beyond today’s loads. Choose a longer bed, 21 feet or more, if you anticipate hauling extended vehicles or want more flexibility with load placement. For materials, go with aluminum for corrosion resistance and weight savings, or steel for added toughness. To extend the life of your carrier, consider upgrading to a galvanized sub-frame—especially if you operate in snowy or coastal environments where rust is a concern.

\n
\n
\n
\n
\n
\n
\"num-3-red-circle\"\n

Disregarding Tilt and Load Angle Requirements

\n
\n

MISTAKE: If you're towing low-clearance vehicles like EVs, sports cars, or custom builds, steep load angles can lead to serious front-end damage. This often results from overlooking how bed length, carrier height or tilt mechanisms impact loading geometry. Poor load angles can also make the loading process more difficult and hazardous in tight or uneven spaces.

\n
\n
\"car-carriers-mistake-3\"
\n
\n
\"zips-tips-new\"
\n

If you frequently haul low-clearance vehicles, you have several smart options to improve loading safety and efficiency. A Low Center of Gravity (LCG) carrier offers a naturally lower deck height and better load angles by design. You can also consider a dual angle bed or a right approach bed, both engineered to significantly reduce the approach angle during loading. Pair any of these with a longer bed to further minimize drag points and make the loading process safer and smoother.

\n
\n
\n
\n
\n
\n
\"num-4-red-circle\"\n

Ignore Lighting and Visibility Upgrades

\n
\n

MISTAKE: Most standard builds only come with the minimum DOT lighting required to be road legal—and that’s it. But for real-world recovery and roadside work, especially at night or in low-visibility conditions, that’s not nearly enough. Relying on standard lights puts your operators—and your equipment—at unnecessary risk.

\n
\n
\"car-carriers-mistake-4\"
\n
\n
\"zips-tips-new\"
\n

Zip’s Tip: Don’t settle for the base package. Additional safety lighting like a Traffic Commander, LED strobes and side-facing scene lights dramatically improve roadside visibility and operator safety. When added during the build, these upgrades are cleaner, better integrated and often more cost-effective than aftermarket installs.

\n
\n
\n
\n
\"num-5-red-circle\"\n

Skipping Expert Guidance and After-Sale Support

\n
\n

MISTAKE: Buying a car carrier based solely on a spec sheet, online listing or price tag can lead to costly mismatches—like underpowered chassis, poor load distribution or missing safety upgrades. Worse yet, many buyers don’t consider what happens after the sale. Without strong after-sale support, you're on your own when something breaks or when your fleet needs to evolve.

\n
\n
\n
\"zips-tips-new\"
\n

Don’t go it alone. Work with a Zip’s sales rep expert who understands your region, operating style and long-term fleet goals. Our team doesn’t just sell you a truck—we support it for the life of your business. From custom spec consultations to dependable after-sale support and warranty service, we’re here to keep your fleet rolling.

\n
\n
\"car-carriers-mistake-5\"
\n
\n
\n","enable_google_amp_output_override":false,"generate_json_ld_enabled":true,"blog_post_schedule_task_uid":null,"blog_publish_to_social_media_task":"DONE_NOT_SENT","blog_publish_instant_email_task_uid":null,"blog_publish_instant_email_campaign_id":null,"blog_publish_instant_email_retry_count":null,"keywords":[],"composition_id":0,"is_crawlable_by_bots":false,"header":null,"published_at":1755782399452,"head_html":null,"footer_html":null,"attached_stylesheets":[],"enable_domain_stylesheets":null,"include_default_custom_css":null,"layout_sections":{},"past_mab_experiment_ids":[],"deleted_by":null,"featured_image_alt_text":"Top 5 mistakes when buying a car carrier","enable_layout_stylesheets":null,"tweet":null,"tweet_at":null,"campaign_name":null,"campaign_utm":null,"meta_keywords":null,"meta_description":"Lead the road with us. Zip's keeps an up-to-date blog to help you stay informed on all the current industry trends, hottest products and latest news. ","tweet_immediately":false,"publish_immediately":true,"security_state":"NONE","scheduled_update_date":0,"placement_guids":[],"header_template_path":null,"header_variant_name":null,"footer_template_path":null,"footer_variant_name":null,"global_block_overrides":{},"property_for_dynamic_page_title":null,"property_for_dynamic_page_slug":null,"property_for_dynamic_page_meta_description":null,"property_for_dynamic_page_featured_image":null,"property_for_dynamic_page_canonical_url":null,"preview_image_src":null,"legacy_blog_tabid":null,"legacy_post_guid":null,"performable_variation_letter":null,"style_override_id":null,"has_user_changes":true,"css":{},"css_text":"","unpublished_at":0,"published_by_id":79766377,"allowed_slug_conflict":false,"ai_features":null,"link_rel_canonical_url":"","page_redirected":false,"page_expiry_enabled":null,"page_expiry_date":null,"page_expiry_redirect_id":null,"page_expiry_redirect_url":null,"deleted_by_id":null,"state_when_deleted":null,"cloned_from":null,"staged_from":null,"personas":[],"compose_body":null,"featured_image":"https://48463649.fs1.hubspotusercontent-na1.net/hubfs/48463649/top-5-mistakes-buying-car-carrier.png","featured_image_width":1811,"featured_image_height":984,"publish_timezone_offset":null,"theme_settings_values":null,"password":null,"last_edit_session_id":null,"last_edit_update_id":null,"created_by_agent":null},"metaDescription":"Lead the road with us. Zip's keeps an up-to-date blog to help you stay informed on all the current industry trends, hottest products and latest news. ","metaKeywords":null,"name":"Top 5 Mistakes When Buying a New Car Carrier","nextPostFeaturedImage":"https://48463649.fs1.hubspotusercontent-na1.net/hubfs/48463649/header-2.png","nextPostFeaturedImageAltText":"","nextPostName":"Zip's Top 10 Accessories for Your Service Truck","nextPostSlug":"blog/zips-top-10-accessories-for-their-service-truck","pageExpiryDate":null,"pageExpiryEnabled":null,"pageExpiryRedirectId":null,"pageExpiryRedirectUrl":null,"pageRedirected":false,"pageTitle":"Top 5 Mistakes When Buying a New Car Carrier","parentBlog":{"absoluteUrl":"/blog","allowComments":true,"ampBodyColor":"#404040","ampBodyFont":"'Helvetica Neue', Helvetica, Arial, sans-serif","ampBodyFontSize":"18","ampCustomCss":"","ampHeaderBackgroundColor":"#ffffff","ampHeaderColor":"#1e1e1e","ampHeaderFont":"'Helvetica Neue', Helvetica, Arial, sans-serif","ampHeaderFontSize":"36","ampLinkColor":"#416bb3","ampLogoAlt":"","ampLogoHeight":0,"ampLogoSrc":"","ampLogoWidth":0,"analyticsPageId":190096341139,"attachedStylesheets":[],"audienceAccess":"PUBLIC","businessUnitId":null,"captchaAfterDays":7,"captchaAlways":false,"categoryId":3,"cdnPurgeEmbargoTime":null,"closeCommentsOlder":0,"commentDateFormat":"medium","commentFormGuid":"a4128401-39db-4c54-a62b-88ff335d3a69","commentMaxThreadDepth":1,"commentModeration":false,"commentNotificationEmails":[],"commentShouldCreateContact":false,"commentVerificationText":"","cosObjectType":"BLOG","created":1747163443999,"createdDateTime":1747163443999,"dailyNotificationEmailId":null,"dateFormattingLanguage":null,"defaultGroupStyleId":"","defaultNotificationFromName":"","defaultNotificationReplyTo":"","deletedAt":0,"description":"","domain":"","domainWhenPublished":"www.zips.com","emailApiSubscriptionId":null,"enableGoogleAmpOutput":true,"enableSocialAutoPublishing":false,"generateJsonLdEnabled":true,"header":null,"htmlFooter":"","htmlFooterIsShared":true,"htmlHead":"","htmlHeadIsShared":true,"htmlKeywords":[],"htmlTitle":"blog","id":190096341139,"ilsSubscriptionListsByType":{},"instantNotificationEmailId":null,"itemLayoutId":null,"itemTemplateIsShared":false,"itemTemplatePath":"zips-basic-theme/templates/blog-post.html","label":"blog","language":"en","legacyGuid":null,"legacyModuleId":null,"legacyTabId":null,"listingLayoutId":null,"listingPageId":190096341141,"listingTemplatePath":"","liveDomain":"www.zips.com","monthFilterFormat":"MMMM yyyy","monthlyNotificationEmailId":null,"name":"blog","parentBlogUpdateTaskId":null,"portalId":48463649,"postHtmlFooter":"","postHtmlHead":"","postsPerListingPage":111,"postsPerRssFeed":10,"publicAccessRules":[],"publicAccessRulesEnabled":false,"publicTitle":"blog","publishDateFormat":"medium","resolvedDomain":"www.zips.com","rootUrl":"/blog","rssCustomFeed":null,"rssDescription":null,"rssItemFooter":null,"rssItemHeader":null,"settingsOverrides":{"itemLayoutId":false,"itemTemplatePath":false,"itemTemplateIsShared":false,"listingLayoutId":false,"listingTemplatePath":false,"postsPerListingPage":false,"showSummaryInListing":false,"useFeaturedImageInSummary":false,"htmlHead":false,"postHtmlHead":false,"htmlHeadIsShared":false,"htmlFooter":false,"listingPageHtmlFooter":false,"postHtmlFooter":false,"htmlFooterIsShared":false,"attachedStylesheets":false,"postsPerRssFeed":false,"showSummaryInRss":false,"showSummaryInEmails":false,"showSummariesInEmails":false,"allowComments":false,"commentShouldCreateContact":false,"commentModeration":false,"closeCommentsOlder":false,"commentNotificationEmails":false,"commentMaxThreadDepth":false,"commentVerificationText":false,"socialAccountTwitter":false,"showSocialLinkTwitter":false,"showSocialLinkLinkedin":false,"showSocialLinkFacebook":false,"enableGoogleAmpOutput":false,"ampLogoSrc":false,"ampLogoHeight":false,"ampLogoWidth":false,"ampLogoAlt":false,"ampHeaderFont":false,"ampHeaderFontSize":false,"ampHeaderColor":false,"ampHeaderBackgroundColor":false,"ampBodyFont":false,"ampBodyFontSize":false,"ampBodyColor":false,"ampLinkColor":false,"generateJsonLdEnabled":false},"showSocialLinkFacebook":true,"showSocialLinkLinkedin":true,"showSocialLinkTwitter":true,"showSummaryInEmails":true,"showSummaryInListing":true,"showSummaryInRss":true,"siteId":null,"slug":"blog","socialAccountTwitter":"","state":null,"subscriptionContactsProperty":null,"subscriptionEmailType":null,"subscriptionFormGuid":null,"subscriptionListsByType":{},"title":null,"translatedFromId":null,"translations":{},"updated":1755110916417,"updatedDateTime":1755110916417,"urlBase":"www.zips.com/blog","urlSegments":{"all":"all","archive":"archive","author":"author","page":"page","tag":"tag"},"useFeaturedImageInSummary":true,"usesDefaultTemplate":false,"weeklyNotificationEmailId":null},"password":null,"pastMabExperimentIds":[],"performableGuid":null,"performableVariationLetter":null,"personalizationStrategyId":null,"personalizationVariantStatus":null,"personas":[],"placementGuids":[],"portableKey":null,"portalId":48463649,"position":null,"postBody":"
\n
\n

You have a lot to consider when purchasing a new car carrier for your business. Bed length, truck capacity, bed material and equipment upgrades all weigh into the decision-making process.

\n

Whether it's your first purchase or you're looking to upgrade or expand your fleet, the equipment experts at Zip's have taken a moment here to review the Top 5 common mistakes customers overlook when buying a new rollback.

\n

Even seasoned owners and operators can forget simple considerations. Learn from their missteps and make the right decision for your operation based on your workload, customer base, geography and climate.

\n

Our experienced sales staff is here to help. If you have additional questions regarding a new rollback or want to learn more about the capacity rating of the one you already own, don't hesitate to reach out to us at 800-222-6047.

\n

Let's get started now on what to consider when buying a new car carrier.

\n
\n\n
\n
\n
\n
\"num-1-red-circle\"\n

Underestimating GVWR and Payload Capacity

\n
\n

MISTAKE: If your carrier is routinely maxed out, you're risking DOT compliance issues, excessive wear on your truck and reduced braking and handling performance. This often happens when operators only factor in the vehicle being hauled and overlook key contributors to total weight.

\n
\n
\"car-carriers-mistake-1\"
\n
\n

Common oversights include the weight of diesel fuel, DEF tanks, co-workers and passengers, toolboxes and rigging gear and the growing trend of heavier vehicles like EVs, AWD’s, SUVs and cargo vans. Towed loads, especially underlifted, can also transfer significant weight onto the rear axle, pushing it over its rating even when overall GVWR appears within limits. Over time, running at or near max capacity can shorten the lifespan of your truck and compromise safety.

\n
\"zips-tips-new\"
\n

Don’t spec your unit based solely on your average load—plan for your heaviest. Account for both payload on the bed and axle load from towed vehicles. A longer bed or strategic weight placement may help balance axle distribution. Talk with your Zip’s rep about chassis options, axle ratings and suspension upgrades if your hauls and tows run heavy day-to-day.

\n
\n
\n
\n
\n
\n
\"num-2-red-circle\"\n

Choosing the Wrong Bed Length & Material

\n
\n

MISTAKE: Choosing the wrong bed size or material can limit the carrier’s capability and performance. Shorter beds (e.g., 19') might come at a lower upfront cost, but they restrict your ability to haul longer vehicles and negatively affect load distribution. This can lead to improper winch angles (which may drag or damage vehicles), increased risk of bottoming out low-clearance vehicles and the inability to legally or safely load extended SUVs, trucks or specialty vehicles.

\n
\n
\"car-carriers-mistake-2\"
\n
\n

Deck material also matters. Steel offers durability but adds more weight, while aluminum is lighter and corrosion-resistant but can come at a higher cost. Choosing the wrong material for your climate or use case can lead to premature wear or unnecessary maintenance.

\n
\"zips-tips-new\"
\n

Think beyond today’s loads. Choose a longer bed, 21 feet or more, if you anticipate hauling extended vehicles or want more flexibility with load placement. For materials, go with aluminum for corrosion resistance and weight savings, or steel for added toughness. To extend the life of your carrier, consider upgrading to a galvanized sub-frame—especially if you operate in snowy or coastal environments where rust is a concern.

\n
\n
\n
\n
\n
\n
\"num-3-red-circle\"\n

Disregarding Tilt and Load Angle Requirements

\n
\n

MISTAKE: If you're towing low-clearance vehicles like EVs, sports cars, or custom builds, steep load angles can lead to serious front-end damage. This often results from overlooking how bed length, carrier height or tilt mechanisms impact loading geometry. Poor load angles can also make the loading process more difficult and hazardous in tight or uneven spaces.

\n
\n
\"car-carriers-mistake-3\"
\n
\n
\"zips-tips-new\"
\n

If you frequently haul low-clearance vehicles, you have several smart options to improve loading safety and efficiency. A Low Center of Gravity (LCG) carrier offers a naturally lower deck height and better load angles by design. You can also consider a dual angle bed or a right approach bed, both engineered to significantly reduce the approach angle during loading. Pair any of these with a longer bed to further minimize drag points and make the loading process safer and smoother.

\n
\n
\n
\n
\n
\n
\"num-4-red-circle\"\n

Ignore Lighting and Visibility Upgrades

\n
\n

MISTAKE: Most standard builds only come with the minimum DOT lighting required to be road legal—and that’s it. But for real-world recovery and roadside work, especially at night or in low-visibility conditions, that’s not nearly enough. Relying on standard lights puts your operators—and your equipment—at unnecessary risk.

\n
\n
\"car-carriers-mistake-4\"
\n
\n
\"zips-tips-new\"
\n

Zip’s Tip: Don’t settle for the base package. Additional safety lighting like a Traffic Commander, LED strobes and side-facing scene lights dramatically improve roadside visibility and operator safety. When added during the build, these upgrades are cleaner, better integrated and often more cost-effective than aftermarket installs.

\n
\n
\n
\n
\"num-5-red-circle\"\n

Skipping Expert Guidance and After-Sale Support

\n
\n

MISTAKE: Buying a car carrier based solely on a spec sheet, online listing or price tag can lead to costly mismatches—like underpowered chassis, poor load distribution or missing safety upgrades. Worse yet, many buyers don’t consider what happens after the sale. Without strong after-sale support, you're on your own when something breaks or when your fleet needs to evolve.

\n
\n
\n
\"zips-tips-new\"
\n

Don’t go it alone. Work with a Zip’s sales rep expert who understands your region, operating style and long-term fleet goals. Our team doesn’t just sell you a truck—we support it for the life of your business. From custom spec consultations to dependable after-sale support and warranty service, we’re here to keep your fleet rolling.

\n
\n
\"car-carriers-mistake-5\"
\n
\n
\n","postBodyRss":"
\n
\n

You have a lot to consider when purchasing a new car carrier for your business. Bed length, truck capacity, bed material and equipment upgrades all weigh into the decision-making process.

\n

Whether it's your first purchase or you're looking to upgrade or expand your fleet, the equipment experts at Zip's have taken a moment here to review the Top 5 common mistakes customers overlook when buying a new rollback.

\n

Even seasoned owners and operators can forget simple considerations. Learn from their missteps and make the right decision for your operation based on your workload, customer base, geography and climate.

\n

Our experienced sales staff is here to help. If you have additional questions regarding a new rollback or want to learn more about the capacity rating of the one you already own, don't hesitate to reach out to us at 800-222-6047.

\n

Let's get started now on what to consider when buying a new car carrier.

\n
\n\n
\n
\n
\n
\"num-1-red-circle\"\n

Underestimating GVWR and Payload Capacity

\n
\n

MISTAKE: If your carrier is routinely maxed out, you're risking DOT compliance issues, excessive wear on your truck and reduced braking and handling performance. This often happens when operators only factor in the vehicle being hauled and overlook key contributors to total weight.

\n
\n
\"car-carriers-mistake-1\"
\n
\n

Common oversights include the weight of diesel fuel, DEF tanks, co-workers and passengers, toolboxes and rigging gear and the growing trend of heavier vehicles like EVs, AWD’s, SUVs and cargo vans. Towed loads, especially underlifted, can also transfer significant weight onto the rear axle, pushing it over its rating even when overall GVWR appears within limits. Over time, running at or near max capacity can shorten the lifespan of your truck and compromise safety.

\n
\"zips-tips-new\"
\n

Don’t spec your unit based solely on your average load—plan for your heaviest. Account for both payload on the bed and axle load from towed vehicles. A longer bed or strategic weight placement may help balance axle distribution. Talk with your Zip’s rep about chassis options, axle ratings and suspension upgrades if your hauls and tows run heavy day-to-day.

\n
\n
\n
\n
\n
\n
\"num-2-red-circle\"\n

Choosing the Wrong Bed Length & Material

\n
\n

MISTAKE: Choosing the wrong bed size or material can limit the carrier’s capability and performance. Shorter beds (e.g., 19') might come at a lower upfront cost, but they restrict your ability to haul longer vehicles and negatively affect load distribution. This can lead to improper winch angles (which may drag or damage vehicles), increased risk of bottoming out low-clearance vehicles and the inability to legally or safely load extended SUVs, trucks or specialty vehicles.

\n
\n
\"car-carriers-mistake-2\"
\n
\n

Deck material also matters. Steel offers durability but adds more weight, while aluminum is lighter and corrosion-resistant but can come at a higher cost. Choosing the wrong material for your climate or use case can lead to premature wear or unnecessary maintenance.

\n
\"zips-tips-new\"
\n

Think beyond today’s loads. Choose a longer bed, 21 feet or more, if you anticipate hauling extended vehicles or want more flexibility with load placement. For materials, go with aluminum for corrosion resistance and weight savings, or steel for added toughness. To extend the life of your carrier, consider upgrading to a galvanized sub-frame—especially if you operate in snowy or coastal environments where rust is a concern.

\n
\n
\n
\n
\n
\n
\"num-3-red-circle\"\n

Disregarding Tilt and Load Angle Requirements

\n
\n

MISTAKE: If you're towing low-clearance vehicles like EVs, sports cars, or custom builds, steep load angles can lead to serious front-end damage. This often results from overlooking how bed length, carrier height or tilt mechanisms impact loading geometry. Poor load angles can also make the loading process more difficult and hazardous in tight or uneven spaces.

\n
\n
\"car-carriers-mistake-3\"
\n
\n
\"zips-tips-new\"
\n

If you frequently haul low-clearance vehicles, you have several smart options to improve loading safety and efficiency. A Low Center of Gravity (LCG) carrier offers a naturally lower deck height and better load angles by design. You can also consider a dual angle bed or a right approach bed, both engineered to significantly reduce the approach angle during loading. Pair any of these with a longer bed to further minimize drag points and make the loading process safer and smoother.

\n
\n
\n
\n
\n
\n
\"num-4-red-circle\"\n

Ignore Lighting and Visibility Upgrades

\n
\n

MISTAKE: Most standard builds only come with the minimum DOT lighting required to be road legal—and that’s it. But for real-world recovery and roadside work, especially at night or in low-visibility conditions, that’s not nearly enough. Relying on standard lights puts your operators—and your equipment—at unnecessary risk.

\n
\n
\"car-carriers-mistake-4\"
\n
\n
\"zips-tips-new\"
\n

Zip’s Tip: Don’t settle for the base package. Additional safety lighting like a Traffic Commander, LED strobes and side-facing scene lights dramatically improve roadside visibility and operator safety. When added during the build, these upgrades are cleaner, better integrated and often more cost-effective than aftermarket installs.

\n
\n
\n
\n
\"num-5-red-circle\"\n

Skipping Expert Guidance and After-Sale Support

\n
\n

MISTAKE: Buying a car carrier based solely on a spec sheet, online listing or price tag can lead to costly mismatches—like underpowered chassis, poor load distribution or missing safety upgrades. Worse yet, many buyers don’t consider what happens after the sale. Without strong after-sale support, you're on your own when something breaks or when your fleet needs to evolve.

\n
\n
\n
\"zips-tips-new\"
\n

Don’t go it alone. Work with a Zip’s sales rep expert who understands your region, operating style and long-term fleet goals. Our team doesn’t just sell you a truck—we support it for the life of your business. From custom spec consultations to dependable after-sale support and warranty service, we’re here to keep your fleet rolling.

\n
\n
\"car-carriers-mistake-5\"
\n
\n
\n","postEmailContent":"
\n
\n

You have a lot to consider when purchasing a new car carrier for your business. Bed length, truck capacity, bed material and equipment upgrades all weigh into the decision-making process.

\n

Whether it's your first purchase or you're looking to upgrade or expand your fleet, the equipment experts at Zip's have taken a moment here to review the Top 5 common mistakes customers overlook when buying a new rollback.

\n

Even seasoned owners and operators can forget simple considerations. Learn from their missteps and make the right decision for your operation based on your workload, customer base, geography and climate.

\n

Our experienced sales staff is here to help. If you have additional questions regarding a new rollback or want to learn more about the capacity rating of the one you already own, don't hesitate to reach out to us at 800-222-6047.

\n

Let's get started now on what to consider when buying a new car carrier.

\n
","postFeaturedImageIfEnabled":"https://48463649.fs1.hubspotusercontent-na1.net/hubfs/48463649/top-5-mistakes-buying-car-carrier.png","postListContent":"
\n
\n

You have a lot to consider when purchasing a new car carrier for your business. Bed length, truck capacity, bed material and equipment upgrades all weigh into the decision-making process.

\n

Whether it's your first purchase or you're looking to upgrade or expand your fleet, the equipment experts at Zip's have taken a moment here to review the Top 5 common mistakes customers overlook when buying a new rollback.

\n

Even seasoned owners and operators can forget simple considerations. Learn from their missteps and make the right decision for your operation based on your workload, customer base, geography and climate.

\n

Our experienced sales staff is here to help. If you have additional questions regarding a new rollback or want to learn more about the capacity rating of the one you already own, don't hesitate to reach out to us at 800-222-6047.

\n

Let's get started now on what to consider when buying a new car carrier.

\n
","postListSummaryFeaturedImage":"https://48463649.fs1.hubspotusercontent-na1.net/hubfs/48463649/top-5-mistakes-buying-car-carrier.png","postRssContent":"
\n
\n

You have a lot to consider when purchasing a new car carrier for your business. Bed length, truck capacity, bed material and equipment upgrades all weigh into the decision-making process.

\n

Whether it's your first purchase or you're looking to upgrade or expand your fleet, the equipment experts at Zip's have taken a moment here to review the Top 5 common mistakes customers overlook when buying a new rollback.

\n

Even seasoned owners and operators can forget simple considerations. Learn from their missteps and make the right decision for your operation based on your workload, customer base, geography and climate.

\n

Our experienced sales staff is here to help. If you have additional questions regarding a new rollback or want to learn more about the capacity rating of the one you already own, don't hesitate to reach out to us at 800-222-6047.

\n

Let's get started now on what to consider when buying a new car carrier.

\n
","postRssSummaryFeaturedImage":"https://48463649.fs1.hubspotusercontent-na1.net/hubfs/48463649/top-5-mistakes-buying-car-carrier.png","postSummary":"
\n
\n

You have a lot to consider when purchasing a new car carrier for your business. Bed length, truck capacity, bed material and equipment upgrades all weigh into the decision-making process.

\n

Whether it's your first purchase or you're looking to upgrade or expand your fleet, the equipment experts at Zip's have taken a moment here to review the Top 5 common mistakes customers overlook when buying a new rollback.

\n

Even seasoned owners and operators can forget simple considerations. Learn from their missteps and make the right decision for your operation based on your workload, customer base, geography and climate.

\n

Our experienced sales staff is here to help. If you have additional questions regarding a new rollback or want to learn more about the capacity rating of the one you already own, don't hesitate to reach out to us at 800-222-6047.

\n

Let's get started now on what to consider when buying a new car carrier.

\n
\n","postSummaryRss":"
\n
\n

You have a lot to consider when purchasing a new car carrier for your business. Bed length, truck capacity, bed material and equipment upgrades all weigh into the decision-making process.

\n

Whether it's your first purchase or you're looking to upgrade or expand your fleet, the equipment experts at Zip's have taken a moment here to review the Top 5 common mistakes customers overlook when buying a new rollback.

\n

Even seasoned owners and operators can forget simple considerations. Learn from their missteps and make the right decision for your operation based on your workload, customer base, geography and climate.

\n

Our experienced sales staff is here to help. If you have additional questions regarding a new rollback or want to learn more about the capacity rating of the one you already own, don't hesitate to reach out to us at 800-222-6047.

\n

Let's get started now on what to consider when buying a new car carrier.

\n
","postTemplate":"zips-basic-theme/templates/blog-post.html","previewImageSrc":null,"previewKey":"PPruFPFc","previousPostFeaturedImage":"https://48463649.fs1.hubspotusercontent-na1.net/hubfs/48463649/firebox-west-lot-nov2025-01-800x300-landing-page.jpg","previousPostFeaturedImageAltText":"","previousPostName":"Compliance Is the Answer: Billing with Confidence When Using the Firebox","previousPostSlug":"blog/ev-firebox-billing-compliance-guide","processingStatus":"PUBLISHED","propertyForDynamicPageCanonicalUrl":null,"propertyForDynamicPageFeaturedImage":null,"propertyForDynamicPageMetaDescription":null,"propertyForDynamicPageSlug":null,"propertyForDynamicPageTitle":null,"publicAccessRules":[],"publicAccessRulesEnabled":false,"publishDate":1751029200000,"publishDateLocalTime":1751029200000,"publishDateLocalized":{"date":1751029200000,"format":"medium","language":null},"publishImmediately":true,"publishTimezoneOffset":null,"publishedAt":1755782399452,"publishedByEmail":null,"publishedById":79766377,"publishedByName":null,"publishedUrl":"/blog/top-5-mistakes-when-buying-a-new-car-carrier","resolvedDomain":"www.zips.com","resolvedLanguage":null,"rssBody":"
\n
\n

You have a lot to consider when purchasing a new car carrier for your business. Bed length, truck capacity, bed material and equipment upgrades all weigh into the decision-making process.

\n

Whether it's your first purchase or you're looking to upgrade or expand your fleet, the equipment experts at Zip's have taken a moment here to review the Top 5 common mistakes customers overlook when buying a new rollback.

\n

Even seasoned owners and operators can forget simple considerations. Learn from their missteps and make the right decision for your operation based on your workload, customer base, geography and climate.

\n

Our experienced sales staff is here to help. If you have additional questions regarding a new rollback or want to learn more about the capacity rating of the one you already own, don't hesitate to reach out to us at 800-222-6047.

\n

Let's get started now on what to consider when buying a new car carrier.

\n
\n\n
\n
\n
\n
\"num-1-red-circle\"\n

Underestimating GVWR and Payload Capacity

\n
\n

MISTAKE: If your carrier is routinely maxed out, you're risking DOT compliance issues, excessive wear on your truck and reduced braking and handling performance. This often happens when operators only factor in the vehicle being hauled and overlook key contributors to total weight.

\n
\n
\"car-carriers-mistake-1\"
\n
\n

Common oversights include the weight of diesel fuel, DEF tanks, co-workers and passengers, toolboxes and rigging gear and the growing trend of heavier vehicles like EVs, AWD’s, SUVs and cargo vans. Towed loads, especially underlifted, can also transfer significant weight onto the rear axle, pushing it over its rating even when overall GVWR appears within limits. Over time, running at or near max capacity can shorten the lifespan of your truck and compromise safety.

\n
\"zips-tips-new\"
\n

Don’t spec your unit based solely on your average load—plan for your heaviest. Account for both payload on the bed and axle load from towed vehicles. A longer bed or strategic weight placement may help balance axle distribution. Talk with your Zip’s rep about chassis options, axle ratings and suspension upgrades if your hauls and tows run heavy day-to-day.

\n
\n
\n
\n
\n
\n
\"num-2-red-circle\"\n

Choosing the Wrong Bed Length & Material

\n
\n

MISTAKE: Choosing the wrong bed size or material can limit the carrier’s capability and performance. Shorter beds (e.g., 19') might come at a lower upfront cost, but they restrict your ability to haul longer vehicles and negatively affect load distribution. This can lead to improper winch angles (which may drag or damage vehicles), increased risk of bottoming out low-clearance vehicles and the inability to legally or safely load extended SUVs, trucks or specialty vehicles.

\n
\n
\"car-carriers-mistake-2\"
\n
\n

Deck material also matters. Steel offers durability but adds more weight, while aluminum is lighter and corrosion-resistant but can come at a higher cost. Choosing the wrong material for your climate or use case can lead to premature wear or unnecessary maintenance.

\n
\"zips-tips-new\"
\n

Think beyond today’s loads. Choose a longer bed, 21 feet or more, if you anticipate hauling extended vehicles or want more flexibility with load placement. For materials, go with aluminum for corrosion resistance and weight savings, or steel for added toughness. To extend the life of your carrier, consider upgrading to a galvanized sub-frame—especially if you operate in snowy or coastal environments where rust is a concern.

\n
\n
\n
\n
\n
\n
\"num-3-red-circle\"\n

Disregarding Tilt and Load Angle Requirements

\n
\n

MISTAKE: If you're towing low-clearance vehicles like EVs, sports cars, or custom builds, steep load angles can lead to serious front-end damage. This often results from overlooking how bed length, carrier height or tilt mechanisms impact loading geometry. Poor load angles can also make the loading process more difficult and hazardous in tight or uneven spaces.

\n
\n
\"car-carriers-mistake-3\"
\n
\n
\"zips-tips-new\"
\n

If you frequently haul low-clearance vehicles, you have several smart options to improve loading safety and efficiency. A Low Center of Gravity (LCG) carrier offers a naturally lower deck height and better load angles by design. You can also consider a dual angle bed or a right approach bed, both engineered to significantly reduce the approach angle during loading. Pair any of these with a longer bed to further minimize drag points and make the loading process safer and smoother.

\n
\n
\n
\n
\n
\n
\"num-4-red-circle\"\n

Ignore Lighting and Visibility Upgrades

\n
\n

MISTAKE: Most standard builds only come with the minimum DOT lighting required to be road legal—and that’s it. But for real-world recovery and roadside work, especially at night or in low-visibility conditions, that’s not nearly enough. Relying on standard lights puts your operators—and your equipment—at unnecessary risk.

\n
\n
\"car-carriers-mistake-4\"
\n
\n
\"zips-tips-new\"
\n

Zip’s Tip: Don’t settle for the base package. Additional safety lighting like a Traffic Commander, LED strobes and side-facing scene lights dramatically improve roadside visibility and operator safety. When added during the build, these upgrades are cleaner, better integrated and often more cost-effective than aftermarket installs.

\n
\n
\n
\n
\"num-5-red-circle\"\n

Skipping Expert Guidance and After-Sale Support

\n
\n

MISTAKE: Buying a car carrier based solely on a spec sheet, online listing or price tag can lead to costly mismatches—like underpowered chassis, poor load distribution or missing safety upgrades. Worse yet, many buyers don’t consider what happens after the sale. Without strong after-sale support, you're on your own when something breaks or when your fleet needs to evolve.

\n
\n
\n
\"zips-tips-new\"
\n

Don’t go it alone. Work with a Zip’s sales rep expert who understands your region, operating style and long-term fleet goals. Our team doesn’t just sell you a truck—we support it for the life of your business. From custom spec consultations to dependable after-sale support and warranty service, we’re here to keep your fleet rolling.

\n
\n
\"car-carriers-mistake-5\"
\n
\n
\n","rssSummary":"
\n
\n

You have a lot to consider when purchasing a new car carrier for your business. Bed length, truck capacity, bed material and equipment upgrades all weigh into the decision-making process.

\n

Whether it's your first purchase or you're looking to upgrade or expand your fleet, the equipment experts at Zip's have taken a moment here to review the Top 5 common mistakes customers overlook when buying a new rollback.

\n

Even seasoned owners and operators can forget simple considerations. Learn from their missteps and make the right decision for your operation based on your workload, customer base, geography and climate.

\n

Our experienced sales staff is here to help. If you have additional questions regarding a new rollback or want to learn more about the capacity rating of the one you already own, don't hesitate to reach out to us at 800-222-6047.

\n

Let's get started now on what to consider when buying a new car carrier.

\n
\n","rssSummaryFeaturedImage":"https://48463649.fs1.hubspotusercontent-na1.net/hubfs/48463649/top-5-mistakes-buying-car-carrier.png","scheduledUpdateDate":0,"screenshotPreviewTakenAt":1770124799550,"screenshotPreviewUrl":"https://cdn1.hubspot.net/hubshotv3/prod/e/0/e529a08e-cca3-41f7-9cfb-7710afacf9e0.png","sections":{},"securityState":"NONE","siteId":null,"slug":"blog/top-5-mistakes-when-buying-a-new-car-carrier","stagedFrom":null,"state":"PUBLISHED","stateWhenDeleted":null,"structuredContentPageType":null,"structuredContentType":null,"styleOverrideId":null,"subcategory":"normal_blog_post","syncedWithBlogRoot":true,"tagIds":[192169769490,192174528148,194718191195,194719179289],"tagList":[{"categoryId":3,"cdnPurgeEmbargoTime":null,"contentIds":[],"cosObjectType":"TAG","created":1751598346713,"deletedAt":0,"description":"","id":192169769490,"label":"Towing & Recovery","language":null,"name":"Towing & Recovery","portalId":48463649,"slug":"towing-recovery","translatedFromId":null,"translations":{},"updated":1751598346713},{"categoryId":3,"cdnPurgeEmbargoTime":null,"contentIds":[],"cosObjectType":"TAG","created":1751601475164,"deletedAt":0,"description":"","id":192174528148,"label":"Automotive","language":null,"name":"Automotive","portalId":48463649,"slug":"automotive","translatedFromId":null,"translations":{},"updated":1751601475164},{"categoryId":3,"cdnPurgeEmbargoTime":null,"contentIds":[],"cosObjectType":"TAG","created":1755545324474,"deletedAt":0,"description":"","id":194718191195,"label":"Equipment Guides","language":null,"name":"Equipment Guides","portalId":48463649,"slug":"equipment-guides","translatedFromId":null,"translations":{},"updated":1755545324474},{"categoryId":3,"cdnPurgeEmbargoTime":null,"contentIds":[],"cosObjectType":"TAG","created":1755545213046,"deletedAt":0,"description":"","id":194719179289,"label":"Industry Knowledge & Updates","language":null,"name":"Industry Knowledge & Updates","portalId":48463649,"slug":"industry-knowledge-updates","translatedFromId":null,"translations":{},"updated":1755545213046}],"tagNames":["Towing & Recovery","Automotive","Equipment Guides","Industry Knowledge & Updates"],"teamPerms":[],"templatePath":"","templatePathForRender":"zips-basic-theme/templates/blog-post.html","textToAudioFileId":null,"textToAudioGenerationRequestId":null,"themePath":null,"themeSettingsValues":null,"title":"Top 5 Mistakes When Buying a New Car Carrier","tmsId":null,"topicIds":[192169769490,192174528148,194718191195,194719179289],"topicList":[{"categoryId":3,"cdnPurgeEmbargoTime":null,"contentIds":[],"cosObjectType":"TAG","created":1751598346713,"deletedAt":0,"description":"","id":192169769490,"label":"Towing & Recovery","language":null,"name":"Towing & Recovery","portalId":48463649,"slug":"towing-recovery","translatedFromId":null,"translations":{},"updated":1751598346713},{"categoryId":3,"cdnPurgeEmbargoTime":null,"contentIds":[],"cosObjectType":"TAG","created":1751601475164,"deletedAt":0,"description":"","id":192174528148,"label":"Automotive","language":null,"name":"Automotive","portalId":48463649,"slug":"automotive","translatedFromId":null,"translations":{},"updated":1751601475164},{"categoryId":3,"cdnPurgeEmbargoTime":null,"contentIds":[],"cosObjectType":"TAG","created":1755545324474,"deletedAt":0,"description":"","id":194718191195,"label":"Equipment Guides","language":null,"name":"Equipment Guides","portalId":48463649,"slug":"equipment-guides","translatedFromId":null,"translations":{},"updated":1755545324474},{"categoryId":3,"cdnPurgeEmbargoTime":null,"contentIds":[],"cosObjectType":"TAG","created":1755545213046,"deletedAt":0,"description":"","id":194719179289,"label":"Industry Knowledge & Updates","language":null,"name":"Industry Knowledge & Updates","portalId":48463649,"slug":"industry-knowledge-updates","translatedFromId":null,"translations":{},"updated":1755545213046}],"topicNames":["Towing & Recovery","Automotive","Equipment Guides","Industry Knowledge & Updates"],"topics":[192169769490,192174528148,194718191195,194719179289],"translatedContent":{},"translatedFromId":null,"translations":{},"tweet":null,"tweetAt":null,"tweetImmediately":false,"unpublishedAt":0,"updated":1755782399457,"updatedById":79766377,"upsizeFeaturedImage":false,"url":"/blog/top-5-mistakes-when-buying-a-new-car-carrier","useFeaturedImage":true,"userPerms":[],"views":null,"visibleToAll":null,"widgetContainers":{},"widgetcontainers":{},"widgets":{}},{"ab":false,"abStatus":null,"abTestId":null,"abVariation":false,"abVariationAutomated":false,"absoluteUrl":"/blog/zips-top-10-accessories-for-their-service-truck","afterPostBody":null,"aifeatures":null,"allowedSlugConflict":false,"analytics":null,"analyticsPageId":"192174575529","analyticsPageType":"blog-post","approvalStatus":null,"archived":false,"archivedAt":0,"archivedInDashboard":false,"areCommentsAllowed":true,"attachedStylesheets":[],"audienceAccess":"PUBLIC","author":null,"authorName":null,"authorUsername":null,"blogAuthor":{"avatar":"","bio":"","cdnPurgeEmbargoTime":null,"cosObjectType":"BLOG_AUTHOR","created":1755530565784,"deletedAt":0,"displayName":"Tyler Nestvedt","email":null,"facebook":"","fullName":"Tyler Nestvedt","gravatarUrl":null,"hasSocialProfiles":false,"id":194707404365,"label":"Tyler Nestvedt","language":"en","linkedin":"","name":"Tyler Nestvedt","portalId":48463649,"slug":"tyler-nestvedt","translatedFromId":null,"translations":{},"twitter":"","twitterUsername":"","updated":1755530565784,"userId":null,"username":null,"website":""},"blogAuthorId":194707404365,"blogAuthorIdList":[194707404365],"blogAuthorList":[{"avatar":"","bio":"","cdnPurgeEmbargoTime":null,"cosObjectType":"BLOG_AUTHOR","created":1755530565784,"deletedAt":0,"displayName":"Tyler Nestvedt","email":null,"facebook":"","fullName":"Tyler Nestvedt","gravatarUrl":null,"hasSocialProfiles":false,"id":194707404365,"label":"Tyler Nestvedt","language":"en","linkedin":"","name":"Tyler Nestvedt","portalId":48463649,"slug":"tyler-nestvedt","translatedFromId":null,"translations":{},"twitter":"","twitterUsername":"","updated":1755530565784,"userId":null,"username":null,"website":""}],"blogPostAuthor":{"avatar":"","bio":"","cdnPurgeEmbargoTime":null,"cosObjectType":"BLOG_AUTHOR","created":1755530565784,"deletedAt":0,"displayName":"Tyler Nestvedt","email":null,"facebook":"","fullName":"Tyler Nestvedt","gravatarUrl":null,"hasSocialProfiles":false,"id":194707404365,"label":"Tyler Nestvedt","language":"en","linkedin":"","name":"Tyler Nestvedt","portalId":48463649,"slug":"tyler-nestvedt","translatedFromId":null,"translations":{},"twitter":"","twitterUsername":"","updated":1755530565784,"userId":null,"username":null,"website":""},"blogPostScheduleTaskUid":null,"blogPublishInstantEmailCampaignId":null,"blogPublishInstantEmailRetryCount":null,"blogPublishInstantEmailTaskUid":null,"blogPublishToSocialMediaTask":"DONE_NOT_SENT","blueprintTypeId":0,"businessUnitId":null,"campaign":null,"campaignName":null,"campaignUtm":null,"category":3,"categoryId":3,"cdnPurgeEmbargoTime":null,"checkPostLevelAudienceAccessFirst":true,"clonedFrom":null,"composeBody":null,"compositionId":0,"contentAccessRuleIds":[],"contentAccessRuleTypes":[],"contentGroup":190096341139,"contentGroupId":190096341139,"contentTypeCategory":3,"contentTypeCategoryId":3,"contentTypeId":null,"created":1751603099654,"createdByAgent":null,"createdById":74657203,"createdTime":1751603099654,"crmObjectId":null,"css":{},"cssText":"","ctaClicks":null,"ctaViews":null,"currentState":"PUBLISHED","currentlyPublished":true,"deletedAt":0,"deletedBy":null,"deletedByEmail":null,"deletedById":null,"domain":"","dynamicPageDataSourceId":null,"dynamicPageDataSourceType":null,"dynamicPageHubDbTableId":null,"enableDomainStylesheets":null,"enableGoogleAmpOutputOverride":false,"enableLayoutStylesheets":null,"errors":[],"featuredImage":"https://48463649.fs1.hubspotusercontent-na1.net/hubfs/48463649/header-2.png","featuredImageAltText":"","featuredImageHeight":783,"featuredImageLength":0,"featuredImageWidth":1789,"flexAreas":{},"folderId":null,"footerHtml":null,"footerTemplatePath":null,"footerVariantName":null,"freezeDate":1747054800000,"generateJsonLdEnabledOverride":true,"globalBlockOverrides":{},"hasContentAccessRules":false,"hasUserChanges":true,"headHtml":null,"header":null,"headerTemplatePath":null,"headerVariantName":null,"htmlTitle":"Zip's Top 10 Accessories for Your Service Truck","id":192174575529,"includeDefaultCustomCss":null,"isCaptchaRequired":true,"isCrawlableByBots":false,"isDraft":false,"isInstantEmailEnabled":false,"isPublished":true,"isSocialPublishingEnabled":false,"keywords":[],"label":"Zip's Top 10 Accessories for Your Service Truck","language":"en","lastEditSessionId":null,"lastEditUpdateId":null,"layoutSections":{},"legacyBlogTabid":null,"legacyId":null,"legacyPostGuid":null,"linkRelCanonicalUrl":"","listTemplate":"","liveDomain":"www.zips.com","mab":false,"mabExperimentId":null,"mabMaster":false,"mabVariant":false,"marketingCampaignGuids":[],"meta":{"html_title":"Zip's Top 10 Accessories for Your Service Truck","public_access_rules":[],"public_access_rules_enabled":false,"use_featured_image":true,"tag_ids":[192169769490,192169769491,192174528148,192174529697,192174572389,194718191114,194719586666],"topic_ids":[192169769490,192169769491,192174528148,192174529697,192174572389,194718191114,194719586666],"post_summary":"
\n
\n

Providing top-tier roadside service begins with having the right tools for the job. With so many products on the market, selecting the most effective accessories can be a challenge. To simplify your decision-making, Zip’s AW Direct has curated a list of 10 essential, roadside-qualified products to support your operations below.

\n
\n
\n
\n

\"num1\"

\n

Access Tools Contractor’s Lockout Kit
Item #: ACTACS

\n
\n
\n
\"num1-img1\" \"num1-img2\"
\n
\n

Don’t get locked out of profits. The Access Tools Contractor’s Lockout Kit includes 10 specialized tools designed for efficient entry. Each long-reach tool features a scratch-resistant coating to protect vehicle surfaces during use. Once the job is complete, all tools conveniently store in the included heavy-duty soft case, ensuring both organization and protection.

\n

A full list of the kit’s contents is provided below.

\n
    \n
  • Standard One-Hand Door Jack Tool
  • \n
  • Air Wedge
  • \n
  • Wedgee Wedge w/ Strip Savers
  • \n
  • Quick Max
  • \n
  • Flex Max
  • \n
  • Button Master Tool
  • \n
  • Glassman Tool
  • \n
  • Slim Jim
  • \n
  • Wonder Shield
  • \n
  • Button Strip Tool
  • \n
  • Heavy-Duty Soft Carrying Case
  • \n
\nBUY IT!
\n
\n
\n\"line-break\" \n
\n
\n

\"num2\"

\n

Lokithor J402 PRO 3500A Jump Start Kit
Item #: J402 PRO

\n
\n
\n
\n
\"num2-img1\"
\n
\"num2-img2\"
\n
\n

Delivering 3,500 peak amps—an increase of 500 over the original J402—the Lokithor J402 PRO 3500A Jump Start Kit is an essential addition to any service truck. When fully charged, it can start up to 60 engines before requiring a recharge, and it retains its charge for up to 30 months when not in use. The integrated BMS (Battery Management System) safeguards against overheating, short circuits, overcurrent, reverse polarity and more. For added convenience, the unit includes a built-in flashlight with three modes, making low-light connections easier and safer.

\n

IP65-rated | Dimensions: 9.46\"L x 4.19\"W x 2.36\"H | Weight: 3.86 lbs.

\n
\n
\n\"line-break\"\n
\n
\n

\"num3\"

\n

SpillTech 5-Gallon Spill Kit
Item #: ST-SPK-5

\n
\n
\n
\n
\"num8-img1\"
\n
\n
\n
\n
\n
\n
\n

Respond to spills efficiently with the SpillTech 5-Gallon Spill Kit, available in three specialized types: HazMat, Universal and Oil-Only. The HazMat kit is ideal for hazardous or unidentified substances, while the Universal option handles water, coolants and a range of non-aggressive fluids. The Oil-Only kit is formulated to absorb oil, fuel and other petroleum-based liquids. All essential components are contained within a compact, portable five-gallon bucket, which also serves as a disposal container for used absorbents once the spill is under control.

\n

White five-gallon overpack bucket | Durable, lightweight and weather and chemical resistant | Screw-on lid with integrated lever lock

\n
\n
\n\"line-break\"\n
\n
\n

\"num4\"

\n

Eagle Flight 12 Volt Portable Air Compressor
Item #: AC12TC

\n
\n
\n
\n
\"num3-img1-2\"
\n
\"num3-img2-2\"
\n
\n

Quickly and efficiently inflate tires with the Eagle Flight 12-Volt Portable Air Compressor. Capable of delivering up to 120 PSI in just 90 seconds, this unit helps your team or customers get back on the road with minimal downtime. Weighing only 35 pounds, it is easy to handle and transport during service calls. For added safety and convenience, the compressor features an automatic shutoff to prevent overfilling once the desired pressure is reached.

\n

Dimensions: 20\" x 18\" x 8\" | Equipped with a three-gallon tank | Maximum load is 45 amps

\n
\n
\n\"line-break\"\n
\n
\n

\"num3\"

\n

Reelcraft DP5000 Series Air/Water Dual Pedestal Hose Reel
Item #: DP5000 SERIES

\n
\n
\n
\n
\"num5-img1\"
\n
\n
\n
\n
\n
\n
\n

Designed for direct truck mounting, the Reelcraft DP5000 Series Air/Water Dual Pedestal Hose Reel provides a reliable solution for delivering air or water to vehicles in need. Its dual pedestal structure and durable steel construction minimize vibration and maintain stability during transit. With seven versatile mounting options, it offers flexible installation without occupying excessive space. Once on site, the hose extends up to 50 feet and delivers up to 300 PSI of pressure.

\n

Powder-coat finish | Buna seals | Steel internal fluid path

\n
\n
\n\"line-break\"\n
\n
\n

\"num3\"

\n

GoJak RakJak 2-Ton Air Jack
Item #: GJ-AIR-JAK

\n
\n
\n
\n
\"num4-img1\"
\n
\n
\n
\n
\n
\n
\n

Efficient and user-friendly, the GoJak RakJak 2-Ton Air Jack is an ideal solution for roadside vehicle lifting. Available in two models, the double bag design extends up to 13.75 inches, while the triple bag version extends up to 18 inches. Internal telescoping steel rods provide structural support to maintain a two-ton lifting capacity. For added safety, the unit includes a pressure-release valve to prevent over-inflation.

\n

Diameter: 10\" | Air Pressure: 105 PSI | Extended handle sold separately

\n
\n
\n\"line-break\"\n
\n
\n

\"num2\"

\n

PSS FirstGard 28\" Foldable Safety Cone
Item #: PSS-FG28

\n
\n
\n
\n
\"num7-img1\"
\n
\"num7-img2\"
\n
\n
\n
\n

Ensure maximum visibility on the job with the PSS FirstGard 28\" Foldable Safety Cone. Engineered for both portability and stability, the cone stands 28” tall with a 29\" x 29\" base. When collapsed, it folds down to just 1.5 inches, allowing for easy storage and transport. Rubber feet on each leg help keep the cone securely in place, even on uneven surfaces. Available in high-visibility fluorescent green or safety orange, it enhances safety by ensuring you're clearly seen at the scene.

\n

Molded-in handles | Reflective engineering-grade sheeting | High-density polyethylene

\n
\n
\n
\n
\n
\n
\n
\n
\n
\n\"line-break\"\n
\n
\n

\"num2\"

\n

Safety Seal Over the Road and Heavy Equipment Tire Repair Kit
Item #: SSKHE

\n
\n
\n
\n
\"num6-img1\"
\n
\"num6-img2\"
\n
\n

Minimize downtime with the Over the Road and Heavy Equipment Tire Repair Kit from Safety Seal, designed to handle punctures in even the thickest treads. This comprehensive kit includes 18 vulcanized 16-inch repair seals, providing a temporary fix that allows vehicles to reach a service facility safely. It also features an insertion tool, a seven-inch spiral probe and lubricant—everything needed for fast, effective roadside tire repairs.

\n

Dimensions (molded plastic case): 12\" x 8\" x 2.5\" | Weight: 3.6 lbs. | Made in the USA

\n
\n
\n\"line-break\"\n
\n
\n

\"num2\"

\n

Tork Advanced ShopMax Centerfeed Shop Towels
Item #: 13-24-40

\n
\n
\n
\n
\"num9-img1\"
\n
\"num9-img2\"
\n
\n

For fast, effective clean-up on the job, Tork Advanced ShopMax Centerfeed Shop Towels offer a reliable solution. These highly absorbent towels are designed to handle oil, grease, lubricants and dirt, yet remain soft enough for use on hands and face. Their strong, durable construction allows them to perform even when wet. Packaged in a convenient self-dispensing box containing 200 wipes, they deliver both performance and value.

\n

Sheet length: 13\" | Single ply | Roll width: 9\"

\n
\n
\n\"line-break\"\n
\n
\n

\"num2\"

\n

SureCan 5 Gallon Yellow Diesel Can
Item #: SC5D

\n
\n
\n
\n
\"num10-img1\"
\n
\"num10-img2\"
\n
\n
\n
\n

Efficiently deliver diesel with the SureCan 5-Gallon Yellow Diesel Can, constructed from durable high-density polyethylene for long-lasting use. Featuring an ergonomically designed grip, the can ensures a comfortable and secure hold. For controlled pouring, it includes an intuitive release and lock flow trigger, operated with your thumb. The self-ventilating design promotes smooth and steady flow, while the flexible hose rotates 180° to provide maximum convenience during use.

\n

Durable 6-layer design | Tethered nozzle cap | OSHA-certified

\n
\n
\n
\n
\n
\n
\n
\n
\n
\n\"line-break\"\n

Understanding the essential tools for any job is crucial to success. We hope this list has provided valuable insights to help you expand your toolkit and tackle a wide range of tasks. At Zip's AW Direct, we offer a wide selection of durable, high-quality accessories designed to enhance your service capabilities. Visit zips.com to explore the items featured in this list, as well as many other useful product

\n
","post_body":"
\n
\n

Providing top-tier roadside service begins with having the right tools for the job. With so many products on the market, selecting the most effective accessories can be a challenge. To simplify your decision-making, Zip’s AW Direct has curated a list of 10 essential, roadside-qualified products to support your operations below.

\n
\n
\n
\n

\"num1\"

\n

Access Tools Contractor’s Lockout Kit
Item #: ACTACS

\n
\n
\n
\"num1-img1\" \"num1-img2\"
\n
\n

Don’t get locked out of profits. The Access Tools Contractor’s Lockout Kit includes 10 specialized tools designed for efficient entry. Each long-reach tool features a scratch-resistant coating to protect vehicle surfaces during use. Once the job is complete, all tools conveniently store in the included heavy-duty soft case, ensuring both organization and protection.

\n

A full list of the kit’s contents is provided below.

\n
    \n
  • Standard One-Hand Door Jack Tool
  • \n
  • Air Wedge
  • \n
  • Wedgee Wedge w/ Strip Savers
  • \n
  • Quick Max
  • \n
  • Flex Max
  • \n
  • Button Master Tool
  • \n
  • Glassman Tool
  • \n
  • Slim Jim
  • \n
  • Wonder Shield
  • \n
  • Button Strip Tool
  • \n
  • Heavy-Duty Soft Carrying Case
  • \n
\nBUY IT!
\n
\n
\n\"line-break\" \n
\n
\n

\"num2\"

\n

Lokithor J402 PRO 3500A Jump Start Kit
Item #: J402 PRO

\n
\n
\n
\n
\"num2-img1\"
\n
\"num2-img2\"
\n
\n

Delivering 3,500 peak amps—an increase of 500 over the original J402—the Lokithor J402 PRO 3500A Jump Start Kit is an essential addition to any service truck. When fully charged, it can start up to 60 engines before requiring a recharge, and it retains its charge for up to 30 months when not in use. The integrated BMS (Battery Management System) safeguards against overheating, short circuits, overcurrent, reverse polarity and more. For added convenience, the unit includes a built-in flashlight with three modes, making low-light connections easier and safer.

\n

IP65-rated | Dimensions: 9.46\"L x 4.19\"W x 2.36\"H | Weight: 3.86 lbs.

\n
\n
\n\"line-break\"\n
\n
\n

\"num3\"

\n

SpillTech 5-Gallon Spill Kit
Item #: ST-SPK-5

\n
\n
\n
\n
\"num8-img1\"
\n
\n
\n
\n
\n
\n
\n

Respond to spills efficiently with the SpillTech 5-Gallon Spill Kit, available in three specialized types: HazMat, Universal and Oil-Only. The HazMat kit is ideal for hazardous or unidentified substances, while the Universal option handles water, coolants and a range of non-aggressive fluids. The Oil-Only kit is formulated to absorb oil, fuel and other petroleum-based liquids. All essential components are contained within a compact, portable five-gallon bucket, which also serves as a disposal container for used absorbents once the spill is under control.

\n

White five-gallon overpack bucket | Durable, lightweight and weather and chemical resistant | Screw-on lid with integrated lever lock

\n
\n
\n\"line-break\"\n
\n
\n

\"num4\"

\n

Eagle Flight 12 Volt Portable Air Compressor
Item #: AC12TC

\n
\n
\n
\n
\"num3-img1-2\"
\n
\"num3-img2-2\"
\n
\n

Quickly and efficiently inflate tires with the Eagle Flight 12-Volt Portable Air Compressor. Capable of delivering up to 120 PSI in just 90 seconds, this unit helps your team or customers get back on the road with minimal downtime. Weighing only 35 pounds, it is easy to handle and transport during service calls. For added safety and convenience, the compressor features an automatic shutoff to prevent overfilling once the desired pressure is reached.

\n

Dimensions: 20\" x 18\" x 8\" | Equipped with a three-gallon tank | Maximum load is 45 amps

\n
\n
\n\"line-break\"\n
\n
\n

\"num3\"

\n

Reelcraft DP5000 Series Air/Water Dual Pedestal Hose Reel
Item #: DP5000 SERIES

\n
\n
\n
\n
\"num5-img1\"
\n
\n
\n
\n
\n
\n
\n

Designed for direct truck mounting, the Reelcraft DP5000 Series Air/Water Dual Pedestal Hose Reel provides a reliable solution for delivering air or water to vehicles in need. Its dual pedestal structure and durable steel construction minimize vibration and maintain stability during transit. With seven versatile mounting options, it offers flexible installation without occupying excessive space. Once on site, the hose extends up to 50 feet and delivers up to 300 PSI of pressure.

\n

Powder-coat finish | Buna seals | Steel internal fluid path

\n
\n
\n\"line-break\"\n
\n
\n

\"num3\"

\n

GoJak RakJak 2-Ton Air Jack
Item #: GJ-AIR-JAK

\n
\n
\n
\n
\"num4-img1\"
\n
\n
\n
\n
\n
\n
\n

Efficient and user-friendly, the GoJak RakJak 2-Ton Air Jack is an ideal solution for roadside vehicle lifting. Available in two models, the double bag design extends up to 13.75 inches, while the triple bag version extends up to 18 inches. Internal telescoping steel rods provide structural support to maintain a two-ton lifting capacity. For added safety, the unit includes a pressure-release valve to prevent over-inflation.

\n

Diameter: 10\" | Air Pressure: 105 PSI | Extended handle sold separately

\n
\n
\n\"line-break\"\n
\n
\n

\"num2\"

\n

PSS FirstGard 28\" Foldable Safety Cone
Item #: PSS-FG28

\n
\n
\n
\n
\"num7-img1\"
\n
\"num7-img2\"
\n
\n
\n
\n

Ensure maximum visibility on the job with the PSS FirstGard 28\" Foldable Safety Cone. Engineered for both portability and stability, the cone stands 28” tall with a 29\" x 29\" base. When collapsed, it folds down to just 1.5 inches, allowing for easy storage and transport. Rubber feet on each leg help keep the cone securely in place, even on uneven surfaces. Available in high-visibility fluorescent green or safety orange, it enhances safety by ensuring you're clearly seen at the scene.

\n

Molded-in handles | Reflective engineering-grade sheeting | High-density polyethylene

\n
\n
\n
\n
\n
\n
\n
\n
\n
\n\"line-break\"\n
\n
\n

\"num2\"

\n

Safety Seal Over the Road and Heavy Equipment Tire Repair Kit
Item #: SSKHE

\n
\n
\n
\n
\"num6-img1\"
\n
\"num6-img2\"
\n
\n

Minimize downtime with the Over the Road and Heavy Equipment Tire Repair Kit from Safety Seal, designed to handle punctures in even the thickest treads. This comprehensive kit includes 18 vulcanized 16-inch repair seals, providing a temporary fix that allows vehicles to reach a service facility safely. It also features an insertion tool, a seven-inch spiral probe and lubricant—everything needed for fast, effective roadside tire repairs.

\n

Dimensions (molded plastic case): 12\" x 8\" x 2.5\" | Weight: 3.6 lbs. | Made in the USA

\n
\n
\n\"line-break\"\n
\n
\n

\"num2\"

\n

Tork Advanced ShopMax Centerfeed Shop Towels
Item #: 13-24-40

\n
\n
\n
\n
\"num9-img1\"
\n
\"num9-img2\"
\n
\n

For fast, effective clean-up on the job, Tork Advanced ShopMax Centerfeed Shop Towels offer a reliable solution. These highly absorbent towels are designed to handle oil, grease, lubricants and dirt, yet remain soft enough for use on hands and face. Their strong, durable construction allows them to perform even when wet. Packaged in a convenient self-dispensing box containing 200 wipes, they deliver both performance and value.

\n

Sheet length: 13\" | Single ply | Roll width: 9\"

\n
\n
\n\"line-break\"\n
\n
\n

\"num2\"

\n

SureCan 5 Gallon Yellow Diesel Can
Item #: SC5D

\n
\n
\n
\n
\"num10-img1\"
\n
\"num10-img2\"
\n
\n
\n
\n

Efficiently deliver diesel with the SureCan 5-Gallon Yellow Diesel Can, constructed from durable high-density polyethylene for long-lasting use. Featuring an ergonomically designed grip, the can ensures a comfortable and secure hold. For controlled pouring, it includes an intuitive release and lock flow trigger, operated with your thumb. The self-ventilating design promotes smooth and steady flow, while the flexible hose rotates 180° to provide maximum convenience during use.

\n

Durable 6-layer design | Tethered nozzle cap | OSHA-certified

\n
\n
\n
\n
\n
\n
\n
\n
\n
\n\"line-break\"\n

Understanding the essential tools for any job is crucial to success. We hope this list has provided valuable insights to help you expand your toolkit and tackle a wide range of tasks. At Zip's AW Direct, we offer a wide selection of durable, high-quality accessories designed to enhance your service capabilities. Visit zips.com to explore the items featured in this list, as well as many other useful product

\n
","rss_summary":"
\n
\n

Providing top-tier roadside service begins with having the right tools for the job. With so many products on the market, selecting the most effective accessories can be a challenge. To simplify your decision-making, Zip’s AW Direct has curated a list of 10 essential, roadside-qualified products to support your operations below.

\n
\n
\n
\n

\"num1\"

\n

Access Tools Contractor’s Lockout Kit
Item #: ACTACS

\n
\n
\n
\"num1-img1\" \"num1-img2\"
\n
\n

Don’t get locked out of profits. The Access Tools Contractor’s Lockout Kit includes 10 specialized tools designed for efficient entry. Each long-reach tool features a scratch-resistant coating to protect vehicle surfaces during use. Once the job is complete, all tools conveniently store in the included heavy-duty soft case, ensuring both organization and protection.

\n

A full list of the kit’s contents is provided below.

\n
    \n
  • Standard One-Hand Door Jack Tool
  • \n
  • Air Wedge
  • \n
  • Wedgee Wedge w/ Strip Savers
  • \n
  • Quick Max
  • \n
  • Flex Max
  • \n
  • Button Master Tool
  • \n
  • Glassman Tool
  • \n
  • Slim Jim
  • \n
  • Wonder Shield
  • \n
  • Button Strip Tool
  • \n
  • Heavy-Duty Soft Carrying Case
  • \n
\nBUY IT!
\n
\n
\n\"line-break\" \n
\n
\n

\"num2\"

\n

Lokithor J402 PRO 3500A Jump Start Kit
Item #: J402 PRO

\n
\n
\n
\n
\"num2-img1\"
\n
\"num2-img2\"
\n
\n

Delivering 3,500 peak amps—an increase of 500 over the original J402—the Lokithor J402 PRO 3500A Jump Start Kit is an essential addition to any service truck. When fully charged, it can start up to 60 engines before requiring a recharge, and it retains its charge for up to 30 months when not in use. The integrated BMS (Battery Management System) safeguards against overheating, short circuits, overcurrent, reverse polarity and more. For added convenience, the unit includes a built-in flashlight with three modes, making low-light connections easier and safer.

\n

IP65-rated | Dimensions: 9.46\"L x 4.19\"W x 2.36\"H | Weight: 3.86 lbs.

\n
\n
\n\"line-break\"\n
\n
\n

\"num3\"

\n

SpillTech 5-Gallon Spill Kit
Item #: ST-SPK-5

\n
\n
\n
\n
\"num8-img1\"
\n
\n
\n
\n
\n
\n
\n

Respond to spills efficiently with the SpillTech 5-Gallon Spill Kit, available in three specialized types: HazMat, Universal and Oil-Only. The HazMat kit is ideal for hazardous or unidentified substances, while the Universal option handles water, coolants and a range of non-aggressive fluids. The Oil-Only kit is formulated to absorb oil, fuel and other petroleum-based liquids. All essential components are contained within a compact, portable five-gallon bucket, which also serves as a disposal container for used absorbents once the spill is under control.

\n

White five-gallon overpack bucket | Durable, lightweight and weather and chemical resistant | Screw-on lid with integrated lever lock

\n
\n
\n\"line-break\"\n
\n
\n

\"num4\"

\n

Eagle Flight 12 Volt Portable Air Compressor
Item #: AC12TC

\n
\n
\n
\n
\"num3-img1-2\"
\n
\"num3-img2-2\"
\n
\n

Quickly and efficiently inflate tires with the Eagle Flight 12-Volt Portable Air Compressor. Capable of delivering up to 120 PSI in just 90 seconds, this unit helps your team or customers get back on the road with minimal downtime. Weighing only 35 pounds, it is easy to handle and transport during service calls. For added safety and convenience, the compressor features an automatic shutoff to prevent overfilling once the desired pressure is reached.

\n

Dimensions: 20\" x 18\" x 8\" | Equipped with a three-gallon tank | Maximum load is 45 amps

\n
\n
\n\"line-break\"\n
\n
\n

\"num3\"

\n

Reelcraft DP5000 Series Air/Water Dual Pedestal Hose Reel
Item #: DP5000 SERIES

\n
\n
\n
\n
\"num5-img1\"
\n
\n
\n
\n
\n
\n
\n

Designed for direct truck mounting, the Reelcraft DP5000 Series Air/Water Dual Pedestal Hose Reel provides a reliable solution for delivering air or water to vehicles in need. Its dual pedestal structure and durable steel construction minimize vibration and maintain stability during transit. With seven versatile mounting options, it offers flexible installation without occupying excessive space. Once on site, the hose extends up to 50 feet and delivers up to 300 PSI of pressure.

\n

Powder-coat finish | Buna seals | Steel internal fluid path

\n
\n
\n\"line-break\"\n
\n
\n

\"num3\"

\n

GoJak RakJak 2-Ton Air Jack
Item #: GJ-AIR-JAK

\n
\n
\n
\n
\"num4-img1\"
\n
\n
\n
\n
\n
\n
\n

Efficient and user-friendly, the GoJak RakJak 2-Ton Air Jack is an ideal solution for roadside vehicle lifting. Available in two models, the double bag design extends up to 13.75 inches, while the triple bag version extends up to 18 inches. Internal telescoping steel rods provide structural support to maintain a two-ton lifting capacity. For added safety, the unit includes a pressure-release valve to prevent over-inflation.

\n

Diameter: 10\" | Air Pressure: 105 PSI | Extended handle sold separately

\n
\n
\n\"line-break\"\n
\n
\n

\"num2\"

\n

PSS FirstGard 28\" Foldable Safety Cone
Item #: PSS-FG28

\n
\n
\n
\n
\"num7-img1\"
\n
\"num7-img2\"
\n
\n
\n
\n

Ensure maximum visibility on the job with the PSS FirstGard 28\" Foldable Safety Cone. Engineered for both portability and stability, the cone stands 28” tall with a 29\" x 29\" base. When collapsed, it folds down to just 1.5 inches, allowing for easy storage and transport. Rubber feet on each leg help keep the cone securely in place, even on uneven surfaces. Available in high-visibility fluorescent green or safety orange, it enhances safety by ensuring you're clearly seen at the scene.

\n

Molded-in handles | Reflective engineering-grade sheeting | High-density polyethylene

\n
\n
\n
\n
\n
\n
\n
\n
\n
\n\"line-break\"\n
\n
\n

\"num2\"

\n

Safety Seal Over the Road and Heavy Equipment Tire Repair Kit
Item #: SSKHE

\n
\n
\n
\n
\"num6-img1\"
\n
\"num6-img2\"
\n
\n

Minimize downtime with the Over the Road and Heavy Equipment Tire Repair Kit from Safety Seal, designed to handle punctures in even the thickest treads. This comprehensive kit includes 18 vulcanized 16-inch repair seals, providing a temporary fix that allows vehicles to reach a service facility safely. It also features an insertion tool, a seven-inch spiral probe and lubricant—everything needed for fast, effective roadside tire repairs.

\n

Dimensions (molded plastic case): 12\" x 8\" x 2.5\" | Weight: 3.6 lbs. | Made in the USA

\n
\n
\n\"line-break\"\n
\n
\n

\"num2\"

\n

Tork Advanced ShopMax Centerfeed Shop Towels
Item #: 13-24-40

\n
\n
\n
\n
\"num9-img1\"
\n
\"num9-img2\"
\n
\n

For fast, effective clean-up on the job, Tork Advanced ShopMax Centerfeed Shop Towels offer a reliable solution. These highly absorbent towels are designed to handle oil, grease, lubricants and dirt, yet remain soft enough for use on hands and face. Their strong, durable construction allows them to perform even when wet. Packaged in a convenient self-dispensing box containing 200 wipes, they deliver both performance and value.

\n

Sheet length: 13\" | Single ply | Roll width: 9\"

\n
\n
\n\"line-break\"\n
\n
\n

\"num2\"

\n

SureCan 5 Gallon Yellow Diesel Can
Item #: SC5D

\n
\n
\n
\n
\"num10-img1\"
\n
\"num10-img2\"
\n
\n
\n
\n

Efficiently deliver diesel with the SureCan 5-Gallon Yellow Diesel Can, constructed from durable high-density polyethylene for long-lasting use. Featuring an ergonomically designed grip, the can ensures a comfortable and secure hold. For controlled pouring, it includes an intuitive release and lock flow trigger, operated with your thumb. The self-ventilating design promotes smooth and steady flow, while the flexible hose rotates 180° to provide maximum convenience during use.

\n

Durable 6-layer design | Tethered nozzle cap | OSHA-certified

\n
\n
\n
\n
\n
\n
\n
\n
\n
\n\"line-break\"\n

Understanding the essential tools for any job is crucial to success. We hope this list has provided valuable insights to help you expand your toolkit and tackle a wide range of tasks. At Zip's AW Direct, we offer a wide selection of durable, high-quality accessories designed to enhance your service capabilities. Visit zips.com to explore the items featured in this list, as well as many other useful product

\n
","rss_body":"
\n
\n

Providing top-tier roadside service begins with having the right tools for the job. With so many products on the market, selecting the most effective accessories can be a challenge. To simplify your decision-making, Zip’s AW Direct has curated a list of 10 essential, roadside-qualified products to support your operations below.

\n
\n
\n
\n

\"num1\"

\n

Access Tools Contractor’s Lockout Kit
Item #: ACTACS

\n
\n
\n
\"num1-img1\" \"num1-img2\"
\n
\n

Don’t get locked out of profits. The Access Tools Contractor’s Lockout Kit includes 10 specialized tools designed for efficient entry. Each long-reach tool features a scratch-resistant coating to protect vehicle surfaces during use. Once the job is complete, all tools conveniently store in the included heavy-duty soft case, ensuring both organization and protection.

\n

A full list of the kit’s contents is provided below.

\n
    \n
  • Standard One-Hand Door Jack Tool
  • \n
  • Air Wedge
  • \n
  • Wedgee Wedge w/ Strip Savers
  • \n
  • Quick Max
  • \n
  • Flex Max
  • \n
  • Button Master Tool
  • \n
  • Glassman Tool
  • \n
  • Slim Jim
  • \n
  • Wonder Shield
  • \n
  • Button Strip Tool
  • \n
  • Heavy-Duty Soft Carrying Case
  • \n
\nBUY IT!
\n
\n
\n\"line-break\" \n
\n
\n

\"num2\"

\n

Lokithor J402 PRO 3500A Jump Start Kit
Item #: J402 PRO

\n
\n
\n
\n
\"num2-img1\"
\n
\"num2-img2\"
\n
\n

Delivering 3,500 peak amps—an increase of 500 over the original J402—the Lokithor J402 PRO 3500A Jump Start Kit is an essential addition to any service truck. When fully charged, it can start up to 60 engines before requiring a recharge, and it retains its charge for up to 30 months when not in use. The integrated BMS (Battery Management System) safeguards against overheating, short circuits, overcurrent, reverse polarity and more. For added convenience, the unit includes a built-in flashlight with three modes, making low-light connections easier and safer.

\n

IP65-rated | Dimensions: 9.46\"L x 4.19\"W x 2.36\"H | Weight: 3.86 lbs.

\n
\n
\n\"line-break\"\n
\n
\n

\"num3\"

\n

SpillTech 5-Gallon Spill Kit
Item #: ST-SPK-5

\n
\n
\n
\n
\"num8-img1\"
\n
\n
\n
\n
\n
\n
\n

Respond to spills efficiently with the SpillTech 5-Gallon Spill Kit, available in three specialized types: HazMat, Universal and Oil-Only. The HazMat kit is ideal for hazardous or unidentified substances, while the Universal option handles water, coolants and a range of non-aggressive fluids. The Oil-Only kit is formulated to absorb oil, fuel and other petroleum-based liquids. All essential components are contained within a compact, portable five-gallon bucket, which also serves as a disposal container for used absorbents once the spill is under control.

\n

White five-gallon overpack bucket | Durable, lightweight and weather and chemical resistant | Screw-on lid with integrated lever lock

\n
\n
\n\"line-break\"\n
\n
\n

\"num4\"

\n

Eagle Flight 12 Volt Portable Air Compressor
Item #: AC12TC

\n
\n
\n
\n
\"num3-img1-2\"
\n
\"num3-img2-2\"
\n
\n

Quickly and efficiently inflate tires with the Eagle Flight 12-Volt Portable Air Compressor. Capable of delivering up to 120 PSI in just 90 seconds, this unit helps your team or customers get back on the road with minimal downtime. Weighing only 35 pounds, it is easy to handle and transport during service calls. For added safety and convenience, the compressor features an automatic shutoff to prevent overfilling once the desired pressure is reached.

\n

Dimensions: 20\" x 18\" x 8\" | Equipped with a three-gallon tank | Maximum load is 45 amps

\n
\n
\n\"line-break\"\n
\n
\n

\"num3\"

\n

Reelcraft DP5000 Series Air/Water Dual Pedestal Hose Reel
Item #: DP5000 SERIES

\n
\n
\n
\n
\"num5-img1\"
\n
\n
\n
\n
\n
\n
\n

Designed for direct truck mounting, the Reelcraft DP5000 Series Air/Water Dual Pedestal Hose Reel provides a reliable solution for delivering air or water to vehicles in need. Its dual pedestal structure and durable steel construction minimize vibration and maintain stability during transit. With seven versatile mounting options, it offers flexible installation without occupying excessive space. Once on site, the hose extends up to 50 feet and delivers up to 300 PSI of pressure.

\n

Powder-coat finish | Buna seals | Steel internal fluid path

\n
\n
\n\"line-break\"\n
\n
\n

\"num3\"

\n

GoJak RakJak 2-Ton Air Jack
Item #: GJ-AIR-JAK

\n
\n
\n
\n
\"num4-img1\"
\n
\n
\n
\n
\n
\n
\n

Efficient and user-friendly, the GoJak RakJak 2-Ton Air Jack is an ideal solution for roadside vehicle lifting. Available in two models, the double bag design extends up to 13.75 inches, while the triple bag version extends up to 18 inches. Internal telescoping steel rods provide structural support to maintain a two-ton lifting capacity. For added safety, the unit includes a pressure-release valve to prevent over-inflation.

\n

Diameter: 10\" | Air Pressure: 105 PSI | Extended handle sold separately

\n
\n
\n\"line-break\"\n
\n
\n

\"num2\"

\n

PSS FirstGard 28\" Foldable Safety Cone
Item #: PSS-FG28

\n
\n
\n
\n
\"num7-img1\"
\n
\"num7-img2\"
\n
\n
\n
\n

Ensure maximum visibility on the job with the PSS FirstGard 28\" Foldable Safety Cone. Engineered for both portability and stability, the cone stands 28” tall with a 29\" x 29\" base. When collapsed, it folds down to just 1.5 inches, allowing for easy storage and transport. Rubber feet on each leg help keep the cone securely in place, even on uneven surfaces. Available in high-visibility fluorescent green or safety orange, it enhances safety by ensuring you're clearly seen at the scene.

\n

Molded-in handles | Reflective engineering-grade sheeting | High-density polyethylene

\n
\n
\n
\n
\n
\n
\n
\n
\n
\n\"line-break\"\n
\n
\n

\"num2\"

\n

Safety Seal Over the Road and Heavy Equipment Tire Repair Kit
Item #: SSKHE

\n
\n
\n
\n
\"num6-img1\"
\n
\"num6-img2\"
\n
\n

Minimize downtime with the Over the Road and Heavy Equipment Tire Repair Kit from Safety Seal, designed to handle punctures in even the thickest treads. This comprehensive kit includes 18 vulcanized 16-inch repair seals, providing a temporary fix that allows vehicles to reach a service facility safely. It also features an insertion tool, a seven-inch spiral probe and lubricant—everything needed for fast, effective roadside tire repairs.

\n

Dimensions (molded plastic case): 12\" x 8\" x 2.5\" | Weight: 3.6 lbs. | Made in the USA

\n
\n
\n\"line-break\"\n
\n
\n

\"num2\"

\n

Tork Advanced ShopMax Centerfeed Shop Towels
Item #: 13-24-40

\n
\n
\n
\n
\"num9-img1\"
\n
\"num9-img2\"
\n
\n

For fast, effective clean-up on the job, Tork Advanced ShopMax Centerfeed Shop Towels offer a reliable solution. These highly absorbent towels are designed to handle oil, grease, lubricants and dirt, yet remain soft enough for use on hands and face. Their strong, durable construction allows them to perform even when wet. Packaged in a convenient self-dispensing box containing 200 wipes, they deliver both performance and value.

\n

Sheet length: 13\" | Single ply | Roll width: 9\"

\n
\n
\n\"line-break\"\n
\n
\n

\"num2\"

\n

SureCan 5 Gallon Yellow Diesel Can
Item #: SC5D

\n
\n
\n
\n
\"num10-img1\"
\n
\"num10-img2\"
\n
\n
\n
\n

Efficiently deliver diesel with the SureCan 5-Gallon Yellow Diesel Can, constructed from durable high-density polyethylene for long-lasting use. Featuring an ergonomically designed grip, the can ensures a comfortable and secure hold. For controlled pouring, it includes an intuitive release and lock flow trigger, operated with your thumb. The self-ventilating design promotes smooth and steady flow, while the flexible hose rotates 180° to provide maximum convenience during use.

\n

Durable 6-layer design | Tethered nozzle cap | OSHA-certified

\n
\n
\n
\n
\n
\n
\n
\n
\n
\n\"line-break\"\n

Understanding the essential tools for any job is crucial to success. We hope this list has provided valuable insights to help you expand your toolkit and tackle a wide range of tasks. At Zip's AW Direct, we offer a wide selection of durable, high-quality accessories designed to enhance your service capabilities. Visit zips.com to explore the items featured in this list, as well as many other useful product

\n
","enable_google_amp_output_override":false,"generate_json_ld_enabled":true,"blog_post_schedule_task_uid":null,"blog_publish_to_social_media_task":"DONE_NOT_SENT","blog_publish_instant_email_task_uid":null,"blog_publish_instant_email_campaign_id":null,"blog_publish_instant_email_retry_count":null,"keywords":[],"composition_id":0,"is_crawlable_by_bots":false,"head_html":null,"footer_html":null,"attached_stylesheets":[],"enable_domain_stylesheets":null,"include_default_custom_css":null,"layout_sections":{},"past_mab_experiment_ids":[],"deleted_by":null,"featured_image_alt_text":"","enable_layout_stylesheets":null,"tweet":null,"tweet_at":null,"campaign_name":null,"campaign_utm":null,"meta_keywords":null,"meta_description":"Discover the ten must-have service truck accessories from Zip's AW Direct—ranging from lockout kits and jump starters to roadside safety gear. Enhance your roadside operations with essential tools and equipment curated for professional efficiency.","tweet_immediately":false,"publish_immediately":true,"security_state":"NONE","scheduled_update_date":0,"placement_guids":[],"header_template_path":null,"header_variant_name":null,"footer_template_path":null,"footer_variant_name":null,"global_block_overrides":{},"property_for_dynamic_page_title":null,"property_for_dynamic_page_slug":null,"property_for_dynamic_page_meta_description":null,"property_for_dynamic_page_featured_image":null,"property_for_dynamic_page_canonical_url":null,"preview_image_src":null,"legacy_blog_tabid":null,"legacy_post_guid":null,"performable_variation_letter":null,"style_override_id":null,"has_user_changes":true,"css":{},"css_text":"","unpublished_at":0,"published_by_id":79766377,"allowed_slug_conflict":false,"ai_features":null,"link_rel_canonical_url":"","page_redirected":false,"page_expiry_enabled":null,"page_expiry_date":null,"page_expiry_redirect_id":null,"page_expiry_redirect_url":null,"deleted_by_id":null,"state_when_deleted":null,"cloned_from":null,"staged_from":null,"personas":[],"compose_body":null,"featured_image":"https://48463649.fs1.hubspotusercontent-na1.net/hubfs/48463649/header-2.png","featured_image_width":1789,"featured_image_height":783,"publish_timezone_offset":null,"theme_settings_values":null,"header":null,"password":null,"published_at":1755714435455,"last_edit_session_id":null,"last_edit_update_id":null,"created_by_agent":null},"metaDescription":"Discover the ten must-have service truck accessories from Zip's AW Direct—ranging from lockout kits and jump starters to roadside safety gear. Enhance your roadside operations with essential tools and equipment curated for professional efficiency.","metaKeywords":null,"name":"Zip's Top 10 Accessories for Your Service Truck","nextPostFeaturedImage":"https://48463649.fs1.hubspotusercontent-na1.net/hubfs/48463649/Blog/lockout-tools-header.png","nextPostFeaturedImageAltText":"Lockout kit assortment","nextPostName":"Best Vehicle Lockout Kits","nextPostSlug":"blog/best-vehicle-lockout-kits","pageExpiryDate":null,"pageExpiryEnabled":null,"pageExpiryRedirectId":null,"pageExpiryRedirectUrl":null,"pageRedirected":false,"pageTitle":"Zip's Top 10 Accessories for Your Service Truck","parentBlog":{"absoluteUrl":"/blog","allowComments":true,"ampBodyColor":"#404040","ampBodyFont":"'Helvetica Neue', Helvetica, Arial, sans-serif","ampBodyFontSize":"18","ampCustomCss":"","ampHeaderBackgroundColor":"#ffffff","ampHeaderColor":"#1e1e1e","ampHeaderFont":"'Helvetica Neue', Helvetica, Arial, sans-serif","ampHeaderFontSize":"36","ampLinkColor":"#416bb3","ampLogoAlt":"","ampLogoHeight":0,"ampLogoSrc":"","ampLogoWidth":0,"analyticsPageId":190096341139,"attachedStylesheets":[],"audienceAccess":"PUBLIC","businessUnitId":null,"captchaAfterDays":7,"captchaAlways":false,"categoryId":3,"cdnPurgeEmbargoTime":null,"closeCommentsOlder":0,"commentDateFormat":"medium","commentFormGuid":"a4128401-39db-4c54-a62b-88ff335d3a69","commentMaxThreadDepth":1,"commentModeration":false,"commentNotificationEmails":[],"commentShouldCreateContact":false,"commentVerificationText":"","cosObjectType":"BLOG","created":1747163443999,"createdDateTime":1747163443999,"dailyNotificationEmailId":null,"dateFormattingLanguage":null,"defaultGroupStyleId":"","defaultNotificationFromName":"","defaultNotificationReplyTo":"","deletedAt":0,"description":"","domain":"","domainWhenPublished":"www.zips.com","emailApiSubscriptionId":null,"enableGoogleAmpOutput":true,"enableSocialAutoPublishing":false,"generateJsonLdEnabled":true,"header":null,"htmlFooter":"","htmlFooterIsShared":true,"htmlHead":"","htmlHeadIsShared":true,"htmlKeywords":[],"htmlTitle":"blog","id":190096341139,"ilsSubscriptionListsByType":{},"instantNotificationEmailId":null,"itemLayoutId":null,"itemTemplateIsShared":false,"itemTemplatePath":"zips-basic-theme/templates/blog-post.html","label":"blog","language":"en","legacyGuid":null,"legacyModuleId":null,"legacyTabId":null,"listingLayoutId":null,"listingPageId":190096341141,"listingTemplatePath":"","liveDomain":"www.zips.com","monthFilterFormat":"MMMM yyyy","monthlyNotificationEmailId":null,"name":"blog","parentBlogUpdateTaskId":null,"portalId":48463649,"postHtmlFooter":"","postHtmlHead":"","postsPerListingPage":111,"postsPerRssFeed":10,"publicAccessRules":[],"publicAccessRulesEnabled":false,"publicTitle":"blog","publishDateFormat":"medium","resolvedDomain":"www.zips.com","rootUrl":"/blog","rssCustomFeed":null,"rssDescription":null,"rssItemFooter":null,"rssItemHeader":null,"settingsOverrides":{"itemLayoutId":false,"itemTemplatePath":false,"itemTemplateIsShared":false,"listingLayoutId":false,"listingTemplatePath":false,"postsPerListingPage":false,"showSummaryInListing":false,"useFeaturedImageInSummary":false,"htmlHead":false,"postHtmlHead":false,"htmlHeadIsShared":false,"htmlFooter":false,"listingPageHtmlFooter":false,"postHtmlFooter":false,"htmlFooterIsShared":false,"attachedStylesheets":false,"postsPerRssFeed":false,"showSummaryInRss":false,"showSummaryInEmails":false,"showSummariesInEmails":false,"allowComments":false,"commentShouldCreateContact":false,"commentModeration":false,"closeCommentsOlder":false,"commentNotificationEmails":false,"commentMaxThreadDepth":false,"commentVerificationText":false,"socialAccountTwitter":false,"showSocialLinkTwitter":false,"showSocialLinkLinkedin":false,"showSocialLinkFacebook":false,"enableGoogleAmpOutput":false,"ampLogoSrc":false,"ampLogoHeight":false,"ampLogoWidth":false,"ampLogoAlt":false,"ampHeaderFont":false,"ampHeaderFontSize":false,"ampHeaderColor":false,"ampHeaderBackgroundColor":false,"ampBodyFont":false,"ampBodyFontSize":false,"ampBodyColor":false,"ampLinkColor":false,"generateJsonLdEnabled":false},"showSocialLinkFacebook":true,"showSocialLinkLinkedin":true,"showSocialLinkTwitter":true,"showSummaryInEmails":true,"showSummaryInListing":true,"showSummaryInRss":true,"siteId":null,"slug":"blog","socialAccountTwitter":"","state":null,"subscriptionContactsProperty":null,"subscriptionEmailType":null,"subscriptionFormGuid":null,"subscriptionListsByType":{},"title":null,"translatedFromId":null,"translations":{},"updated":1755110916417,"updatedDateTime":1755110916417,"urlBase":"www.zips.com/blog","urlSegments":{"all":"all","archive":"archive","author":"author","page":"page","tag":"tag"},"useFeaturedImageInSummary":true,"usesDefaultTemplate":false,"weeklyNotificationEmailId":null},"password":null,"pastMabExperimentIds":[],"performableGuid":null,"performableVariationLetter":null,"personalizationStrategyId":null,"personalizationVariantStatus":null,"personas":[],"placementGuids":[],"portableKey":null,"portalId":48463649,"position":null,"postBody":"
\n
\n

Providing top-tier roadside service begins with having the right tools for the job. With so many products on the market, selecting the most effective accessories can be a challenge. To simplify your decision-making, Zip’s AW Direct has curated a list of 10 essential, roadside-qualified products to support your operations below.

\n
\n
\n
\n

\"num1\"

\n

Access Tools Contractor’s Lockout Kit
Item #: ACTACS

\n
\n
\n
\"num1-img1\" \"num1-img2\"
\n
\n

Don’t get locked out of profits. The Access Tools Contractor’s Lockout Kit includes 10 specialized tools designed for efficient entry. Each long-reach tool features a scratch-resistant coating to protect vehicle surfaces during use. Once the job is complete, all tools conveniently store in the included heavy-duty soft case, ensuring both organization and protection.

\n

A full list of the kit’s contents is provided below.

\n
    \n
  • Standard One-Hand Door Jack Tool
  • \n
  • Air Wedge
  • \n
  • Wedgee Wedge w/ Strip Savers
  • \n
  • Quick Max
  • \n
  • Flex Max
  • \n
  • Button Master Tool
  • \n
  • Glassman Tool
  • \n
  • Slim Jim
  • \n
  • Wonder Shield
  • \n
  • Button Strip Tool
  • \n
  • Heavy-Duty Soft Carrying Case
  • \n
\nBUY IT!
\n
\n
\n\"line-break\" \n
\n
\n

\"num2\"

\n

Lokithor J402 PRO 3500A Jump Start Kit
Item #: J402 PRO

\n
\n
\n
\n
\"num2-img1\"
\n
\"num2-img2\"
\n
\n

Delivering 3,500 peak amps—an increase of 500 over the original J402—the Lokithor J402 PRO 3500A Jump Start Kit is an essential addition to any service truck. When fully charged, it can start up to 60 engines before requiring a recharge, and it retains its charge for up to 30 months when not in use. The integrated BMS (Battery Management System) safeguards against overheating, short circuits, overcurrent, reverse polarity and more. For added convenience, the unit includes a built-in flashlight with three modes, making low-light connections easier and safer.

\n

IP65-rated | Dimensions: 9.46\"L x 4.19\"W x 2.36\"H | Weight: 3.86 lbs.

\n
\n
\n\"line-break\"\n
\n
\n

\"num3\"

\n

SpillTech 5-Gallon Spill Kit
Item #: ST-SPK-5

\n
\n
\n
\n
\"num8-img1\"
\n
\n
\n
\n
\n
\n
\n

Respond to spills efficiently with the SpillTech 5-Gallon Spill Kit, available in three specialized types: HazMat, Universal and Oil-Only. The HazMat kit is ideal for hazardous or unidentified substances, while the Universal option handles water, coolants and a range of non-aggressive fluids. The Oil-Only kit is formulated to absorb oil, fuel and other petroleum-based liquids. All essential components are contained within a compact, portable five-gallon bucket, which also serves as a disposal container for used absorbents once the spill is under control.

\n

White five-gallon overpack bucket | Durable, lightweight and weather and chemical resistant | Screw-on lid with integrated lever lock

\n
\n
\n\"line-break\"\n
\n
\n

\"num4\"

\n

Eagle Flight 12 Volt Portable Air Compressor
Item #: AC12TC

\n
\n
\n
\n
\"num3-img1-2\"
\n
\"num3-img2-2\"
\n
\n

Quickly and efficiently inflate tires with the Eagle Flight 12-Volt Portable Air Compressor. Capable of delivering up to 120 PSI in just 90 seconds, this unit helps your team or customers get back on the road with minimal downtime. Weighing only 35 pounds, it is easy to handle and transport during service calls. For added safety and convenience, the compressor features an automatic shutoff to prevent overfilling once the desired pressure is reached.

\n

Dimensions: 20\" x 18\" x 8\" | Equipped with a three-gallon tank | Maximum load is 45 amps

\n
\n
\n\"line-break\"\n
\n
\n

\"num3\"

\n

Reelcraft DP5000 Series Air/Water Dual Pedestal Hose Reel
Item #: DP5000 SERIES

\n
\n
\n
\n
\"num5-img1\"
\n
\n
\n
\n
\n
\n
\n

Designed for direct truck mounting, the Reelcraft DP5000 Series Air/Water Dual Pedestal Hose Reel provides a reliable solution for delivering air or water to vehicles in need. Its dual pedestal structure and durable steel construction minimize vibration and maintain stability during transit. With seven versatile mounting options, it offers flexible installation without occupying excessive space. Once on site, the hose extends up to 50 feet and delivers up to 300 PSI of pressure.

\n

Powder-coat finish | Buna seals | Steel internal fluid path

\n
\n
\n\"line-break\"\n
\n
\n

\"num3\"

\n

GoJak RakJak 2-Ton Air Jack
Item #: GJ-AIR-JAK

\n
\n
\n
\n
\"num4-img1\"
\n
\n
\n
\n
\n
\n
\n

Efficient and user-friendly, the GoJak RakJak 2-Ton Air Jack is an ideal solution for roadside vehicle lifting. Available in two models, the double bag design extends up to 13.75 inches, while the triple bag version extends up to 18 inches. Internal telescoping steel rods provide structural support to maintain a two-ton lifting capacity. For added safety, the unit includes a pressure-release valve to prevent over-inflation.

\n

Diameter: 10\" | Air Pressure: 105 PSI | Extended handle sold separately

\n
\n
\n\"line-break\"\n
\n
\n

\"num2\"

\n

PSS FirstGard 28\" Foldable Safety Cone
Item #: PSS-FG28

\n
\n
\n
\n
\"num7-img1\"
\n
\"num7-img2\"
\n
\n
\n
\n

Ensure maximum visibility on the job with the PSS FirstGard 28\" Foldable Safety Cone. Engineered for both portability and stability, the cone stands 28” tall with a 29\" x 29\" base. When collapsed, it folds down to just 1.5 inches, allowing for easy storage and transport. Rubber feet on each leg help keep the cone securely in place, even on uneven surfaces. Available in high-visibility fluorescent green or safety orange, it enhances safety by ensuring you're clearly seen at the scene.

\n

Molded-in handles | Reflective engineering-grade sheeting | High-density polyethylene

\n
\n
\n
\n
\n
\n
\n
\n
\n
\n\"line-break\"\n
\n
\n

\"num2\"

\n

Safety Seal Over the Road and Heavy Equipment Tire Repair Kit
Item #: SSKHE

\n
\n
\n
\n
\"num6-img1\"
\n
\"num6-img2\"
\n
\n

Minimize downtime with the Over the Road and Heavy Equipment Tire Repair Kit from Safety Seal, designed to handle punctures in even the thickest treads. This comprehensive kit includes 18 vulcanized 16-inch repair seals, providing a temporary fix that allows vehicles to reach a service facility safely. It also features an insertion tool, a seven-inch spiral probe and lubricant—everything needed for fast, effective roadside tire repairs.

\n

Dimensions (molded plastic case): 12\" x 8\" x 2.5\" | Weight: 3.6 lbs. | Made in the USA

\n
\n
\n\"line-break\"\n
\n
\n

\"num2\"

\n

Tork Advanced ShopMax Centerfeed Shop Towels
Item #: 13-24-40

\n
\n
\n
\n
\"num9-img1\"
\n
\"num9-img2\"
\n
\n

For fast, effective clean-up on the job, Tork Advanced ShopMax Centerfeed Shop Towels offer a reliable solution. These highly absorbent towels are designed to handle oil, grease, lubricants and dirt, yet remain soft enough for use on hands and face. Their strong, durable construction allows them to perform even when wet. Packaged in a convenient self-dispensing box containing 200 wipes, they deliver both performance and value.

\n

Sheet length: 13\" | Single ply | Roll width: 9\"

\n
\n
\n\"line-break\"\n
\n
\n

\"num2\"

\n

SureCan 5 Gallon Yellow Diesel Can
Item #: SC5D

\n
\n
\n
\n
\"num10-img1\"
\n
\"num10-img2\"
\n
\n
\n
\n

Efficiently deliver diesel with the SureCan 5-Gallon Yellow Diesel Can, constructed from durable high-density polyethylene for long-lasting use. Featuring an ergonomically designed grip, the can ensures a comfortable and secure hold. For controlled pouring, it includes an intuitive release and lock flow trigger, operated with your thumb. The self-ventilating design promotes smooth and steady flow, while the flexible hose rotates 180° to provide maximum convenience during use.

\n

Durable 6-layer design | Tethered nozzle cap | OSHA-certified

\n
\n
\n
\n
\n
\n
\n
\n
\n
\n\"line-break\"\n

Understanding the essential tools for any job is crucial to success. We hope this list has provided valuable insights to help you expand your toolkit and tackle a wide range of tasks. At Zip's AW Direct, we offer a wide selection of durable, high-quality accessories designed to enhance your service capabilities. Visit zips.com to explore the items featured in this list, as well as many other useful product

\n
","postBodyRss":"
\n
\n

Providing top-tier roadside service begins with having the right tools for the job. With so many products on the market, selecting the most effective accessories can be a challenge. To simplify your decision-making, Zip’s AW Direct has curated a list of 10 essential, roadside-qualified products to support your operations below.

\n
\n
\n
\n

\"num1\"

\n

Access Tools Contractor’s Lockout Kit
Item #: ACTACS

\n
\n
\n
\"num1-img1\" \"num1-img2\"
\n
\n

Don’t get locked out of profits. The Access Tools Contractor’s Lockout Kit includes 10 specialized tools designed for efficient entry. Each long-reach tool features a scratch-resistant coating to protect vehicle surfaces during use. Once the job is complete, all tools conveniently store in the included heavy-duty soft case, ensuring both organization and protection.

\n

A full list of the kit’s contents is provided below.

\n
    \n
  • Standard One-Hand Door Jack Tool
  • \n
  • Air Wedge
  • \n
  • Wedgee Wedge w/ Strip Savers
  • \n
  • Quick Max
  • \n
  • Flex Max
  • \n
  • Button Master Tool
  • \n
  • Glassman Tool
  • \n
  • Slim Jim
  • \n
  • Wonder Shield
  • \n
  • Button Strip Tool
  • \n
  • Heavy-Duty Soft Carrying Case
  • \n
\nBUY IT!
\n
\n
\n\"line-break\" \n
\n
\n

\"num2\"

\n

Lokithor J402 PRO 3500A Jump Start Kit
Item #: J402 PRO

\n
\n
\n
\n
\"num2-img1\"
\n
\"num2-img2\"
\n
\n

Delivering 3,500 peak amps—an increase of 500 over the original J402—the Lokithor J402 PRO 3500A Jump Start Kit is an essential addition to any service truck. When fully charged, it can start up to 60 engines before requiring a recharge, and it retains its charge for up to 30 months when not in use. The integrated BMS (Battery Management System) safeguards against overheating, short circuits, overcurrent, reverse polarity and more. For added convenience, the unit includes a built-in flashlight with three modes, making low-light connections easier and safer.

\n

IP65-rated | Dimensions: 9.46\"L x 4.19\"W x 2.36\"H | Weight: 3.86 lbs.

\n
\n
\n\"line-break\"\n
\n
\n

\"num3\"

\n

SpillTech 5-Gallon Spill Kit
Item #: ST-SPK-5

\n
\n
\n
\n
\"num8-img1\"
\n
\n
\n
\n
\n
\n
\n

Respond to spills efficiently with the SpillTech 5-Gallon Spill Kit, available in three specialized types: HazMat, Universal and Oil-Only. The HazMat kit is ideal for hazardous or unidentified substances, while the Universal option handles water, coolants and a range of non-aggressive fluids. The Oil-Only kit is formulated to absorb oil, fuel and other petroleum-based liquids. All essential components are contained within a compact, portable five-gallon bucket, which also serves as a disposal container for used absorbents once the spill is under control.

\n

White five-gallon overpack bucket | Durable, lightweight and weather and chemical resistant | Screw-on lid with integrated lever lock

\n
\n
\n\"line-break\"\n
\n
\n

\"num4\"

\n

Eagle Flight 12 Volt Portable Air Compressor
Item #: AC12TC

\n
\n
\n
\n
\"num3-img1-2\"
\n
\"num3-img2-2\"
\n
\n

Quickly and efficiently inflate tires with the Eagle Flight 12-Volt Portable Air Compressor. Capable of delivering up to 120 PSI in just 90 seconds, this unit helps your team or customers get back on the road with minimal downtime. Weighing only 35 pounds, it is easy to handle and transport during service calls. For added safety and convenience, the compressor features an automatic shutoff to prevent overfilling once the desired pressure is reached.

\n

Dimensions: 20\" x 18\" x 8\" | Equipped with a three-gallon tank | Maximum load is 45 amps

\n
\n
\n\"line-break\"\n
\n
\n

\"num3\"

\n

Reelcraft DP5000 Series Air/Water Dual Pedestal Hose Reel
Item #: DP5000 SERIES

\n
\n
\n
\n
\"num5-img1\"
\n
\n
\n
\n
\n
\n
\n

Designed for direct truck mounting, the Reelcraft DP5000 Series Air/Water Dual Pedestal Hose Reel provides a reliable solution for delivering air or water to vehicles in need. Its dual pedestal structure and durable steel construction minimize vibration and maintain stability during transit. With seven versatile mounting options, it offers flexible installation without occupying excessive space. Once on site, the hose extends up to 50 feet and delivers up to 300 PSI of pressure.

\n

Powder-coat finish | Buna seals | Steel internal fluid path

\n
\n
\n\"line-break\"\n
\n
\n

\"num3\"

\n

GoJak RakJak 2-Ton Air Jack
Item #: GJ-AIR-JAK

\n
\n
\n
\n
\"num4-img1\"
\n
\n
\n
\n
\n
\n
\n

Efficient and user-friendly, the GoJak RakJak 2-Ton Air Jack is an ideal solution for roadside vehicle lifting. Available in two models, the double bag design extends up to 13.75 inches, while the triple bag version extends up to 18 inches. Internal telescoping steel rods provide structural support to maintain a two-ton lifting capacity. For added safety, the unit includes a pressure-release valve to prevent over-inflation.

\n

Diameter: 10\" | Air Pressure: 105 PSI | Extended handle sold separately

\n
\n
\n\"line-break\"\n
\n
\n

\"num2\"

\n

PSS FirstGard 28\" Foldable Safety Cone
Item #: PSS-FG28

\n
\n
\n
\n
\"num7-img1\"
\n
\"num7-img2\"
\n
\n
\n
\n

Ensure maximum visibility on the job with the PSS FirstGard 28\" Foldable Safety Cone. Engineered for both portability and stability, the cone stands 28” tall with a 29\" x 29\" base. When collapsed, it folds down to just 1.5 inches, allowing for easy storage and transport. Rubber feet on each leg help keep the cone securely in place, even on uneven surfaces. Available in high-visibility fluorescent green or safety orange, it enhances safety by ensuring you're clearly seen at the scene.

\n

Molded-in handles | Reflective engineering-grade sheeting | High-density polyethylene

\n
\n
\n
\n
\n
\n
\n
\n
\n
\n\"line-break\"\n
\n
\n

\"num2\"

\n

Safety Seal Over the Road and Heavy Equipment Tire Repair Kit
Item #: SSKHE

\n
\n
\n
\n
\"num6-img1\"
\n
\"num6-img2\"
\n
\n

Minimize downtime with the Over the Road and Heavy Equipment Tire Repair Kit from Safety Seal, designed to handle punctures in even the thickest treads. This comprehensive kit includes 18 vulcanized 16-inch repair seals, providing a temporary fix that allows vehicles to reach a service facility safely. It also features an insertion tool, a seven-inch spiral probe and lubricant—everything needed for fast, effective roadside tire repairs.

\n

Dimensions (molded plastic case): 12\" x 8\" x 2.5\" | Weight: 3.6 lbs. | Made in the USA

\n
\n
\n\"line-break\"\n
\n
\n

\"num2\"

\n

Tork Advanced ShopMax Centerfeed Shop Towels
Item #: 13-24-40

\n
\n
\n
\n
\"num9-img1\"
\n
\"num9-img2\"
\n
\n

For fast, effective clean-up on the job, Tork Advanced ShopMax Centerfeed Shop Towels offer a reliable solution. These highly absorbent towels are designed to handle oil, grease, lubricants and dirt, yet remain soft enough for use on hands and face. Their strong, durable construction allows them to perform even when wet. Packaged in a convenient self-dispensing box containing 200 wipes, they deliver both performance and value.

\n

Sheet length: 13\" | Single ply | Roll width: 9\"

\n
\n
\n\"line-break\"\n
\n
\n

\"num2\"

\n

SureCan 5 Gallon Yellow Diesel Can
Item #: SC5D

\n
\n
\n
\n
\"num10-img1\"
\n
\"num10-img2\"
\n
\n
\n
\n

Efficiently deliver diesel with the SureCan 5-Gallon Yellow Diesel Can, constructed from durable high-density polyethylene for long-lasting use. Featuring an ergonomically designed grip, the can ensures a comfortable and secure hold. For controlled pouring, it includes an intuitive release and lock flow trigger, operated with your thumb. The self-ventilating design promotes smooth and steady flow, while the flexible hose rotates 180° to provide maximum convenience during use.

\n

Durable 6-layer design | Tethered nozzle cap | OSHA-certified

\n
\n
\n
\n
\n
\n
\n
\n
\n
\n\"line-break\"\n

Understanding the essential tools for any job is crucial to success. We hope this list has provided valuable insights to help you expand your toolkit and tackle a wide range of tasks. At Zip's AW Direct, we offer a wide selection of durable, high-quality accessories designed to enhance your service capabilities. Visit zips.com to explore the items featured in this list, as well as many other useful product

\n
","postEmailContent":"
\n
\n

Providing top-tier roadside service begins with having the right tools for the job. With so many products on the market, selecting the most effective accessories can be a challenge. To simplify your decision-making, Zip’s AW Direct has curated a list of 10 essential, roadside-qualified products to support your operations below.

\n
\n
\n
\n

Access Tools Contractor’s Lockout Kit
Item #: ACTACS

\n
\n
\n
\n
\n
\n

Don’t get locked out of profits. The Access Tools Contractor’s Lockout Kit includes 10 specialized tools designed for efficient entry. Each long-reach tool features a scratch-resistant coating to protect vehicle surfaces during use. Once the job is complete, all tools conveniently store in the included heavy-duty soft case, ensuring both organization and protection.

\n

A full list of the kit’s contents is provided below.

\n
    \n
  • Standard One-Hand Door Jack Tool
  • \n
  • Air Wedge
  • \n
  • Wedgee Wedge w/ Strip Savers
  • \n
  • Quick Max
  • \n
  • Flex Max
  • \n
  • Button Master Tool
  • \n
  • Glassman Tool
  • \n
  • Slim Jim
  • \n
  • Wonder Shield
  • \n
  • Button Strip Tool
  • \n
  • Heavy-Duty Soft Carrying Case
  • \n
\n BUY IT!\n
\n
\n
\n \n
\n
\n

Lokithor J402 PRO 3500A Jump Start Kit
Item #: J402 PRO

\n
\n
\n
\n
\n \n
\n
\n
\n

Delivering 3,500 peak amps—an increase of 500 over the original J402—the Lokithor J402 PRO 3500A Jump Start Kit is an essential addition to any service truck. When fully charged, it can start up to 60 engines before requiring a recharge, and it retains its charge for up to 30 months when not in use. The integrated BMS (Battery Management System) safeguards against overheating, short circuits, overcurrent, reverse polarity and more. For added convenience, the unit includes a built-in flashlight with three modes, making low-light connections easier and safer.

\n

IP65-rated | Dimensions: 9.46\"L x 4.19\"W x 2.36\"H | Weight: 3.86 lbs.

\n
\n
\n
\n
\n

SpillTech 5-Gallon Spill Kit
Item #: ST-SPK-5

\n
\n
\n
\n
\n \n
\n
\n
\n
\n \n
\n
\n
\n
\n

Respond to spills efficiently with the SpillTech 5-Gallon Spill Kit, available in three specialized types: HazMat, Universal and Oil-Only. The HazMat kit is ideal for hazardous or unidentified substances, while the Universal option handles water, coolants and a range of non-aggressive fluids. The Oil-Only kit is formulated to absorb oil, fuel and other petroleum-based liquids. All essential components are contained within a compact, portable five-gallon bucket, which also serves as a disposal container for used absorbents once the spill is under control.

\n

White five-gallon overpack bucket | Durable, lightweight and weather and chemical resistant | Screw-on lid with integrated lever lock

\n
\n
\n
\n
\n

Eagle Flight 12 Volt Portable Air Compressor
Item #: AC12TC

\n
\n
\n
\n
\n \n
\n
\n
\n

Quickly and efficiently inflate tires with the Eagle Flight 12-Volt Portable Air Compressor. Capable of delivering up to 120 PSI in just 90 seconds, this unit helps your team or customers get back on the road with minimal downtime. Weighing only 35 pounds, it is easy to handle and transport during service calls. For added safety and convenience, the compressor features an automatic shutoff to prevent overfilling once the desired pressure is reached.

\n

Dimensions: 20\" x 18\" x 8\" | Equipped with a three-gallon tank | Maximum load is 45 amps

\n
\n
\n
\n \n
\n

Reelcraft DP5000 Series Air/Water Dual Pedestal Hose Reel
Item #: DP5000 SERIES

\n
\n
\n
\n
\n \n
\n
\n
\n
\n \n
\n
\n
\n
\n

Designed for direct truck mounting, the Reelcraft DP5000 Series Air/Water Dual Pedestal Hose Reel provides a reliable solution for delivering air or water to vehicles in need. Its dual pedestal structure and durable steel construction minimize vibration and maintain stability during transit. With seven versatile mounting options, it offers flexible installation without occupying excessive space. Once on site, the hose extends up to 50 feet and delivers up to 300 PSI of pressure.

\n

Powder-coat finish | Buna seals | Steel internal fluid path

\n
\n
\n
\n \n
\n

GoJak RakJak 2-Ton Air Jack
Item #: GJ-AIR-JAK

\n
\n
\n
\n
\n \n
\n
\n
\n
\n \n
\n
\n
\n
\n

Efficient and user-friendly, the GoJak RakJak 2-Ton Air Jack is an ideal solution for roadside vehicle lifting. Available in two models, the double bag design extends up to 13.75 inches, while the triple bag version extends up to 18 inches. Internal telescoping steel rods provide structural support to maintain a two-ton lifting capacity. For added safety, the unit includes a pressure-release valve to prevent over-inflation.

\n

Diameter: 10\" | Air Pressure: 105 PSI | Extended handle sold separately

\n
\n
\n
\n \n
\n

PSS FirstGard 28\" Foldable Safety Cone
Item #: PSS-FG28

\n
\n
\n
\n
\n \n
\n
\n
\n
\n
\n

Ensure maximum visibility on the job with the PSS FirstGard 28\" Foldable Safety Cone. Engineered for both portability and stability, the cone stands 28” tall with a 29\" x 29\" base. When collapsed, it folds down to just 1.5 inches, allowing for easy storage and transport. Rubber feet on each leg help keep the cone securely in place, even on uneven surfaces. Available in high-visibility fluorescent green or safety orange, it enhances safety by ensuring you're clearly seen at the scene.

\n

Molded-in handles | Reflective engineering-grade sheeting | High-density polyethylene

\n
\n
\n
\n
\n \n
\n
\n
\n
\n
\n
\n
\n \n
\n

Safety Seal Over the Road and Heavy Equipment Tire Repair Kit
Item #: SSKHE

\n
\n
\n
\n
\n \n
\n
\n
\n

Minimize downtime with the Over the Road and Heavy Equipment Tire Repair Kit from Safety Seal, designed to handle punctures in even the thickest treads. This comprehensive kit includes 18 vulcanized 16-inch repair seals, providing a temporary fix that allows vehicles to reach a service facility safely. It also features an insertion tool, a seven-inch spiral probe and lubricant—everything needed for fast, effective roadside tire repairs.

\n

Dimensions (molded plastic case): 12\" x 8\" x 2.5\" | Weight: 3.6 lbs. | Made in the USA

\n
\n
\n
\n \n
\n

Tork Advanced ShopMax Centerfeed Shop Towels
Item #: 13-24-40

\n
\n
\n
\n
\n \n
\n
\n
\n

For fast, effective clean-up on the job, Tork Advanced ShopMax Centerfeed Shop Towels offer a reliable solution. These highly absorbent towels are designed to handle oil, grease, lubricants and dirt, yet remain soft enough for use on hands and face. Their strong, durable construction allows them to perform even when wet. Packaged in a convenient self-dispensing box containing 200 wipes, they deliver both performance and value.

\n

Sheet length: 13\" | Single ply | Roll width: 9\"

\n
\n
\n
\n \n
\n

SureCan 5 Gallon Yellow Diesel Can
Item #: SC5D

\n
\n
\n
\n
\n \n
\n
\n
\n
\n
\n

Efficiently deliver diesel with the SureCan 5-Gallon Yellow Diesel Can, constructed from durable high-density polyethylene for long-lasting use. Featuring an ergonomically designed grip, the can ensures a comfortable and secure hold. For controlled pouring, it includes an intuitive release and lock flow trigger, operated with your thumb. The self-ventilating design promotes smooth and steady flow, while the flexible hose rotates 180° to provide maximum convenience during use.

\n

Durable 6-layer design | Tethered nozzle cap | OSHA-certified

\n
\n
\n
\n
\n \n
\n
\n
\n
\n
\n
\n

Understanding the essential tools for any job is crucial to success. We hope this list has provided valuable insights to help you expand your toolkit and tackle a wide range of tasks. At Zip's AW Direct, we offer a wide selection of durable, high-quality accessories designed to enhance your service capabilities. Visit zips.com to explore the items featured in this list, as well as many other useful product

\n
","postFeaturedImageIfEnabled":"https://48463649.fs1.hubspotusercontent-na1.net/hubfs/48463649/header-2.png","postListContent":"
\n
\n

Providing top-tier roadside service begins with having the right tools for the job. With so many products on the market, selecting the most effective accessories can be a challenge. To simplify your decision-making, Zip’s AW Direct has curated a list of 10 essential, roadside-qualified products to support your operations below.

\n
\n
\n
\n

Access Tools Contractor’s Lockout Kit
Item #: ACTACS

\n
\n
\n
\n
\n
\n

Don’t get locked out of profits. The Access Tools Contractor’s Lockout Kit includes 10 specialized tools designed for efficient entry. Each long-reach tool features a scratch-resistant coating to protect vehicle surfaces during use. Once the job is complete, all tools conveniently store in the included heavy-duty soft case, ensuring both organization and protection.

\n

A full list of the kit’s contents is provided below.

\n
    \n
  • Standard One-Hand Door Jack Tool
  • \n
  • Air Wedge
  • \n
  • Wedgee Wedge w/ Strip Savers
  • \n
  • Quick Max
  • \n
  • Flex Max
  • \n
  • Button Master Tool
  • \n
  • Glassman Tool
  • \n
  • Slim Jim
  • \n
  • Wonder Shield
  • \n
  • Button Strip Tool
  • \n
  • Heavy-Duty Soft Carrying Case
  • \n
\n BUY IT!\n
\n
\n
\n \n
\n
\n

Lokithor J402 PRO 3500A Jump Start Kit
Item #: J402 PRO

\n
\n
\n
\n
\n \n
\n
\n
\n

Delivering 3,500 peak amps—an increase of 500 over the original J402—the Lokithor J402 PRO 3500A Jump Start Kit is an essential addition to any service truck. When fully charged, it can start up to 60 engines before requiring a recharge, and it retains its charge for up to 30 months when not in use. The integrated BMS (Battery Management System) safeguards against overheating, short circuits, overcurrent, reverse polarity and more. For added convenience, the unit includes a built-in flashlight with three modes, making low-light connections easier and safer.

\n

IP65-rated | Dimensions: 9.46\"L x 4.19\"W x 2.36\"H | Weight: 3.86 lbs.

\n
\n
\n
\n
\n

SpillTech 5-Gallon Spill Kit
Item #: ST-SPK-5

\n
\n
\n
\n
\n \n
\n
\n
\n
\n \n
\n
\n
\n
\n

Respond to spills efficiently with the SpillTech 5-Gallon Spill Kit, available in three specialized types: HazMat, Universal and Oil-Only. The HazMat kit is ideal for hazardous or unidentified substances, while the Universal option handles water, coolants and a range of non-aggressive fluids. The Oil-Only kit is formulated to absorb oil, fuel and other petroleum-based liquids. All essential components are contained within a compact, portable five-gallon bucket, which also serves as a disposal container for used absorbents once the spill is under control.

\n

White five-gallon overpack bucket | Durable, lightweight and weather and chemical resistant | Screw-on lid with integrated lever lock

\n
\n
\n
\n
\n

Eagle Flight 12 Volt Portable Air Compressor
Item #: AC12TC

\n
\n
\n
\n
\n \n
\n
\n
\n

Quickly and efficiently inflate tires with the Eagle Flight 12-Volt Portable Air Compressor. Capable of delivering up to 120 PSI in just 90 seconds, this unit helps your team or customers get back on the road with minimal downtime. Weighing only 35 pounds, it is easy to handle and transport during service calls. For added safety and convenience, the compressor features an automatic shutoff to prevent overfilling once the desired pressure is reached.

\n

Dimensions: 20\" x 18\" x 8\" | Equipped with a three-gallon tank | Maximum load is 45 amps

\n
\n
\n
\n \n
\n

Reelcraft DP5000 Series Air/Water Dual Pedestal Hose Reel
Item #: DP5000 SERIES

\n
\n
\n
\n
\n \n
\n
\n
\n
\n \n
\n
\n
\n
\n

Designed for direct truck mounting, the Reelcraft DP5000 Series Air/Water Dual Pedestal Hose Reel provides a reliable solution for delivering air or water to vehicles in need. Its dual pedestal structure and durable steel construction minimize vibration and maintain stability during transit. With seven versatile mounting options, it offers flexible installation without occupying excessive space. Once on site, the hose extends up to 50 feet and delivers up to 300 PSI of pressure.

\n

Powder-coat finish | Buna seals | Steel internal fluid path

\n
\n
\n
\n \n
\n

GoJak RakJak 2-Ton Air Jack
Item #: GJ-AIR-JAK

\n
\n
\n
\n
\n \n
\n
\n
\n
\n \n
\n
\n
\n
\n

Efficient and user-friendly, the GoJak RakJak 2-Ton Air Jack is an ideal solution for roadside vehicle lifting. Available in two models, the double bag design extends up to 13.75 inches, while the triple bag version extends up to 18 inches. Internal telescoping steel rods provide structural support to maintain a two-ton lifting capacity. For added safety, the unit includes a pressure-release valve to prevent over-inflation.

\n

Diameter: 10\" | Air Pressure: 105 PSI | Extended handle sold separately

\n
\n
\n
\n \n
\n

PSS FirstGard 28\" Foldable Safety Cone
Item #: PSS-FG28

\n
\n
\n
\n
\n \n
\n
\n
\n
\n
\n

Ensure maximum visibility on the job with the PSS FirstGard 28\" Foldable Safety Cone. Engineered for both portability and stability, the cone stands 28” tall with a 29\" x 29\" base. When collapsed, it folds down to just 1.5 inches, allowing for easy storage and transport. Rubber feet on each leg help keep the cone securely in place, even on uneven surfaces. Available in high-visibility fluorescent green or safety orange, it enhances safety by ensuring you're clearly seen at the scene.

\n

Molded-in handles | Reflective engineering-grade sheeting | High-density polyethylene

\n
\n
\n
\n
\n \n
\n
\n
\n
\n
\n
\n
\n \n
\n

Safety Seal Over the Road and Heavy Equipment Tire Repair Kit
Item #: SSKHE

\n
\n
\n
\n
\n \n
\n
\n
\n

Minimize downtime with the Over the Road and Heavy Equipment Tire Repair Kit from Safety Seal, designed to handle punctures in even the thickest treads. This comprehensive kit includes 18 vulcanized 16-inch repair seals, providing a temporary fix that allows vehicles to reach a service facility safely. It also features an insertion tool, a seven-inch spiral probe and lubricant—everything needed for fast, effective roadside tire repairs.

\n

Dimensions (molded plastic case): 12\" x 8\" x 2.5\" | Weight: 3.6 lbs. | Made in the USA

\n
\n
\n
\n \n
\n

Tork Advanced ShopMax Centerfeed Shop Towels
Item #: 13-24-40

\n
\n
\n
\n
\n \n
\n
\n
\n

For fast, effective clean-up on the job, Tork Advanced ShopMax Centerfeed Shop Towels offer a reliable solution. These highly absorbent towels are designed to handle oil, grease, lubricants and dirt, yet remain soft enough for use on hands and face. Their strong, durable construction allows them to perform even when wet. Packaged in a convenient self-dispensing box containing 200 wipes, they deliver both performance and value.

\n

Sheet length: 13\" | Single ply | Roll width: 9\"

\n
\n
\n
\n \n
\n

SureCan 5 Gallon Yellow Diesel Can
Item #: SC5D

\n
\n
\n
\n
\n \n
\n
\n
\n
\n
\n

Efficiently deliver diesel with the SureCan 5-Gallon Yellow Diesel Can, constructed from durable high-density polyethylene for long-lasting use. Featuring an ergonomically designed grip, the can ensures a comfortable and secure hold. For controlled pouring, it includes an intuitive release and lock flow trigger, operated with your thumb. The self-ventilating design promotes smooth and steady flow, while the flexible hose rotates 180° to provide maximum convenience during use.

\n

Durable 6-layer design | Tethered nozzle cap | OSHA-certified

\n
\n
\n
\n
\n \n
\n
\n
\n
\n
\n
\n

Understanding the essential tools for any job is crucial to success. We hope this list has provided valuable insights to help you expand your toolkit and tackle a wide range of tasks. At Zip's AW Direct, we offer a wide selection of durable, high-quality accessories designed to enhance your service capabilities. Visit zips.com to explore the items featured in this list, as well as many other useful product

\n
","postListSummaryFeaturedImage":"https://48463649.fs1.hubspotusercontent-na1.net/hubfs/48463649/header-2.png","postRssContent":"
\n
\n

Providing top-tier roadside service begins with having the right tools for the job. With so many products on the market, selecting the most effective accessories can be a challenge. To simplify your decision-making, Zip’s AW Direct has curated a list of 10 essential, roadside-qualified products to support your operations below.

\n
\n
\n
\n

Access Tools Contractor’s Lockout Kit
Item #: ACTACS

\n
\n
\n
\n
\n
\n

Don’t get locked out of profits. The Access Tools Contractor’s Lockout Kit includes 10 specialized tools designed for efficient entry. Each long-reach tool features a scratch-resistant coating to protect vehicle surfaces during use. Once the job is complete, all tools conveniently store in the included heavy-duty soft case, ensuring both organization and protection.

\n

A full list of the kit’s contents is provided below.

\n
    \n
  • Standard One-Hand Door Jack Tool
  • \n
  • Air Wedge
  • \n
  • Wedgee Wedge w/ Strip Savers
  • \n
  • Quick Max
  • \n
  • Flex Max
  • \n
  • Button Master Tool
  • \n
  • Glassman Tool
  • \n
  • Slim Jim
  • \n
  • Wonder Shield
  • \n
  • Button Strip Tool
  • \n
  • Heavy-Duty Soft Carrying Case
  • \n
\n BUY IT!\n
\n
\n
\n \n
\n
\n

Lokithor J402 PRO 3500A Jump Start Kit
Item #: J402 PRO

\n
\n
\n
\n
\n \n
\n
\n
\n

Delivering 3,500 peak amps—an increase of 500 over the original J402—the Lokithor J402 PRO 3500A Jump Start Kit is an essential addition to any service truck. When fully charged, it can start up to 60 engines before requiring a recharge, and it retains its charge for up to 30 months when not in use. The integrated BMS (Battery Management System) safeguards against overheating, short circuits, overcurrent, reverse polarity and more. For added convenience, the unit includes a built-in flashlight with three modes, making low-light connections easier and safer.

\n

IP65-rated | Dimensions: 9.46\"L x 4.19\"W x 2.36\"H | Weight: 3.86 lbs.

\n
\n
\n
\n
\n

SpillTech 5-Gallon Spill Kit
Item #: ST-SPK-5

\n
\n
\n
\n
\n \n
\n
\n
\n
\n \n
\n
\n
\n
\n

Respond to spills efficiently with the SpillTech 5-Gallon Spill Kit, available in three specialized types: HazMat, Universal and Oil-Only. The HazMat kit is ideal for hazardous or unidentified substances, while the Universal option handles water, coolants and a range of non-aggressive fluids. The Oil-Only kit is formulated to absorb oil, fuel and other petroleum-based liquids. All essential components are contained within a compact, portable five-gallon bucket, which also serves as a disposal container for used absorbents once the spill is under control.

\n

White five-gallon overpack bucket | Durable, lightweight and weather and chemical resistant | Screw-on lid with integrated lever lock

\n
\n
\n
\n
\n

Eagle Flight 12 Volt Portable Air Compressor
Item #: AC12TC

\n
\n
\n
\n
\n \n
\n
\n
\n

Quickly and efficiently inflate tires with the Eagle Flight 12-Volt Portable Air Compressor. Capable of delivering up to 120 PSI in just 90 seconds, this unit helps your team or customers get back on the road with minimal downtime. Weighing only 35 pounds, it is easy to handle and transport during service calls. For added safety and convenience, the compressor features an automatic shutoff to prevent overfilling once the desired pressure is reached.

\n

Dimensions: 20\" x 18\" x 8\" | Equipped with a three-gallon tank | Maximum load is 45 amps

\n
\n
\n
\n \n
\n

Reelcraft DP5000 Series Air/Water Dual Pedestal Hose Reel
Item #: DP5000 SERIES

\n
\n
\n
\n
\n \n
\n
\n
\n
\n \n
\n
\n
\n
\n

Designed for direct truck mounting, the Reelcraft DP5000 Series Air/Water Dual Pedestal Hose Reel provides a reliable solution for delivering air or water to vehicles in need. Its dual pedestal structure and durable steel construction minimize vibration and maintain stability during transit. With seven versatile mounting options, it offers flexible installation without occupying excessive space. Once on site, the hose extends up to 50 feet and delivers up to 300 PSI of pressure.

\n

Powder-coat finish | Buna seals | Steel internal fluid path

\n
\n
\n
\n \n
\n

GoJak RakJak 2-Ton Air Jack
Item #: GJ-AIR-JAK

\n
\n
\n
\n
\n \n
\n
\n
\n
\n \n
\n
\n
\n
\n

Efficient and user-friendly, the GoJak RakJak 2-Ton Air Jack is an ideal solution for roadside vehicle lifting. Available in two models, the double bag design extends up to 13.75 inches, while the triple bag version extends up to 18 inches. Internal telescoping steel rods provide structural support to maintain a two-ton lifting capacity. For added safety, the unit includes a pressure-release valve to prevent over-inflation.

\n

Diameter: 10\" | Air Pressure: 105 PSI | Extended handle sold separately

\n
\n
\n
\n \n
\n

PSS FirstGard 28\" Foldable Safety Cone
Item #: PSS-FG28

\n
\n
\n
\n
\n \n
\n
\n
\n
\n
\n

Ensure maximum visibility on the job with the PSS FirstGard 28\" Foldable Safety Cone. Engineered for both portability and stability, the cone stands 28” tall with a 29\" x 29\" base. When collapsed, it folds down to just 1.5 inches, allowing for easy storage and transport. Rubber feet on each leg help keep the cone securely in place, even on uneven surfaces. Available in high-visibility fluorescent green or safety orange, it enhances safety by ensuring you're clearly seen at the scene.

\n

Molded-in handles | Reflective engineering-grade sheeting | High-density polyethylene

\n
\n
\n
\n
\n \n
\n
\n
\n
\n
\n
\n
\n \n
\n

Safety Seal Over the Road and Heavy Equipment Tire Repair Kit
Item #: SSKHE

\n
\n
\n
\n
\n \n
\n
\n
\n

Minimize downtime with the Over the Road and Heavy Equipment Tire Repair Kit from Safety Seal, designed to handle punctures in even the thickest treads. This comprehensive kit includes 18 vulcanized 16-inch repair seals, providing a temporary fix that allows vehicles to reach a service facility safely. It also features an insertion tool, a seven-inch spiral probe and lubricant—everything needed for fast, effective roadside tire repairs.

\n

Dimensions (molded plastic case): 12\" x 8\" x 2.5\" | Weight: 3.6 lbs. | Made in the USA

\n
\n
\n
\n \n
\n

Tork Advanced ShopMax Centerfeed Shop Towels
Item #: 13-24-40

\n
\n
\n
\n
\n \n
\n
\n
\n

For fast, effective clean-up on the job, Tork Advanced ShopMax Centerfeed Shop Towels offer a reliable solution. These highly absorbent towels are designed to handle oil, grease, lubricants and dirt, yet remain soft enough for use on hands and face. Their strong, durable construction allows them to perform even when wet. Packaged in a convenient self-dispensing box containing 200 wipes, they deliver both performance and value.

\n

Sheet length: 13\" | Single ply | Roll width: 9\"

\n
\n
\n
\n \n
\n

SureCan 5 Gallon Yellow Diesel Can
Item #: SC5D

\n
\n
\n
\n
\n \n
\n
\n
\n
\n
\n

Efficiently deliver diesel with the SureCan 5-Gallon Yellow Diesel Can, constructed from durable high-density polyethylene for long-lasting use. Featuring an ergonomically designed grip, the can ensures a comfortable and secure hold. For controlled pouring, it includes an intuitive release and lock flow trigger, operated with your thumb. The self-ventilating design promotes smooth and steady flow, while the flexible hose rotates 180° to provide maximum convenience during use.

\n

Durable 6-layer design | Tethered nozzle cap | OSHA-certified

\n
\n
\n
\n
\n \n
\n
\n
\n
\n
\n
\n

Understanding the essential tools for any job is crucial to success. We hope this list has provided valuable insights to help you expand your toolkit and tackle a wide range of tasks. At Zip's AW Direct, we offer a wide selection of durable, high-quality accessories designed to enhance your service capabilities. Visit zips.com to explore the items featured in this list, as well as many other useful product

\n
","postRssSummaryFeaturedImage":"https://48463649.fs1.hubspotusercontent-na1.net/hubfs/48463649/header-2.png","postSummary":"
\n
\n

Providing top-tier roadside service begins with having the right tools for the job. With so many products on the market, selecting the most effective accessories can be a challenge. To simplify your decision-making, Zip’s AW Direct has curated a list of 10 essential, roadside-qualified products to support your operations below.

\n
\n
\n
\n

\"num1\"

\n

Access Tools Contractor’s Lockout Kit
Item #: ACTACS

\n
\n
\n
\"num1-img1\" \"num1-img2\"
\n
\n

Don’t get locked out of profits. The Access Tools Contractor’s Lockout Kit includes 10 specialized tools designed for efficient entry. Each long-reach tool features a scratch-resistant coating to protect vehicle surfaces during use. Once the job is complete, all tools conveniently store in the included heavy-duty soft case, ensuring both organization and protection.

\n

A full list of the kit’s contents is provided below.

\n
    \n
  • Standard One-Hand Door Jack Tool
  • \n
  • Air Wedge
  • \n
  • Wedgee Wedge w/ Strip Savers
  • \n
  • Quick Max
  • \n
  • Flex Max
  • \n
  • Button Master Tool
  • \n
  • Glassman Tool
  • \n
  • Slim Jim
  • \n
  • Wonder Shield
  • \n
  • Button Strip Tool
  • \n
  • Heavy-Duty Soft Carrying Case
  • \n
\nBUY IT!
\n
\n
\n\"line-break\" \n
\n
\n

\"num2\"

\n

Lokithor J402 PRO 3500A Jump Start Kit
Item #: J402 PRO

\n
\n
\n
\n
\"num2-img1\"
\n
\"num2-img2\"
\n
\n

Delivering 3,500 peak amps—an increase of 500 over the original J402—the Lokithor J402 PRO 3500A Jump Start Kit is an essential addition to any service truck. When fully charged, it can start up to 60 engines before requiring a recharge, and it retains its charge for up to 30 months when not in use. The integrated BMS (Battery Management System) safeguards against overheating, short circuits, overcurrent, reverse polarity and more. For added convenience, the unit includes a built-in flashlight with three modes, making low-light connections easier and safer.

\n

IP65-rated | Dimensions: 9.46\"L x 4.19\"W x 2.36\"H | Weight: 3.86 lbs.

\n
\n
\n\"line-break\"\n
\n
\n

\"num3\"

\n

SpillTech 5-Gallon Spill Kit
Item #: ST-SPK-5

\n
\n
\n
\n
\"num8-img1\"
\n
\n
\n
\n
\n
\n
\n

Respond to spills efficiently with the SpillTech 5-Gallon Spill Kit, available in three specialized types: HazMat, Universal and Oil-Only. The HazMat kit is ideal for hazardous or unidentified substances, while the Universal option handles water, coolants and a range of non-aggressive fluids. The Oil-Only kit is formulated to absorb oil, fuel and other petroleum-based liquids. All essential components are contained within a compact, portable five-gallon bucket, which also serves as a disposal container for used absorbents once the spill is under control.

\n

White five-gallon overpack bucket | Durable, lightweight and weather and chemical resistant | Screw-on lid with integrated lever lock

\n
\n
\n\"line-break\"\n
\n
\n

\"num4\"

\n

Eagle Flight 12 Volt Portable Air Compressor
Item #: AC12TC

\n
\n
\n
\n
\"num3-img1-2\"
\n
\"num3-img2-2\"
\n
\n

Quickly and efficiently inflate tires with the Eagle Flight 12-Volt Portable Air Compressor. Capable of delivering up to 120 PSI in just 90 seconds, this unit helps your team or customers get back on the road with minimal downtime. Weighing only 35 pounds, it is easy to handle and transport during service calls. For added safety and convenience, the compressor features an automatic shutoff to prevent overfilling once the desired pressure is reached.

\n

Dimensions: 20\" x 18\" x 8\" | Equipped with a three-gallon tank | Maximum load is 45 amps

\n
\n
\n\"line-break\"\n
\n
\n

\"num3\"

\n

Reelcraft DP5000 Series Air/Water Dual Pedestal Hose Reel
Item #: DP5000 SERIES

\n
\n
\n
\n
\"num5-img1\"
\n
\n
\n
\n
\n
\n
\n

Designed for direct truck mounting, the Reelcraft DP5000 Series Air/Water Dual Pedestal Hose Reel provides a reliable solution for delivering air or water to vehicles in need. Its dual pedestal structure and durable steel construction minimize vibration and maintain stability during transit. With seven versatile mounting options, it offers flexible installation without occupying excessive space. Once on site, the hose extends up to 50 feet and delivers up to 300 PSI of pressure.

\n

Powder-coat finish | Buna seals | Steel internal fluid path

\n
\n
\n\"line-break\"\n
\n
\n

\"num3\"

\n

GoJak RakJak 2-Ton Air Jack
Item #: GJ-AIR-JAK

\n
\n
\n
\n
\"num4-img1\"
\n
\n
\n
\n
\n
\n
\n

Efficient and user-friendly, the GoJak RakJak 2-Ton Air Jack is an ideal solution for roadside vehicle lifting. Available in two models, the double bag design extends up to 13.75 inches, while the triple bag version extends up to 18 inches. Internal telescoping steel rods provide structural support to maintain a two-ton lifting capacity. For added safety, the unit includes a pressure-release valve to prevent over-inflation.

\n

Diameter: 10\" | Air Pressure: 105 PSI | Extended handle sold separately

\n
\n
\n\"line-break\"\n
\n
\n

\"num2\"

\n

PSS FirstGard 28\" Foldable Safety Cone
Item #: PSS-FG28

\n
\n
\n
\n
\"num7-img1\"
\n
\"num7-img2\"
\n
\n
\n
\n

Ensure maximum visibility on the job with the PSS FirstGard 28\" Foldable Safety Cone. Engineered for both portability and stability, the cone stands 28” tall with a 29\" x 29\" base. When collapsed, it folds down to just 1.5 inches, allowing for easy storage and transport. Rubber feet on each leg help keep the cone securely in place, even on uneven surfaces. Available in high-visibility fluorescent green or safety orange, it enhances safety by ensuring you're clearly seen at the scene.

\n

Molded-in handles | Reflective engineering-grade sheeting | High-density polyethylene

\n
\n
\n
\n
\n
\n
\n
\n
\n
\n\"line-break\"\n
\n
\n

\"num2\"

\n

Safety Seal Over the Road and Heavy Equipment Tire Repair Kit
Item #: SSKHE

\n
\n
\n
\n
\"num6-img1\"
\n
\"num6-img2\"
\n
\n

Minimize downtime with the Over the Road and Heavy Equipment Tire Repair Kit from Safety Seal, designed to handle punctures in even the thickest treads. This comprehensive kit includes 18 vulcanized 16-inch repair seals, providing a temporary fix that allows vehicles to reach a service facility safely. It also features an insertion tool, a seven-inch spiral probe and lubricant—everything needed for fast, effective roadside tire repairs.

\n

Dimensions (molded plastic case): 12\" x 8\" x 2.5\" | Weight: 3.6 lbs. | Made in the USA

\n
\n
\n\"line-break\"\n
\n
\n

\"num2\"

\n

Tork Advanced ShopMax Centerfeed Shop Towels
Item #: 13-24-40

\n
\n
\n
\n
\"num9-img1\"
\n
\"num9-img2\"
\n
\n

For fast, effective clean-up on the job, Tork Advanced ShopMax Centerfeed Shop Towels offer a reliable solution. These highly absorbent towels are designed to handle oil, grease, lubricants and dirt, yet remain soft enough for use on hands and face. Their strong, durable construction allows them to perform even when wet. Packaged in a convenient self-dispensing box containing 200 wipes, they deliver both performance and value.

\n

Sheet length: 13\" | Single ply | Roll width: 9\"

\n
\n
\n\"line-break\"\n
\n
\n

\"num2\"

\n

SureCan 5 Gallon Yellow Diesel Can
Item #: SC5D

\n
\n
\n
\n
\"num10-img1\"
\n
\"num10-img2\"
\n
\n
\n
\n

Efficiently deliver diesel with the SureCan 5-Gallon Yellow Diesel Can, constructed from durable high-density polyethylene for long-lasting use. Featuring an ergonomically designed grip, the can ensures a comfortable and secure hold. For controlled pouring, it includes an intuitive release and lock flow trigger, operated with your thumb. The self-ventilating design promotes smooth and steady flow, while the flexible hose rotates 180° to provide maximum convenience during use.

\n

Durable 6-layer design | Tethered nozzle cap | OSHA-certified

\n
\n
\n
\n
\n
\n
\n
\n
\n
\n\"line-break\"\n

Understanding the essential tools for any job is crucial to success. We hope this list has provided valuable insights to help you expand your toolkit and tackle a wide range of tasks. At Zip's AW Direct, we offer a wide selection of durable, high-quality accessories designed to enhance your service capabilities. Visit zips.com to explore the items featured in this list, as well as many other useful product

\n
","postSummaryRss":"
\n
\n

Providing top-tier roadside service begins with having the right tools for the job. With so many products on the market, selecting the most effective accessories can be a challenge. To simplify your decision-making, Zip’s AW Direct has curated a list of 10 essential, roadside-qualified products to support your operations below.

\n
\n
\n
\n

Access Tools Contractor’s Lockout Kit
Item #: ACTACS

\n
\n
\n
\n
\n
\n

Don’t get locked out of profits. The Access Tools Contractor’s Lockout Kit includes 10 specialized tools designed for efficient entry. Each long-reach tool features a scratch-resistant coating to protect vehicle surfaces during use. Once the job is complete, all tools conveniently store in the included heavy-duty soft case, ensuring both organization and protection.

\n

A full list of the kit’s contents is provided below.

\n
    \n
  • Standard One-Hand Door Jack Tool
  • \n
  • Air Wedge
  • \n
  • Wedgee Wedge w/ Strip Savers
  • \n
  • Quick Max
  • \n
  • Flex Max
  • \n
  • Button Master Tool
  • \n
  • Glassman Tool
  • \n
  • Slim Jim
  • \n
  • Wonder Shield
  • \n
  • Button Strip Tool
  • \n
  • Heavy-Duty Soft Carrying Case
  • \n
\n BUY IT!\n
\n
\n
\n \n
\n
\n

Lokithor J402 PRO 3500A Jump Start Kit
Item #: J402 PRO

\n
\n
\n
\n
\n \n
\n
\n
\n

Delivering 3,500 peak amps—an increase of 500 over the original J402—the Lokithor J402 PRO 3500A Jump Start Kit is an essential addition to any service truck. When fully charged, it can start up to 60 engines before requiring a recharge, and it retains its charge for up to 30 months when not in use. The integrated BMS (Battery Management System) safeguards against overheating, short circuits, overcurrent, reverse polarity and more. For added convenience, the unit includes a built-in flashlight with three modes, making low-light connections easier and safer.

\n

IP65-rated | Dimensions: 9.46\"L x 4.19\"W x 2.36\"H | Weight: 3.86 lbs.

\n
\n
\n
\n
\n

SpillTech 5-Gallon Spill Kit
Item #: ST-SPK-5

\n
\n
\n
\n
\n \n
\n
\n
\n
\n \n
\n
\n
\n
\n

Respond to spills efficiently with the SpillTech 5-Gallon Spill Kit, available in three specialized types: HazMat, Universal and Oil-Only. The HazMat kit is ideal for hazardous or unidentified substances, while the Universal option handles water, coolants and a range of non-aggressive fluids. The Oil-Only kit is formulated to absorb oil, fuel and other petroleum-based liquids. All essential components are contained within a compact, portable five-gallon bucket, which also serves as a disposal container for used absorbents once the spill is under control.

\n

White five-gallon overpack bucket | Durable, lightweight and weather and chemical resistant | Screw-on lid with integrated lever lock

\n
\n
\n
\n
\n

Eagle Flight 12 Volt Portable Air Compressor
Item #: AC12TC

\n
\n
\n
\n
\n \n
\n
\n
\n

Quickly and efficiently inflate tires with the Eagle Flight 12-Volt Portable Air Compressor. Capable of delivering up to 120 PSI in just 90 seconds, this unit helps your team or customers get back on the road with minimal downtime. Weighing only 35 pounds, it is easy to handle and transport during service calls. For added safety and convenience, the compressor features an automatic shutoff to prevent overfilling once the desired pressure is reached.

\n

Dimensions: 20\" x 18\" x 8\" | Equipped with a three-gallon tank | Maximum load is 45 amps

\n
\n
\n
\n \n
\n

Reelcraft DP5000 Series Air/Water Dual Pedestal Hose Reel
Item #: DP5000 SERIES

\n
\n
\n
\n
\n \n
\n
\n
\n
\n \n
\n
\n
\n
\n

Designed for direct truck mounting, the Reelcraft DP5000 Series Air/Water Dual Pedestal Hose Reel provides a reliable solution for delivering air or water to vehicles in need. Its dual pedestal structure and durable steel construction minimize vibration and maintain stability during transit. With seven versatile mounting options, it offers flexible installation without occupying excessive space. Once on site, the hose extends up to 50 feet and delivers up to 300 PSI of pressure.

\n

Powder-coat finish | Buna seals | Steel internal fluid path

\n
\n
\n
\n \n
\n

GoJak RakJak 2-Ton Air Jack
Item #: GJ-AIR-JAK

\n
\n
\n
\n
\n \n
\n
\n
\n
\n \n
\n
\n
\n
\n

Efficient and user-friendly, the GoJak RakJak 2-Ton Air Jack is an ideal solution for roadside vehicle lifting. Available in two models, the double bag design extends up to 13.75 inches, while the triple bag version extends up to 18 inches. Internal telescoping steel rods provide structural support to maintain a two-ton lifting capacity. For added safety, the unit includes a pressure-release valve to prevent over-inflation.

\n

Diameter: 10\" | Air Pressure: 105 PSI | Extended handle sold separately

\n
\n
\n
\n \n
\n

PSS FirstGard 28\" Foldable Safety Cone
Item #: PSS-FG28

\n
\n
\n
\n
\n \n
\n
\n
\n
\n
\n

Ensure maximum visibility on the job with the PSS FirstGard 28\" Foldable Safety Cone. Engineered for both portability and stability, the cone stands 28” tall with a 29\" x 29\" base. When collapsed, it folds down to just 1.5 inches, allowing for easy storage and transport. Rubber feet on each leg help keep the cone securely in place, even on uneven surfaces. Available in high-visibility fluorescent green or safety orange, it enhances safety by ensuring you're clearly seen at the scene.

\n

Molded-in handles | Reflective engineering-grade sheeting | High-density polyethylene

\n
\n
\n
\n
\n \n
\n
\n
\n
\n
\n
\n
\n \n
\n

Safety Seal Over the Road and Heavy Equipment Tire Repair Kit
Item #: SSKHE

\n
\n
\n
\n
\n \n
\n
\n
\n

Minimize downtime with the Over the Road and Heavy Equipment Tire Repair Kit from Safety Seal, designed to handle punctures in even the thickest treads. This comprehensive kit includes 18 vulcanized 16-inch repair seals, providing a temporary fix that allows vehicles to reach a service facility safely. It also features an insertion tool, a seven-inch spiral probe and lubricant—everything needed for fast, effective roadside tire repairs.

\n

Dimensions (molded plastic case): 12\" x 8\" x 2.5\" | Weight: 3.6 lbs. | Made in the USA

\n
\n
\n
\n \n
\n

Tork Advanced ShopMax Centerfeed Shop Towels
Item #: 13-24-40

\n
\n
\n
\n
\n \n
\n
\n
\n

For fast, effective clean-up on the job, Tork Advanced ShopMax Centerfeed Shop Towels offer a reliable solution. These highly absorbent towels are designed to handle oil, grease, lubricants and dirt, yet remain soft enough for use on hands and face. Their strong, durable construction allows them to perform even when wet. Packaged in a convenient self-dispensing box containing 200 wipes, they deliver both performance and value.

\n

Sheet length: 13\" | Single ply | Roll width: 9\"

\n
\n
\n
\n \n
\n

SureCan 5 Gallon Yellow Diesel Can
Item #: SC5D

\n
\n
\n
\n
\n \n
\n
\n
\n
\n
\n

Efficiently deliver diesel with the SureCan 5-Gallon Yellow Diesel Can, constructed from durable high-density polyethylene for long-lasting use. Featuring an ergonomically designed grip, the can ensures a comfortable and secure hold. For controlled pouring, it includes an intuitive release and lock flow trigger, operated with your thumb. The self-ventilating design promotes smooth and steady flow, while the flexible hose rotates 180° to provide maximum convenience during use.

\n

Durable 6-layer design | Tethered nozzle cap | OSHA-certified

\n
\n
\n
\n
\n \n
\n
\n
\n
\n
\n
\n

Understanding the essential tools for any job is crucial to success. We hope this list has provided valuable insights to help you expand your toolkit and tackle a wide range of tasks. At Zip's AW Direct, we offer a wide selection of durable, high-quality accessories designed to enhance your service capabilities. Visit zips.com to explore the items featured in this list, as well as many other useful product

\n
","postTemplate":"zips-basic-theme/templates/blog-post.html","previewImageSrc":null,"previewKey":"SgTSsYkF","previousPostFeaturedImage":"https://48463649.fs1.hubspotusercontent-na1.net/hubfs/48463649/top-5-mistakes-buying-car-carrier.png","previousPostFeaturedImageAltText":"Top 5 mistakes when buying a car carrier","previousPostName":"Top 5 Mistakes When Buying a New Car Carrier","previousPostSlug":"blog/top-5-mistakes-when-buying-a-new-car-carrier","processingStatus":"PUBLISHED","propertyForDynamicPageCanonicalUrl":null,"propertyForDynamicPageFeaturedImage":null,"propertyForDynamicPageMetaDescription":null,"propertyForDynamicPageSlug":null,"propertyForDynamicPageTitle":null,"publicAccessRules":[],"publicAccessRulesEnabled":false,"publishDate":1747054800000,"publishDateLocalTime":1747054800000,"publishDateLocalized":{"date":1747054800000,"format":"medium","language":null},"publishImmediately":true,"publishTimezoneOffset":null,"publishedAt":1755714435455,"publishedByEmail":null,"publishedById":79766377,"publishedByName":null,"publishedUrl":"/blog/zips-top-10-accessories-for-their-service-truck","resolvedDomain":"www.zips.com","resolvedLanguage":null,"rssBody":"
\n
\n

Providing top-tier roadside service begins with having the right tools for the job. With so many products on the market, selecting the most effective accessories can be a challenge. To simplify your decision-making, Zip’s AW Direct has curated a list of 10 essential, roadside-qualified products to support your operations below.

\n
\n
\n
\n

\"num1\"

\n

Access Tools Contractor’s Lockout Kit
Item #: ACTACS

\n
\n
\n
\"num1-img1\" \"num1-img2\"
\n
\n

Don’t get locked out of profits. The Access Tools Contractor’s Lockout Kit includes 10 specialized tools designed for efficient entry. Each long-reach tool features a scratch-resistant coating to protect vehicle surfaces during use. Once the job is complete, all tools conveniently store in the included heavy-duty soft case, ensuring both organization and protection.

\n

A full list of the kit’s contents is provided below.

\n
    \n
  • Standard One-Hand Door Jack Tool
  • \n
  • Air Wedge
  • \n
  • Wedgee Wedge w/ Strip Savers
  • \n
  • Quick Max
  • \n
  • Flex Max
  • \n
  • Button Master Tool
  • \n
  • Glassman Tool
  • \n
  • Slim Jim
  • \n
  • Wonder Shield
  • \n
  • Button Strip Tool
  • \n
  • Heavy-Duty Soft Carrying Case
  • \n
\nBUY IT!
\n
\n
\n\"line-break\" \n
\n
\n

\"num2\"

\n

Lokithor J402 PRO 3500A Jump Start Kit
Item #: J402 PRO

\n
\n
\n
\n
\"num2-img1\"
\n
\"num2-img2\"
\n
\n

Delivering 3,500 peak amps—an increase of 500 over the original J402—the Lokithor J402 PRO 3500A Jump Start Kit is an essential addition to any service truck. When fully charged, it can start up to 60 engines before requiring a recharge, and it retains its charge for up to 30 months when not in use. The integrated BMS (Battery Management System) safeguards against overheating, short circuits, overcurrent, reverse polarity and more. For added convenience, the unit includes a built-in flashlight with three modes, making low-light connections easier and safer.

\n

IP65-rated | Dimensions: 9.46\"L x 4.19\"W x 2.36\"H | Weight: 3.86 lbs.

\n
\n
\n\"line-break\"\n
\n
\n

\"num3\"

\n

SpillTech 5-Gallon Spill Kit
Item #: ST-SPK-5

\n
\n
\n
\n
\"num8-img1\"
\n
\n
\n
\n
\n
\n
\n

Respond to spills efficiently with the SpillTech 5-Gallon Spill Kit, available in three specialized types: HazMat, Universal and Oil-Only. The HazMat kit is ideal for hazardous or unidentified substances, while the Universal option handles water, coolants and a range of non-aggressive fluids. The Oil-Only kit is formulated to absorb oil, fuel and other petroleum-based liquids. All essential components are contained within a compact, portable five-gallon bucket, which also serves as a disposal container for used absorbents once the spill is under control.

\n

White five-gallon overpack bucket | Durable, lightweight and weather and chemical resistant | Screw-on lid with integrated lever lock

\n
\n
\n\"line-break\"\n
\n
\n

\"num4\"

\n

Eagle Flight 12 Volt Portable Air Compressor
Item #: AC12TC

\n
\n
\n
\n
\"num3-img1-2\"
\n
\"num3-img2-2\"
\n
\n

Quickly and efficiently inflate tires with the Eagle Flight 12-Volt Portable Air Compressor. Capable of delivering up to 120 PSI in just 90 seconds, this unit helps your team or customers get back on the road with minimal downtime. Weighing only 35 pounds, it is easy to handle and transport during service calls. For added safety and convenience, the compressor features an automatic shutoff to prevent overfilling once the desired pressure is reached.

\n

Dimensions: 20\" x 18\" x 8\" | Equipped with a three-gallon tank | Maximum load is 45 amps

\n
\n
\n\"line-break\"\n
\n
\n

\"num3\"

\n

Reelcraft DP5000 Series Air/Water Dual Pedestal Hose Reel
Item #: DP5000 SERIES

\n
\n
\n
\n
\"num5-img1\"
\n
\n
\n
\n
\n
\n
\n

Designed for direct truck mounting, the Reelcraft DP5000 Series Air/Water Dual Pedestal Hose Reel provides a reliable solution for delivering air or water to vehicles in need. Its dual pedestal structure and durable steel construction minimize vibration and maintain stability during transit. With seven versatile mounting options, it offers flexible installation without occupying excessive space. Once on site, the hose extends up to 50 feet and delivers up to 300 PSI of pressure.

\n

Powder-coat finish | Buna seals | Steel internal fluid path

\n
\n
\n\"line-break\"\n
\n
\n

\"num3\"

\n

GoJak RakJak 2-Ton Air Jack
Item #: GJ-AIR-JAK

\n
\n
\n
\n
\"num4-img1\"
\n
\n
\n
\n
\n
\n
\n

Efficient and user-friendly, the GoJak RakJak 2-Ton Air Jack is an ideal solution for roadside vehicle lifting. Available in two models, the double bag design extends up to 13.75 inches, while the triple bag version extends up to 18 inches. Internal telescoping steel rods provide structural support to maintain a two-ton lifting capacity. For added safety, the unit includes a pressure-release valve to prevent over-inflation.

\n

Diameter: 10\" | Air Pressure: 105 PSI | Extended handle sold separately

\n
\n
\n\"line-break\"\n
\n
\n

\"num2\"

\n

PSS FirstGard 28\" Foldable Safety Cone
Item #: PSS-FG28

\n
\n
\n
\n
\"num7-img1\"
\n
\"num7-img2\"
\n
\n
\n
\n

Ensure maximum visibility on the job with the PSS FirstGard 28\" Foldable Safety Cone. Engineered for both portability and stability, the cone stands 28” tall with a 29\" x 29\" base. When collapsed, it folds down to just 1.5 inches, allowing for easy storage and transport. Rubber feet on each leg help keep the cone securely in place, even on uneven surfaces. Available in high-visibility fluorescent green or safety orange, it enhances safety by ensuring you're clearly seen at the scene.

\n

Molded-in handles | Reflective engineering-grade sheeting | High-density polyethylene

\n
\n
\n
\n
\n
\n
\n
\n
\n
\n\"line-break\"\n
\n
\n

\"num2\"

\n

Safety Seal Over the Road and Heavy Equipment Tire Repair Kit
Item #: SSKHE

\n
\n
\n
\n
\"num6-img1\"
\n
\"num6-img2\"
\n
\n

Minimize downtime with the Over the Road and Heavy Equipment Tire Repair Kit from Safety Seal, designed to handle punctures in even the thickest treads. This comprehensive kit includes 18 vulcanized 16-inch repair seals, providing a temporary fix that allows vehicles to reach a service facility safely. It also features an insertion tool, a seven-inch spiral probe and lubricant—everything needed for fast, effective roadside tire repairs.

\n

Dimensions (molded plastic case): 12\" x 8\" x 2.5\" | Weight: 3.6 lbs. | Made in the USA

\n
\n
\n\"line-break\"\n
\n
\n

\"num2\"

\n

Tork Advanced ShopMax Centerfeed Shop Towels
Item #: 13-24-40

\n
\n
\n
\n
\"num9-img1\"
\n
\"num9-img2\"
\n
\n

For fast, effective clean-up on the job, Tork Advanced ShopMax Centerfeed Shop Towels offer a reliable solution. These highly absorbent towels are designed to handle oil, grease, lubricants and dirt, yet remain soft enough for use on hands and face. Their strong, durable construction allows them to perform even when wet. Packaged in a convenient self-dispensing box containing 200 wipes, they deliver both performance and value.

\n

Sheet length: 13\" | Single ply | Roll width: 9\"

\n
\n
\n\"line-break\"\n
\n
\n

\"num2\"

\n

SureCan 5 Gallon Yellow Diesel Can
Item #: SC5D

\n
\n
\n
\n
\"num10-img1\"
\n
\"num10-img2\"
\n
\n
\n
\n

Efficiently deliver diesel with the SureCan 5-Gallon Yellow Diesel Can, constructed from durable high-density polyethylene for long-lasting use. Featuring an ergonomically designed grip, the can ensures a comfortable and secure hold. For controlled pouring, it includes an intuitive release and lock flow trigger, operated with your thumb. The self-ventilating design promotes smooth and steady flow, while the flexible hose rotates 180° to provide maximum convenience during use.

\n

Durable 6-layer design | Tethered nozzle cap | OSHA-certified

\n
\n
\n
\n
\n
\n
\n
\n
\n
\n\"line-break\"\n

Understanding the essential tools for any job is crucial to success. We hope this list has provided valuable insights to help you expand your toolkit and tackle a wide range of tasks. At Zip's AW Direct, we offer a wide selection of durable, high-quality accessories designed to enhance your service capabilities. Visit zips.com to explore the items featured in this list, as well as many other useful product

\n
","rssSummary":"
\n
\n

Providing top-tier roadside service begins with having the right tools for the job. With so many products on the market, selecting the most effective accessories can be a challenge. To simplify your decision-making, Zip’s AW Direct has curated a list of 10 essential, roadside-qualified products to support your operations below.

\n
\n
\n
\n

\"num1\"

\n

Access Tools Contractor’s Lockout Kit
Item #: ACTACS

\n
\n
\n
\"num1-img1\" \"num1-img2\"
\n
\n

Don’t get locked out of profits. The Access Tools Contractor’s Lockout Kit includes 10 specialized tools designed for efficient entry. Each long-reach tool features a scratch-resistant coating to protect vehicle surfaces during use. Once the job is complete, all tools conveniently store in the included heavy-duty soft case, ensuring both organization and protection.

\n

A full list of the kit’s contents is provided below.

\n
    \n
  • Standard One-Hand Door Jack Tool
  • \n
  • Air Wedge
  • \n
  • Wedgee Wedge w/ Strip Savers
  • \n
  • Quick Max
  • \n
  • Flex Max
  • \n
  • Button Master Tool
  • \n
  • Glassman Tool
  • \n
  • Slim Jim
  • \n
  • Wonder Shield
  • \n
  • Button Strip Tool
  • \n
  • Heavy-Duty Soft Carrying Case
  • \n
\nBUY IT!
\n
\n
\n\"line-break\" \n
\n
\n

\"num2\"

\n

Lokithor J402 PRO 3500A Jump Start Kit
Item #: J402 PRO

\n
\n
\n
\n
\"num2-img1\"
\n
\"num2-img2\"
\n
\n

Delivering 3,500 peak amps—an increase of 500 over the original J402—the Lokithor J402 PRO 3500A Jump Start Kit is an essential addition to any service truck. When fully charged, it can start up to 60 engines before requiring a recharge, and it retains its charge for up to 30 months when not in use. The integrated BMS (Battery Management System) safeguards against overheating, short circuits, overcurrent, reverse polarity and more. For added convenience, the unit includes a built-in flashlight with three modes, making low-light connections easier and safer.

\n

IP65-rated | Dimensions: 9.46\"L x 4.19\"W x 2.36\"H | Weight: 3.86 lbs.

\n
\n
\n\"line-break\"\n
\n
\n

\"num3\"

\n

SpillTech 5-Gallon Spill Kit
Item #: ST-SPK-5

\n
\n
\n
\n
\"num8-img1\"
\n
\n
\n
\n
\n
\n
\n

Respond to spills efficiently with the SpillTech 5-Gallon Spill Kit, available in three specialized types: HazMat, Universal and Oil-Only. The HazMat kit is ideal for hazardous or unidentified substances, while the Universal option handles water, coolants and a range of non-aggressive fluids. The Oil-Only kit is formulated to absorb oil, fuel and other petroleum-based liquids. All essential components are contained within a compact, portable five-gallon bucket, which also serves as a disposal container for used absorbents once the spill is under control.

\n

White five-gallon overpack bucket | Durable, lightweight and weather and chemical resistant | Screw-on lid with integrated lever lock

\n
\n
\n\"line-break\"\n
\n
\n

\"num4\"

\n

Eagle Flight 12 Volt Portable Air Compressor
Item #: AC12TC

\n
\n
\n
\n
\"num3-img1-2\"
\n
\"num3-img2-2\"
\n
\n

Quickly and efficiently inflate tires with the Eagle Flight 12-Volt Portable Air Compressor. Capable of delivering up to 120 PSI in just 90 seconds, this unit helps your team or customers get back on the road with minimal downtime. Weighing only 35 pounds, it is easy to handle and transport during service calls. For added safety and convenience, the compressor features an automatic shutoff to prevent overfilling once the desired pressure is reached.

\n

Dimensions: 20\" x 18\" x 8\" | Equipped with a three-gallon tank | Maximum load is 45 amps

\n
\n
\n\"line-break\"\n
\n
\n

\"num3\"

\n

Reelcraft DP5000 Series Air/Water Dual Pedestal Hose Reel
Item #: DP5000 SERIES

\n
\n
\n
\n
\"num5-img1\"
\n
\n
\n
\n
\n
\n
\n

Designed for direct truck mounting, the Reelcraft DP5000 Series Air/Water Dual Pedestal Hose Reel provides a reliable solution for delivering air or water to vehicles in need. Its dual pedestal structure and durable steel construction minimize vibration and maintain stability during transit. With seven versatile mounting options, it offers flexible installation without occupying excessive space. Once on site, the hose extends up to 50 feet and delivers up to 300 PSI of pressure.

\n

Powder-coat finish | Buna seals | Steel internal fluid path

\n
\n
\n\"line-break\"\n
\n
\n

\"num3\"

\n

GoJak RakJak 2-Ton Air Jack
Item #: GJ-AIR-JAK

\n
\n
\n
\n
\"num4-img1\"
\n
\n
\n
\n
\n
\n
\n

Efficient and user-friendly, the GoJak RakJak 2-Ton Air Jack is an ideal solution for roadside vehicle lifting. Available in two models, the double bag design extends up to 13.75 inches, while the triple bag version extends up to 18 inches. Internal telescoping steel rods provide structural support to maintain a two-ton lifting capacity. For added safety, the unit includes a pressure-release valve to prevent over-inflation.

\n

Diameter: 10\" | Air Pressure: 105 PSI | Extended handle sold separately

\n
\n
\n\"line-break\"\n
\n
\n

\"num2\"

\n

PSS FirstGard 28\" Foldable Safety Cone
Item #: PSS-FG28

\n
\n
\n
\n
\"num7-img1\"
\n
\"num7-img2\"
\n
\n
\n
\n

Ensure maximum visibility on the job with the PSS FirstGard 28\" Foldable Safety Cone. Engineered for both portability and stability, the cone stands 28” tall with a 29\" x 29\" base. When collapsed, it folds down to just 1.5 inches, allowing for easy storage and transport. Rubber feet on each leg help keep the cone securely in place, even on uneven surfaces. Available in high-visibility fluorescent green or safety orange, it enhances safety by ensuring you're clearly seen at the scene.

\n

Molded-in handles | Reflective engineering-grade sheeting | High-density polyethylene

\n
\n
\n
\n
\n
\n
\n
\n
\n
\n\"line-break\"\n
\n
\n

\"num2\"

\n

Safety Seal Over the Road and Heavy Equipment Tire Repair Kit
Item #: SSKHE

\n
\n
\n
\n
\"num6-img1\"
\n
\"num6-img2\"
\n
\n

Minimize downtime with the Over the Road and Heavy Equipment Tire Repair Kit from Safety Seal, designed to handle punctures in even the thickest treads. This comprehensive kit includes 18 vulcanized 16-inch repair seals, providing a temporary fix that allows vehicles to reach a service facility safely. It also features an insertion tool, a seven-inch spiral probe and lubricant—everything needed for fast, effective roadside tire repairs.

\n

Dimensions (molded plastic case): 12\" x 8\" x 2.5\" | Weight: 3.6 lbs. | Made in the USA

\n
\n
\n\"line-break\"\n
\n
\n

\"num2\"

\n

Tork Advanced ShopMax Centerfeed Shop Towels
Item #: 13-24-40

\n
\n
\n
\n
\"num9-img1\"
\n
\"num9-img2\"
\n
\n

For fast, effective clean-up on the job, Tork Advanced ShopMax Centerfeed Shop Towels offer a reliable solution. These highly absorbent towels are designed to handle oil, grease, lubricants and dirt, yet remain soft enough for use on hands and face. Their strong, durable construction allows them to perform even when wet. Packaged in a convenient self-dispensing box containing 200 wipes, they deliver both performance and value.

\n

Sheet length: 13\" | Single ply | Roll width: 9\"

\n
\n
\n\"line-break\"\n
\n
\n

\"num2\"

\n

SureCan 5 Gallon Yellow Diesel Can
Item #: SC5D

\n
\n
\n
\n
\"num10-img1\"
\n
\"num10-img2\"
\n
\n
\n
\n

Efficiently deliver diesel with the SureCan 5-Gallon Yellow Diesel Can, constructed from durable high-density polyethylene for long-lasting use. Featuring an ergonomically designed grip, the can ensures a comfortable and secure hold. For controlled pouring, it includes an intuitive release and lock flow trigger, operated with your thumb. The self-ventilating design promotes smooth and steady flow, while the flexible hose rotates 180° to provide maximum convenience during use.

\n

Durable 6-layer design | Tethered nozzle cap | OSHA-certified

\n
\n
\n
\n
\n
\n
\n
\n
\n
\n\"line-break\"\n

Understanding the essential tools for any job is crucial to success. We hope this list has provided valuable insights to help you expand your toolkit and tackle a wide range of tasks. At Zip's AW Direct, we offer a wide selection of durable, high-quality accessories designed to enhance your service capabilities. Visit zips.com to explore the items featured in this list, as well as many other useful product

\n
","rssSummaryFeaturedImage":"https://48463649.fs1.hubspotusercontent-na1.net/hubfs/48463649/header-2.png","scheduledUpdateDate":0,"screenshotPreviewTakenAt":1770056835311,"screenshotPreviewUrl":"https://cdn1.hubspot.net/hubshotv3/prod/e/0/8def8a46-5dcc-48b4-9cdc-69eef91f0ec4.png","sections":{},"securityState":"NONE","siteId":null,"slug":"blog/zips-top-10-accessories-for-their-service-truck","stagedFrom":null,"state":"PUBLISHED","stateWhenDeleted":null,"structuredContentPageType":null,"structuredContentType":null,"styleOverrideId":null,"subcategory":"normal_blog_post","syncedWithBlogRoot":true,"tagIds":[192169769490,192169769491,192174528148,192174529697,192174572389,194718191114,194719586666],"tagList":[{"categoryId":3,"cdnPurgeEmbargoTime":null,"contentIds":[],"cosObjectType":"TAG","created":1751598346713,"deletedAt":0,"description":"","id":192169769490,"label":"Towing & Recovery","language":null,"name":"Towing & Recovery","portalId":48463649,"slug":"towing-recovery","translatedFromId":null,"translations":{},"updated":1751598346713},{"categoryId":3,"cdnPurgeEmbargoTime":null,"contentIds":[],"cosObjectType":"TAG","created":1751598346811,"deletedAt":0,"description":"","id":192169769491,"label":"Roadside Assistance","language":null,"name":"Roadside Assistance","portalId":48463649,"slug":"roadside-assistance","translatedFromId":null,"translations":{},"updated":1751598346811},{"categoryId":3,"cdnPurgeEmbargoTime":null,"contentIds":[],"cosObjectType":"TAG","created":1751601475164,"deletedAt":0,"description":"","id":192174528148,"label":"Automotive","language":null,"name":"Automotive","portalId":48463649,"slug":"automotive","translatedFromId":null,"translations":{},"updated":1751601475164},{"categoryId":3,"cdnPurgeEmbargoTime":null,"contentIds":[],"cosObjectType":"TAG","created":1751602285139,"deletedAt":0,"description":"","id":192174529697,"label":"Construction","language":null,"name":"Construction","portalId":48463649,"slug":"construction","translatedFromId":null,"translations":{},"updated":1751602285139},{"categoryId":3,"cdnPurgeEmbargoTime":null,"contentIds":[],"cosObjectType":"TAG","created":1751602285235,"deletedAt":0,"description":"","id":192174572389,"label":"Municipalities","language":null,"name":"Municipalities","portalId":48463649,"slug":"municipalities","translatedFromId":null,"translations":{},"updated":1751602285235},{"categoryId":3,"cdnPurgeEmbargoTime":null,"contentIds":[],"cosObjectType":"TAG","created":1755545220719,"deletedAt":0,"description":"","id":194718191114,"label":"Trending","language":null,"name":"Trending","portalId":48463649,"slug":"trending","translatedFromId":null,"translations":{},"updated":1755545220719},{"categoryId":3,"cdnPurgeEmbargoTime":null,"contentIds":[],"cosObjectType":"TAG","created":1755545331471,"deletedAt":0,"description":"","id":194719586666,"label":"Product Guides","language":null,"name":"Product Guides","portalId":48463649,"slug":"product-guides","translatedFromId":null,"translations":{},"updated":1755545331471}],"tagNames":["Towing & Recovery","Roadside Assistance","Automotive","Construction","Municipalities","Trending","Product Guides"],"teamPerms":[],"templatePath":"","templatePathForRender":"zips-basic-theme/templates/blog-post.html","textToAudioFileId":null,"textToAudioGenerationRequestId":null,"themePath":null,"themeSettingsValues":null,"title":"Zip's Top 10 Accessories for Your Service Truck","tmsId":null,"topicIds":[192169769490,192169769491,192174528148,192174529697,192174572389,194718191114,194719586666],"topicList":[{"categoryId":3,"cdnPurgeEmbargoTime":null,"contentIds":[],"cosObjectType":"TAG","created":1751598346713,"deletedAt":0,"description":"","id":192169769490,"label":"Towing & Recovery","language":null,"name":"Towing & Recovery","portalId":48463649,"slug":"towing-recovery","translatedFromId":null,"translations":{},"updated":1751598346713},{"categoryId":3,"cdnPurgeEmbargoTime":null,"contentIds":[],"cosObjectType":"TAG","created":1751598346811,"deletedAt":0,"description":"","id":192169769491,"label":"Roadside Assistance","language":null,"name":"Roadside Assistance","portalId":48463649,"slug":"roadside-assistance","translatedFromId":null,"translations":{},"updated":1751598346811},{"categoryId":3,"cdnPurgeEmbargoTime":null,"contentIds":[],"cosObjectType":"TAG","created":1751601475164,"deletedAt":0,"description":"","id":192174528148,"label":"Automotive","language":null,"name":"Automotive","portalId":48463649,"slug":"automotive","translatedFromId":null,"translations":{},"updated":1751601475164},{"categoryId":3,"cdnPurgeEmbargoTime":null,"contentIds":[],"cosObjectType":"TAG","created":1751602285139,"deletedAt":0,"description":"","id":192174529697,"label":"Construction","language":null,"name":"Construction","portalId":48463649,"slug":"construction","translatedFromId":null,"translations":{},"updated":1751602285139},{"categoryId":3,"cdnPurgeEmbargoTime":null,"contentIds":[],"cosObjectType":"TAG","created":1751602285235,"deletedAt":0,"description":"","id":192174572389,"label":"Municipalities","language":null,"name":"Municipalities","portalId":48463649,"slug":"municipalities","translatedFromId":null,"translations":{},"updated":1751602285235},{"categoryId":3,"cdnPurgeEmbargoTime":null,"contentIds":[],"cosObjectType":"TAG","created":1755545220719,"deletedAt":0,"description":"","id":194718191114,"label":"Trending","language":null,"name":"Trending","portalId":48463649,"slug":"trending","translatedFromId":null,"translations":{},"updated":1755545220719},{"categoryId":3,"cdnPurgeEmbargoTime":null,"contentIds":[],"cosObjectType":"TAG","created":1755545331471,"deletedAt":0,"description":"","id":194719586666,"label":"Product Guides","language":null,"name":"Product Guides","portalId":48463649,"slug":"product-guides","translatedFromId":null,"translations":{},"updated":1755545331471}],"topicNames":["Towing & Recovery","Roadside Assistance","Automotive","Construction","Municipalities","Trending","Product Guides"],"topics":[192169769490,192169769491,192174528148,192174529697,192174572389,194718191114,194719586666],"translatedContent":{},"translatedFromId":null,"translations":{},"tweet":null,"tweetAt":null,"tweetImmediately":false,"unpublishedAt":0,"updated":1755714435460,"updatedById":79766377,"upsizeFeaturedImage":false,"url":"/blog/zips-top-10-accessories-for-their-service-truck","useFeaturedImage":true,"userPerms":[],"views":null,"visibleToAll":null,"widgetContainers":{},"widgetcontainers":{},"widgets":{}},{"ab":false,"abStatus":null,"abTestId":null,"abVariation":false,"abVariationAutomated":false,"absoluteUrl":"/blog/best-vehicle-lockout-kits","afterPostBody":null,"aifeatures":null,"allowedSlugConflict":false,"analytics":null,"analyticsPageId":"192172328787","analyticsPageType":"blog-post","approvalStatus":null,"archived":false,"archivedAt":0,"archivedInDashboard":false,"areCommentsAllowed":true,"attachedStylesheets":[],"audienceAccess":"PUBLIC","author":null,"authorName":null,"authorUsername":null,"blogAuthor":{"avatar":"","bio":"","cdnPurgeEmbargoTime":null,"cosObjectType":"BLOG_AUTHOR","created":1755187092136,"deletedAt":0,"displayName":"Cameron Hanson","email":null,"facebook":"","fullName":"Cameron Hanson","gravatarUrl":null,"hasSocialProfiles":false,"id":194499322288,"label":"Cameron Hanson","language":"en","linkedin":"","name":" Cameron Hanson","portalId":48463649,"slug":"cameron-hanson","translatedFromId":null,"translations":{},"twitter":"","twitterUsername":"","updated":1755187092136,"userId":null,"username":null,"website":""},"blogAuthorId":194499322288,"blogAuthorIdList":[194499322288],"blogAuthorList":[{"avatar":"","bio":"","cdnPurgeEmbargoTime":null,"cosObjectType":"BLOG_AUTHOR","created":1755187092136,"deletedAt":0,"displayName":"Cameron Hanson","email":null,"facebook":"","fullName":"Cameron Hanson","gravatarUrl":null,"hasSocialProfiles":false,"id":194499322288,"label":"Cameron Hanson","language":"en","linkedin":"","name":" Cameron Hanson","portalId":48463649,"slug":"cameron-hanson","translatedFromId":null,"translations":{},"twitter":"","twitterUsername":"","updated":1755187092136,"userId":null,"username":null,"website":""}],"blogPostAuthor":{"avatar":"","bio":"","cdnPurgeEmbargoTime":null,"cosObjectType":"BLOG_AUTHOR","created":1755187092136,"deletedAt":0,"displayName":"Cameron Hanson","email":null,"facebook":"","fullName":"Cameron Hanson","gravatarUrl":null,"hasSocialProfiles":false,"id":194499322288,"label":"Cameron Hanson","language":"en","linkedin":"","name":" Cameron Hanson","portalId":48463649,"slug":"cameron-hanson","translatedFromId":null,"translations":{},"twitter":"","twitterUsername":"","updated":1755187092136,"userId":null,"username":null,"website":""},"blogPostScheduleTaskUid":null,"blogPublishInstantEmailCampaignId":null,"blogPublishInstantEmailRetryCount":null,"blogPublishInstantEmailTaskUid":null,"blogPublishToSocialMediaTask":"DONE_NOT_SENT","blueprintTypeId":0,"businessUnitId":null,"campaign":null,"campaignName":null,"campaignUtm":null,"category":3,"categoryId":3,"cdnPurgeEmbargoTime":null,"checkPostLevelAudienceAccessFirst":true,"clonedFrom":null,"composeBody":null,"compositionId":0,"contentAccessRuleIds":[],"contentAccessRuleTypes":[],"contentGroup":190096341139,"contentGroupId":190096341139,"contentTypeCategory":3,"contentTypeCategoryId":3,"contentTypeId":null,"created":1751604066362,"createdByAgent":null,"createdById":74657203,"createdTime":1751604066362,"crmObjectId":null,"css":{},"cssText":"","ctaClicks":null,"ctaViews":null,"currentState":"PUBLISHED","currentlyPublished":true,"deletedAt":0,"deletedBy":null,"deletedByEmail":null,"deletedById":null,"domain":"","dynamicPageDataSourceId":null,"dynamicPageDataSourceType":null,"dynamicPageHubDbTableId":null,"enableDomainStylesheets":null,"enableGoogleAmpOutputOverride":false,"enableLayoutStylesheets":null,"errors":[],"featuredImage":"https://48463649.fs1.hubspotusercontent-na1.net/hubfs/48463649/Blog/lockout-tools-header.png","featuredImageAltText":"Lockout kit assortment","featuredImageHeight":481,"featuredImageLength":0,"featuredImageWidth":869,"flexAreas":{},"folderId":null,"footerHtml":null,"footerTemplatePath":null,"footerVariantName":null,"freezeDate":1740060000000,"generateJsonLdEnabledOverride":true,"globalBlockOverrides":{},"hasContentAccessRules":false,"hasUserChanges":true,"headHtml":"","header":null,"headerTemplatePath":null,"headerVariantName":null,"htmlTitle":"Best Vehicle Lockout Kits","id":192172328787,"includeDefaultCustomCss":null,"isCaptchaRequired":true,"isCrawlableByBots":false,"isDraft":false,"isInstantEmailEnabled":false,"isPublished":true,"isSocialPublishingEnabled":false,"keywords":[],"label":"Best Vehicle Lockout Kits","language":"en","lastEditSessionId":null,"lastEditUpdateId":null,"layoutSections":{},"legacyBlogTabid":null,"legacyId":null,"legacyPostGuid":null,"linkRelCanonicalUrl":"","listTemplate":"","liveDomain":"www.zips.com","mab":false,"mabExperimentId":null,"mabMaster":false,"mabVariant":false,"marketingCampaignGuids":[],"meta":{"html_title":"Best Vehicle Lockout Kits","public_access_rules":[],"public_access_rules_enabled":false,"use_featured_image":true,"tag_ids":[192169769490,192174528148,194718191114,194719586666],"topic_ids":[192169769490,192174528148,194718191114,194719586666],"post_summary":"
\n

Doesn’t matter who locked the keys inside the car. What matters is what you’re going to do to get them out. Zip’s AW Direct offers several car-opening kits to help automotive professionals gain access to locked vehicles.

\n

In today’s blog, we’re going to look at some of our best-selling kits from different manufacturers. We’ll start with basic packages and finish with the most comprehensive kits, going over each lockout kit contents. Each one brings its own value, price-point and distinct lockout advantages.

\n

Steck’s BigEasy Door Tool Kit See Details

\n
\n
\n
    \n
  • (1) 4-1/2’ L long reach tool
  • \n
  • (1) Glow-in-the-dark tip
  • \n
  • (1) Window wedge
  • \n
  • (1) Paint protector
  • \n
  • (1) Lock knob plastic strip tool
  • \n
\n
\n
\n

\"lockout-tools-1\"

\n
\n
\n

Steck’s BigEasy door tool kit includes a fluorescent pink long reach tool with glow-in-the-dark properties. This allows for better visibility in low-light situations. Featuring a T-handle for better maneuvering, the long reach tool’s tip will appear white in the daylight and then bright green at night.

\n

This kit also features a window wedge and other essential accessories for most unlock scenarios. With customer service in mind, the paint protector, rubber tip and plastic strip all combine to prevent unwanted scratches to the vehicle.

\n

AW Direct Big Blue Long-Reach Door Tool Kit See Details

\n
\n
\n
    \n
  • (1) Rigid plastic window wedge
  • \n
  • (1) Long reach door tool
  • \n
  • (1) Protective rubber tip
  • \n
  • (1) Inflatable air wedge
  • \n
  • (1) Strip tool
  • \n
  • (1) Carrying case
  • \n
\n

This convenient door tool kit from AW Direct includes a zippered, black carrying case so your tools will stay organized, stay together, will be easy to transport and will be ready to go to work when you need them.

\n
\n
\n

\"lockout-tools-2\"

\n
\n
\n

Pro-Lok 4 Piece Extra Length Long Arm Lockout Kit See Details

\n
\n
\n
    \n
  • (1) Extra Long Arm tool
  • \n
  • (1) Plastic sleeve
  • \n
  • (1) Pump wedge
  • \n
  • (1) Mini rubber wedge
  • \n
\n

By now, we’ve established the importance of protecting your customer’s vehicle and finish with soft air wedges, plastic paint protectors and rubber rod tips. What makes this four-piece kit from Pro-Lok different from the first two is the additional length of the long reach tool.

\n
\n
\n

\"lockout-tools-3\"

\n
\n
\n

At 76”, the Extra Long Arm tool is nearly two feet longer than the standard 4-1/2’ long reach tool. Most of these door tools work alongside the window to reach door control buttons. With Pro-Lok’s kit, you now have the ability to reach across the vehicle’s interior.

\n

With a direct line of sight, you can easily position the long reach tool to depress the unlock button, access the pull handle, lift the lock button and even retrieve the keys. With this improved viewing angle, the only better position would be from inside the vehicle.

\n

Sully Tools Basic Door Tool Kit See Details

\n
\n
\n
    \n
  • (1) Sully Pouch carry case
  • \n
  • (1) Sully Strip
  • \n
  • (2) Handle Wedges
  • \n
  • (1 ) Sticky L
  • \n
  • (1) Sully J
  • \n
  • (1) Sully Big Foot
  • \n
  • (1) Sully Dipper
  • \n
  • (1) Sully L
  • \n
  • (1) Sully Drop Hook
  • \n
  • (1) Sully Double Dipper
  • \n
\n

Unlike the first three kits, Sully Tools’ Basic Door Tool Kit gives us our first look at In The Door tools, a separate category at Zips.com. The previous kits just featured long reach tools, which work well between the door frame and window weatherstripping to access the door controls.

\n
\n
\n

\"lockout-tools-4\"

\n
\n
\n

With In The Door tools, the pre-bent rods are inserted into the door cavity and, through careful manipulation, emerge on the inside of the window. The plated shafts are able to hold their shape but remain flexible enough to bend and form to the contour of the door.

\n

When using these tools, auto entry experts use extreme caution to avoid damage to internal door components and also use the Sully strips to prevent scratches on the glass surface. Each tool number is stamped on the handle for easy identification and replacement.

\n

Access Tools Contractor’s Lockout Kit See Details

\n
\n
\n
    \n
  • (1) Wonder shield
  • \n
  • (1) Glassman tool
  • \n
  • (1) Wedgee wedge with strip savers
  • \n
  • (1) Standard one-hand jack tool
  • \n
  • (1) Air Jack wedge
  • \n
  • (1) Button Master tool
  • \n
  • (1) Button Strip tool
  • \n
  • (1) Quick Max long reach tool
  • \n
  • (1) Slim Jim
  • \n
  • (1) Flex Max Long Reach Tool
  • \n
  • (1) Carrying case
  • \n
\n

The Contractor’s Lockout Kit from Access Tools is the most popular and best-selling kit at Zips.com. Complete with a soft-sided carrying case to keep everything together, this kit offers several wedge options as well as unique tools for door pulls and unlock buttons.

\n
\n
\n

\"lockout-tools-5-2\"

\n
\n
\n

At 24-1/2”, the Slim Jim tool included in this professional kit is made from stainless steel for added firmness, corrosion resistance and durability. As its name implies, the thin profile slides into the door cavity to reach door linkages for simple opening of any vehicle.

\n

Access Tools’ contractor kit also includes two options to reach the door lock knob. The Button Strip was designed for insertion into narrow gaps for grabbing vertical buttons, and with its handle-operated lasso, the Button Master was specifically created to pull up knobs.

\n

Save your customer’s day

\n

Unintentionally locking keys in a vehicle can be an embarrassing moment for your customers and cause unnecessary delays in their busy lives. Be a hero and come to their rescue with the right lockout tools from Zip’s AW Direct.

\n

Our rundown today of five different types of lockout kits should give you an idea of what you’ll need to respond to your next dispatch. If you don’t get a lot of those calls, a basic set may be right for you. However, if you handle a lot of them, consider a more comprehensive kit.

\n

Several more options are available at Zips.com. Click on the ‘Shop Products’ tab on the top navigation bar and then scroll down to Lockout Tools. Here, you’ll discover more kits and individual tools in a number of different categories.

\n

Find the options that are right for your operation. We also sell how-to manuals and include instructional videos on our product detail pages. These resources will come in handy the next time you head out to a lockout call.

\n
","post_body":"
\n

Doesn’t matter who locked the keys inside the car. What matters is what you’re going to do to get them out. Zip’s AW Direct offers several car-opening kits to help automotive professionals gain access to locked vehicles.

\n

In today’s blog, we’re going to look at some of our best-selling kits from different manufacturers. We’ll start with basic packages and finish with the most comprehensive kits, going over each lockout kit contents. Each one brings its own value, price-point and distinct lockout advantages.

\n

Steck’s BigEasy Door Tool Kit See Details

\n
\n
\n
    \n
  • (1) 4-1/2’ L long reach tool
  • \n
  • (1) Glow-in-the-dark tip
  • \n
  • (1) Window wedge
  • \n
  • (1) Paint protector
  • \n
  • (1) Lock knob plastic strip tool
  • \n
\n
\n
\n

\"lockout-tools-1\"

\n
\n
\n

Steck’s BigEasy door tool kit includes a fluorescent pink long reach tool with glow-in-the-dark properties. This allows for better visibility in low-light situations. Featuring a T-handle for better maneuvering, the long reach tool’s tip will appear white in the daylight and then bright green at night.

\n

This kit also features a window wedge and other essential accessories for most unlock scenarios. With customer service in mind, the paint protector, rubber tip and plastic strip all combine to prevent unwanted scratches to the vehicle.

\n

AW Direct Big Blue Long-Reach Door Tool Kit See Details

\n
\n
\n
    \n
  • (1) Rigid plastic window wedge
  • \n
  • (1) Long reach door tool
  • \n
  • (1) Protective rubber tip
  • \n
  • (1) Inflatable air wedge
  • \n
  • (1) Strip tool
  • \n
  • (1) Carrying case
  • \n
\n

This convenient door tool kit from AW Direct includes a zippered, black carrying case so your tools will stay organized, stay together, will be easy to transport and will be ready to go to work when you need them.

\n
\n
\n

\"lockout-tools-2\"

\n
\n
\n

Pro-Lok 4 Piece Extra Length Long Arm Lockout Kit See Details

\n
\n
\n
    \n
  • (1) Extra Long Arm tool
  • \n
  • (1) Plastic sleeve
  • \n
  • (1) Pump wedge
  • \n
  • (1) Mini rubber wedge
  • \n
\n

By now, we’ve established the importance of protecting your customer’s vehicle and finish with soft air wedges, plastic paint protectors and rubber rod tips. What makes this four-piece kit from Pro-Lok different from the first two is the additional length of the long reach tool.

\n
\n
\n

\"lockout-tools-3\"

\n
\n
\n

At 76”, the Extra Long Arm tool is nearly two feet longer than the standard 4-1/2’ long reach tool. Most of these door tools work alongside the window to reach door control buttons. With Pro-Lok’s kit, you now have the ability to reach across the vehicle’s interior.

\n

With a direct line of sight, you can easily position the long reach tool to depress the unlock button, access the pull handle, lift the lock button and even retrieve the keys. With this improved viewing angle, the only better position would be from inside the vehicle.

\n

Sully Tools Basic Door Tool Kit See Details

\n
\n
\n
    \n
  • (1) Sully Pouch carry case
  • \n
  • (1) Sully Strip
  • \n
  • (2) Handle Wedges
  • \n
  • (1 ) Sticky L
  • \n
  • (1) Sully J
  • \n
  • (1) Sully Big Foot
  • \n
  • (1) Sully Dipper
  • \n
  • (1) Sully L
  • \n
  • (1) Sully Drop Hook
  • \n
  • (1) Sully Double Dipper
  • \n
\n

Unlike the first three kits, Sully Tools’ Basic Door Tool Kit gives us our first look at In The Door tools, a separate category at Zips.com. The previous kits just featured long reach tools, which work well between the door frame and window weatherstripping to access the door controls.

\n
\n
\n

\"lockout-tools-4\"

\n
\n
\n

With In The Door tools, the pre-bent rods are inserted into the door cavity and, through careful manipulation, emerge on the inside of the window. The plated shafts are able to hold their shape but remain flexible enough to bend and form to the contour of the door.

\n

When using these tools, auto entry experts use extreme caution to avoid damage to internal door components and also use the Sully strips to prevent scratches on the glass surface. Each tool number is stamped on the handle for easy identification and replacement.

\n

Access Tools Contractor’s Lockout Kit See Details

\n
\n
\n
    \n
  • (1) Wonder shield
  • \n
  • (1) Glassman tool
  • \n
  • (1) Wedgee wedge with strip savers
  • \n
  • (1) Standard one-hand jack tool
  • \n
  • (1) Air Jack wedge
  • \n
  • (1) Button Master tool
  • \n
  • (1) Button Strip tool
  • \n
  • (1) Quick Max long reach tool
  • \n
  • (1) Slim Jim
  • \n
  • (1) Flex Max Long Reach Tool
  • \n
  • (1) Carrying case
  • \n
\n

The Contractor’s Lockout Kit from Access Tools is the most popular and best-selling kit at Zips.com. Complete with a soft-sided carrying case to keep everything together, this kit offers several wedge options as well as unique tools for door pulls and unlock buttons.

\n
\n
\n

\"lockout-tools-5-2\"

\n
\n
\n

At 24-1/2”, the Slim Jim tool included in this professional kit is made from stainless steel for added firmness, corrosion resistance and durability. As its name implies, the thin profile slides into the door cavity to reach door linkages for simple opening of any vehicle.

\n

Access Tools’ contractor kit also includes two options to reach the door lock knob. The Button Strip was designed for insertion into narrow gaps for grabbing vertical buttons, and with its handle-operated lasso, the Button Master was specifically created to pull up knobs.

\n

Save your customer’s day

\n

Unintentionally locking keys in a vehicle can be an embarrassing moment for your customers and cause unnecessary delays in their busy lives. Be a hero and come to their rescue with the right lockout tools from Zip’s AW Direct.

\n

Our rundown today of five different types of lockout kits should give you an idea of what you’ll need to respond to your next dispatch. If you don’t get a lot of those calls, a basic set may be right for you. However, if you handle a lot of them, consider a more comprehensive kit.

\n

Several more options are available at Zips.com. Click on the ‘Shop Products’ tab on the top navigation bar and then scroll down to Lockout Tools. Here, you’ll discover more kits and individual tools in a number of different categories.

\n

Find the options that are right for your operation. We also sell how-to manuals and include instructional videos on our product detail pages. These resources will come in handy the next time you head out to a lockout call.

\n
","rss_summary":"
\n

Doesn’t matter who locked the keys inside the car. What matters is what you’re going to do to get them out. Zip’s AW Direct offers several car-opening kits to help automotive professionals gain access to locked vehicles.

\n

In today’s blog, we’re going to look at some of our best-selling kits from different manufacturers. We’ll start with basic packages and finish with the most comprehensive kits, going over each lockout kit contents. Each one brings its own value, price-point and distinct lockout advantages.

\n

Steck’s BigEasy Door Tool Kit See Details

\n
\n
\n
    \n
  • (1) 4-1/2’ L long reach tool
  • \n
  • (1) Glow-in-the-dark tip
  • \n
  • (1) Window wedge
  • \n
  • (1) Paint protector
  • \n
  • (1) Lock knob plastic strip tool
  • \n
\n
\n
\n

\"lockout-tools-1\"

\n
\n
\n

Steck’s BigEasy door tool kit includes a fluorescent pink long reach tool with glow-in-the-dark properties. This allows for better visibility in low-light situations. Featuring a T-handle for better maneuvering, the long reach tool’s tip will appear white in the daylight and then bright green at night.

\n

This kit also features a window wedge and other essential accessories for most unlock scenarios. With customer service in mind, the paint protector, rubber tip and plastic strip all combine to prevent unwanted scratches to the vehicle.

\n

AW Direct Big Blue Long-Reach Door Tool Kit See Details

\n
\n
\n
    \n
  • (1) Rigid plastic window wedge
  • \n
  • (1) Long reach door tool
  • \n
  • (1) Protective rubber tip
  • \n
  • (1) Inflatable air wedge
  • \n
  • (1) Strip tool
  • \n
  • (1) Carrying case
  • \n
\n

This convenient door tool kit from AW Direct includes a zippered, black carrying case so your tools will stay organized, stay together, will be easy to transport and will be ready to go to work when you need them.

\n
\n
\n

\"lockout-tools-2\"

\n
\n
\n

Pro-Lok 4 Piece Extra Length Long Arm Lockout Kit See Details

\n
\n
\n
    \n
  • (1) Extra Long Arm tool
  • \n
  • (1) Plastic sleeve
  • \n
  • (1) Pump wedge
  • \n
  • (1) Mini rubber wedge
  • \n
\n

By now, we’ve established the importance of protecting your customer’s vehicle and finish with soft air wedges, plastic paint protectors and rubber rod tips. What makes this four-piece kit from Pro-Lok different from the first two is the additional length of the long reach tool.

\n
\n
\n

\"lockout-tools-3\"

\n
\n
\n

At 76”, the Extra Long Arm tool is nearly two feet longer than the standard 4-1/2’ long reach tool. Most of these door tools work alongside the window to reach door control buttons. With Pro-Lok’s kit, you now have the ability to reach across the vehicle’s interior.

\n

With a direct line of sight, you can easily position the long reach tool to depress the unlock button, access the pull handle, lift the lock button and even retrieve the keys. With this improved viewing angle, the only better position would be from inside the vehicle.

\n

Sully Tools Basic Door Tool Kit See Details

\n
\n
\n
    \n
  • (1) Sully Pouch carry case
  • \n
  • (1) Sully Strip
  • \n
  • (2) Handle Wedges
  • \n
  • (1 ) Sticky L
  • \n
  • (1) Sully J
  • \n
  • (1) Sully Big Foot
  • \n
  • (1) Sully Dipper
  • \n
  • (1) Sully L
  • \n
  • (1) Sully Drop Hook
  • \n
  • (1) Sully Double Dipper
  • \n
\n

Unlike the first three kits, Sully Tools’ Basic Door Tool Kit gives us our first look at In The Door tools, a separate category at Zips.com. The previous kits just featured long reach tools, which work well between the door frame and window weatherstripping to access the door controls.

\n
\n
\n

\"lockout-tools-4\"

\n
\n
\n

With In The Door tools, the pre-bent rods are inserted into the door cavity and, through careful manipulation, emerge on the inside of the window. The plated shafts are able to hold their shape but remain flexible enough to bend and form to the contour of the door.

\n

When using these tools, auto entry experts use extreme caution to avoid damage to internal door components and also use the Sully strips to prevent scratches on the glass surface. Each tool number is stamped on the handle for easy identification and replacement.

\n

Access Tools Contractor’s Lockout Kit See Details

\n
\n
\n
    \n
  • (1) Wonder shield
  • \n
  • (1) Glassman tool
  • \n
  • (1) Wedgee wedge with strip savers
  • \n
  • (1) Standard one-hand jack tool
  • \n
  • (1) Air Jack wedge
  • \n
  • (1) Button Master tool
  • \n
  • (1) Button Strip tool
  • \n
  • (1) Quick Max long reach tool
  • \n
  • (1) Slim Jim
  • \n
  • (1) Flex Max Long Reach Tool
  • \n
  • (1) Carrying case
  • \n
\n

The Contractor’s Lockout Kit from Access Tools is the most popular and best-selling kit at Zips.com. Complete with a soft-sided carrying case to keep everything together, this kit offers several wedge options as well as unique tools for door pulls and unlock buttons.

\n
\n
\n

\"lockout-tools-5-2\"

\n
\n
\n

At 24-1/2”, the Slim Jim tool included in this professional kit is made from stainless steel for added firmness, corrosion resistance and durability. As its name implies, the thin profile slides into the door cavity to reach door linkages for simple opening of any vehicle.

\n

Access Tools’ contractor kit also includes two options to reach the door lock knob. The Button Strip was designed for insertion into narrow gaps for grabbing vertical buttons, and with its handle-operated lasso, the Button Master was specifically created to pull up knobs.

\n

Save your customer’s day

\n

Unintentionally locking keys in a vehicle can be an embarrassing moment for your customers and cause unnecessary delays in their busy lives. Be a hero and come to their rescue with the right lockout tools from Zip’s AW Direct.

\n

Our rundown today of five different types of lockout kits should give you an idea of what you’ll need to respond to your next dispatch. If you don’t get a lot of those calls, a basic set may be right for you. However, if you handle a lot of them, consider a more comprehensive kit.

\n

Several more options are available at Zips.com. Click on the ‘Shop Products’ tab on the top navigation bar and then scroll down to Lockout Tools. Here, you’ll discover more kits and individual tools in a number of different categories.

\n

Find the options that are right for your operation. We also sell how-to manuals and include instructional videos on our product detail pages. These resources will come in handy the next time you head out to a lockout call.

\n
","rss_body":"
\n

Doesn’t matter who locked the keys inside the car. What matters is what you’re going to do to get them out. Zip’s AW Direct offers several car-opening kits to help automotive professionals gain access to locked vehicles.

\n

In today’s blog, we’re going to look at some of our best-selling kits from different manufacturers. We’ll start with basic packages and finish with the most comprehensive kits, going over each lockout kit contents. Each one brings its own value, price-point and distinct lockout advantages.

\n

Steck’s BigEasy Door Tool Kit See Details

\n
\n
\n
    \n
  • (1) 4-1/2’ L long reach tool
  • \n
  • (1) Glow-in-the-dark tip
  • \n
  • (1) Window wedge
  • \n
  • (1) Paint protector
  • \n
  • (1) Lock knob plastic strip tool
  • \n
\n
\n
\n

\"lockout-tools-1\"

\n
\n
\n

Steck’s BigEasy door tool kit includes a fluorescent pink long reach tool with glow-in-the-dark properties. This allows for better visibility in low-light situations. Featuring a T-handle for better maneuvering, the long reach tool’s tip will appear white in the daylight and then bright green at night.

\n

This kit also features a window wedge and other essential accessories for most unlock scenarios. With customer service in mind, the paint protector, rubber tip and plastic strip all combine to prevent unwanted scratches to the vehicle.

\n

AW Direct Big Blue Long-Reach Door Tool Kit See Details

\n
\n
\n
    \n
  • (1) Rigid plastic window wedge
  • \n
  • (1) Long reach door tool
  • \n
  • (1) Protective rubber tip
  • \n
  • (1) Inflatable air wedge
  • \n
  • (1) Strip tool
  • \n
  • (1) Carrying case
  • \n
\n

This convenient door tool kit from AW Direct includes a zippered, black carrying case so your tools will stay organized, stay together, will be easy to transport and will be ready to go to work when you need them.

\n
\n
\n

\"lockout-tools-2\"

\n
\n
\n

Pro-Lok 4 Piece Extra Length Long Arm Lockout Kit See Details

\n
\n
\n
    \n
  • (1) Extra Long Arm tool
  • \n
  • (1) Plastic sleeve
  • \n
  • (1) Pump wedge
  • \n
  • (1) Mini rubber wedge
  • \n
\n

By now, we’ve established the importance of protecting your customer’s vehicle and finish with soft air wedges, plastic paint protectors and rubber rod tips. What makes this four-piece kit from Pro-Lok different from the first two is the additional length of the long reach tool.

\n
\n
\n

\"lockout-tools-3\"

\n
\n
\n

At 76”, the Extra Long Arm tool is nearly two feet longer than the standard 4-1/2’ long reach tool. Most of these door tools work alongside the window to reach door control buttons. With Pro-Lok’s kit, you now have the ability to reach across the vehicle’s interior.

\n

With a direct line of sight, you can easily position the long reach tool to depress the unlock button, access the pull handle, lift the lock button and even retrieve the keys. With this improved viewing angle, the only better position would be from inside the vehicle.

\n

Sully Tools Basic Door Tool Kit See Details

\n
\n
\n
    \n
  • (1) Sully Pouch carry case
  • \n
  • (1) Sully Strip
  • \n
  • (2) Handle Wedges
  • \n
  • (1 ) Sticky L
  • \n
  • (1) Sully J
  • \n
  • (1) Sully Big Foot
  • \n
  • (1) Sully Dipper
  • \n
  • (1) Sully L
  • \n
  • (1) Sully Drop Hook
  • \n
  • (1) Sully Double Dipper
  • \n
\n

Unlike the first three kits, Sully Tools’ Basic Door Tool Kit gives us our first look at In The Door tools, a separate category at Zips.com. The previous kits just featured long reach tools, which work well between the door frame and window weatherstripping to access the door controls.

\n
\n
\n

\"lockout-tools-4\"

\n
\n
\n

With In The Door tools, the pre-bent rods are inserted into the door cavity and, through careful manipulation, emerge on the inside of the window. The plated shafts are able to hold their shape but remain flexible enough to bend and form to the contour of the door.

\n

When using these tools, auto entry experts use extreme caution to avoid damage to internal door components and also use the Sully strips to prevent scratches on the glass surface. Each tool number is stamped on the handle for easy identification and replacement.

\n

Access Tools Contractor’s Lockout Kit See Details

\n
\n
\n
    \n
  • (1) Wonder shield
  • \n
  • (1) Glassman tool
  • \n
  • (1) Wedgee wedge with strip savers
  • \n
  • (1) Standard one-hand jack tool
  • \n
  • (1) Air Jack wedge
  • \n
  • (1) Button Master tool
  • \n
  • (1) Button Strip tool
  • \n
  • (1) Quick Max long reach tool
  • \n
  • (1) Slim Jim
  • \n
  • (1) Flex Max Long Reach Tool
  • \n
  • (1) Carrying case
  • \n
\n

The Contractor’s Lockout Kit from Access Tools is the most popular and best-selling kit at Zips.com. Complete with a soft-sided carrying case to keep everything together, this kit offers several wedge options as well as unique tools for door pulls and unlock buttons.

\n
\n
\n

\"lockout-tools-5-2\"

\n
\n
\n

At 24-1/2”, the Slim Jim tool included in this professional kit is made from stainless steel for added firmness, corrosion resistance and durability. As its name implies, the thin profile slides into the door cavity to reach door linkages for simple opening of any vehicle.

\n

Access Tools’ contractor kit also includes two options to reach the door lock knob. The Button Strip was designed for insertion into narrow gaps for grabbing vertical buttons, and with its handle-operated lasso, the Button Master was specifically created to pull up knobs.

\n

Save your customer’s day

\n

Unintentionally locking keys in a vehicle can be an embarrassing moment for your customers and cause unnecessary delays in their busy lives. Be a hero and come to their rescue with the right lockout tools from Zip’s AW Direct.

\n

Our rundown today of five different types of lockout kits should give you an idea of what you’ll need to respond to your next dispatch. If you don’t get a lot of those calls, a basic set may be right for you. However, if you handle a lot of them, consider a more comprehensive kit.

\n

Several more options are available at Zips.com. Click on the ‘Shop Products’ tab on the top navigation bar and then scroll down to Lockout Tools. Here, you’ll discover more kits and individual tools in a number of different categories.

\n

Find the options that are right for your operation. We also sell how-to manuals and include instructional videos on our product detail pages. These resources will come in handy the next time you head out to a lockout call.

\n
","enable_google_amp_output_override":false,"generate_json_ld_enabled":true,"blog_post_schedule_task_uid":null,"blog_publish_to_social_media_task":"DONE_NOT_SENT","blog_publish_instant_email_task_uid":null,"blog_publish_instant_email_campaign_id":null,"blog_publish_instant_email_retry_count":null,"keywords":[],"composition_id":0,"is_crawlable_by_bots":false,"head_html":"","footer_html":null,"attached_stylesheets":[],"enable_domain_stylesheets":null,"include_default_custom_css":null,"layout_sections":{},"past_mab_experiment_ids":[],"deleted_by":null,"featured_image_alt_text":"Lockout kit assortment","enable_layout_stylesheets":null,"tweet":null,"tweet_at":null,"campaign_name":null,"campaign_utm":null,"meta_keywords":null,"meta_description":"A comprehensive guide to the best vehicle lockout kits for professionals and first responders: key features, what’s included, and how each kit is suited for different lockout scenarios. Featuring top products from Steck, AW Direct, Pro-Lok, Sully Tools, and Access Tools.","tweet_immediately":false,"publish_immediately":true,"security_state":"NONE","scheduled_update_date":0,"placement_guids":[],"header_template_path":null,"header_variant_name":null,"footer_template_path":null,"footer_variant_name":null,"global_block_overrides":{},"property_for_dynamic_page_title":null,"property_for_dynamic_page_slug":null,"property_for_dynamic_page_meta_description":null,"property_for_dynamic_page_featured_image":null,"property_for_dynamic_page_canonical_url":null,"preview_image_src":null,"legacy_blog_tabid":null,"legacy_post_guid":null,"performable_variation_letter":null,"style_override_id":null,"has_user_changes":true,"css":{},"css_text":"","unpublished_at":0,"published_by_id":76755706,"allowed_slug_conflict":false,"ai_features":null,"link_rel_canonical_url":"","page_redirected":false,"page_expiry_enabled":null,"page_expiry_date":null,"page_expiry_redirect_id":null,"page_expiry_redirect_url":null,"deleted_by_id":null,"state_when_deleted":null,"cloned_from":null,"staged_from":null,"personas":[],"compose_body":null,"featured_image":"https://48463649.fs1.hubspotusercontent-na1.net/hubfs/48463649/Blog/lockout-tools-header.png","featured_image_width":869,"featured_image_height":481,"publish_timezone_offset":null,"theme_settings_values":null,"header":null,"password":null,"published_at":1756235402747,"last_edit_session_id":null,"last_edit_update_id":null,"created_by_agent":null},"metaDescription":"A comprehensive guide to the best vehicle lockout kits for professionals and first responders: key features, what’s included, and how each kit is suited for different lockout scenarios. Featuring top products from Steck, AW Direct, Pro-Lok, Sully Tools, and Access Tools.","metaKeywords":null,"name":"Best Vehicle Lockout Kits","nextPostFeaturedImage":"https://48463649.fs1.hubspotusercontent-na1.net/hubfs/48463649/Blog/guni-1.png","nextPostFeaturedImageAltText":"GUNI products","nextPostName":"Zip's AW Direct Acquires GUNI Products","nextPostSlug":"blog/zips-aw-direct-acquires-guni-products","pageExpiryDate":null,"pageExpiryEnabled":null,"pageExpiryRedirectId":null,"pageExpiryRedirectUrl":null,"pageRedirected":false,"pageTitle":"Best Vehicle Lockout Kits","parentBlog":{"absoluteUrl":"/blog","allowComments":true,"ampBodyColor":"#404040","ampBodyFont":"'Helvetica Neue', Helvetica, Arial, sans-serif","ampBodyFontSize":"18","ampCustomCss":"","ampHeaderBackgroundColor":"#ffffff","ampHeaderColor":"#1e1e1e","ampHeaderFont":"'Helvetica Neue', Helvetica, Arial, sans-serif","ampHeaderFontSize":"36","ampLinkColor":"#416bb3","ampLogoAlt":"","ampLogoHeight":0,"ampLogoSrc":"","ampLogoWidth":0,"analyticsPageId":190096341139,"attachedStylesheets":[],"audienceAccess":"PUBLIC","businessUnitId":null,"captchaAfterDays":7,"captchaAlways":false,"categoryId":3,"cdnPurgeEmbargoTime":null,"closeCommentsOlder":0,"commentDateFormat":"medium","commentFormGuid":"a4128401-39db-4c54-a62b-88ff335d3a69","commentMaxThreadDepth":1,"commentModeration":false,"commentNotificationEmails":[],"commentShouldCreateContact":false,"commentVerificationText":"","cosObjectType":"BLOG","created":1747163443999,"createdDateTime":1747163443999,"dailyNotificationEmailId":null,"dateFormattingLanguage":null,"defaultGroupStyleId":"","defaultNotificationFromName":"","defaultNotificationReplyTo":"","deletedAt":0,"description":"","domain":"","domainWhenPublished":"www.zips.com","emailApiSubscriptionId":null,"enableGoogleAmpOutput":true,"enableSocialAutoPublishing":false,"generateJsonLdEnabled":true,"header":null,"htmlFooter":"","htmlFooterIsShared":true,"htmlHead":"","htmlHeadIsShared":true,"htmlKeywords":[],"htmlTitle":"blog","id":190096341139,"ilsSubscriptionListsByType":{},"instantNotificationEmailId":null,"itemLayoutId":null,"itemTemplateIsShared":false,"itemTemplatePath":"zips-basic-theme/templates/blog-post.html","label":"blog","language":"en","legacyGuid":null,"legacyModuleId":null,"legacyTabId":null,"listingLayoutId":null,"listingPageId":190096341141,"listingTemplatePath":"","liveDomain":"www.zips.com","monthFilterFormat":"MMMM yyyy","monthlyNotificationEmailId":null,"name":"blog","parentBlogUpdateTaskId":null,"portalId":48463649,"postHtmlFooter":"","postHtmlHead":"","postsPerListingPage":111,"postsPerRssFeed":10,"publicAccessRules":[],"publicAccessRulesEnabled":false,"publicTitle":"blog","publishDateFormat":"medium","resolvedDomain":"www.zips.com","rootUrl":"/blog","rssCustomFeed":null,"rssDescription":null,"rssItemFooter":null,"rssItemHeader":null,"settingsOverrides":{"itemLayoutId":false,"itemTemplatePath":false,"itemTemplateIsShared":false,"listingLayoutId":false,"listingTemplatePath":false,"postsPerListingPage":false,"showSummaryInListing":false,"useFeaturedImageInSummary":false,"htmlHead":false,"postHtmlHead":false,"htmlHeadIsShared":false,"htmlFooter":false,"listingPageHtmlFooter":false,"postHtmlFooter":false,"htmlFooterIsShared":false,"attachedStylesheets":false,"postsPerRssFeed":false,"showSummaryInRss":false,"showSummaryInEmails":false,"showSummariesInEmails":false,"allowComments":false,"commentShouldCreateContact":false,"commentModeration":false,"closeCommentsOlder":false,"commentNotificationEmails":false,"commentMaxThreadDepth":false,"commentVerificationText":false,"socialAccountTwitter":false,"showSocialLinkTwitter":false,"showSocialLinkLinkedin":false,"showSocialLinkFacebook":false,"enableGoogleAmpOutput":false,"ampLogoSrc":false,"ampLogoHeight":false,"ampLogoWidth":false,"ampLogoAlt":false,"ampHeaderFont":false,"ampHeaderFontSize":false,"ampHeaderColor":false,"ampHeaderBackgroundColor":false,"ampBodyFont":false,"ampBodyFontSize":false,"ampBodyColor":false,"ampLinkColor":false,"generateJsonLdEnabled":false},"showSocialLinkFacebook":true,"showSocialLinkLinkedin":true,"showSocialLinkTwitter":true,"showSummaryInEmails":true,"showSummaryInListing":true,"showSummaryInRss":true,"siteId":null,"slug":"blog","socialAccountTwitter":"","state":null,"subscriptionContactsProperty":null,"subscriptionEmailType":null,"subscriptionFormGuid":null,"subscriptionListsByType":{},"title":null,"translatedFromId":null,"translations":{},"updated":1755110916417,"updatedDateTime":1755110916417,"urlBase":"www.zips.com/blog","urlSegments":{"all":"all","archive":"archive","author":"author","page":"page","tag":"tag"},"useFeaturedImageInSummary":true,"usesDefaultTemplate":false,"weeklyNotificationEmailId":null},"password":null,"pastMabExperimentIds":[],"performableGuid":null,"performableVariationLetter":null,"personalizationStrategyId":null,"personalizationVariantStatus":null,"personas":[],"placementGuids":[],"portableKey":null,"portalId":48463649,"position":null,"postBody":"
\n

Doesn’t matter who locked the keys inside the car. What matters is what you’re going to do to get them out. Zip’s AW Direct offers several car-opening kits to help automotive professionals gain access to locked vehicles.

\n

In today’s blog, we’re going to look at some of our best-selling kits from different manufacturers. We’ll start with basic packages and finish with the most comprehensive kits, going over each lockout kit contents. Each one brings its own value, price-point and distinct lockout advantages.

\n

Steck’s BigEasy Door Tool Kit See Details

\n
\n
\n
    \n
  • (1) 4-1/2’ L long reach tool
  • \n
  • (1) Glow-in-the-dark tip
  • \n
  • (1) Window wedge
  • \n
  • (1) Paint protector
  • \n
  • (1) Lock knob plastic strip tool
  • \n
\n
\n
\n

\"lockout-tools-1\"

\n
\n
\n

Steck’s BigEasy door tool kit includes a fluorescent pink long reach tool with glow-in-the-dark properties. This allows for better visibility in low-light situations. Featuring a T-handle for better maneuvering, the long reach tool’s tip will appear white in the daylight and then bright green at night.

\n

This kit also features a window wedge and other essential accessories for most unlock scenarios. With customer service in mind, the paint protector, rubber tip and plastic strip all combine to prevent unwanted scratches to the vehicle.

\n

AW Direct Big Blue Long-Reach Door Tool Kit See Details

\n
\n
\n
    \n
  • (1) Rigid plastic window wedge
  • \n
  • (1) Long reach door tool
  • \n
  • (1) Protective rubber tip
  • \n
  • (1) Inflatable air wedge
  • \n
  • (1) Strip tool
  • \n
  • (1) Carrying case
  • \n
\n

This convenient door tool kit from AW Direct includes a zippered, black carrying case so your tools will stay organized, stay together, will be easy to transport and will be ready to go to work when you need them.

\n
\n
\n

\"lockout-tools-2\"

\n
\n
\n

Pro-Lok 4 Piece Extra Length Long Arm Lockout Kit See Details

\n
\n
\n
    \n
  • (1) Extra Long Arm tool
  • \n
  • (1) Plastic sleeve
  • \n
  • (1) Pump wedge
  • \n
  • (1) Mini rubber wedge
  • \n
\n

By now, we’ve established the importance of protecting your customer’s vehicle and finish with soft air wedges, plastic paint protectors and rubber rod tips. What makes this four-piece kit from Pro-Lok different from the first two is the additional length of the long reach tool.

\n
\n
\n

\"lockout-tools-3\"

\n
\n
\n

At 76”, the Extra Long Arm tool is nearly two feet longer than the standard 4-1/2’ long reach tool. Most of these door tools work alongside the window to reach door control buttons. With Pro-Lok’s kit, you now have the ability to reach across the vehicle’s interior.

\n

With a direct line of sight, you can easily position the long reach tool to depress the unlock button, access the pull handle, lift the lock button and even retrieve the keys. With this improved viewing angle, the only better position would be from inside the vehicle.

\n

Sully Tools Basic Door Tool Kit See Details

\n
\n
\n
    \n
  • (1) Sully Pouch carry case
  • \n
  • (1) Sully Strip
  • \n
  • (2) Handle Wedges
  • \n
  • (1 ) Sticky L
  • \n
  • (1) Sully J
  • \n
  • (1) Sully Big Foot
  • \n
  • (1) Sully Dipper
  • \n
  • (1) Sully L
  • \n
  • (1) Sully Drop Hook
  • \n
  • (1) Sully Double Dipper
  • \n
\n

Unlike the first three kits, Sully Tools’ Basic Door Tool Kit gives us our first look at In The Door tools, a separate category at Zips.com. The previous kits just featured long reach tools, which work well between the door frame and window weatherstripping to access the door controls.

\n
\n
\n

\"lockout-tools-4\"

\n
\n
\n

With In The Door tools, the pre-bent rods are inserted into the door cavity and, through careful manipulation, emerge on the inside of the window. The plated shafts are able to hold their shape but remain flexible enough to bend and form to the contour of the door.

\n

When using these tools, auto entry experts use extreme caution to avoid damage to internal door components and also use the Sully strips to prevent scratches on the glass surface. Each tool number is stamped on the handle for easy identification and replacement.

\n

Access Tools Contractor’s Lockout Kit See Details

\n
\n
\n
    \n
  • (1) Wonder shield
  • \n
  • (1) Glassman tool
  • \n
  • (1) Wedgee wedge with strip savers
  • \n
  • (1) Standard one-hand jack tool
  • \n
  • (1) Air Jack wedge
  • \n
  • (1) Button Master tool
  • \n
  • (1) Button Strip tool
  • \n
  • (1) Quick Max long reach tool
  • \n
  • (1) Slim Jim
  • \n
  • (1) Flex Max Long Reach Tool
  • \n
  • (1) Carrying case
  • \n
\n

The Contractor’s Lockout Kit from Access Tools is the most popular and best-selling kit at Zips.com. Complete with a soft-sided carrying case to keep everything together, this kit offers several wedge options as well as unique tools for door pulls and unlock buttons.

\n
\n
\n

\"lockout-tools-5-2\"

\n
\n
\n

At 24-1/2”, the Slim Jim tool included in this professional kit is made from stainless steel for added firmness, corrosion resistance and durability. As its name implies, the thin profile slides into the door cavity to reach door linkages for simple opening of any vehicle.

\n

Access Tools’ contractor kit also includes two options to reach the door lock knob. The Button Strip was designed for insertion into narrow gaps for grabbing vertical buttons, and with its handle-operated lasso, the Button Master was specifically created to pull up knobs.

\n

Save your customer’s day

\n

Unintentionally locking keys in a vehicle can be an embarrassing moment for your customers and cause unnecessary delays in their busy lives. Be a hero and come to their rescue with the right lockout tools from Zip’s AW Direct.

\n

Our rundown today of five different types of lockout kits should give you an idea of what you’ll need to respond to your next dispatch. If you don’t get a lot of those calls, a basic set may be right for you. However, if you handle a lot of them, consider a more comprehensive kit.

\n

Several more options are available at Zips.com. Click on the ‘Shop Products’ tab on the top navigation bar and then scroll down to Lockout Tools. Here, you’ll discover more kits and individual tools in a number of different categories.

\n

Find the options that are right for your operation. We also sell how-to manuals and include instructional videos on our product detail pages. These resources will come in handy the next time you head out to a lockout call.

\n
","postBodyRss":"
\n

Doesn’t matter who locked the keys inside the car. What matters is what you’re going to do to get them out. Zip’s AW Direct offers several car-opening kits to help automotive professionals gain access to locked vehicles.

\n

In today’s blog, we’re going to look at some of our best-selling kits from different manufacturers. We’ll start with basic packages and finish with the most comprehensive kits, going over each lockout kit contents. Each one brings its own value, price-point and distinct lockout advantages.

\n

Steck’s BigEasy Door Tool Kit See Details

\n
\n
\n
    \n
  • (1) 4-1/2’ L long reach tool
  • \n
  • (1) Glow-in-the-dark tip
  • \n
  • (1) Window wedge
  • \n
  • (1) Paint protector
  • \n
  • (1) Lock knob plastic strip tool
  • \n
\n
\n
\n

\"lockout-tools-1\"

\n
\n
\n

Steck’s BigEasy door tool kit includes a fluorescent pink long reach tool with glow-in-the-dark properties. This allows for better visibility in low-light situations. Featuring a T-handle for better maneuvering, the long reach tool’s tip will appear white in the daylight and then bright green at night.

\n

This kit also features a window wedge and other essential accessories for most unlock scenarios. With customer service in mind, the paint protector, rubber tip and plastic strip all combine to prevent unwanted scratches to the vehicle.

\n

AW Direct Big Blue Long-Reach Door Tool Kit See Details

\n
\n
\n
    \n
  • (1) Rigid plastic window wedge
  • \n
  • (1) Long reach door tool
  • \n
  • (1) Protective rubber tip
  • \n
  • (1) Inflatable air wedge
  • \n
  • (1) Strip tool
  • \n
  • (1) Carrying case
  • \n
\n

This convenient door tool kit from AW Direct includes a zippered, black carrying case so your tools will stay organized, stay together, will be easy to transport and will be ready to go to work when you need them.

\n
\n
\n

\"lockout-tools-2\"

\n
\n
\n

Pro-Lok 4 Piece Extra Length Long Arm Lockout Kit See Details

\n
\n
\n
    \n
  • (1) Extra Long Arm tool
  • \n
  • (1) Plastic sleeve
  • \n
  • (1) Pump wedge
  • \n
  • (1) Mini rubber wedge
  • \n
\n

By now, we’ve established the importance of protecting your customer’s vehicle and finish with soft air wedges, plastic paint protectors and rubber rod tips. What makes this four-piece kit from Pro-Lok different from the first two is the additional length of the long reach tool.

\n
\n
\n

\"lockout-tools-3\"

\n
\n
\n

At 76”, the Extra Long Arm tool is nearly two feet longer than the standard 4-1/2’ long reach tool. Most of these door tools work alongside the window to reach door control buttons. With Pro-Lok’s kit, you now have the ability to reach across the vehicle’s interior.

\n

With a direct line of sight, you can easily position the long reach tool to depress the unlock button, access the pull handle, lift the lock button and even retrieve the keys. With this improved viewing angle, the only better position would be from inside the vehicle.

\n

Sully Tools Basic Door Tool Kit See Details

\n
\n
\n
    \n
  • (1) Sully Pouch carry case
  • \n
  • (1) Sully Strip
  • \n
  • (2) Handle Wedges
  • \n
  • (1 ) Sticky L
  • \n
  • (1) Sully J
  • \n
  • (1) Sully Big Foot
  • \n
  • (1) Sully Dipper
  • \n
  • (1) Sully L
  • \n
  • (1) Sully Drop Hook
  • \n
  • (1) Sully Double Dipper
  • \n
\n

Unlike the first three kits, Sully Tools’ Basic Door Tool Kit gives us our first look at In The Door tools, a separate category at Zips.com. The previous kits just featured long reach tools, which work well between the door frame and window weatherstripping to access the door controls.

\n
\n
\n

\"lockout-tools-4\"

\n
\n
\n

With In The Door tools, the pre-bent rods are inserted into the door cavity and, through careful manipulation, emerge on the inside of the window. The plated shafts are able to hold their shape but remain flexible enough to bend and form to the contour of the door.

\n

When using these tools, auto entry experts use extreme caution to avoid damage to internal door components and also use the Sully strips to prevent scratches on the glass surface. Each tool number is stamped on the handle for easy identification and replacement.

\n

Access Tools Contractor’s Lockout Kit See Details

\n
\n
\n
    \n
  • (1) Wonder shield
  • \n
  • (1) Glassman tool
  • \n
  • (1) Wedgee wedge with strip savers
  • \n
  • (1) Standard one-hand jack tool
  • \n
  • (1) Air Jack wedge
  • \n
  • (1) Button Master tool
  • \n
  • (1) Button Strip tool
  • \n
  • (1) Quick Max long reach tool
  • \n
  • (1) Slim Jim
  • \n
  • (1) Flex Max Long Reach Tool
  • \n
  • (1) Carrying case
  • \n
\n

The Contractor’s Lockout Kit from Access Tools is the most popular and best-selling kit at Zips.com. Complete with a soft-sided carrying case to keep everything together, this kit offers several wedge options as well as unique tools for door pulls and unlock buttons.

\n
\n
\n

\"lockout-tools-5-2\"

\n
\n
\n

At 24-1/2”, the Slim Jim tool included in this professional kit is made from stainless steel for added firmness, corrosion resistance and durability. As its name implies, the thin profile slides into the door cavity to reach door linkages for simple opening of any vehicle.

\n

Access Tools’ contractor kit also includes two options to reach the door lock knob. The Button Strip was designed for insertion into narrow gaps for grabbing vertical buttons, and with its handle-operated lasso, the Button Master was specifically created to pull up knobs.

\n

Save your customer’s day

\n

Unintentionally locking keys in a vehicle can be an embarrassing moment for your customers and cause unnecessary delays in their busy lives. Be a hero and come to their rescue with the right lockout tools from Zip’s AW Direct.

\n

Our rundown today of five different types of lockout kits should give you an idea of what you’ll need to respond to your next dispatch. If you don’t get a lot of those calls, a basic set may be right for you. However, if you handle a lot of them, consider a more comprehensive kit.

\n

Several more options are available at Zips.com. Click on the ‘Shop Products’ tab on the top navigation bar and then scroll down to Lockout Tools. Here, you’ll discover more kits and individual tools in a number of different categories.

\n

Find the options that are right for your operation. We also sell how-to manuals and include instructional videos on our product detail pages. These resources will come in handy the next time you head out to a lockout call.

\n
","postEmailContent":"
\n

Doesn’t matter who locked the keys inside the car. What matters is what you’re going to do to get them out. Zip’s AW Direct offers several car-opening kits to help automotive professionals gain access to locked vehicles.

\n

In today’s blog, we’re going to look at some of our best-selling kits from different manufacturers. We’ll start with basic packages and finish with the most comprehensive kits, going over each lockout kit contents. Each one brings its own value, price-point and distinct lockout advantages.

\n

Steck’s BigEasy Door Tool Kit See Details

\n
\n
\n
    \n
  • (1) 4-1/2’ L long reach tool
  • \n
  • (1) Glow-in-the-dark tip
  • \n
  • (1) Window wedge
  • \n
  • (1) Paint protector
  • \n
  • (1) Lock knob plastic strip tool
  • \n
\n
\n
\n
\n
\n

Steck’s BigEasy door tool kit includes a fluorescent pink long reach tool with glow-in-the-dark properties. This allows for better visibility in low-light situations. Featuring a T-handle for better maneuvering, the long reach tool’s tip will appear white in the daylight and then bright green at night.

\n

This kit also features a window wedge and other essential accessories for most unlock scenarios. With customer service in mind, the paint protector, rubber tip and plastic strip all combine to prevent unwanted scratches to the vehicle.

\n

AW Direct Big Blue Long-Reach Door Tool Kit See Details

\n
\n
\n
    \n
  • (1) Rigid plastic window wedge
  • \n
  • (1) Long reach door tool
  • \n
  • (1) Protective rubber tip
  • \n
  • (1) Inflatable air wedge
  • \n
  • (1) Strip tool
  • \n
  • (1) Carrying case
  • \n
\n

This convenient door tool kit from AW Direct includes a zippered, black carrying case so your tools will stay organized, stay together, will be easy to transport and will be ready to go to work when you need them.

\n
\n
\n
\n
\n

Pro-Lok 4 Piece Extra Length Long Arm Lockout Kit See Details

\n
\n
\n
    \n
  • (1) Extra Long Arm tool
  • \n
  • (1) Plastic sleeve
  • \n
  • (1) Pump wedge
  • \n
  • (1) Mini rubber wedge
  • \n
\n

By now, we’ve established the importance of protecting your customer’s vehicle and finish with soft air wedges, plastic paint protectors and rubber rod tips. What makes this four-piece kit from Pro-Lok different from the first two is the additional length of the long reach tool.

\n
\n
\n
\n
\n

At 76”, the Extra Long Arm tool is nearly two feet longer than the standard 4-1/2’ long reach tool. Most of these door tools work alongside the window to reach door control buttons. With Pro-Lok’s kit, you now have the ability to reach across the vehicle’s interior.

\n

With a direct line of sight, you can easily position the long reach tool to depress the unlock button, access the pull handle, lift the lock button and even retrieve the keys. With this improved viewing angle, the only better position would be from inside the vehicle.

\n

Sully Tools Basic Door Tool Kit See Details

\n
\n
\n
    \n
  • (1) Sully Pouch carry case
  • \n
  • (1) Sully Strip
  • \n
  • (2) Handle Wedges
  • \n
  • (1 ) Sticky L
  • \n
  • (1) Sully J
  • \n
  • (1) Sully Big Foot
  • \n
  • (1) Sully Dipper
  • \n
  • (1) Sully L
  • \n
  • (1) Sully Drop Hook
  • \n
  • (1) Sully Double Dipper
  • \n
\n

Unlike the first three kits, Sully Tools’ Basic Door Tool Kit gives us our first look at In The Door tools, a separate category at Zips.com. The previous kits just featured long reach tools, which work well between the door frame and window weatherstripping to access the door controls.

\n
\n
\n
\n
\n

With In The Door tools, the pre-bent rods are inserted into the door cavity and, through careful manipulation, emerge on the inside of the window. The plated shafts are able to hold their shape but remain flexible enough to bend and form to the contour of the door.

\n

When using these tools, auto entry experts use extreme caution to avoid damage to internal door components and also use the Sully strips to prevent scratches on the glass surface. Each tool number is stamped on the handle for easy identification and replacement.

\n

Access Tools Contractor’s Lockout Kit See Details

\n
\n
\n
    \n
  • (1) Wonder shield
  • \n
  • (1) Glassman tool
  • \n
  • (1) Wedgee wedge with strip savers
  • \n
  • (1) Standard one-hand jack tool
  • \n
  • (1) Air Jack wedge
  • \n
  • (1) Button Master tool
  • \n
  • (1) Button Strip tool
  • \n
  • (1) Quick Max long reach tool
  • \n
  • (1) Slim Jim
  • \n
  • (1) Flex Max Long Reach Tool
  • \n
  • (1) Carrying case
  • \n
\n

The Contractor’s Lockout Kit from Access Tools is the most popular and best-selling kit at Zips.com. Complete with a soft-sided carrying case to keep everything together, this kit offers several wedge options as well as unique tools for door pulls and unlock buttons.

\n
\n
\n
\n
\n

At 24-1/2”, the Slim Jim tool included in this professional kit is made from stainless steel for added firmness, corrosion resistance and durability. As its name implies, the thin profile slides into the door cavity to reach door linkages for simple opening of any vehicle.

\n

Access Tools’ contractor kit also includes two options to reach the door lock knob. The Button Strip was designed for insertion into narrow gaps for grabbing vertical buttons, and with its handle-operated lasso, the Button Master was specifically created to pull up knobs.

\n

Save your customer’s day

\n

Unintentionally locking keys in a vehicle can be an embarrassing moment for your customers and cause unnecessary delays in their busy lives. Be a hero and come to their rescue with the right lockout tools from Zip’s AW Direct.

\n

Our rundown today of five different types of lockout kits should give you an idea of what you’ll need to respond to your next dispatch. If you don’t get a lot of those calls, a basic set may be right for you. However, if you handle a lot of them, consider a more comprehensive kit.

\n

Several more options are available at Zips.com. Click on the ‘Shop Products’ tab on the top navigation bar and then scroll down to Lockout Tools. Here, you’ll discover more kits and individual tools in a number of different categories.

\n

Find the options that are right for your operation. We also sell how-to manuals and include instructional videos on our product detail pages. These resources will come in handy the next time you head out to a lockout call.

\n
","postFeaturedImageIfEnabled":"https://48463649.fs1.hubspotusercontent-na1.net/hubfs/48463649/Blog/lockout-tools-header.png","postListContent":"
\n

Doesn’t matter who locked the keys inside the car. What matters is what you’re going to do to get them out. Zip’s AW Direct offers several car-opening kits to help automotive professionals gain access to locked vehicles.

\n

In today’s blog, we’re going to look at some of our best-selling kits from different manufacturers. We’ll start with basic packages and finish with the most comprehensive kits, going over each lockout kit contents. Each one brings its own value, price-point and distinct lockout advantages.

\n

Steck’s BigEasy Door Tool Kit See Details

\n
\n
\n
    \n
  • (1) 4-1/2’ L long reach tool
  • \n
  • (1) Glow-in-the-dark tip
  • \n
  • (1) Window wedge
  • \n
  • (1) Paint protector
  • \n
  • (1) Lock knob plastic strip tool
  • \n
\n
\n
\n
\n
\n

Steck’s BigEasy door tool kit includes a fluorescent pink long reach tool with glow-in-the-dark properties. This allows for better visibility in low-light situations. Featuring a T-handle for better maneuvering, the long reach tool’s tip will appear white in the daylight and then bright green at night.

\n

This kit also features a window wedge and other essential accessories for most unlock scenarios. With customer service in mind, the paint protector, rubber tip and plastic strip all combine to prevent unwanted scratches to the vehicle.

\n

AW Direct Big Blue Long-Reach Door Tool Kit See Details

\n
\n
\n
    \n
  • (1) Rigid plastic window wedge
  • \n
  • (1) Long reach door tool
  • \n
  • (1) Protective rubber tip
  • \n
  • (1) Inflatable air wedge
  • \n
  • (1) Strip tool
  • \n
  • (1) Carrying case
  • \n
\n

This convenient door tool kit from AW Direct includes a zippered, black carrying case so your tools will stay organized, stay together, will be easy to transport and will be ready to go to work when you need them.

\n
\n
\n
\n
\n

Pro-Lok 4 Piece Extra Length Long Arm Lockout Kit See Details

\n
\n
\n
    \n
  • (1) Extra Long Arm tool
  • \n
  • (1) Plastic sleeve
  • \n
  • (1) Pump wedge
  • \n
  • (1) Mini rubber wedge
  • \n
\n

By now, we’ve established the importance of protecting your customer’s vehicle and finish with soft air wedges, plastic paint protectors and rubber rod tips. What makes this four-piece kit from Pro-Lok different from the first two is the additional length of the long reach tool.

\n
\n
\n
\n
\n

At 76”, the Extra Long Arm tool is nearly two feet longer than the standard 4-1/2’ long reach tool. Most of these door tools work alongside the window to reach door control buttons. With Pro-Lok’s kit, you now have the ability to reach across the vehicle’s interior.

\n

With a direct line of sight, you can easily position the long reach tool to depress the unlock button, access the pull handle, lift the lock button and even retrieve the keys. With this improved viewing angle, the only better position would be from inside the vehicle.

\n

Sully Tools Basic Door Tool Kit See Details

\n
\n
\n
    \n
  • (1) Sully Pouch carry case
  • \n
  • (1) Sully Strip
  • \n
  • (2) Handle Wedges
  • \n
  • (1 ) Sticky L
  • \n
  • (1) Sully J
  • \n
  • (1) Sully Big Foot
  • \n
  • (1) Sully Dipper
  • \n
  • (1) Sully L
  • \n
  • (1) Sully Drop Hook
  • \n
  • (1) Sully Double Dipper
  • \n
\n

Unlike the first three kits, Sully Tools’ Basic Door Tool Kit gives us our first look at In The Door tools, a separate category at Zips.com. The previous kits just featured long reach tools, which work well between the door frame and window weatherstripping to access the door controls.

\n
\n
\n
\n
\n

With In The Door tools, the pre-bent rods are inserted into the door cavity and, through careful manipulation, emerge on the inside of the window. The plated shafts are able to hold their shape but remain flexible enough to bend and form to the contour of the door.

\n

When using these tools, auto entry experts use extreme caution to avoid damage to internal door components and also use the Sully strips to prevent scratches on the glass surface. Each tool number is stamped on the handle for easy identification and replacement.

\n

Access Tools Contractor’s Lockout Kit See Details

\n
\n
\n
    \n
  • (1) Wonder shield
  • \n
  • (1) Glassman tool
  • \n
  • (1) Wedgee wedge with strip savers
  • \n
  • (1) Standard one-hand jack tool
  • \n
  • (1) Air Jack wedge
  • \n
  • (1) Button Master tool
  • \n
  • (1) Button Strip tool
  • \n
  • (1) Quick Max long reach tool
  • \n
  • (1) Slim Jim
  • \n
  • (1) Flex Max Long Reach Tool
  • \n
  • (1) Carrying case
  • \n
\n

The Contractor’s Lockout Kit from Access Tools is the most popular and best-selling kit at Zips.com. Complete with a soft-sided carrying case to keep everything together, this kit offers several wedge options as well as unique tools for door pulls and unlock buttons.

\n
\n
\n
\n
\n

At 24-1/2”, the Slim Jim tool included in this professional kit is made from stainless steel for added firmness, corrosion resistance and durability. As its name implies, the thin profile slides into the door cavity to reach door linkages for simple opening of any vehicle.

\n

Access Tools’ contractor kit also includes two options to reach the door lock knob. The Button Strip was designed for insertion into narrow gaps for grabbing vertical buttons, and with its handle-operated lasso, the Button Master was specifically created to pull up knobs.

\n

Save your customer’s day

\n

Unintentionally locking keys in a vehicle can be an embarrassing moment for your customers and cause unnecessary delays in their busy lives. Be a hero and come to their rescue with the right lockout tools from Zip’s AW Direct.

\n

Our rundown today of five different types of lockout kits should give you an idea of what you’ll need to respond to your next dispatch. If you don’t get a lot of those calls, a basic set may be right for you. However, if you handle a lot of them, consider a more comprehensive kit.

\n

Several more options are available at Zips.com. Click on the ‘Shop Products’ tab on the top navigation bar and then scroll down to Lockout Tools. Here, you’ll discover more kits and individual tools in a number of different categories.

\n

Find the options that are right for your operation. We also sell how-to manuals and include instructional videos on our product detail pages. These resources will come in handy the next time you head out to a lockout call.

\n
","postListSummaryFeaturedImage":"https://48463649.fs1.hubspotusercontent-na1.net/hubfs/48463649/Blog/lockout-tools-header.png","postRssContent":"
\n

Doesn’t matter who locked the keys inside the car. What matters is what you’re going to do to get them out. Zip’s AW Direct offers several car-opening kits to help automotive professionals gain access to locked vehicles.

\n

In today’s blog, we’re going to look at some of our best-selling kits from different manufacturers. We’ll start with basic packages and finish with the most comprehensive kits, going over each lockout kit contents. Each one brings its own value, price-point and distinct lockout advantages.

\n

Steck’s BigEasy Door Tool Kit See Details

\n
\n
\n
    \n
  • (1) 4-1/2’ L long reach tool
  • \n
  • (1) Glow-in-the-dark tip
  • \n
  • (1) Window wedge
  • \n
  • (1) Paint protector
  • \n
  • (1) Lock knob plastic strip tool
  • \n
\n
\n
\n
\n
\n

Steck’s BigEasy door tool kit includes a fluorescent pink long reach tool with glow-in-the-dark properties. This allows for better visibility in low-light situations. Featuring a T-handle for better maneuvering, the long reach tool’s tip will appear white in the daylight and then bright green at night.

\n

This kit also features a window wedge and other essential accessories for most unlock scenarios. With customer service in mind, the paint protector, rubber tip and plastic strip all combine to prevent unwanted scratches to the vehicle.

\n

AW Direct Big Blue Long-Reach Door Tool Kit See Details

\n
\n
\n
    \n
  • (1) Rigid plastic window wedge
  • \n
  • (1) Long reach door tool
  • \n
  • (1) Protective rubber tip
  • \n
  • (1) Inflatable air wedge
  • \n
  • (1) Strip tool
  • \n
  • (1) Carrying case
  • \n
\n

This convenient door tool kit from AW Direct includes a zippered, black carrying case so your tools will stay organized, stay together, will be easy to transport and will be ready to go to work when you need them.

\n
\n
\n
\n
\n

Pro-Lok 4 Piece Extra Length Long Arm Lockout Kit See Details

\n
\n
\n
    \n
  • (1) Extra Long Arm tool
  • \n
  • (1) Plastic sleeve
  • \n
  • (1) Pump wedge
  • \n
  • (1) Mini rubber wedge
  • \n
\n

By now, we’ve established the importance of protecting your customer’s vehicle and finish with soft air wedges, plastic paint protectors and rubber rod tips. What makes this four-piece kit from Pro-Lok different from the first two is the additional length of the long reach tool.

\n
\n
\n
\n
\n

At 76”, the Extra Long Arm tool is nearly two feet longer than the standard 4-1/2’ long reach tool. Most of these door tools work alongside the window to reach door control buttons. With Pro-Lok’s kit, you now have the ability to reach across the vehicle’s interior.

\n

With a direct line of sight, you can easily position the long reach tool to depress the unlock button, access the pull handle, lift the lock button and even retrieve the keys. With this improved viewing angle, the only better position would be from inside the vehicle.

\n

Sully Tools Basic Door Tool Kit See Details

\n
\n
\n
    \n
  • (1) Sully Pouch carry case
  • \n
  • (1) Sully Strip
  • \n
  • (2) Handle Wedges
  • \n
  • (1 ) Sticky L
  • \n
  • (1) Sully J
  • \n
  • (1) Sully Big Foot
  • \n
  • (1) Sully Dipper
  • \n
  • (1) Sully L
  • \n
  • (1) Sully Drop Hook
  • \n
  • (1) Sully Double Dipper
  • \n
\n

Unlike the first three kits, Sully Tools’ Basic Door Tool Kit gives us our first look at In The Door tools, a separate category at Zips.com. The previous kits just featured long reach tools, which work well between the door frame and window weatherstripping to access the door controls.

\n
\n
\n
\n
\n

With In The Door tools, the pre-bent rods are inserted into the door cavity and, through careful manipulation, emerge on the inside of the window. The plated shafts are able to hold their shape but remain flexible enough to bend and form to the contour of the door.

\n

When using these tools, auto entry experts use extreme caution to avoid damage to internal door components and also use the Sully strips to prevent scratches on the glass surface. Each tool number is stamped on the handle for easy identification and replacement.

\n

Access Tools Contractor’s Lockout Kit See Details

\n
\n
\n
    \n
  • (1) Wonder shield
  • \n
  • (1) Glassman tool
  • \n
  • (1) Wedgee wedge with strip savers
  • \n
  • (1) Standard one-hand jack tool
  • \n
  • (1) Air Jack wedge
  • \n
  • (1) Button Master tool
  • \n
  • (1) Button Strip tool
  • \n
  • (1) Quick Max long reach tool
  • \n
  • (1) Slim Jim
  • \n
  • (1) Flex Max Long Reach Tool
  • \n
  • (1) Carrying case
  • \n
\n

The Contractor’s Lockout Kit from Access Tools is the most popular and best-selling kit at Zips.com. Complete with a soft-sided carrying case to keep everything together, this kit offers several wedge options as well as unique tools for door pulls and unlock buttons.

\n
\n
\n
\n
\n

At 24-1/2”, the Slim Jim tool included in this professional kit is made from stainless steel for added firmness, corrosion resistance and durability. As its name implies, the thin profile slides into the door cavity to reach door linkages for simple opening of any vehicle.

\n

Access Tools’ contractor kit also includes two options to reach the door lock knob. The Button Strip was designed for insertion into narrow gaps for grabbing vertical buttons, and with its handle-operated lasso, the Button Master was specifically created to pull up knobs.

\n

Save your customer’s day

\n

Unintentionally locking keys in a vehicle can be an embarrassing moment for your customers and cause unnecessary delays in their busy lives. Be a hero and come to their rescue with the right lockout tools from Zip’s AW Direct.

\n

Our rundown today of five different types of lockout kits should give you an idea of what you’ll need to respond to your next dispatch. If you don’t get a lot of those calls, a basic set may be right for you. However, if you handle a lot of them, consider a more comprehensive kit.

\n

Several more options are available at Zips.com. Click on the ‘Shop Products’ tab on the top navigation bar and then scroll down to Lockout Tools. Here, you’ll discover more kits and individual tools in a number of different categories.

\n

Find the options that are right for your operation. We also sell how-to manuals and include instructional videos on our product detail pages. These resources will come in handy the next time you head out to a lockout call.

\n
","postRssSummaryFeaturedImage":"https://48463649.fs1.hubspotusercontent-na1.net/hubfs/48463649/Blog/lockout-tools-header.png","postSummary":"
\n

Doesn’t matter who locked the keys inside the car. What matters is what you’re going to do to get them out. Zip’s AW Direct offers several car-opening kits to help automotive professionals gain access to locked vehicles.

\n

In today’s blog, we’re going to look at some of our best-selling kits from different manufacturers. We’ll start with basic packages and finish with the most comprehensive kits, going over each lockout kit contents. Each one brings its own value, price-point and distinct lockout advantages.

\n

Steck’s BigEasy Door Tool Kit See Details

\n
\n
\n
    \n
  • (1) 4-1/2’ L long reach tool
  • \n
  • (1) Glow-in-the-dark tip
  • \n
  • (1) Window wedge
  • \n
  • (1) Paint protector
  • \n
  • (1) Lock knob plastic strip tool
  • \n
\n
\n
\n

\"lockout-tools-1\"

\n
\n
\n

Steck’s BigEasy door tool kit includes a fluorescent pink long reach tool with glow-in-the-dark properties. This allows for better visibility in low-light situations. Featuring a T-handle for better maneuvering, the long reach tool’s tip will appear white in the daylight and then bright green at night.

\n

This kit also features a window wedge and other essential accessories for most unlock scenarios. With customer service in mind, the paint protector, rubber tip and plastic strip all combine to prevent unwanted scratches to the vehicle.

\n

AW Direct Big Blue Long-Reach Door Tool Kit See Details

\n
\n
\n
    \n
  • (1) Rigid plastic window wedge
  • \n
  • (1) Long reach door tool
  • \n
  • (1) Protective rubber tip
  • \n
  • (1) Inflatable air wedge
  • \n
  • (1) Strip tool
  • \n
  • (1) Carrying case
  • \n
\n

This convenient door tool kit from AW Direct includes a zippered, black carrying case so your tools will stay organized, stay together, will be easy to transport and will be ready to go to work when you need them.

\n
\n
\n

\"lockout-tools-2\"

\n
\n
\n

Pro-Lok 4 Piece Extra Length Long Arm Lockout Kit See Details

\n
\n
\n
    \n
  • (1) Extra Long Arm tool
  • \n
  • (1) Plastic sleeve
  • \n
  • (1) Pump wedge
  • \n
  • (1) Mini rubber wedge
  • \n
\n

By now, we’ve established the importance of protecting your customer’s vehicle and finish with soft air wedges, plastic paint protectors and rubber rod tips. What makes this four-piece kit from Pro-Lok different from the first two is the additional length of the long reach tool.

\n
\n
\n

\"lockout-tools-3\"

\n
\n
\n

At 76”, the Extra Long Arm tool is nearly two feet longer than the standard 4-1/2’ long reach tool. Most of these door tools work alongside the window to reach door control buttons. With Pro-Lok’s kit, you now have the ability to reach across the vehicle’s interior.

\n

With a direct line of sight, you can easily position the long reach tool to depress the unlock button, access the pull handle, lift the lock button and even retrieve the keys. With this improved viewing angle, the only better position would be from inside the vehicle.

\n

Sully Tools Basic Door Tool Kit See Details

\n
\n
\n
    \n
  • (1) Sully Pouch carry case
  • \n
  • (1) Sully Strip
  • \n
  • (2) Handle Wedges
  • \n
  • (1 ) Sticky L
  • \n
  • (1) Sully J
  • \n
  • (1) Sully Big Foot
  • \n
  • (1) Sully Dipper
  • \n
  • (1) Sully L
  • \n
  • (1) Sully Drop Hook
  • \n
  • (1) Sully Double Dipper
  • \n
\n

Unlike the first three kits, Sully Tools’ Basic Door Tool Kit gives us our first look at In The Door tools, a separate category at Zips.com. The previous kits just featured long reach tools, which work well between the door frame and window weatherstripping to access the door controls.

\n
\n
\n

\"lockout-tools-4\"

\n
\n
\n

With In The Door tools, the pre-bent rods are inserted into the door cavity and, through careful manipulation, emerge on the inside of the window. The plated shafts are able to hold their shape but remain flexible enough to bend and form to the contour of the door.

\n

When using these tools, auto entry experts use extreme caution to avoid damage to internal door components and also use the Sully strips to prevent scratches on the glass surface. Each tool number is stamped on the handle for easy identification and replacement.

\n

Access Tools Contractor’s Lockout Kit See Details

\n
\n
\n
    \n
  • (1) Wonder shield
  • \n
  • (1) Glassman tool
  • \n
  • (1) Wedgee wedge with strip savers
  • \n
  • (1) Standard one-hand jack tool
  • \n
  • (1) Air Jack wedge
  • \n
  • (1) Button Master tool
  • \n
  • (1) Button Strip tool
  • \n
  • (1) Quick Max long reach tool
  • \n
  • (1) Slim Jim
  • \n
  • (1) Flex Max Long Reach Tool
  • \n
  • (1) Carrying case
  • \n
\n

The Contractor’s Lockout Kit from Access Tools is the most popular and best-selling kit at Zips.com. Complete with a soft-sided carrying case to keep everything together, this kit offers several wedge options as well as unique tools for door pulls and unlock buttons.

\n
\n
\n

\"lockout-tools-5-2\"

\n
\n
\n

At 24-1/2”, the Slim Jim tool included in this professional kit is made from stainless steel for added firmness, corrosion resistance and durability. As its name implies, the thin profile slides into the door cavity to reach door linkages for simple opening of any vehicle.

\n

Access Tools’ contractor kit also includes two options to reach the door lock knob. The Button Strip was designed for insertion into narrow gaps for grabbing vertical buttons, and with its handle-operated lasso, the Button Master was specifically created to pull up knobs.

\n

Save your customer’s day

\n

Unintentionally locking keys in a vehicle can be an embarrassing moment for your customers and cause unnecessary delays in their busy lives. Be a hero and come to their rescue with the right lockout tools from Zip’s AW Direct.

\n

Our rundown today of five different types of lockout kits should give you an idea of what you’ll need to respond to your next dispatch. If you don’t get a lot of those calls, a basic set may be right for you. However, if you handle a lot of them, consider a more comprehensive kit.

\n

Several more options are available at Zips.com. Click on the ‘Shop Products’ tab on the top navigation bar and then scroll down to Lockout Tools. Here, you’ll discover more kits and individual tools in a number of different categories.

\n

Find the options that are right for your operation. We also sell how-to manuals and include instructional videos on our product detail pages. These resources will come in handy the next time you head out to a lockout call.

\n
","postSummaryRss":"
\n

Doesn’t matter who locked the keys inside the car. What matters is what you’re going to do to get them out. Zip’s AW Direct offers several car-opening kits to help automotive professionals gain access to locked vehicles.

\n

In today’s blog, we’re going to look at some of our best-selling kits from different manufacturers. We’ll start with basic packages and finish with the most comprehensive kits, going over each lockout kit contents. Each one brings its own value, price-point and distinct lockout advantages.

\n

Steck’s BigEasy Door Tool Kit See Details

\n
\n
\n
    \n
  • (1) 4-1/2’ L long reach tool
  • \n
  • (1) Glow-in-the-dark tip
  • \n
  • (1) Window wedge
  • \n
  • (1) Paint protector
  • \n
  • (1) Lock knob plastic strip tool
  • \n
\n
\n
\n
\n
\n

Steck’s BigEasy door tool kit includes a fluorescent pink long reach tool with glow-in-the-dark properties. This allows for better visibility in low-light situations. Featuring a T-handle for better maneuvering, the long reach tool’s tip will appear white in the daylight and then bright green at night.

\n

This kit also features a window wedge and other essential accessories for most unlock scenarios. With customer service in mind, the paint protector, rubber tip and plastic strip all combine to prevent unwanted scratches to the vehicle.

\n

AW Direct Big Blue Long-Reach Door Tool Kit See Details

\n
\n
\n
    \n
  • (1) Rigid plastic window wedge
  • \n
  • (1) Long reach door tool
  • \n
  • (1) Protective rubber tip
  • \n
  • (1) Inflatable air wedge
  • \n
  • (1) Strip tool
  • \n
  • (1) Carrying case
  • \n
\n

This convenient door tool kit from AW Direct includes a zippered, black carrying case so your tools will stay organized, stay together, will be easy to transport and will be ready to go to work when you need them.

\n
\n
\n
\n
\n

Pro-Lok 4 Piece Extra Length Long Arm Lockout Kit See Details

\n
\n
\n
    \n
  • (1) Extra Long Arm tool
  • \n
  • (1) Plastic sleeve
  • \n
  • (1) Pump wedge
  • \n
  • (1) Mini rubber wedge
  • \n
\n

By now, we’ve established the importance of protecting your customer’s vehicle and finish with soft air wedges, plastic paint protectors and rubber rod tips. What makes this four-piece kit from Pro-Lok different from the first two is the additional length of the long reach tool.

\n
\n
\n
\n
\n

At 76”, the Extra Long Arm tool is nearly two feet longer than the standard 4-1/2’ long reach tool. Most of these door tools work alongside the window to reach door control buttons. With Pro-Lok’s kit, you now have the ability to reach across the vehicle’s interior.

\n

With a direct line of sight, you can easily position the long reach tool to depress the unlock button, access the pull handle, lift the lock button and even retrieve the keys. With this improved viewing angle, the only better position would be from inside the vehicle.

\n

Sully Tools Basic Door Tool Kit See Details

\n
\n
\n
    \n
  • (1) Sully Pouch carry case
  • \n
  • (1) Sully Strip
  • \n
  • (2) Handle Wedges
  • \n
  • (1 ) Sticky L
  • \n
  • (1) Sully J
  • \n
  • (1) Sully Big Foot
  • \n
  • (1) Sully Dipper
  • \n
  • (1) Sully L
  • \n
  • (1) Sully Drop Hook
  • \n
  • (1) Sully Double Dipper
  • \n
\n

Unlike the first three kits, Sully Tools’ Basic Door Tool Kit gives us our first look at In The Door tools, a separate category at Zips.com. The previous kits just featured long reach tools, which work well between the door frame and window weatherstripping to access the door controls.

\n
\n
\n
\n
\n

With In The Door tools, the pre-bent rods are inserted into the door cavity and, through careful manipulation, emerge on the inside of the window. The plated shafts are able to hold their shape but remain flexible enough to bend and form to the contour of the door.

\n

When using these tools, auto entry experts use extreme caution to avoid damage to internal door components and also use the Sully strips to prevent scratches on the glass surface. Each tool number is stamped on the handle for easy identification and replacement.

\n

Access Tools Contractor’s Lockout Kit See Details

\n
\n
\n
    \n
  • (1) Wonder shield
  • \n
  • (1) Glassman tool
  • \n
  • (1) Wedgee wedge with strip savers
  • \n
  • (1) Standard one-hand jack tool
  • \n
  • (1) Air Jack wedge
  • \n
  • (1) Button Master tool
  • \n
  • (1) Button Strip tool
  • \n
  • (1) Quick Max long reach tool
  • \n
  • (1) Slim Jim
  • \n
  • (1) Flex Max Long Reach Tool
  • \n
  • (1) Carrying case
  • \n
\n

The Contractor’s Lockout Kit from Access Tools is the most popular and best-selling kit at Zips.com. Complete with a soft-sided carrying case to keep everything together, this kit offers several wedge options as well as unique tools for door pulls and unlock buttons.

\n
\n
\n
\n
\n

At 24-1/2”, the Slim Jim tool included in this professional kit is made from stainless steel for added firmness, corrosion resistance and durability. As its name implies, the thin profile slides into the door cavity to reach door linkages for simple opening of any vehicle.

\n

Access Tools’ contractor kit also includes two options to reach the door lock knob. The Button Strip was designed for insertion into narrow gaps for grabbing vertical buttons, and with its handle-operated lasso, the Button Master was specifically created to pull up knobs.

\n

Save your customer’s day

\n

Unintentionally locking keys in a vehicle can be an embarrassing moment for your customers and cause unnecessary delays in their busy lives. Be a hero and come to their rescue with the right lockout tools from Zip’s AW Direct.

\n

Our rundown today of five different types of lockout kits should give you an idea of what you’ll need to respond to your next dispatch. If you don’t get a lot of those calls, a basic set may be right for you. However, if you handle a lot of them, consider a more comprehensive kit.

\n

Several more options are available at Zips.com. Click on the ‘Shop Products’ tab on the top navigation bar and then scroll down to Lockout Tools. Here, you’ll discover more kits and individual tools in a number of different categories.

\n

Find the options that are right for your operation. We also sell how-to manuals and include instructional videos on our product detail pages. These resources will come in handy the next time you head out to a lockout call.

\n
","postTemplate":"zips-basic-theme/templates/blog-post.html","previewImageSrc":null,"previewKey":"UdbPYGaI","previousPostFeaturedImage":"https://48463649.fs1.hubspotusercontent-na1.net/hubfs/48463649/header-2.png","previousPostFeaturedImageAltText":"","previousPostName":"Zip's Top 10 Accessories for Your Service Truck","previousPostSlug":"blog/zips-top-10-accessories-for-their-service-truck","processingStatus":"PUBLISHED","propertyForDynamicPageCanonicalUrl":null,"propertyForDynamicPageFeaturedImage":null,"propertyForDynamicPageMetaDescription":null,"propertyForDynamicPageSlug":null,"propertyForDynamicPageTitle":null,"publicAccessRules":[],"publicAccessRulesEnabled":false,"publishDate":1740060000000,"publishDateLocalTime":1740060000000,"publishDateLocalized":{"date":1740060000000,"format":"medium","language":null},"publishImmediately":true,"publishTimezoneOffset":null,"publishedAt":1756235402747,"publishedByEmail":null,"publishedById":76755706,"publishedByName":null,"publishedUrl":"/blog/best-vehicle-lockout-kits","resolvedDomain":"www.zips.com","resolvedLanguage":null,"rssBody":"
\n

Doesn’t matter who locked the keys inside the car. What matters is what you’re going to do to get them out. Zip’s AW Direct offers several car-opening kits to help automotive professionals gain access to locked vehicles.

\n

In today’s blog, we’re going to look at some of our best-selling kits from different manufacturers. We’ll start with basic packages and finish with the most comprehensive kits, going over each lockout kit contents. Each one brings its own value, price-point and distinct lockout advantages.

\n

Steck’s BigEasy Door Tool Kit See Details

\n
\n
\n
    \n
  • (1) 4-1/2’ L long reach tool
  • \n
  • (1) Glow-in-the-dark tip
  • \n
  • (1) Window wedge
  • \n
  • (1) Paint protector
  • \n
  • (1) Lock knob plastic strip tool
  • \n
\n
\n
\n

\"lockout-tools-1\"

\n
\n
\n

Steck’s BigEasy door tool kit includes a fluorescent pink long reach tool with glow-in-the-dark properties. This allows for better visibility in low-light situations. Featuring a T-handle for better maneuvering, the long reach tool’s tip will appear white in the daylight and then bright green at night.

\n

This kit also features a window wedge and other essential accessories for most unlock scenarios. With customer service in mind, the paint protector, rubber tip and plastic strip all combine to prevent unwanted scratches to the vehicle.

\n

AW Direct Big Blue Long-Reach Door Tool Kit See Details

\n
\n
\n
    \n
  • (1) Rigid plastic window wedge
  • \n
  • (1) Long reach door tool
  • \n
  • (1) Protective rubber tip
  • \n
  • (1) Inflatable air wedge
  • \n
  • (1) Strip tool
  • \n
  • (1) Carrying case
  • \n
\n

This convenient door tool kit from AW Direct includes a zippered, black carrying case so your tools will stay organized, stay together, will be easy to transport and will be ready to go to work when you need them.

\n
\n
\n

\"lockout-tools-2\"

\n
\n
\n

Pro-Lok 4 Piece Extra Length Long Arm Lockout Kit See Details

\n
\n
\n
    \n
  • (1) Extra Long Arm tool
  • \n
  • (1) Plastic sleeve
  • \n
  • (1) Pump wedge
  • \n
  • (1) Mini rubber wedge
  • \n
\n

By now, we’ve established the importance of protecting your customer’s vehicle and finish with soft air wedges, plastic paint protectors and rubber rod tips. What makes this four-piece kit from Pro-Lok different from the first two is the additional length of the long reach tool.

\n
\n
\n

\"lockout-tools-3\"

\n
\n
\n

At 76”, the Extra Long Arm tool is nearly two feet longer than the standard 4-1/2’ long reach tool. Most of these door tools work alongside the window to reach door control buttons. With Pro-Lok’s kit, you now have the ability to reach across the vehicle’s interior.

\n

With a direct line of sight, you can easily position the long reach tool to depress the unlock button, access the pull handle, lift the lock button and even retrieve the keys. With this improved viewing angle, the only better position would be from inside the vehicle.

\n

Sully Tools Basic Door Tool Kit See Details

\n
\n
\n
    \n
  • (1) Sully Pouch carry case
  • \n
  • (1) Sully Strip
  • \n
  • (2) Handle Wedges
  • \n
  • (1 ) Sticky L
  • \n
  • (1) Sully J
  • \n
  • (1) Sully Big Foot
  • \n
  • (1) Sully Dipper
  • \n
  • (1) Sully L
  • \n
  • (1) Sully Drop Hook
  • \n
  • (1) Sully Double Dipper
  • \n
\n

Unlike the first three kits, Sully Tools’ Basic Door Tool Kit gives us our first look at In The Door tools, a separate category at Zips.com. The previous kits just featured long reach tools, which work well between the door frame and window weatherstripping to access the door controls.

\n
\n
\n

\"lockout-tools-4\"

\n
\n
\n

With In The Door tools, the pre-bent rods are inserted into the door cavity and, through careful manipulation, emerge on the inside of the window. The plated shafts are able to hold their shape but remain flexible enough to bend and form to the contour of the door.

\n

When using these tools, auto entry experts use extreme caution to avoid damage to internal door components and also use the Sully strips to prevent scratches on the glass surface. Each tool number is stamped on the handle for easy identification and replacement.

\n

Access Tools Contractor’s Lockout Kit See Details

\n
\n
\n
    \n
  • (1) Wonder shield
  • \n
  • (1) Glassman tool
  • \n
  • (1) Wedgee wedge with strip savers
  • \n
  • (1) Standard one-hand jack tool
  • \n
  • (1) Air Jack wedge
  • \n
  • (1) Button Master tool
  • \n
  • (1) Button Strip tool
  • \n
  • (1) Quick Max long reach tool
  • \n
  • (1) Slim Jim
  • \n
  • (1) Flex Max Long Reach Tool
  • \n
  • (1) Carrying case
  • \n
\n

The Contractor’s Lockout Kit from Access Tools is the most popular and best-selling kit at Zips.com. Complete with a soft-sided carrying case to keep everything together, this kit offers several wedge options as well as unique tools for door pulls and unlock buttons.

\n
\n
\n

\"lockout-tools-5-2\"

\n
\n
\n

At 24-1/2”, the Slim Jim tool included in this professional kit is made from stainless steel for added firmness, corrosion resistance and durability. As its name implies, the thin profile slides into the door cavity to reach door linkages for simple opening of any vehicle.

\n

Access Tools’ contractor kit also includes two options to reach the door lock knob. The Button Strip was designed for insertion into narrow gaps for grabbing vertical buttons, and with its handle-operated lasso, the Button Master was specifically created to pull up knobs.

\n

Save your customer’s day

\n

Unintentionally locking keys in a vehicle can be an embarrassing moment for your customers and cause unnecessary delays in their busy lives. Be a hero and come to their rescue with the right lockout tools from Zip’s AW Direct.

\n

Our rundown today of five different types of lockout kits should give you an idea of what you’ll need to respond to your next dispatch. If you don’t get a lot of those calls, a basic set may be right for you. However, if you handle a lot of them, consider a more comprehensive kit.

\n

Several more options are available at Zips.com. Click on the ‘Shop Products’ tab on the top navigation bar and then scroll down to Lockout Tools. Here, you’ll discover more kits and individual tools in a number of different categories.

\n

Find the options that are right for your operation. We also sell how-to manuals and include instructional videos on our product detail pages. These resources will come in handy the next time you head out to a lockout call.

\n
","rssSummary":"
\n

Doesn’t matter who locked the keys inside the car. What matters is what you’re going to do to get them out. Zip’s AW Direct offers several car-opening kits to help automotive professionals gain access to locked vehicles.

\n

In today’s blog, we’re going to look at some of our best-selling kits from different manufacturers. We’ll start with basic packages and finish with the most comprehensive kits, going over each lockout kit contents. Each one brings its own value, price-point and distinct lockout advantages.

\n

Steck’s BigEasy Door Tool Kit See Details

\n
\n
\n
    \n
  • (1) 4-1/2’ L long reach tool
  • \n
  • (1) Glow-in-the-dark tip
  • \n
  • (1) Window wedge
  • \n
  • (1) Paint protector
  • \n
  • (1) Lock knob plastic strip tool
  • \n
\n
\n
\n

\"lockout-tools-1\"

\n
\n
\n

Steck’s BigEasy door tool kit includes a fluorescent pink long reach tool with glow-in-the-dark properties. This allows for better visibility in low-light situations. Featuring a T-handle for better maneuvering, the long reach tool’s tip will appear white in the daylight and then bright green at night.

\n

This kit also features a window wedge and other essential accessories for most unlock scenarios. With customer service in mind, the paint protector, rubber tip and plastic strip all combine to prevent unwanted scratches to the vehicle.

\n

AW Direct Big Blue Long-Reach Door Tool Kit See Details

\n
\n
\n
    \n
  • (1) Rigid plastic window wedge
  • \n
  • (1) Long reach door tool
  • \n
  • (1) Protective rubber tip
  • \n
  • (1) Inflatable air wedge
  • \n
  • (1) Strip tool
  • \n
  • (1) Carrying case
  • \n
\n

This convenient door tool kit from AW Direct includes a zippered, black carrying case so your tools will stay organized, stay together, will be easy to transport and will be ready to go to work when you need them.

\n
\n
\n

\"lockout-tools-2\"

\n
\n
\n

Pro-Lok 4 Piece Extra Length Long Arm Lockout Kit See Details

\n
\n
\n
    \n
  • (1) Extra Long Arm tool
  • \n
  • (1) Plastic sleeve
  • \n
  • (1) Pump wedge
  • \n
  • (1) Mini rubber wedge
  • \n
\n

By now, we’ve established the importance of protecting your customer’s vehicle and finish with soft air wedges, plastic paint protectors and rubber rod tips. What makes this four-piece kit from Pro-Lok different from the first two is the additional length of the long reach tool.

\n
\n
\n

\"lockout-tools-3\"

\n
\n
\n

At 76”, the Extra Long Arm tool is nearly two feet longer than the standard 4-1/2’ long reach tool. Most of these door tools work alongside the window to reach door control buttons. With Pro-Lok’s kit, you now have the ability to reach across the vehicle’s interior.

\n

With a direct line of sight, you can easily position the long reach tool to depress the unlock button, access the pull handle, lift the lock button and even retrieve the keys. With this improved viewing angle, the only better position would be from inside the vehicle.

\n

Sully Tools Basic Door Tool Kit See Details

\n
\n
\n
    \n
  • (1) Sully Pouch carry case
  • \n
  • (1) Sully Strip
  • \n
  • (2) Handle Wedges
  • \n
  • (1 ) Sticky L
  • \n
  • (1) Sully J
  • \n
  • (1) Sully Big Foot
  • \n
  • (1) Sully Dipper
  • \n
  • (1) Sully L
  • \n
  • (1) Sully Drop Hook
  • \n
  • (1) Sully Double Dipper
  • \n
\n

Unlike the first three kits, Sully Tools’ Basic Door Tool Kit gives us our first look at In The Door tools, a separate category at Zips.com. The previous kits just featured long reach tools, which work well between the door frame and window weatherstripping to access the door controls.

\n
\n
\n

\"lockout-tools-4\"

\n
\n
\n

With In The Door tools, the pre-bent rods are inserted into the door cavity and, through careful manipulation, emerge on the inside of the window. The plated shafts are able to hold their shape but remain flexible enough to bend and form to the contour of the door.

\n

When using these tools, auto entry experts use extreme caution to avoid damage to internal door components and also use the Sully strips to prevent scratches on the glass surface. Each tool number is stamped on the handle for easy identification and replacement.

\n

Access Tools Contractor’s Lockout Kit See Details

\n
\n
\n
    \n
  • (1) Wonder shield
  • \n
  • (1) Glassman tool
  • \n
  • (1) Wedgee wedge with strip savers
  • \n
  • (1) Standard one-hand jack tool
  • \n
  • (1) Air Jack wedge
  • \n
  • (1) Button Master tool
  • \n
  • (1) Button Strip tool
  • \n
  • (1) Quick Max long reach tool
  • \n
  • (1) Slim Jim
  • \n
  • (1) Flex Max Long Reach Tool
  • \n
  • (1) Carrying case
  • \n
\n

The Contractor’s Lockout Kit from Access Tools is the most popular and best-selling kit at Zips.com. Complete with a soft-sided carrying case to keep everything together, this kit offers several wedge options as well as unique tools for door pulls and unlock buttons.

\n
\n
\n

\"lockout-tools-5-2\"

\n
\n
\n

At 24-1/2”, the Slim Jim tool included in this professional kit is made from stainless steel for added firmness, corrosion resistance and durability. As its name implies, the thin profile slides into the door cavity to reach door linkages for simple opening of any vehicle.

\n

Access Tools’ contractor kit also includes two options to reach the door lock knob. The Button Strip was designed for insertion into narrow gaps for grabbing vertical buttons, and with its handle-operated lasso, the Button Master was specifically created to pull up knobs.

\n

Save your customer’s day

\n

Unintentionally locking keys in a vehicle can be an embarrassing moment for your customers and cause unnecessary delays in their busy lives. Be a hero and come to their rescue with the right lockout tools from Zip’s AW Direct.

\n

Our rundown today of five different types of lockout kits should give you an idea of what you’ll need to respond to your next dispatch. If you don’t get a lot of those calls, a basic set may be right for you. However, if you handle a lot of them, consider a more comprehensive kit.

\n

Several more options are available at Zips.com. Click on the ‘Shop Products’ tab on the top navigation bar and then scroll down to Lockout Tools. Here, you’ll discover more kits and individual tools in a number of different categories.

\n

Find the options that are right for your operation. We also sell how-to manuals and include instructional videos on our product detail pages. These resources will come in handy the next time you head out to a lockout call.

\n
","rssSummaryFeaturedImage":"https://48463649.fs1.hubspotusercontent-na1.net/hubfs/48463649/Blog/lockout-tools-header.png","scheduledUpdateDate":0,"screenshotPreviewTakenAt":1770577802651,"screenshotPreviewUrl":"https://cdn1.hubspot.net/hubshotv3/prod/e/0/66328f78-2bef-49d2-93aa-aeaa760008ca.png","sections":{},"securityState":"NONE","siteId":null,"slug":"blog/best-vehicle-lockout-kits","stagedFrom":null,"state":"PUBLISHED","stateWhenDeleted":null,"structuredContentPageType":null,"structuredContentType":null,"styleOverrideId":null,"subcategory":"normal_blog_post","syncedWithBlogRoot":true,"tagIds":[192169769490,192174528148,194718191114,194719586666],"tagList":[{"categoryId":3,"cdnPurgeEmbargoTime":null,"contentIds":[],"cosObjectType":"TAG","created":1751598346713,"deletedAt":0,"description":"","id":192169769490,"label":"Towing & Recovery","language":null,"name":"Towing & Recovery","portalId":48463649,"slug":"towing-recovery","translatedFromId":null,"translations":{},"updated":1751598346713},{"categoryId":3,"cdnPurgeEmbargoTime":null,"contentIds":[],"cosObjectType":"TAG","created":1751601475164,"deletedAt":0,"description":"","id":192174528148,"label":"Automotive","language":null,"name":"Automotive","portalId":48463649,"slug":"automotive","translatedFromId":null,"translations":{},"updated":1751601475164},{"categoryId":3,"cdnPurgeEmbargoTime":null,"contentIds":[],"cosObjectType":"TAG","created":1755545220719,"deletedAt":0,"description":"","id":194718191114,"label":"Trending","language":null,"name":"Trending","portalId":48463649,"slug":"trending","translatedFromId":null,"translations":{},"updated":1755545220719},{"categoryId":3,"cdnPurgeEmbargoTime":null,"contentIds":[],"cosObjectType":"TAG","created":1755545331471,"deletedAt":0,"description":"","id":194719586666,"label":"Product Guides","language":null,"name":"Product Guides","portalId":48463649,"slug":"product-guides","translatedFromId":null,"translations":{},"updated":1755545331471}],"tagNames":["Towing & Recovery","Automotive","Trending","Product Guides"],"teamPerms":[],"templatePath":"","templatePathForRender":"zips-basic-theme/templates/blog-post.html","textToAudioFileId":null,"textToAudioGenerationRequestId":null,"themePath":null,"themeSettingsValues":null,"title":"Best Vehicle Lockout Kits","tmsId":null,"topicIds":[192169769490,192174528148,194718191114,194719586666],"topicList":[{"categoryId":3,"cdnPurgeEmbargoTime":null,"contentIds":[],"cosObjectType":"TAG","created":1751598346713,"deletedAt":0,"description":"","id":192169769490,"label":"Towing & Recovery","language":null,"name":"Towing & Recovery","portalId":48463649,"slug":"towing-recovery","translatedFromId":null,"translations":{},"updated":1751598346713},{"categoryId":3,"cdnPurgeEmbargoTime":null,"contentIds":[],"cosObjectType":"TAG","created":1751601475164,"deletedAt":0,"description":"","id":192174528148,"label":"Automotive","language":null,"name":"Automotive","portalId":48463649,"slug":"automotive","translatedFromId":null,"translations":{},"updated":1751601475164},{"categoryId":3,"cdnPurgeEmbargoTime":null,"contentIds":[],"cosObjectType":"TAG","created":1755545220719,"deletedAt":0,"description":"","id":194718191114,"label":"Trending","language":null,"name":"Trending","portalId":48463649,"slug":"trending","translatedFromId":null,"translations":{},"updated":1755545220719},{"categoryId":3,"cdnPurgeEmbargoTime":null,"contentIds":[],"cosObjectType":"TAG","created":1755545331471,"deletedAt":0,"description":"","id":194719586666,"label":"Product Guides","language":null,"name":"Product Guides","portalId":48463649,"slug":"product-guides","translatedFromId":null,"translations":{},"updated":1755545331471}],"topicNames":["Towing & Recovery","Automotive","Trending","Product Guides"],"topics":[192169769490,192174528148,194718191114,194719586666],"translatedContent":{},"translatedFromId":null,"translations":{},"tweet":null,"tweetAt":null,"tweetImmediately":false,"unpublishedAt":0,"updated":1756235402752,"updatedById":76755706,"upsizeFeaturedImage":false,"url":"/blog/best-vehicle-lockout-kits","useFeaturedImage":true,"userPerms":[],"views":null,"visibleToAll":null,"widgetContainers":{},"widgetcontainers":{},"widgets":{}},{"ab":false,"abStatus":null,"abTestId":null,"abVariation":false,"abVariationAutomated":false,"absoluteUrl":"/blog/zips-aw-direct-acquires-guni-products","afterPostBody":null,"aifeatures":null,"allowedSlugConflict":false,"analytics":null,"analyticsPageId":"192174529894","analyticsPageType":"blog-post","approvalStatus":null,"archived":false,"archivedAt":0,"archivedInDashboard":false,"areCommentsAllowed":true,"attachedStylesheets":[],"audienceAccess":"PUBLIC","author":null,"authorName":null,"authorUsername":null,"blogAuthor":{"avatar":"","bio":"","cdnPurgeEmbargoTime":null,"cosObjectType":"BLOG_AUTHOR","created":1755187092136,"deletedAt":0,"displayName":"Cameron Hanson","email":null,"facebook":"","fullName":"Cameron Hanson","gravatarUrl":null,"hasSocialProfiles":false,"id":194499322288,"label":"Cameron Hanson","language":"en","linkedin":"","name":" Cameron Hanson","portalId":48463649,"slug":"cameron-hanson","translatedFromId":null,"translations":{},"twitter":"","twitterUsername":"","updated":1755187092136,"userId":null,"username":null,"website":""},"blogAuthorId":194499322288,"blogAuthorIdList":[194499322288],"blogAuthorList":[{"avatar":"","bio":"","cdnPurgeEmbargoTime":null,"cosObjectType":"BLOG_AUTHOR","created":1755187092136,"deletedAt":0,"displayName":"Cameron Hanson","email":null,"facebook":"","fullName":"Cameron Hanson","gravatarUrl":null,"hasSocialProfiles":false,"id":194499322288,"label":"Cameron Hanson","language":"en","linkedin":"","name":" Cameron Hanson","portalId":48463649,"slug":"cameron-hanson","translatedFromId":null,"translations":{},"twitter":"","twitterUsername":"","updated":1755187092136,"userId":null,"username":null,"website":""}],"blogPostAuthor":{"avatar":"","bio":"","cdnPurgeEmbargoTime":null,"cosObjectType":"BLOG_AUTHOR","created":1755187092136,"deletedAt":0,"displayName":"Cameron Hanson","email":null,"facebook":"","fullName":"Cameron Hanson","gravatarUrl":null,"hasSocialProfiles":false,"id":194499322288,"label":"Cameron Hanson","language":"en","linkedin":"","name":" Cameron Hanson","portalId":48463649,"slug":"cameron-hanson","translatedFromId":null,"translations":{},"twitter":"","twitterUsername":"","updated":1755187092136,"userId":null,"username":null,"website":""},"blogPostScheduleTaskUid":null,"blogPublishInstantEmailCampaignId":null,"blogPublishInstantEmailRetryCount":null,"blogPublishInstantEmailTaskUid":null,"blogPublishToSocialMediaTask":"DONE_NOT_SENT","blueprintTypeId":0,"businessUnitId":null,"campaign":null,"campaignName":null,"campaignUtm":null,"category":3,"categoryId":3,"cdnPurgeEmbargoTime":null,"checkPostLevelAudienceAccessFirst":true,"clonedFrom":null,"composeBody":null,"compositionId":0,"contentAccessRuleIds":[],"contentAccessRuleTypes":[],"contentGroup":190096341139,"contentGroupId":190096341139,"contentTypeCategory":3,"contentTypeCategoryId":3,"contentTypeId":null,"created":1751602356929,"createdByAgent":null,"createdById":74657203,"createdTime":1751602356929,"crmObjectId":null,"css":{},"cssText":"","ctaClicks":null,"ctaViews":null,"currentState":"PUBLISHED","currentlyPublished":true,"deletedAt":0,"deletedBy":null,"deletedByEmail":null,"deletedById":null,"domain":"","dynamicPageDataSourceId":null,"dynamicPageDataSourceType":null,"dynamicPageHubDbTableId":null,"enableDomainStylesheets":null,"enableGoogleAmpOutputOverride":false,"enableLayoutStylesheets":null,"errors":[],"featuredImage":"https://48463649.fs1.hubspotusercontent-na1.net/hubfs/48463649/Blog/guni-1.png","featuredImageAltText":"GUNI products","featuredImageHeight":431,"featuredImageLength":0,"featuredImageWidth":877,"flexAreas":{},"folderId":null,"footerHtml":null,"footerTemplatePath":null,"footerVariantName":null,"freezeDate":1739455200000,"generateJsonLdEnabledOverride":true,"globalBlockOverrides":{},"hasContentAccessRules":false,"hasUserChanges":true,"headHtml":"","header":null,"headerTemplatePath":null,"headerVariantName":null,"htmlTitle":"Zip's AW Direct Acquires GUNI Products","id":192174529894,"includeDefaultCustomCss":null,"isCaptchaRequired":true,"isCrawlableByBots":false,"isDraft":false,"isInstantEmailEnabled":false,"isPublished":true,"isSocialPublishingEnabled":false,"keywords":[],"label":"Zip's AW Direct Acquires GUNI Products","language":"en","lastEditSessionId":null,"lastEditUpdateId":null,"layoutSections":{},"legacyBlogTabid":null,"legacyId":null,"legacyPostGuid":null,"linkRelCanonicalUrl":"","listTemplate":"","liveDomain":"www.zips.com","mab":false,"mabExperimentId":null,"mabMaster":false,"mabVariant":false,"marketingCampaignGuids":[],"meta":{"tag_ids":[192169769490,192174528148,194719179273,194719586584],"topic_ids":[192169769490,192174528148,194719179273,194719586584],"post_summary":"
\n

NEW HAMPTON, Iowa–Zip’s AW Direct, a leading distributor of trucks, parts and accessories to the Towing and Recovery market, is pleased to announce the acquisition of Georgia-based GUNI products, a global manufacturer of universal vehicle repositioning wheels. The deal was made official in November of 2024.

\n

“We are excited to bring this innovative line of products under the Zip’s family umbrella,” said David Rottinghaus, executive vice president at Zip’s Aw Direct. “We first learned of their unique products five years ago and have been promoting, marketing and distributing them ever since. We’re a big fan of GUNI, and this acquisition certainly aligns with our goals as a company to deliver the best and latest products to our customers.”

\n
\n
\n

Led by the flagship GUNI Wheel, the GUNI family of products includes temporary repositioning wheels for all makes and models of passenger cars and trucks. What makes them universal are the slotted mounting holes for 4/5, 5/6, 8 and 6x120 lug bolt patterns. Their narrow profile allows for easy maneuverability on the road or in the shop, and the airless, molded tread works perfect for long-term storage for collector cars, recreational vehicles and impound vehicles.

\n

In recent years, the GUNI line has expanded to include the GUNI Wheel 45S and the GUNI Wheel X, both of which offer deeper offsets to work around large aftermarket brake calipers. Lately, the GUNI Wheel X has revolutionized the vehicle repositioning industry by offering interchangeable hub inserts and a rolling spinner option in one convenient platform. This space-saving design makes it a favorite among towing companies, auto repair shops and auto body and restoration specialists.

\n
\n
\n

\"guni-2\"

\n
\n
\n
\n

\"guni-3\"

\n

\"guni-4\"

\n
\n

The GUNI family of products also includes the GUNI Fast Puller, a portable dent-removal system, as well as accessories to accommodate the original GUNI Wheel. Under the new ownership, the plan is to continue to expand the product line and offer the latest innovation to Zip’s customers. Since the acquisition, the GUNI brand has already been refreshed with a new logo and updated website.

\n

\"guni-5\"

\n

“We appreciate the leadership former owner, Sergio Rovito, and his team at GUNI have done in developing their popular wheels and creating a huge following in several automotive markets,” Rottinghaus said. “We don’t plan on stopping there and can’t wait to deliver their beautiful orange wheels to professionals and hobbyists alike. We are well positioned for the future.\"

\n

For more information on GUNI products, visit guniproducts.com.

\n
","post_body":"
\n

NEW HAMPTON, Iowa–Zip’s AW Direct, a leading distributor of trucks, parts and accessories to the Towing and Recovery market, is pleased to announce the acquisition of Georgia-based GUNI products, a global manufacturer of universal vehicle repositioning wheels. The deal was made official in November of 2024.

\n

“We are excited to bring this innovative line of products under the Zip’s family umbrella,” said David Rottinghaus, executive vice president at Zip’s Aw Direct. “We first learned of their unique products five years ago and have been promoting, marketing and distributing them ever since. We’re a big fan of GUNI, and this acquisition certainly aligns with our goals as a company to deliver the best and latest products to our customers.”

\n
\n
\n

Led by the flagship GUNI Wheel, the GUNI family of products includes temporary repositioning wheels for all makes and models of passenger cars and trucks. What makes them universal are the slotted mounting holes for 4/5, 5/6, 8 and 6x120 lug bolt patterns. Their narrow profile allows for easy maneuverability on the road or in the shop, and the airless, molded tread works perfect for long-term storage for collector cars, recreational vehicles and impound vehicles.

\n

In recent years, the GUNI line has expanded to include the GUNI Wheel 45S and the GUNI Wheel X, both of which offer deeper offsets to work around large aftermarket brake calipers. Lately, the GUNI Wheel X has revolutionized the vehicle repositioning industry by offering interchangeable hub inserts and a rolling spinner option in one convenient platform. This space-saving design makes it a favorite among towing companies, auto repair shops and auto body and restoration specialists.

\n
\n
\n

\"guni-2\"

\n
\n
\n
\n

\"guni-3\"

\n

\"guni-4\"

\n
\n

The GUNI family of products also includes the GUNI Fast Puller, a portable dent-removal system, as well as accessories to accommodate the original GUNI Wheel. Under the new ownership, the plan is to continue to expand the product line and offer the latest innovation to Zip’s customers. Since the acquisition, the GUNI brand has already been refreshed with a new logo and updated website.

\n

\"guni-5\"

\n

“We appreciate the leadership former owner, Sergio Rovito, and his team at GUNI have done in developing their popular wheels and creating a huge following in several automotive markets,” Rottinghaus said. “We don’t plan on stopping there and can’t wait to deliver their beautiful orange wheels to professionals and hobbyists alike. We are well positioned for the future.\"

\n

For more information on GUNI products, visit guniproducts.com.

\n
","rss_summary":"
\n

NEW HAMPTON, Iowa–Zip’s AW Direct, a leading distributor of trucks, parts and accessories to the Towing and Recovery market, is pleased to announce the acquisition of Georgia-based GUNI products, a global manufacturer of universal vehicle repositioning wheels. The deal was made official in November of 2024.

\n

“We are excited to bring this innovative line of products under the Zip’s family umbrella,” said David Rottinghaus, executive vice president at Zip’s Aw Direct. “We first learned of their unique products five years ago and have been promoting, marketing and distributing them ever since. We’re a big fan of GUNI, and this acquisition certainly aligns with our goals as a company to deliver the best and latest products to our customers.”

\n
\n
\n

Led by the flagship GUNI Wheel, the GUNI family of products includes temporary repositioning wheels for all makes and models of passenger cars and trucks. What makes them universal are the slotted mounting holes for 4/5, 5/6, 8 and 6x120 lug bolt patterns. Their narrow profile allows for easy maneuverability on the road or in the shop, and the airless, molded tread works perfect for long-term storage for collector cars, recreational vehicles and impound vehicles.

\n

In recent years, the GUNI line has expanded to include the GUNI Wheel 45S and the GUNI Wheel X, both of which offer deeper offsets to work around large aftermarket brake calipers. Lately, the GUNI Wheel X has revolutionized the vehicle repositioning industry by offering interchangeable hub inserts and a rolling spinner option in one convenient platform. This space-saving design makes it a favorite among towing companies, auto repair shops and auto body and restoration specialists.

\n
\n
\n

\"guni-2\"

\n
\n
\n
\n

\"guni-3\"

\n

\"guni-4\"

\n
\n

The GUNI family of products also includes the GUNI Fast Puller, a portable dent-removal system, as well as accessories to accommodate the original GUNI Wheel. Under the new ownership, the plan is to continue to expand the product line and offer the latest innovation to Zip’s customers. Since the acquisition, the GUNI brand has already been refreshed with a new logo and updated website.

\n

\"guni-5\"

\n

“We appreciate the leadership former owner, Sergio Rovito, and his team at GUNI have done in developing their popular wheels and creating a huge following in several automotive markets,” Rottinghaus said. “We don’t plan on stopping there and can’t wait to deliver their beautiful orange wheels to professionals and hobbyists alike. We are well positioned for the future.\"

\n

For more information on GUNI products, visit guniproducts.com.

\n
","rss_body":"
\n

NEW HAMPTON, Iowa–Zip’s AW Direct, a leading distributor of trucks, parts and accessories to the Towing and Recovery market, is pleased to announce the acquisition of Georgia-based GUNI products, a global manufacturer of universal vehicle repositioning wheels. The deal was made official in November of 2024.

\n

“We are excited to bring this innovative line of products under the Zip’s family umbrella,” said David Rottinghaus, executive vice president at Zip’s Aw Direct. “We first learned of their unique products five years ago and have been promoting, marketing and distributing them ever since. We’re a big fan of GUNI, and this acquisition certainly aligns with our goals as a company to deliver the best and latest products to our customers.”

\n
\n
\n

Led by the flagship GUNI Wheel, the GUNI family of products includes temporary repositioning wheels for all makes and models of passenger cars and trucks. What makes them universal are the slotted mounting holes for 4/5, 5/6, 8 and 6x120 lug bolt patterns. Their narrow profile allows for easy maneuverability on the road or in the shop, and the airless, molded tread works perfect for long-term storage for collector cars, recreational vehicles and impound vehicles.

\n

In recent years, the GUNI line has expanded to include the GUNI Wheel 45S and the GUNI Wheel X, both of which offer deeper offsets to work around large aftermarket brake calipers. Lately, the GUNI Wheel X has revolutionized the vehicle repositioning industry by offering interchangeable hub inserts and a rolling spinner option in one convenient platform. This space-saving design makes it a favorite among towing companies, auto repair shops and auto body and restoration specialists.

\n
\n
\n

\"guni-2\"

\n
\n
\n
\n

\"guni-3\"

\n

\"guni-4\"

\n
\n

The GUNI family of products also includes the GUNI Fast Puller, a portable dent-removal system, as well as accessories to accommodate the original GUNI Wheel. Under the new ownership, the plan is to continue to expand the product line and offer the latest innovation to Zip’s customers. Since the acquisition, the GUNI brand has already been refreshed with a new logo and updated website.

\n

\"guni-5\"

\n

“We appreciate the leadership former owner, Sergio Rovito, and his team at GUNI have done in developing their popular wheels and creating a huge following in several automotive markets,” Rottinghaus said. “We don’t plan on stopping there and can’t wait to deliver their beautiful orange wheels to professionals and hobbyists alike. We are well positioned for the future.\"

\n

For more information on GUNI products, visit guniproducts.com.

\n
","enable_google_amp_output_override":false,"generate_json_ld_enabled":true,"blog_post_schedule_task_uid":null,"blog_publish_to_social_media_task":"DONE_NOT_SENT","blog_publish_instant_email_task_uid":null,"blog_publish_instant_email_campaign_id":null,"blog_publish_instant_email_retry_count":null,"keywords":[],"composition_id":0,"is_crawlable_by_bots":false,"html_title":"Zip's AW Direct Acquires GUNI Products","public_access_rules":[],"public_access_rules_enabled":false,"use_featured_image":true,"published_at":1756240514086,"layout_sections":{},"past_mab_experiment_ids":[],"deleted_by":null,"featured_image_alt_text":"GUNI products","enable_layout_stylesheets":null,"tweet":null,"tweet_at":null,"campaign_name":null,"campaign_utm":null,"meta_keywords":null,"meta_description":"Zip’s AW Direct, a leading distributor in the towing and recovery market, has acquired Georgia-based GUNI Products, known for universal vehicle repositioning wheels. The acquisition expands Zip’s product line, bringing innovative solutions to their customers and marking a significant growth for both brands.","tweet_immediately":false,"publish_immediately":true,"security_state":"NONE","scheduled_update_date":0,"placement_guids":[],"header_template_path":null,"header_variant_name":null,"footer_template_path":null,"footer_variant_name":null,"global_block_overrides":{},"property_for_dynamic_page_title":null,"property_for_dynamic_page_slug":null,"property_for_dynamic_page_meta_description":null,"property_for_dynamic_page_featured_image":null,"property_for_dynamic_page_canonical_url":null,"preview_image_src":null,"legacy_blog_tabid":null,"legacy_post_guid":null,"performable_variation_letter":null,"style_override_id":null,"has_user_changes":true,"css":{},"css_text":"","unpublished_at":0,"published_by_id":76755706,"allowed_slug_conflict":false,"ai_features":null,"link_rel_canonical_url":"","page_redirected":false,"page_expiry_enabled":null,"page_expiry_date":null,"page_expiry_redirect_id":null,"page_expiry_redirect_url":null,"deleted_by_id":null,"state_when_deleted":null,"cloned_from":null,"staged_from":null,"personas":[],"compose_body":null,"featured_image":"https://48463649.fs1.hubspotusercontent-na1.net/hubfs/48463649/Blog/guni-1.png","featured_image_width":877,"featured_image_height":431,"publish_timezone_offset":null,"theme_settings_values":null,"head_html":"","footer_html":null,"attached_stylesheets":[],"enable_domain_stylesheets":null,"include_default_custom_css":null,"header":null,"password":null,"last_edit_session_id":null,"last_edit_update_id":null,"created_by_agent":null},"metaDescription":"Zip’s AW Direct, a leading distributor in the towing and recovery market, has acquired Georgia-based GUNI Products, known for universal vehicle repositioning wheels. The acquisition expands Zip’s product line, bringing innovative solutions to their customers and marking a significant growth for both brands.","metaKeywords":null,"name":"Zip's AW Direct Acquires GUNI Products","nextPostFeaturedImage":"https://48463649.fs1.hubspotusercontent-na1.net/hubfs/48463649/header-Aug-04-2025-08-43-52-1469-PM.png","nextPostFeaturedImageAltText":"","nextPostName":"How To Choose & Use a Vehicle Jack","nextPostSlug":"blog/how-to-choose-use-a-vehicle-jack","pageExpiryDate":null,"pageExpiryEnabled":null,"pageExpiryRedirectId":null,"pageExpiryRedirectUrl":null,"pageRedirected":false,"pageTitle":"Zip's AW Direct Acquires GUNI Products","parentBlog":{"absoluteUrl":"/blog","allowComments":true,"ampBodyColor":"#404040","ampBodyFont":"'Helvetica Neue', Helvetica, Arial, sans-serif","ampBodyFontSize":"18","ampCustomCss":"","ampHeaderBackgroundColor":"#ffffff","ampHeaderColor":"#1e1e1e","ampHeaderFont":"'Helvetica Neue', Helvetica, Arial, sans-serif","ampHeaderFontSize":"36","ampLinkColor":"#416bb3","ampLogoAlt":"","ampLogoHeight":0,"ampLogoSrc":"","ampLogoWidth":0,"analyticsPageId":190096341139,"attachedStylesheets":[],"audienceAccess":"PUBLIC","businessUnitId":null,"captchaAfterDays":7,"captchaAlways":false,"categoryId":3,"cdnPurgeEmbargoTime":null,"closeCommentsOlder":0,"commentDateFormat":"medium","commentFormGuid":"a4128401-39db-4c54-a62b-88ff335d3a69","commentMaxThreadDepth":1,"commentModeration":false,"commentNotificationEmails":[],"commentShouldCreateContact":false,"commentVerificationText":"","cosObjectType":"BLOG","created":1747163443999,"createdDateTime":1747163443999,"dailyNotificationEmailId":null,"dateFormattingLanguage":null,"defaultGroupStyleId":"","defaultNotificationFromName":"","defaultNotificationReplyTo":"","deletedAt":0,"description":"","domain":"","domainWhenPublished":"www.zips.com","emailApiSubscriptionId":null,"enableGoogleAmpOutput":true,"enableSocialAutoPublishing":false,"generateJsonLdEnabled":true,"header":null,"htmlFooter":"","htmlFooterIsShared":true,"htmlHead":"","htmlHeadIsShared":true,"htmlKeywords":[],"htmlTitle":"blog","id":190096341139,"ilsSubscriptionListsByType":{},"instantNotificationEmailId":null,"itemLayoutId":null,"itemTemplateIsShared":false,"itemTemplatePath":"zips-basic-theme/templates/blog-post.html","label":"blog","language":"en","legacyGuid":null,"legacyModuleId":null,"legacyTabId":null,"listingLayoutId":null,"listingPageId":190096341141,"listingTemplatePath":"","liveDomain":"www.zips.com","monthFilterFormat":"MMMM yyyy","monthlyNotificationEmailId":null,"name":"blog","parentBlogUpdateTaskId":null,"portalId":48463649,"postHtmlFooter":"","postHtmlHead":"","postsPerListingPage":111,"postsPerRssFeed":10,"publicAccessRules":[],"publicAccessRulesEnabled":false,"publicTitle":"blog","publishDateFormat":"medium","resolvedDomain":"www.zips.com","rootUrl":"/blog","rssCustomFeed":null,"rssDescription":null,"rssItemFooter":null,"rssItemHeader":null,"settingsOverrides":{"itemLayoutId":false,"itemTemplatePath":false,"itemTemplateIsShared":false,"listingLayoutId":false,"listingTemplatePath":false,"postsPerListingPage":false,"showSummaryInListing":false,"useFeaturedImageInSummary":false,"htmlHead":false,"postHtmlHead":false,"htmlHeadIsShared":false,"htmlFooter":false,"listingPageHtmlFooter":false,"postHtmlFooter":false,"htmlFooterIsShared":false,"attachedStylesheets":false,"postsPerRssFeed":false,"showSummaryInRss":false,"showSummaryInEmails":false,"showSummariesInEmails":false,"allowComments":false,"commentShouldCreateContact":false,"commentModeration":false,"closeCommentsOlder":false,"commentNotificationEmails":false,"commentMaxThreadDepth":false,"commentVerificationText":false,"socialAccountTwitter":false,"showSocialLinkTwitter":false,"showSocialLinkLinkedin":false,"showSocialLinkFacebook":false,"enableGoogleAmpOutput":false,"ampLogoSrc":false,"ampLogoHeight":false,"ampLogoWidth":false,"ampLogoAlt":false,"ampHeaderFont":false,"ampHeaderFontSize":false,"ampHeaderColor":false,"ampHeaderBackgroundColor":false,"ampBodyFont":false,"ampBodyFontSize":false,"ampBodyColor":false,"ampLinkColor":false,"generateJsonLdEnabled":false},"showSocialLinkFacebook":true,"showSocialLinkLinkedin":true,"showSocialLinkTwitter":true,"showSummaryInEmails":true,"showSummaryInListing":true,"showSummaryInRss":true,"siteId":null,"slug":"blog","socialAccountTwitter":"","state":null,"subscriptionContactsProperty":null,"subscriptionEmailType":null,"subscriptionFormGuid":null,"subscriptionListsByType":{},"title":null,"translatedFromId":null,"translations":{},"updated":1755110916417,"updatedDateTime":1755110916417,"urlBase":"www.zips.com/blog","urlSegments":{"all":"all","archive":"archive","author":"author","page":"page","tag":"tag"},"useFeaturedImageInSummary":true,"usesDefaultTemplate":false,"weeklyNotificationEmailId":null},"password":null,"pastMabExperimentIds":[],"performableGuid":null,"performableVariationLetter":null,"personalizationStrategyId":null,"personalizationVariantStatus":null,"personas":[],"placementGuids":[],"portableKey":null,"portalId":48463649,"position":null,"postBody":"
\n

NEW HAMPTON, Iowa–Zip’s AW Direct, a leading distributor of trucks, parts and accessories to the Towing and Recovery market, is pleased to announce the acquisition of Georgia-based GUNI products, a global manufacturer of universal vehicle repositioning wheels. The deal was made official in November of 2024.

\n

“We are excited to bring this innovative line of products under the Zip’s family umbrella,” said David Rottinghaus, executive vice president at Zip’s Aw Direct. “We first learned of their unique products five years ago and have been promoting, marketing and distributing them ever since. We’re a big fan of GUNI, and this acquisition certainly aligns with our goals as a company to deliver the best and latest products to our customers.”

\n
\n
\n

Led by the flagship GUNI Wheel, the GUNI family of products includes temporary repositioning wheels for all makes and models of passenger cars and trucks. What makes them universal are the slotted mounting holes for 4/5, 5/6, 8 and 6x120 lug bolt patterns. Their narrow profile allows for easy maneuverability on the road or in the shop, and the airless, molded tread works perfect for long-term storage for collector cars, recreational vehicles and impound vehicles.

\n

In recent years, the GUNI line has expanded to include the GUNI Wheel 45S and the GUNI Wheel X, both of which offer deeper offsets to work around large aftermarket brake calipers. Lately, the GUNI Wheel X has revolutionized the vehicle repositioning industry by offering interchangeable hub inserts and a rolling spinner option in one convenient platform. This space-saving design makes it a favorite among towing companies, auto repair shops and auto body and restoration specialists.

\n
\n
\n

\"guni-2\"

\n
\n
\n
\n

\"guni-3\"

\n

\"guni-4\"

\n
\n

The GUNI family of products also includes the GUNI Fast Puller, a portable dent-removal system, as well as accessories to accommodate the original GUNI Wheel. Under the new ownership, the plan is to continue to expand the product line and offer the latest innovation to Zip’s customers. Since the acquisition, the GUNI brand has already been refreshed with a new logo and updated website.

\n

\"guni-5\"

\n

“We appreciate the leadership former owner, Sergio Rovito, and his team at GUNI have done in developing their popular wheels and creating a huge following in several automotive markets,” Rottinghaus said. “We don’t plan on stopping there and can’t wait to deliver their beautiful orange wheels to professionals and hobbyists alike. We are well positioned for the future.\"

\n

For more information on GUNI products, visit guniproducts.com.

\n
","postBodyRss":"
\n

NEW HAMPTON, Iowa–Zip’s AW Direct, a leading distributor of trucks, parts and accessories to the Towing and Recovery market, is pleased to announce the acquisition of Georgia-based GUNI products, a global manufacturer of universal vehicle repositioning wheels. The deal was made official in November of 2024.

\n

“We are excited to bring this innovative line of products under the Zip’s family umbrella,” said David Rottinghaus, executive vice president at Zip’s Aw Direct. “We first learned of their unique products five years ago and have been promoting, marketing and distributing them ever since. We’re a big fan of GUNI, and this acquisition certainly aligns with our goals as a company to deliver the best and latest products to our customers.”

\n
\n
\n

Led by the flagship GUNI Wheel, the GUNI family of products includes temporary repositioning wheels for all makes and models of passenger cars and trucks. What makes them universal are the slotted mounting holes for 4/5, 5/6, 8 and 6x120 lug bolt patterns. Their narrow profile allows for easy maneuverability on the road or in the shop, and the airless, molded tread works perfect for long-term storage for collector cars, recreational vehicles and impound vehicles.

\n

In recent years, the GUNI line has expanded to include the GUNI Wheel 45S and the GUNI Wheel X, both of which offer deeper offsets to work around large aftermarket brake calipers. Lately, the GUNI Wheel X has revolutionized the vehicle repositioning industry by offering interchangeable hub inserts and a rolling spinner option in one convenient platform. This space-saving design makes it a favorite among towing companies, auto repair shops and auto body and restoration specialists.

\n
\n
\n

\"guni-2\"

\n
\n
\n
\n

\"guni-3\"

\n

\"guni-4\"

\n
\n

The GUNI family of products also includes the GUNI Fast Puller, a portable dent-removal system, as well as accessories to accommodate the original GUNI Wheel. Under the new ownership, the plan is to continue to expand the product line and offer the latest innovation to Zip’s customers. Since the acquisition, the GUNI brand has already been refreshed with a new logo and updated website.

\n

\"guni-5\"

\n

“We appreciate the leadership former owner, Sergio Rovito, and his team at GUNI have done in developing their popular wheels and creating a huge following in several automotive markets,” Rottinghaus said. “We don’t plan on stopping there and can’t wait to deliver their beautiful orange wheels to professionals and hobbyists alike. We are well positioned for the future.\"

\n

For more information on GUNI products, visit guniproducts.com.

\n
","postEmailContent":"
\n

NEW HAMPTON, Iowa–Zip’s AW Direct, a leading distributor of trucks, parts and accessories to the Towing and Recovery market, is pleased to announce the acquisition of Georgia-based GUNI products, a global manufacturer of universal vehicle repositioning wheels. The deal was made official in November of 2024.

\n

“We are excited to bring this innovative line of products under the Zip’s family umbrella,” said David Rottinghaus, executive vice president at Zip’s Aw Direct. “We first learned of their unique products five years ago and have been promoting, marketing and distributing them ever since. We’re a big fan of GUNI, and this acquisition certainly aligns with our goals as a company to deliver the best and latest products to our customers.”

\n
\n
\n

Led by the flagship GUNI Wheel, the GUNI family of products includes temporary repositioning wheels for all makes and models of passenger cars and trucks. What makes them universal are the slotted mounting holes for 4/5, 5/6, 8 and 6x120 lug bolt patterns. Their narrow profile allows for easy maneuverability on the road or in the shop, and the airless, molded tread works perfect for long-term storage for collector cars, recreational vehicles and impound vehicles.

\n

In recent years, the GUNI line has expanded to include the GUNI Wheel 45S and the GUNI Wheel X, both of which offer deeper offsets to work around large aftermarket brake calipers. Lately, the GUNI Wheel X has revolutionized the vehicle repositioning industry by offering interchangeable hub inserts and a rolling spinner option in one convenient platform. This space-saving design makes it a favorite among towing companies, auto repair shops and auto body and restoration specialists.

\n
\n
\n
\n
\n
\n
\n

The GUNI family of products also includes the GUNI Fast Puller, a portable dent-removal system, as well as accessories to accommodate the original GUNI Wheel. Under the new ownership, the plan is to continue to expand the product line and offer the latest innovation to Zip’s customers. Since the acquisition, the GUNI brand has already been refreshed with a new logo and updated website.

\n

“We appreciate the leadership former owner, Sergio Rovito, and his team at GUNI have done in developing their popular wheels and creating a huge following in several automotive markets,” Rottinghaus said. “We don’t plan on stopping there and can’t wait to deliver their beautiful orange wheels to professionals and hobbyists alike. We are well positioned for the future.\"

\n

For more information on GUNI products, visit guniproducts.com.

\n
","postFeaturedImageIfEnabled":"https://48463649.fs1.hubspotusercontent-na1.net/hubfs/48463649/Blog/guni-1.png","postListContent":"
\n

NEW HAMPTON, Iowa–Zip’s AW Direct, a leading distributor of trucks, parts and accessories to the Towing and Recovery market, is pleased to announce the acquisition of Georgia-based GUNI products, a global manufacturer of universal vehicle repositioning wheels. The deal was made official in November of 2024.

\n

“We are excited to bring this innovative line of products under the Zip’s family umbrella,” said David Rottinghaus, executive vice president at Zip’s Aw Direct. “We first learned of their unique products five years ago and have been promoting, marketing and distributing them ever since. We’re a big fan of GUNI, and this acquisition certainly aligns with our goals as a company to deliver the best and latest products to our customers.”

\n
\n
\n

Led by the flagship GUNI Wheel, the GUNI family of products includes temporary repositioning wheels for all makes and models of passenger cars and trucks. What makes them universal are the slotted mounting holes for 4/5, 5/6, 8 and 6x120 lug bolt patterns. Their narrow profile allows for easy maneuverability on the road or in the shop, and the airless, molded tread works perfect for long-term storage for collector cars, recreational vehicles and impound vehicles.

\n

In recent years, the GUNI line has expanded to include the GUNI Wheel 45S and the GUNI Wheel X, both of which offer deeper offsets to work around large aftermarket brake calipers. Lately, the GUNI Wheel X has revolutionized the vehicle repositioning industry by offering interchangeable hub inserts and a rolling spinner option in one convenient platform. This space-saving design makes it a favorite among towing companies, auto repair shops and auto body and restoration specialists.

\n
\n
\n
\n
\n
\n
\n

The GUNI family of products also includes the GUNI Fast Puller, a portable dent-removal system, as well as accessories to accommodate the original GUNI Wheel. Under the new ownership, the plan is to continue to expand the product line and offer the latest innovation to Zip’s customers. Since the acquisition, the GUNI brand has already been refreshed with a new logo and updated website.

\n

“We appreciate the leadership former owner, Sergio Rovito, and his team at GUNI have done in developing their popular wheels and creating a huge following in several automotive markets,” Rottinghaus said. “We don’t plan on stopping there and can’t wait to deliver their beautiful orange wheels to professionals and hobbyists alike. We are well positioned for the future.\"

\n

For more information on GUNI products, visit guniproducts.com.

\n
","postListSummaryFeaturedImage":"https://48463649.fs1.hubspotusercontent-na1.net/hubfs/48463649/Blog/guni-1.png","postRssContent":"
\n

NEW HAMPTON, Iowa–Zip’s AW Direct, a leading distributor of trucks, parts and accessories to the Towing and Recovery market, is pleased to announce the acquisition of Georgia-based GUNI products, a global manufacturer of universal vehicle repositioning wheels. The deal was made official in November of 2024.

\n

“We are excited to bring this innovative line of products under the Zip’s family umbrella,” said David Rottinghaus, executive vice president at Zip’s Aw Direct. “We first learned of their unique products five years ago and have been promoting, marketing and distributing them ever since. We’re a big fan of GUNI, and this acquisition certainly aligns with our goals as a company to deliver the best and latest products to our customers.”

\n
\n
\n

Led by the flagship GUNI Wheel, the GUNI family of products includes temporary repositioning wheels for all makes and models of passenger cars and trucks. What makes them universal are the slotted mounting holes for 4/5, 5/6, 8 and 6x120 lug bolt patterns. Their narrow profile allows for easy maneuverability on the road or in the shop, and the airless, molded tread works perfect for long-term storage for collector cars, recreational vehicles and impound vehicles.

\n

In recent years, the GUNI line has expanded to include the GUNI Wheel 45S and the GUNI Wheel X, both of which offer deeper offsets to work around large aftermarket brake calipers. Lately, the GUNI Wheel X has revolutionized the vehicle repositioning industry by offering interchangeable hub inserts and a rolling spinner option in one convenient platform. This space-saving design makes it a favorite among towing companies, auto repair shops and auto body and restoration specialists.

\n
\n
\n
\n
\n
\n
\n

The GUNI family of products also includes the GUNI Fast Puller, a portable dent-removal system, as well as accessories to accommodate the original GUNI Wheel. Under the new ownership, the plan is to continue to expand the product line and offer the latest innovation to Zip’s customers. Since the acquisition, the GUNI brand has already been refreshed with a new logo and updated website.

\n

“We appreciate the leadership former owner, Sergio Rovito, and his team at GUNI have done in developing their popular wheels and creating a huge following in several automotive markets,” Rottinghaus said. “We don’t plan on stopping there and can’t wait to deliver their beautiful orange wheels to professionals and hobbyists alike. We are well positioned for the future.\"

\n

For more information on GUNI products, visit guniproducts.com.

\n
","postRssSummaryFeaturedImage":"https://48463649.fs1.hubspotusercontent-na1.net/hubfs/48463649/Blog/guni-1.png","postSummary":"
\n

NEW HAMPTON, Iowa–Zip’s AW Direct, a leading distributor of trucks, parts and accessories to the Towing and Recovery market, is pleased to announce the acquisition of Georgia-based GUNI products, a global manufacturer of universal vehicle repositioning wheels. The deal was made official in November of 2024.

\n

“We are excited to bring this innovative line of products under the Zip’s family umbrella,” said David Rottinghaus, executive vice president at Zip’s Aw Direct. “We first learned of their unique products five years ago and have been promoting, marketing and distributing them ever since. We’re a big fan of GUNI, and this acquisition certainly aligns with our goals as a company to deliver the best and latest products to our customers.”

\n
\n
\n

Led by the flagship GUNI Wheel, the GUNI family of products includes temporary repositioning wheels for all makes and models of passenger cars and trucks. What makes them universal are the slotted mounting holes for 4/5, 5/6, 8 and 6x120 lug bolt patterns. Their narrow profile allows for easy maneuverability on the road or in the shop, and the airless, molded tread works perfect for long-term storage for collector cars, recreational vehicles and impound vehicles.

\n

In recent years, the GUNI line has expanded to include the GUNI Wheel 45S and the GUNI Wheel X, both of which offer deeper offsets to work around large aftermarket brake calipers. Lately, the GUNI Wheel X has revolutionized the vehicle repositioning industry by offering interchangeable hub inserts and a rolling spinner option in one convenient platform. This space-saving design makes it a favorite among towing companies, auto repair shops and auto body and restoration specialists.

\n
\n
\n

\"guni-2\"

\n
\n
\n
\n

\"guni-3\"

\n

\"guni-4\"

\n
\n

The GUNI family of products also includes the GUNI Fast Puller, a portable dent-removal system, as well as accessories to accommodate the original GUNI Wheel. Under the new ownership, the plan is to continue to expand the product line and offer the latest innovation to Zip’s customers. Since the acquisition, the GUNI brand has already been refreshed with a new logo and updated website.

\n

\"guni-5\"

\n

“We appreciate the leadership former owner, Sergio Rovito, and his team at GUNI have done in developing their popular wheels and creating a huge following in several automotive markets,” Rottinghaus said. “We don’t plan on stopping there and can’t wait to deliver their beautiful orange wheels to professionals and hobbyists alike. We are well positioned for the future.\"

\n

For more information on GUNI products, visit guniproducts.com.

\n
","postSummaryRss":"
\n

NEW HAMPTON, Iowa–Zip’s AW Direct, a leading distributor of trucks, parts and accessories to the Towing and Recovery market, is pleased to announce the acquisition of Georgia-based GUNI products, a global manufacturer of universal vehicle repositioning wheels. The deal was made official in November of 2024.

\n

“We are excited to bring this innovative line of products under the Zip’s family umbrella,” said David Rottinghaus, executive vice president at Zip’s Aw Direct. “We first learned of their unique products five years ago and have been promoting, marketing and distributing them ever since. We’re a big fan of GUNI, and this acquisition certainly aligns with our goals as a company to deliver the best and latest products to our customers.”

\n
\n
\n

Led by the flagship GUNI Wheel, the GUNI family of products includes temporary repositioning wheels for all makes and models of passenger cars and trucks. What makes them universal are the slotted mounting holes for 4/5, 5/6, 8 and 6x120 lug bolt patterns. Their narrow profile allows for easy maneuverability on the road or in the shop, and the airless, molded tread works perfect for long-term storage for collector cars, recreational vehicles and impound vehicles.

\n

In recent years, the GUNI line has expanded to include the GUNI Wheel 45S and the GUNI Wheel X, both of which offer deeper offsets to work around large aftermarket brake calipers. Lately, the GUNI Wheel X has revolutionized the vehicle repositioning industry by offering interchangeable hub inserts and a rolling spinner option in one convenient platform. This space-saving design makes it a favorite among towing companies, auto repair shops and auto body and restoration specialists.

\n
\n
\n
\n
\n
\n
\n

The GUNI family of products also includes the GUNI Fast Puller, a portable dent-removal system, as well as accessories to accommodate the original GUNI Wheel. Under the new ownership, the plan is to continue to expand the product line and offer the latest innovation to Zip’s customers. Since the acquisition, the GUNI brand has already been refreshed with a new logo and updated website.

\n

“We appreciate the leadership former owner, Sergio Rovito, and his team at GUNI have done in developing their popular wheels and creating a huge following in several automotive markets,” Rottinghaus said. “We don’t plan on stopping there and can’t wait to deliver their beautiful orange wheels to professionals and hobbyists alike. We are well positioned for the future.\"

\n

For more information on GUNI products, visit guniproducts.com.

\n
","postTemplate":"zips-basic-theme/templates/blog-post.html","previewImageSrc":null,"previewKey":"PyQgOpEw","previousPostFeaturedImage":"https://48463649.fs1.hubspotusercontent-na1.net/hubfs/48463649/Blog/lockout-tools-header.png","previousPostFeaturedImageAltText":"Lockout kit assortment","previousPostName":"Best Vehicle Lockout Kits","previousPostSlug":"blog/best-vehicle-lockout-kits","processingStatus":"PUBLISHED","propertyForDynamicPageCanonicalUrl":null,"propertyForDynamicPageFeaturedImage":null,"propertyForDynamicPageMetaDescription":null,"propertyForDynamicPageSlug":null,"propertyForDynamicPageTitle":null,"publicAccessRules":[],"publicAccessRulesEnabled":false,"publishDate":1739455200000,"publishDateLocalTime":1739455200000,"publishDateLocalized":{"date":1739455200000,"format":"medium","language":null},"publishImmediately":true,"publishTimezoneOffset":null,"publishedAt":1756240514086,"publishedByEmail":null,"publishedById":76755706,"publishedByName":null,"publishedUrl":"/blog/zips-aw-direct-acquires-guni-products","resolvedDomain":"www.zips.com","resolvedLanguage":null,"rssBody":"
\n

NEW HAMPTON, Iowa–Zip’s AW Direct, a leading distributor of trucks, parts and accessories to the Towing and Recovery market, is pleased to announce the acquisition of Georgia-based GUNI products, a global manufacturer of universal vehicle repositioning wheels. The deal was made official in November of 2024.

\n

“We are excited to bring this innovative line of products under the Zip’s family umbrella,” said David Rottinghaus, executive vice president at Zip’s Aw Direct. “We first learned of their unique products five years ago and have been promoting, marketing and distributing them ever since. We’re a big fan of GUNI, and this acquisition certainly aligns with our goals as a company to deliver the best and latest products to our customers.”

\n
\n
\n

Led by the flagship GUNI Wheel, the GUNI family of products includes temporary repositioning wheels for all makes and models of passenger cars and trucks. What makes them universal are the slotted mounting holes for 4/5, 5/6, 8 and 6x120 lug bolt patterns. Their narrow profile allows for easy maneuverability on the road or in the shop, and the airless, molded tread works perfect for long-term storage for collector cars, recreational vehicles and impound vehicles.

\n

In recent years, the GUNI line has expanded to include the GUNI Wheel 45S and the GUNI Wheel X, both of which offer deeper offsets to work around large aftermarket brake calipers. Lately, the GUNI Wheel X has revolutionized the vehicle repositioning industry by offering interchangeable hub inserts and a rolling spinner option in one convenient platform. This space-saving design makes it a favorite among towing companies, auto repair shops and auto body and restoration specialists.

\n
\n
\n

\"guni-2\"

\n
\n
\n
\n

\"guni-3\"

\n

\"guni-4\"

\n
\n

The GUNI family of products also includes the GUNI Fast Puller, a portable dent-removal system, as well as accessories to accommodate the original GUNI Wheel. Under the new ownership, the plan is to continue to expand the product line and offer the latest innovation to Zip’s customers. Since the acquisition, the GUNI brand has already been refreshed with a new logo and updated website.

\n

\"guni-5\"

\n

“We appreciate the leadership former owner, Sergio Rovito, and his team at GUNI have done in developing their popular wheels and creating a huge following in several automotive markets,” Rottinghaus said. “We don’t plan on stopping there and can’t wait to deliver their beautiful orange wheels to professionals and hobbyists alike. We are well positioned for the future.\"

\n

For more information on GUNI products, visit guniproducts.com.

\n
","rssSummary":"
\n

NEW HAMPTON, Iowa–Zip’s AW Direct, a leading distributor of trucks, parts and accessories to the Towing and Recovery market, is pleased to announce the acquisition of Georgia-based GUNI products, a global manufacturer of universal vehicle repositioning wheels. The deal was made official in November of 2024.

\n

“We are excited to bring this innovative line of products under the Zip’s family umbrella,” said David Rottinghaus, executive vice president at Zip’s Aw Direct. “We first learned of their unique products five years ago and have been promoting, marketing and distributing them ever since. We’re a big fan of GUNI, and this acquisition certainly aligns with our goals as a company to deliver the best and latest products to our customers.”

\n
\n
\n

Led by the flagship GUNI Wheel, the GUNI family of products includes temporary repositioning wheels for all makes and models of passenger cars and trucks. What makes them universal are the slotted mounting holes for 4/5, 5/6, 8 and 6x120 lug bolt patterns. Their narrow profile allows for easy maneuverability on the road or in the shop, and the airless, molded tread works perfect for long-term storage for collector cars, recreational vehicles and impound vehicles.

\n

In recent years, the GUNI line has expanded to include the GUNI Wheel 45S and the GUNI Wheel X, both of which offer deeper offsets to work around large aftermarket brake calipers. Lately, the GUNI Wheel X has revolutionized the vehicle repositioning industry by offering interchangeable hub inserts and a rolling spinner option in one convenient platform. This space-saving design makes it a favorite among towing companies, auto repair shops and auto body and restoration specialists.

\n
\n
\n

\"guni-2\"

\n
\n
\n
\n

\"guni-3\"

\n

\"guni-4\"

\n
\n

The GUNI family of products also includes the GUNI Fast Puller, a portable dent-removal system, as well as accessories to accommodate the original GUNI Wheel. Under the new ownership, the plan is to continue to expand the product line and offer the latest innovation to Zip’s customers. Since the acquisition, the GUNI brand has already been refreshed with a new logo and updated website.

\n

\"guni-5\"

\n

“We appreciate the leadership former owner, Sergio Rovito, and his team at GUNI have done in developing their popular wheels and creating a huge following in several automotive markets,” Rottinghaus said. “We don’t plan on stopping there and can’t wait to deliver their beautiful orange wheels to professionals and hobbyists alike. We are well positioned for the future.\"

\n

For more information on GUNI products, visit guniproducts.com.

\n
","rssSummaryFeaturedImage":"https://48463649.fs1.hubspotusercontent-na1.net/hubfs/48463649/Blog/guni-1.png","scheduledUpdateDate":0,"screenshotPreviewTakenAt":1770582913755,"screenshotPreviewUrl":"https://cdn1.hubspot.net/hubshotv3/prod/e/0/938b4c5a-c60c-42a9-8929-750a75334832.png","sections":{},"securityState":"NONE","siteId":null,"slug":"blog/zips-aw-direct-acquires-guni-products","stagedFrom":null,"state":"PUBLISHED","stateWhenDeleted":null,"structuredContentPageType":null,"structuredContentType":null,"styleOverrideId":null,"subcategory":"normal_blog_post","syncedWithBlogRoot":true,"tagIds":[192169769490,192174528148,194719179273,194719586584],"tagList":[{"categoryId":3,"cdnPurgeEmbargoTime":null,"contentIds":[],"cosObjectType":"TAG","created":1751598346713,"deletedAt":0,"description":"","id":192169769490,"label":"Towing & Recovery","language":null,"name":"Towing & Recovery","portalId":48463649,"slug":"towing-recovery","translatedFromId":null,"translations":{},"updated":1751598346713},{"categoryId":3,"cdnPurgeEmbargoTime":null,"contentIds":[],"cosObjectType":"TAG","created":1751601475164,"deletedAt":0,"description":"","id":192174528148,"label":"Automotive","language":null,"name":"Automotive","portalId":48463649,"slug":"automotive","translatedFromId":null,"translations":{},"updated":1751601475164},{"categoryId":3,"cdnPurgeEmbargoTime":null,"contentIds":[],"cosObjectType":"TAG","created":1755545199638,"deletedAt":0,"description":"","id":194719179273,"label":"News & Insights","language":null,"name":"News & Insights","portalId":48463649,"slug":"news-insights","translatedFromId":null,"translations":{},"updated":1755545199638},{"categoryId":3,"cdnPurgeEmbargoTime":null,"contentIds":[],"cosObjectType":"TAG","created":1755545289731,"deletedAt":0,"description":"","id":194719586584,"label":"Press Release","language":null,"name":"Press Release","portalId":48463649,"slug":"press-release","translatedFromId":null,"translations":{},"updated":1755545289731}],"tagNames":["Towing & Recovery","Automotive","News & Insights","Press Release"],"teamPerms":[],"templatePath":"","templatePathForRender":"zips-basic-theme/templates/blog-post.html","textToAudioFileId":null,"textToAudioGenerationRequestId":null,"themePath":null,"themeSettingsValues":null,"title":"Zip's AW Direct Acquires GUNI Products","tmsId":null,"topicIds":[192169769490,192174528148,194719179273,194719586584],"topicList":[{"categoryId":3,"cdnPurgeEmbargoTime":null,"contentIds":[],"cosObjectType":"TAG","created":1751598346713,"deletedAt":0,"description":"","id":192169769490,"label":"Towing & Recovery","language":null,"name":"Towing & Recovery","portalId":48463649,"slug":"towing-recovery","translatedFromId":null,"translations":{},"updated":1751598346713},{"categoryId":3,"cdnPurgeEmbargoTime":null,"contentIds":[],"cosObjectType":"TAG","created":1751601475164,"deletedAt":0,"description":"","id":192174528148,"label":"Automotive","language":null,"name":"Automotive","portalId":48463649,"slug":"automotive","translatedFromId":null,"translations":{},"updated":1751601475164},{"categoryId":3,"cdnPurgeEmbargoTime":null,"contentIds":[],"cosObjectType":"TAG","created":1755545199638,"deletedAt":0,"description":"","id":194719179273,"label":"News & Insights","language":null,"name":"News & Insights","portalId":48463649,"slug":"news-insights","translatedFromId":null,"translations":{},"updated":1755545199638},{"categoryId":3,"cdnPurgeEmbargoTime":null,"contentIds":[],"cosObjectType":"TAG","created":1755545289731,"deletedAt":0,"description":"","id":194719586584,"label":"Press Release","language":null,"name":"Press Release","portalId":48463649,"slug":"press-release","translatedFromId":null,"translations":{},"updated":1755545289731}],"topicNames":["Towing & Recovery","Automotive","News & Insights","Press Release"],"topics":[192169769490,192174528148,194719179273,194719586584],"translatedContent":{},"translatedFromId":null,"translations":{},"tweet":null,"tweetAt":null,"tweetImmediately":false,"unpublishedAt":0,"updated":1756240514091,"updatedById":76755706,"upsizeFeaturedImage":false,"url":"/blog/zips-aw-direct-acquires-guni-products","useFeaturedImage":true,"userPerms":[],"views":null,"visibleToAll":null,"widgetContainers":{},"widgetcontainers":{},"widgets":{}},{"ab":false,"abStatus":null,"abTestId":null,"abVariation":false,"abVariationAutomated":false,"absoluteUrl":"/blog/how-to-choose-use-a-vehicle-jack","afterPostBody":null,"aifeatures":null,"allowedSlugConflict":false,"analytics":null,"analyticsPageId":"192172329000","analyticsPageType":"blog-post","approvalStatus":null,"archived":false,"archivedAt":0,"archivedInDashboard":false,"areCommentsAllowed":true,"attachedStylesheets":[],"audienceAccess":"PUBLIC","author":null,"authorName":null,"authorUsername":null,"blogAuthor":{"avatar":"","bio":"","cdnPurgeEmbargoTime":null,"cosObjectType":"BLOG_AUTHOR","created":1755530565784,"deletedAt":0,"displayName":"Tyler Nestvedt","email":null,"facebook":"","fullName":"Tyler Nestvedt","gravatarUrl":null,"hasSocialProfiles":false,"id":194707404365,"label":"Tyler Nestvedt","language":"en","linkedin":"","name":"Tyler Nestvedt","portalId":48463649,"slug":"tyler-nestvedt","translatedFromId":null,"translations":{},"twitter":"","twitterUsername":"","updated":1755530565784,"userId":null,"username":null,"website":""},"blogAuthorId":194707404365,"blogAuthorIdList":[194707404365],"blogAuthorList":[{"avatar":"","bio":"","cdnPurgeEmbargoTime":null,"cosObjectType":"BLOG_AUTHOR","created":1755530565784,"deletedAt":0,"displayName":"Tyler Nestvedt","email":null,"facebook":"","fullName":"Tyler Nestvedt","gravatarUrl":null,"hasSocialProfiles":false,"id":194707404365,"label":"Tyler Nestvedt","language":"en","linkedin":"","name":"Tyler Nestvedt","portalId":48463649,"slug":"tyler-nestvedt","translatedFromId":null,"translations":{},"twitter":"","twitterUsername":"","updated":1755530565784,"userId":null,"username":null,"website":""}],"blogPostAuthor":{"avatar":"","bio":"","cdnPurgeEmbargoTime":null,"cosObjectType":"BLOG_AUTHOR","created":1755530565784,"deletedAt":0,"displayName":"Tyler Nestvedt","email":null,"facebook":"","fullName":"Tyler Nestvedt","gravatarUrl":null,"hasSocialProfiles":false,"id":194707404365,"label":"Tyler Nestvedt","language":"en","linkedin":"","name":"Tyler Nestvedt","portalId":48463649,"slug":"tyler-nestvedt","translatedFromId":null,"translations":{},"twitter":"","twitterUsername":"","updated":1755530565784,"userId":null,"username":null,"website":""},"blogPostScheduleTaskUid":null,"blogPublishInstantEmailCampaignId":null,"blogPublishInstantEmailRetryCount":null,"blogPublishInstantEmailTaskUid":null,"blogPublishToSocialMediaTask":"DONE_NOT_SENT","blueprintTypeId":0,"businessUnitId":null,"campaign":null,"campaignName":null,"campaignUtm":null,"category":3,"categoryId":3,"cdnPurgeEmbargoTime":null,"checkPostLevelAudienceAccessFirst":true,"clonedFrom":null,"composeBody":null,"compositionId":0,"contentAccessRuleIds":[],"contentAccessRuleTypes":[],"contentGroup":190096341139,"contentGroupId":190096341139,"contentTypeCategory":3,"contentTypeCategoryId":3,"contentTypeId":null,"created":1751604156866,"createdByAgent":null,"createdById":74657203,"createdTime":1751604156866,"crmObjectId":null,"css":{},"cssText":"","ctaClicks":null,"ctaViews":null,"currentState":"PUBLISHED","currentlyPublished":true,"deletedAt":0,"deletedBy":null,"deletedByEmail":null,"deletedById":null,"domain":"","dynamicPageDataSourceId":null,"dynamicPageDataSourceType":null,"dynamicPageHubDbTableId":null,"enableDomainStylesheets":null,"enableGoogleAmpOutputOverride":false,"enableLayoutStylesheets":null,"errors":[],"featuredImage":"https://48463649.fs1.hubspotusercontent-na1.net/hubfs/48463649/header-Aug-04-2025-08-43-52-1469-PM.png","featuredImageAltText":"","featuredImageHeight":256,"featuredImageLength":0,"featuredImageWidth":869,"flexAreas":{},"folderId":null,"footerHtml":null,"footerTemplatePath":null,"footerVariantName":null,"freezeDate":1732284000000,"generateJsonLdEnabledOverride":true,"globalBlockOverrides":{},"hasContentAccessRules":false,"hasUserChanges":true,"headHtml":null,"header":null,"headerTemplatePath":null,"headerVariantName":null,"htmlTitle":"How To Choose & Use a Vehicle Jack","id":192172329000,"includeDefaultCustomCss":null,"isCaptchaRequired":true,"isCrawlableByBots":false,"isDraft":false,"isInstantEmailEnabled":false,"isPublished":true,"isSocialPublishingEnabled":false,"keywords":[],"label":"How To Choose & Use a Vehicle Jack","language":"en","lastEditSessionId":null,"lastEditUpdateId":null,"layoutSections":{},"legacyBlogTabid":null,"legacyId":null,"legacyPostGuid":null,"linkRelCanonicalUrl":"","listTemplate":"","liveDomain":"www.zips.com","mab":false,"mabExperimentId":null,"mabMaster":false,"mabVariant":false,"marketingCampaignGuids":[],"meta":{"html_title":"How To Choose & Use a Vehicle Jack","public_access_rules":[],"public_access_rules_enabled":false,"use_featured_image":true,"tag_ids":[192174528148,192174572389,194719179289,194719586666],"topic_ids":[192174528148,192174572389,194719179289,194719586666],"post_summary":"
\n

Whether you get a flat tire on the road or you want to perform basic car maintenance in your shop, knowing the proper way to jack up a vehicle is vital. This procedure must be done correctly to prevent further damage, injury, or even death. In this guide, we will discuss the different types of jacks and the proper procedure for jacking up your vehicle to avoid catastrophe.

\n

Understanding Your Vehicle Jack

\n

Before discussing specifics, it is important to identify the type of vehicle jack you have. Each type of jack has distinct advantages and disadvantages that influence their use. Regardless of which jack you choose, always consider the weight capacity of the jack in comparison to the weight of the vehicle.

\n

Floor & Trolly Jacks

\n
\n
\n

Floor and trolley jacks are hydraulic jacks operated by a lever mechanism. Although heavier than other types of jacks, their castor wheels provide better mobility. They come in a variety of shapes and sizes to accommodate different vehicle types and are very easy to use, making them a popular choice.

\n

While they're very similar, there are differences between trolley and floor jacks. Trolley jacks tend to be smaller and lift vehicles lower, making them suitable for roadside repairs. Floor jacks, on the other hand, are larger and provide a higher lift, making them used in professional settings more often.

\nShop all Floor and Trolly Jacks
\n
\"floor-jack\"
\n
\n
 
\n

Scissor Jacks

\n
\n
\n

Scissor jacks are mechanical jacks that use two sets of vertical arms contracted by turning a screw. Their simplicity requires minimal maintenance, and the lack of hydraulic components eliminates the risk of leaks. Their compact size allows easy storage in the boot of a car.

\nShop all Scissor Jacks
\n
\"scissor-jack\"
\n
\n
 
\n

Bottle Jacks

\n
\n
\n

Bottle jacks, another type of hydraulic jack, operate by forcing pressure from a small-diameter piston to a larger piston chamber when pumped. They are user-friendly and compact for easy storage. However, they typically have a lower weight limit and can be more unstable compared to other jacks.

\nShop all Bottle Jacks
\n
\"bottle-jack\"
\n
\n
 
\n

Air Jacks

\n
\n
\n

Air jacks, also known as inflatable jacks, are operated by filling them with air, water or oil. They are extremely quick and require minimal space, making them suitable for confined areas that other jacks may struggle with.

\nShop all Air Jacks
\n
\"air-jack\"
\n
\n
 
\n

Specialty Jacks

\n
\n
\"specialty-jack-1\"\n

Transmission jacks are designed to lift and lower a vehicle’s transmission from below, featuring a large cradle for easy installation, maintenance or replacement.

\nShop Transmission Jacks
\n
\"specialty-jack-2\"\n

Motorcycle jacks are specifically built for motorcycles.

\nShop Motorcycle Jacks
\n
\n

How to Jack Up a Vehicle

\n

Step 1.

\n

The first step is to ensure you have all necessary equipment ready. A jack and jack stands are essential, but wheel chocks and lifting pads are also important to have on hand. Wheel chocks help secure your vehicle, while lifting pads can prevent damage. Additionally, verify that all equipment is in good working order and that you know the proper weight limits. Do not use a jack or jack stands that cannot handle the weight of your vehicle.

\n

Step 2.

\n

Next, create a safe environment. Ensure that you are on level ground and have a stable surface to prevent the vehicle from moving. Block the wheels with wheel chocks in front of each wheel opposite from the end of the car you will be lifting for additional safety. Then make sure the vehicle is in park and the parking brake is engaged.

\n

Step 3.

\n

Arguably, the most important step in lifting the car is deciding where to jack it up. The right location allows safer access underneath the vehicle and prevents damage. When you find a spot, ensure it is not rusted or damaged. There are various locations on a car that can be used to jack the vehicle up, which differ depending on the make and model. Check your owner’s manual for guidance. If that isn’t available, focus on finding a spot on the frame near the wheel that balances the vehicle to prevent tipping. These lifting areas are reinforced to handle the weight of your vehicle. Check your owner's manual or our towing instructions for guidance.

\n

Once you have positioned the jack, the next step is simple: begin to jack your vehicle. Operate the machinery properly to avoid damage or unnecessary risk. \"underneath-vehicle-chassis\"

\n

To further avoid damage, place a lifting pad or block of wood between the jack and the car to spread out the load. This does not work with all jacks, but floor jacks, bottle jacks and scissor jacks can benefit from them. While you can start out jacking a bit faster, slow down as the jack makes contact with the vehicle. Raise the vehicle a little higher than you need, but not so high that it risks tipping over.

\n

Step 4.

\n

Once you’ve lifted the vehicle just above where you need it, place jack stands under the appropriate locations, close to where the jack is positioned as they will hold the vehicle's weight. Adjust the jack stands to the proper height, and slowly lower the jack until the vehicle rests on the stands. Ensure your jack stands can handle the vehicle’s weight.

\n

If you plan on lifting all wheels, lift the vehicle one end at a time. For example, if you lift the front left tire first, lift the right front tire next. This helps keep the vehicle stable.

\n

Once the vehicle is properly lifted, perform a final check to catch any issues before working underneath. Verify that the vehicle is level and all stands are at the same height to ensure they do not slip. Then, gently push the vehicle to ensure it is stable.

\n

When the work is done, re-lift the vehicle using your jack until the weight is off the jack stands. Remove the stands and slowly lower the vehicle back down. The vehicle's shocks will absorb the descent, so don’t worry if it seems too quick. You can then remove the jack. If you lifted all wheels, follow the same pattern you used when raising them.

\n

Conclusion

\n

Knowing how to lift your vehicle and choosing the appropriate jack can prevent excessive damage and ensure your safety. Whether you are dealing with a flat tire on the side of the road or performing routine maintenance in your shop, this guide aims to help you lift your vehicle correctly and safely. For all your jacking needs and more, explore our Auto & Truck Service section at zips.com

\n

Shop all Jacks

\n
","post_body":"
\n

Whether you get a flat tire on the road or you want to perform basic car maintenance in your shop, knowing the proper way to jack up a vehicle is vital. This procedure must be done correctly to prevent further damage, injury, or even death. In this guide, we will discuss the different types of jacks and the proper procedure for jacking up your vehicle to avoid catastrophe.

\n

Understanding Your Vehicle Jack

\n

Before discussing specifics, it is important to identify the type of vehicle jack you have. Each type of jack has distinct advantages and disadvantages that influence their use. Regardless of which jack you choose, always consider the weight capacity of the jack in comparison to the weight of the vehicle.

\n

Floor & Trolly Jacks

\n
\n
\n

Floor and trolley jacks are hydraulic jacks operated by a lever mechanism. Although heavier than other types of jacks, their castor wheels provide better mobility. They come in a variety of shapes and sizes to accommodate different vehicle types and are very easy to use, making them a popular choice.

\n

While they're very similar, there are differences between trolley and floor jacks. Trolley jacks tend to be smaller and lift vehicles lower, making them suitable for roadside repairs. Floor jacks, on the other hand, are larger and provide a higher lift, making them used in professional settings more often.

\nShop all Floor and Trolly Jacks
\n
\"floor-jack\"
\n
\n
 
\n

Scissor Jacks

\n
\n
\n

Scissor jacks are mechanical jacks that use two sets of vertical arms contracted by turning a screw. Their simplicity requires minimal maintenance, and the lack of hydraulic components eliminates the risk of leaks. Their compact size allows easy storage in the boot of a car.

\nShop all Scissor Jacks
\n
\"scissor-jack\"
\n
\n
 
\n

Bottle Jacks

\n
\n
\n

Bottle jacks, another type of hydraulic jack, operate by forcing pressure from a small-diameter piston to a larger piston chamber when pumped. They are user-friendly and compact for easy storage. However, they typically have a lower weight limit and can be more unstable compared to other jacks.

\nShop all Bottle Jacks
\n
\"bottle-jack\"
\n
\n
 
\n

Air Jacks

\n
\n
\n

Air jacks, also known as inflatable jacks, are operated by filling them with air, water or oil. They are extremely quick and require minimal space, making them suitable for confined areas that other jacks may struggle with.

\nShop all Air Jacks
\n
\"air-jack\"
\n
\n
 
\n

Specialty Jacks

\n
\n
\"specialty-jack-1\"\n

Transmission jacks are designed to lift and lower a vehicle’s transmission from below, featuring a large cradle for easy installation, maintenance or replacement.

\nShop Transmission Jacks
\n
\"specialty-jack-2\"\n

Motorcycle jacks are specifically built for motorcycles.

\nShop Motorcycle Jacks
\n
\n

How to Jack Up a Vehicle

\n

Step 1.

\n

The first step is to ensure you have all necessary equipment ready. A jack and jack stands are essential, but wheel chocks and lifting pads are also important to have on hand. Wheel chocks help secure your vehicle, while lifting pads can prevent damage. Additionally, verify that all equipment is in good working order and that you know the proper weight limits. Do not use a jack or jack stands that cannot handle the weight of your vehicle.

\n

Step 2.

\n

Next, create a safe environment. Ensure that you are on level ground and have a stable surface to prevent the vehicle from moving. Block the wheels with wheel chocks in front of each wheel opposite from the end of the car you will be lifting for additional safety. Then make sure the vehicle is in park and the parking brake is engaged.

\n

Step 3.

\n

Arguably, the most important step in lifting the car is deciding where to jack it up. The right location allows safer access underneath the vehicle and prevents damage. When you find a spot, ensure it is not rusted or damaged. There are various locations on a car that can be used to jack the vehicle up, which differ depending on the make and model. Check your owner’s manual for guidance. If that isn’t available, focus on finding a spot on the frame near the wheel that balances the vehicle to prevent tipping. These lifting areas are reinforced to handle the weight of your vehicle. Check your owner's manual or our towing instructions for guidance.

\n

Once you have positioned the jack, the next step is simple: begin to jack your vehicle. Operate the machinery properly to avoid damage or unnecessary risk. \"underneath-vehicle-chassis\"

\n

To further avoid damage, place a lifting pad or block of wood between the jack and the car to spread out the load. This does not work with all jacks, but floor jacks, bottle jacks and scissor jacks can benefit from them. While you can start out jacking a bit faster, slow down as the jack makes contact with the vehicle. Raise the vehicle a little higher than you need, but not so high that it risks tipping over.

\n

Step 4.

\n

Once you’ve lifted the vehicle just above where you need it, place jack stands under the appropriate locations, close to where the jack is positioned as they will hold the vehicle's weight. Adjust the jack stands to the proper height, and slowly lower the jack until the vehicle rests on the stands. Ensure your jack stands can handle the vehicle’s weight.

\n

If you plan on lifting all wheels, lift the vehicle one end at a time. For example, if you lift the front left tire first, lift the right front tire next. This helps keep the vehicle stable.

\n

Once the vehicle is properly lifted, perform a final check to catch any issues before working underneath. Verify that the vehicle is level and all stands are at the same height to ensure they do not slip. Then, gently push the vehicle to ensure it is stable.

\n

When the work is done, re-lift the vehicle using your jack until the weight is off the jack stands. Remove the stands and slowly lower the vehicle back down. The vehicle's shocks will absorb the descent, so don’t worry if it seems too quick. You can then remove the jack. If you lifted all wheels, follow the same pattern you used when raising them.

\n

Conclusion

\n

Knowing how to lift your vehicle and choosing the appropriate jack can prevent excessive damage and ensure your safety. Whether you are dealing with a flat tire on the side of the road or performing routine maintenance in your shop, this guide aims to help you lift your vehicle correctly and safely. For all your jacking needs and more, explore our Auto & Truck Service section at zips.com

\n

Shop all Jacks

\n
","rss_summary":"
\n

Whether you get a flat tire on the road or you want to perform basic car maintenance in your shop, knowing the proper way to jack up a vehicle is vital. This procedure must be done correctly to prevent further damage, injury, or even death. In this guide, we will discuss the different types of jacks and the proper procedure for jacking up your vehicle to avoid catastrophe.

\n

Understanding Your Vehicle Jack

\n

Before discussing specifics, it is important to identify the type of vehicle jack you have. Each type of jack has distinct advantages and disadvantages that influence their use. Regardless of which jack you choose, always consider the weight capacity of the jack in comparison to the weight of the vehicle.

\n

Floor & Trolly Jacks

\n
\n
\n

Floor and trolley jacks are hydraulic jacks operated by a lever mechanism. Although heavier than other types of jacks, their castor wheels provide better mobility. They come in a variety of shapes and sizes to accommodate different vehicle types and are very easy to use, making them a popular choice.

\n

While they're very similar, there are differences between trolley and floor jacks. Trolley jacks tend to be smaller and lift vehicles lower, making them suitable for roadside repairs. Floor jacks, on the other hand, are larger and provide a higher lift, making them used in professional settings more often.

\nShop all Floor and Trolly Jacks
\n
\"floor-jack\"
\n
\n
 
\n

Scissor Jacks

\n
\n
\n

Scissor jacks are mechanical jacks that use two sets of vertical arms contracted by turning a screw. Their simplicity requires minimal maintenance, and the lack of hydraulic components eliminates the risk of leaks. Their compact size allows easy storage in the boot of a car.

\nShop all Scissor Jacks
\n
\"scissor-jack\"
\n
\n
 
\n

Bottle Jacks

\n
\n
\n

Bottle jacks, another type of hydraulic jack, operate by forcing pressure from a small-diameter piston to a larger piston chamber when pumped. They are user-friendly and compact for easy storage. However, they typically have a lower weight limit and can be more unstable compared to other jacks.

\nShop all Bottle Jacks
\n
\"bottle-jack\"
\n
\n
 
\n

Air Jacks

\n
\n
\n

Air jacks, also known as inflatable jacks, are operated by filling them with air, water or oil. They are extremely quick and require minimal space, making them suitable for confined areas that other jacks may struggle with.

\nShop all Air Jacks
\n
\"air-jack\"
\n
\n
 
\n

Specialty Jacks

\n
\n
\"specialty-jack-1\"\n

Transmission jacks are designed to lift and lower a vehicle’s transmission from below, featuring a large cradle for easy installation, maintenance or replacement.

\nShop Transmission Jacks
\n
\"specialty-jack-2\"\n

Motorcycle jacks are specifically built for motorcycles.

\nShop Motorcycle Jacks
\n
\n

How to Jack Up a Vehicle

\n

Step 1.

\n

The first step is to ensure you have all necessary equipment ready. A jack and jack stands are essential, but wheel chocks and lifting pads are also important to have on hand. Wheel chocks help secure your vehicle, while lifting pads can prevent damage. Additionally, verify that all equipment is in good working order and that you know the proper weight limits. Do not use a jack or jack stands that cannot handle the weight of your vehicle.

\n

Step 2.

\n

Next, create a safe environment. Ensure that you are on level ground and have a stable surface to prevent the vehicle from moving. Block the wheels with wheel chocks in front of each wheel opposite from the end of the car you will be lifting for additional safety. Then make sure the vehicle is in park and the parking brake is engaged.

\n

Step 3.

\n

Arguably, the most important step in lifting the car is deciding where to jack it up. The right location allows safer access underneath the vehicle and prevents damage. When you find a spot, ensure it is not rusted or damaged. There are various locations on a car that can be used to jack the vehicle up, which differ depending on the make and model. Check your owner’s manual for guidance. If that isn’t available, focus on finding a spot on the frame near the wheel that balances the vehicle to prevent tipping. These lifting areas are reinforced to handle the weight of your vehicle. Check your owner's manual or our towing instructions for guidance.

\n

Once you have positioned the jack, the next step is simple: begin to jack your vehicle. Operate the machinery properly to avoid damage or unnecessary risk. \"underneath-vehicle-chassis\"

\n

To further avoid damage, place a lifting pad or block of wood between the jack and the car to spread out the load. This does not work with all jacks, but floor jacks, bottle jacks and scissor jacks can benefit from them. While you can start out jacking a bit faster, slow down as the jack makes contact with the vehicle. Raise the vehicle a little higher than you need, but not so high that it risks tipping over.

\n

Step 4.

\n

Once you’ve lifted the vehicle just above where you need it, place jack stands under the appropriate locations, close to where the jack is positioned as they will hold the vehicle's weight. Adjust the jack stands to the proper height, and slowly lower the jack until the vehicle rests on the stands. Ensure your jack stands can handle the vehicle’s weight.

\n

If you plan on lifting all wheels, lift the vehicle one end at a time. For example, if you lift the front left tire first, lift the right front tire next. This helps keep the vehicle stable.

\n

Once the vehicle is properly lifted, perform a final check to catch any issues before working underneath. Verify that the vehicle is level and all stands are at the same height to ensure they do not slip. Then, gently push the vehicle to ensure it is stable.

\n

When the work is done, re-lift the vehicle using your jack until the weight is off the jack stands. Remove the stands and slowly lower the vehicle back down. The vehicle's shocks will absorb the descent, so don’t worry if it seems too quick. You can then remove the jack. If you lifted all wheels, follow the same pattern you used when raising them.

\n

Conclusion

\n

Knowing how to lift your vehicle and choosing the appropriate jack can prevent excessive damage and ensure your safety. Whether you are dealing with a flat tire on the side of the road or performing routine maintenance in your shop, this guide aims to help you lift your vehicle correctly and safely. For all your jacking needs and more, explore our Auto & Truck Service section at zips.com

\n

Shop all Jacks

\n
","rss_body":"
\n

Whether you get a flat tire on the road or you want to perform basic car maintenance in your shop, knowing the proper way to jack up a vehicle is vital. This procedure must be done correctly to prevent further damage, injury, or even death. In this guide, we will discuss the different types of jacks and the proper procedure for jacking up your vehicle to avoid catastrophe.

\n

Understanding Your Vehicle Jack

\n

Before discussing specifics, it is important to identify the type of vehicle jack you have. Each type of jack has distinct advantages and disadvantages that influence their use. Regardless of which jack you choose, always consider the weight capacity of the jack in comparison to the weight of the vehicle.

\n

Floor & Trolly Jacks

\n
\n
\n

Floor and trolley jacks are hydraulic jacks operated by a lever mechanism. Although heavier than other types of jacks, their castor wheels provide better mobility. They come in a variety of shapes and sizes to accommodate different vehicle types and are very easy to use, making them a popular choice.

\n

While they're very similar, there are differences between trolley and floor jacks. Trolley jacks tend to be smaller and lift vehicles lower, making them suitable for roadside repairs. Floor jacks, on the other hand, are larger and provide a higher lift, making them used in professional settings more often.

\nShop all Floor and Trolly Jacks
\n
\"floor-jack\"
\n
\n
 
\n

Scissor Jacks

\n
\n
\n

Scissor jacks are mechanical jacks that use two sets of vertical arms contracted by turning a screw. Their simplicity requires minimal maintenance, and the lack of hydraulic components eliminates the risk of leaks. Their compact size allows easy storage in the boot of a car.

\nShop all Scissor Jacks
\n
\"scissor-jack\"
\n
\n
 
\n

Bottle Jacks

\n
\n
\n

Bottle jacks, another type of hydraulic jack, operate by forcing pressure from a small-diameter piston to a larger piston chamber when pumped. They are user-friendly and compact for easy storage. However, they typically have a lower weight limit and can be more unstable compared to other jacks.

\nShop all Bottle Jacks
\n
\"bottle-jack\"
\n
\n
 
\n

Air Jacks

\n
\n
\n

Air jacks, also known as inflatable jacks, are operated by filling them with air, water or oil. They are extremely quick and require minimal space, making them suitable for confined areas that other jacks may struggle with.

\nShop all Air Jacks
\n
\"air-jack\"
\n
\n
 
\n

Specialty Jacks

\n
\n
\"specialty-jack-1\"\n

Transmission jacks are designed to lift and lower a vehicle’s transmission from below, featuring a large cradle for easy installation, maintenance or replacement.

\nShop Transmission Jacks
\n
\"specialty-jack-2\"\n

Motorcycle jacks are specifically built for motorcycles.

\nShop Motorcycle Jacks
\n
\n

How to Jack Up a Vehicle

\n

Step 1.

\n

The first step is to ensure you have all necessary equipment ready. A jack and jack stands are essential, but wheel chocks and lifting pads are also important to have on hand. Wheel chocks help secure your vehicle, while lifting pads can prevent damage. Additionally, verify that all equipment is in good working order and that you know the proper weight limits. Do not use a jack or jack stands that cannot handle the weight of your vehicle.

\n

Step 2.

\n

Next, create a safe environment. Ensure that you are on level ground and have a stable surface to prevent the vehicle from moving. Block the wheels with wheel chocks in front of each wheel opposite from the end of the car you will be lifting for additional safety. Then make sure the vehicle is in park and the parking brake is engaged.

\n

Step 3.

\n

Arguably, the most important step in lifting the car is deciding where to jack it up. The right location allows safer access underneath the vehicle and prevents damage. When you find a spot, ensure it is not rusted or damaged. There are various locations on a car that can be used to jack the vehicle up, which differ depending on the make and model. Check your owner’s manual for guidance. If that isn’t available, focus on finding a spot on the frame near the wheel that balances the vehicle to prevent tipping. These lifting areas are reinforced to handle the weight of your vehicle. Check your owner's manual or our towing instructions for guidance.

\n

Once you have positioned the jack, the next step is simple: begin to jack your vehicle. Operate the machinery properly to avoid damage or unnecessary risk. \"underneath-vehicle-chassis\"

\n

To further avoid damage, place a lifting pad or block of wood between the jack and the car to spread out the load. This does not work with all jacks, but floor jacks, bottle jacks and scissor jacks can benefit from them. While you can start out jacking a bit faster, slow down as the jack makes contact with the vehicle. Raise the vehicle a little higher than you need, but not so high that it risks tipping over.

\n

Step 4.

\n

Once you’ve lifted the vehicle just above where you need it, place jack stands under the appropriate locations, close to where the jack is positioned as they will hold the vehicle's weight. Adjust the jack stands to the proper height, and slowly lower the jack until the vehicle rests on the stands. Ensure your jack stands can handle the vehicle’s weight.

\n

If you plan on lifting all wheels, lift the vehicle one end at a time. For example, if you lift the front left tire first, lift the right front tire next. This helps keep the vehicle stable.

\n

Once the vehicle is properly lifted, perform a final check to catch any issues before working underneath. Verify that the vehicle is level and all stands are at the same height to ensure they do not slip. Then, gently push the vehicle to ensure it is stable.

\n

When the work is done, re-lift the vehicle using your jack until the weight is off the jack stands. Remove the stands and slowly lower the vehicle back down. The vehicle's shocks will absorb the descent, so don’t worry if it seems too quick. You can then remove the jack. If you lifted all wheels, follow the same pattern you used when raising them.

\n

Conclusion

\n

Knowing how to lift your vehicle and choosing the appropriate jack can prevent excessive damage and ensure your safety. Whether you are dealing with a flat tire on the side of the road or performing routine maintenance in your shop, this guide aims to help you lift your vehicle correctly and safely. For all your jacking needs and more, explore our Auto & Truck Service section at zips.com

\n

Shop all Jacks

\n
","enable_google_amp_output_override":false,"generate_json_ld_enabled":true,"blog_post_schedule_task_uid":null,"blog_publish_to_social_media_task":"DONE_NOT_SENT","blog_publish_instant_email_task_uid":null,"blog_publish_instant_email_campaign_id":null,"blog_publish_instant_email_retry_count":null,"keywords":[],"composition_id":0,"is_crawlable_by_bots":false,"header":null,"published_at":1755715388076,"head_html":null,"footer_html":null,"attached_stylesheets":[],"enable_domain_stylesheets":null,"include_default_custom_css":null,"layout_sections":{},"past_mab_experiment_ids":[],"deleted_by":null,"featured_image_alt_text":"","enable_layout_stylesheets":null,"tweet":null,"tweet_at":null,"campaign_name":null,"campaign_utm":null,"meta_keywords":null,"meta_description":"Learn the safest and most effective way to choose and use the right vehicle jack for your needs. This comprehensive guide covers types of jacks and step-by-step lifting safety tips.","tweet_immediately":false,"publish_immediately":true,"security_state":"NONE","scheduled_update_date":0,"placement_guids":[],"header_template_path":null,"header_variant_name":null,"footer_template_path":null,"footer_variant_name":null,"global_block_overrides":{},"property_for_dynamic_page_title":null,"property_for_dynamic_page_slug":null,"property_for_dynamic_page_meta_description":null,"property_for_dynamic_page_featured_image":null,"property_for_dynamic_page_canonical_url":null,"preview_image_src":null,"legacy_blog_tabid":null,"legacy_post_guid":null,"performable_variation_letter":null,"style_override_id":null,"has_user_changes":true,"css":{},"css_text":"","unpublished_at":0,"published_by_id":79766377,"allowed_slug_conflict":false,"ai_features":null,"link_rel_canonical_url":"","page_redirected":false,"page_expiry_enabled":null,"page_expiry_date":null,"page_expiry_redirect_id":null,"page_expiry_redirect_url":null,"deleted_by_id":null,"state_when_deleted":null,"cloned_from":null,"staged_from":null,"personas":[],"compose_body":null,"featured_image":"https://48463649.fs1.hubspotusercontent-na1.net/hubfs/48463649/header-Aug-04-2025-08-43-52-1469-PM.png","featured_image_width":869,"featured_image_height":256,"publish_timezone_offset":null,"theme_settings_values":null,"password":null,"last_edit_session_id":null,"last_edit_update_id":null,"created_by_agent":null},"metaDescription":"Learn the safest and most effective way to choose and use the right vehicle jack for your needs. This comprehensive guide covers types of jacks and step-by-step lifting safety tips.","metaKeywords":null,"name":"How To Choose & Use a Vehicle Jack","nextPostFeaturedImage":"https://48463649.fs1.hubspotusercontent-na1.net/hubfs/48463649/0007033_gojak_6200_1_web.jpg_900.jpg","nextPostFeaturedImageAltText":"","nextPostName":"Dolly Inspection Tips","nextPostSlug":"blog/dolly-inspection-tips","pageExpiryDate":null,"pageExpiryEnabled":null,"pageExpiryRedirectId":null,"pageExpiryRedirectUrl":null,"pageRedirected":false,"pageTitle":"How To Choose & Use a Vehicle Jack","parentBlog":{"absoluteUrl":"/blog","allowComments":true,"ampBodyColor":"#404040","ampBodyFont":"'Helvetica Neue', Helvetica, Arial, sans-serif","ampBodyFontSize":"18","ampCustomCss":"","ampHeaderBackgroundColor":"#ffffff","ampHeaderColor":"#1e1e1e","ampHeaderFont":"'Helvetica Neue', Helvetica, Arial, sans-serif","ampHeaderFontSize":"36","ampLinkColor":"#416bb3","ampLogoAlt":"","ampLogoHeight":0,"ampLogoSrc":"","ampLogoWidth":0,"analyticsPageId":190096341139,"attachedStylesheets":[],"audienceAccess":"PUBLIC","businessUnitId":null,"captchaAfterDays":7,"captchaAlways":false,"categoryId":3,"cdnPurgeEmbargoTime":null,"closeCommentsOlder":0,"commentDateFormat":"medium","commentFormGuid":"a4128401-39db-4c54-a62b-88ff335d3a69","commentMaxThreadDepth":1,"commentModeration":false,"commentNotificationEmails":[],"commentShouldCreateContact":false,"commentVerificationText":"","cosObjectType":"BLOG","created":1747163443999,"createdDateTime":1747163443999,"dailyNotificationEmailId":null,"dateFormattingLanguage":null,"defaultGroupStyleId":"","defaultNotificationFromName":"","defaultNotificationReplyTo":"","deletedAt":0,"description":"","domain":"","domainWhenPublished":"www.zips.com","emailApiSubscriptionId":null,"enableGoogleAmpOutput":true,"enableSocialAutoPublishing":false,"generateJsonLdEnabled":true,"header":null,"htmlFooter":"","htmlFooterIsShared":true,"htmlHead":"","htmlHeadIsShared":true,"htmlKeywords":[],"htmlTitle":"blog","id":190096341139,"ilsSubscriptionListsByType":{},"instantNotificationEmailId":null,"itemLayoutId":null,"itemTemplateIsShared":false,"itemTemplatePath":"zips-basic-theme/templates/blog-post.html","label":"blog","language":"en","legacyGuid":null,"legacyModuleId":null,"legacyTabId":null,"listingLayoutId":null,"listingPageId":190096341141,"listingTemplatePath":"","liveDomain":"www.zips.com","monthFilterFormat":"MMMM yyyy","monthlyNotificationEmailId":null,"name":"blog","parentBlogUpdateTaskId":null,"portalId":48463649,"postHtmlFooter":"","postHtmlHead":"","postsPerListingPage":111,"postsPerRssFeed":10,"publicAccessRules":[],"publicAccessRulesEnabled":false,"publicTitle":"blog","publishDateFormat":"medium","resolvedDomain":"www.zips.com","rootUrl":"/blog","rssCustomFeed":null,"rssDescription":null,"rssItemFooter":null,"rssItemHeader":null,"settingsOverrides":{"itemLayoutId":false,"itemTemplatePath":false,"itemTemplateIsShared":false,"listingLayoutId":false,"listingTemplatePath":false,"postsPerListingPage":false,"showSummaryInListing":false,"useFeaturedImageInSummary":false,"htmlHead":false,"postHtmlHead":false,"htmlHeadIsShared":false,"htmlFooter":false,"listingPageHtmlFooter":false,"postHtmlFooter":false,"htmlFooterIsShared":false,"attachedStylesheets":false,"postsPerRssFeed":false,"showSummaryInRss":false,"showSummaryInEmails":false,"showSummariesInEmails":false,"allowComments":false,"commentShouldCreateContact":false,"commentModeration":false,"closeCommentsOlder":false,"commentNotificationEmails":false,"commentMaxThreadDepth":false,"commentVerificationText":false,"socialAccountTwitter":false,"showSocialLinkTwitter":false,"showSocialLinkLinkedin":false,"showSocialLinkFacebook":false,"enableGoogleAmpOutput":false,"ampLogoSrc":false,"ampLogoHeight":false,"ampLogoWidth":false,"ampLogoAlt":false,"ampHeaderFont":false,"ampHeaderFontSize":false,"ampHeaderColor":false,"ampHeaderBackgroundColor":false,"ampBodyFont":false,"ampBodyFontSize":false,"ampBodyColor":false,"ampLinkColor":false,"generateJsonLdEnabled":false},"showSocialLinkFacebook":true,"showSocialLinkLinkedin":true,"showSocialLinkTwitter":true,"showSummaryInEmails":true,"showSummaryInListing":true,"showSummaryInRss":true,"siteId":null,"slug":"blog","socialAccountTwitter":"","state":null,"subscriptionContactsProperty":null,"subscriptionEmailType":null,"subscriptionFormGuid":null,"subscriptionListsByType":{},"title":null,"translatedFromId":null,"translations":{},"updated":1755110916417,"updatedDateTime":1755110916417,"urlBase":"www.zips.com/blog","urlSegments":{"all":"all","archive":"archive","author":"author","page":"page","tag":"tag"},"useFeaturedImageInSummary":true,"usesDefaultTemplate":false,"weeklyNotificationEmailId":null},"password":null,"pastMabExperimentIds":[],"performableGuid":null,"performableVariationLetter":null,"personalizationStrategyId":null,"personalizationVariantStatus":null,"personas":[],"placementGuids":[],"portableKey":null,"portalId":48463649,"position":null,"postBody":"
\n

Whether you get a flat tire on the road or you want to perform basic car maintenance in your shop, knowing the proper way to jack up a vehicle is vital. This procedure must be done correctly to prevent further damage, injury, or even death. In this guide, we will discuss the different types of jacks and the proper procedure for jacking up your vehicle to avoid catastrophe.

\n

Understanding Your Vehicle Jack

\n

Before discussing specifics, it is important to identify the type of vehicle jack you have. Each type of jack has distinct advantages and disadvantages that influence their use. Regardless of which jack you choose, always consider the weight capacity of the jack in comparison to the weight of the vehicle.

\n

Floor & Trolly Jacks

\n
\n
\n

Floor and trolley jacks are hydraulic jacks operated by a lever mechanism. Although heavier than other types of jacks, their castor wheels provide better mobility. They come in a variety of shapes and sizes to accommodate different vehicle types and are very easy to use, making them a popular choice.

\n

While they're very similar, there are differences between trolley and floor jacks. Trolley jacks tend to be smaller and lift vehicles lower, making them suitable for roadside repairs. Floor jacks, on the other hand, are larger and provide a higher lift, making them used in professional settings more often.

\nShop all Floor and Trolly Jacks
\n
\"floor-jack\"
\n
\n
 
\n

Scissor Jacks

\n
\n
\n

Scissor jacks are mechanical jacks that use two sets of vertical arms contracted by turning a screw. Their simplicity requires minimal maintenance, and the lack of hydraulic components eliminates the risk of leaks. Their compact size allows easy storage in the boot of a car.

\nShop all Scissor Jacks
\n
\"scissor-jack\"
\n
\n
 
\n

Bottle Jacks

\n
\n
\n

Bottle jacks, another type of hydraulic jack, operate by forcing pressure from a small-diameter piston to a larger piston chamber when pumped. They are user-friendly and compact for easy storage. However, they typically have a lower weight limit and can be more unstable compared to other jacks.

\nShop all Bottle Jacks
\n
\"bottle-jack\"
\n
\n
 
\n

Air Jacks

\n
\n
\n

Air jacks, also known as inflatable jacks, are operated by filling them with air, water or oil. They are extremely quick and require minimal space, making them suitable for confined areas that other jacks may struggle with.

\nShop all Air Jacks
\n
\"air-jack\"
\n
\n
 
\n

Specialty Jacks

\n
\n
\"specialty-jack-1\"\n

Transmission jacks are designed to lift and lower a vehicle’s transmission from below, featuring a large cradle for easy installation, maintenance or replacement.

\nShop Transmission Jacks
\n
\"specialty-jack-2\"\n

Motorcycle jacks are specifically built for motorcycles.

\nShop Motorcycle Jacks
\n
\n

How to Jack Up a Vehicle

\n

Step 1.

\n

The first step is to ensure you have all necessary equipment ready. A jack and jack stands are essential, but wheel chocks and lifting pads are also important to have on hand. Wheel chocks help secure your vehicle, while lifting pads can prevent damage. Additionally, verify that all equipment is in good working order and that you know the proper weight limits. Do not use a jack or jack stands that cannot handle the weight of your vehicle.

\n

Step 2.

\n

Next, create a safe environment. Ensure that you are on level ground and have a stable surface to prevent the vehicle from moving. Block the wheels with wheel chocks in front of each wheel opposite from the end of the car you will be lifting for additional safety. Then make sure the vehicle is in park and the parking brake is engaged.

\n

Step 3.

\n

Arguably, the most important step in lifting the car is deciding where to jack it up. The right location allows safer access underneath the vehicle and prevents damage. When you find a spot, ensure it is not rusted or damaged. There are various locations on a car that can be used to jack the vehicle up, which differ depending on the make and model. Check your owner’s manual for guidance. If that isn’t available, focus on finding a spot on the frame near the wheel that balances the vehicle to prevent tipping. These lifting areas are reinforced to handle the weight of your vehicle. Check your owner's manual or our towing instructions for guidance.

\n

Once you have positioned the jack, the next step is simple: begin to jack your vehicle. Operate the machinery properly to avoid damage or unnecessary risk. \"underneath-vehicle-chassis\"

\n

To further avoid damage, place a lifting pad or block of wood between the jack and the car to spread out the load. This does not work with all jacks, but floor jacks, bottle jacks and scissor jacks can benefit from them. While you can start out jacking a bit faster, slow down as the jack makes contact with the vehicle. Raise the vehicle a little higher than you need, but not so high that it risks tipping over.

\n

Step 4.

\n

Once you’ve lifted the vehicle just above where you need it, place jack stands under the appropriate locations, close to where the jack is positioned as they will hold the vehicle's weight. Adjust the jack stands to the proper height, and slowly lower the jack until the vehicle rests on the stands. Ensure your jack stands can handle the vehicle’s weight.

\n

If you plan on lifting all wheels, lift the vehicle one end at a time. For example, if you lift the front left tire first, lift the right front tire next. This helps keep the vehicle stable.

\n

Once the vehicle is properly lifted, perform a final check to catch any issues before working underneath. Verify that the vehicle is level and all stands are at the same height to ensure they do not slip. Then, gently push the vehicle to ensure it is stable.

\n

When the work is done, re-lift the vehicle using your jack until the weight is off the jack stands. Remove the stands and slowly lower the vehicle back down. The vehicle's shocks will absorb the descent, so don’t worry if it seems too quick. You can then remove the jack. If you lifted all wheels, follow the same pattern you used when raising them.

\n

Conclusion

\n

Knowing how to lift your vehicle and choosing the appropriate jack can prevent excessive damage and ensure your safety. Whether you are dealing with a flat tire on the side of the road or performing routine maintenance in your shop, this guide aims to help you lift your vehicle correctly and safely. For all your jacking needs and more, explore our Auto & Truck Service section at zips.com

\n

Shop all Jacks

\n
","postBodyRss":"
\n

Whether you get a flat tire on the road or you want to perform basic car maintenance in your shop, knowing the proper way to jack up a vehicle is vital. This procedure must be done correctly to prevent further damage, injury, or even death. In this guide, we will discuss the different types of jacks and the proper procedure for jacking up your vehicle to avoid catastrophe.

\n

Understanding Your Vehicle Jack

\n

Before discussing specifics, it is important to identify the type of vehicle jack you have. Each type of jack has distinct advantages and disadvantages that influence their use. Regardless of which jack you choose, always consider the weight capacity of the jack in comparison to the weight of the vehicle.

\n

Floor & Trolly Jacks

\n
\n
\n

Floor and trolley jacks are hydraulic jacks operated by a lever mechanism. Although heavier than other types of jacks, their castor wheels provide better mobility. They come in a variety of shapes and sizes to accommodate different vehicle types and are very easy to use, making them a popular choice.

\n

While they're very similar, there are differences between trolley and floor jacks. Trolley jacks tend to be smaller and lift vehicles lower, making them suitable for roadside repairs. Floor jacks, on the other hand, are larger and provide a higher lift, making them used in professional settings more often.

\nShop all Floor and Trolly Jacks
\n
\"floor-jack\"
\n
\n
 
\n

Scissor Jacks

\n
\n
\n

Scissor jacks are mechanical jacks that use two sets of vertical arms contracted by turning a screw. Their simplicity requires minimal maintenance, and the lack of hydraulic components eliminates the risk of leaks. Their compact size allows easy storage in the boot of a car.

\nShop all Scissor Jacks
\n
\"scissor-jack\"
\n
\n
 
\n

Bottle Jacks

\n
\n
\n

Bottle jacks, another type of hydraulic jack, operate by forcing pressure from a small-diameter piston to a larger piston chamber when pumped. They are user-friendly and compact for easy storage. However, they typically have a lower weight limit and can be more unstable compared to other jacks.

\nShop all Bottle Jacks
\n
\"bottle-jack\"
\n
\n
 
\n

Air Jacks

\n
\n
\n

Air jacks, also known as inflatable jacks, are operated by filling them with air, water or oil. They are extremely quick and require minimal space, making them suitable for confined areas that other jacks may struggle with.

\nShop all Air Jacks
\n
\"air-jack\"
\n
\n
 
\n

Specialty Jacks

\n
\n
\"specialty-jack-1\"\n

Transmission jacks are designed to lift and lower a vehicle’s transmission from below, featuring a large cradle for easy installation, maintenance or replacement.

\nShop Transmission Jacks
\n
\"specialty-jack-2\"\n

Motorcycle jacks are specifically built for motorcycles.

\nShop Motorcycle Jacks
\n
\n

How to Jack Up a Vehicle

\n

Step 1.

\n

The first step is to ensure you have all necessary equipment ready. A jack and jack stands are essential, but wheel chocks and lifting pads are also important to have on hand. Wheel chocks help secure your vehicle, while lifting pads can prevent damage. Additionally, verify that all equipment is in good working order and that you know the proper weight limits. Do not use a jack or jack stands that cannot handle the weight of your vehicle.

\n

Step 2.

\n

Next, create a safe environment. Ensure that you are on level ground and have a stable surface to prevent the vehicle from moving. Block the wheels with wheel chocks in front of each wheel opposite from the end of the car you will be lifting for additional safety. Then make sure the vehicle is in park and the parking brake is engaged.

\n

Step 3.

\n

Arguably, the most important step in lifting the car is deciding where to jack it up. The right location allows safer access underneath the vehicle and prevents damage. When you find a spot, ensure it is not rusted or damaged. There are various locations on a car that can be used to jack the vehicle up, which differ depending on the make and model. Check your owner’s manual for guidance. If that isn’t available, focus on finding a spot on the frame near the wheel that balances the vehicle to prevent tipping. These lifting areas are reinforced to handle the weight of your vehicle. Check your owner's manual or our towing instructions for guidance.

\n

Once you have positioned the jack, the next step is simple: begin to jack your vehicle. Operate the machinery properly to avoid damage or unnecessary risk. \"underneath-vehicle-chassis\"

\n

To further avoid damage, place a lifting pad or block of wood between the jack and the car to spread out the load. This does not work with all jacks, but floor jacks, bottle jacks and scissor jacks can benefit from them. While you can start out jacking a bit faster, slow down as the jack makes contact with the vehicle. Raise the vehicle a little higher than you need, but not so high that it risks tipping over.

\n

Step 4.

\n

Once you’ve lifted the vehicle just above where you need it, place jack stands under the appropriate locations, close to where the jack is positioned as they will hold the vehicle's weight. Adjust the jack stands to the proper height, and slowly lower the jack until the vehicle rests on the stands. Ensure your jack stands can handle the vehicle’s weight.

\n

If you plan on lifting all wheels, lift the vehicle one end at a time. For example, if you lift the front left tire first, lift the right front tire next. This helps keep the vehicle stable.

\n

Once the vehicle is properly lifted, perform a final check to catch any issues before working underneath. Verify that the vehicle is level and all stands are at the same height to ensure they do not slip. Then, gently push the vehicle to ensure it is stable.

\n

When the work is done, re-lift the vehicle using your jack until the weight is off the jack stands. Remove the stands and slowly lower the vehicle back down. The vehicle's shocks will absorb the descent, so don’t worry if it seems too quick. You can then remove the jack. If you lifted all wheels, follow the same pattern you used when raising them.

\n

Conclusion

\n

Knowing how to lift your vehicle and choosing the appropriate jack can prevent excessive damage and ensure your safety. Whether you are dealing with a flat tire on the side of the road or performing routine maintenance in your shop, this guide aims to help you lift your vehicle correctly and safely. For all your jacking needs and more, explore our Auto & Truck Service section at zips.com

\n

Shop all Jacks

\n
","postEmailContent":"
\n

Whether you get a flat tire on the road or you want to perform basic car maintenance in your shop, knowing the proper way to jack up a vehicle is vital. This procedure must be done correctly to prevent further damage, injury, or even death. In this guide, we will discuss the different types of jacks and the proper procedure for jacking up your vehicle to avoid catastrophe.

\n

Understanding Your Vehicle Jack

\n

Before discussing specifics, it is important to identify the type of vehicle jack you have. Each type of jack has distinct advantages and disadvantages that influence their use. Regardless of which jack you choose, always consider the weight capacity of the jack in comparison to the weight of the vehicle.

\n

Floor & Trolly Jacks

\n
\n
\n

Floor and trolley jacks are hydraulic jacks operated by a lever mechanism. Although heavier than other types of jacks, their castor wheels provide better mobility. They come in a variety of shapes and sizes to accommodate different vehicle types and are very easy to use, making them a popular choice.

\n

While they're very similar, there are differences between trolley and floor jacks. Trolley jacks tend to be smaller and lift vehicles lower, making them suitable for roadside repairs. Floor jacks, on the other hand, are larger and provide a higher lift, making them used in professional settings more often.

\n Shop all Floor and Trolly Jacks\n
\n
\n
\n
\n  \n
\n

Scissor Jacks

\n
\n
\n

Scissor jacks are mechanical jacks that use two sets of vertical arms contracted by turning a screw. Their simplicity requires minimal maintenance, and the lack of hydraulic components eliminates the risk of leaks. Their compact size allows easy storage in the boot of a car.

\n Shop all Scissor Jacks\n
\n
\n
\n
\n  \n
\n

Bottle Jacks

\n
\n
\n

Bottle jacks, another type of hydraulic jack, operate by forcing pressure from a small-diameter piston to a larger piston chamber when pumped. They are user-friendly and compact for easy storage. However, they typically have a lower weight limit and can be more unstable compared to other jacks.

\n Shop all Bottle Jacks\n
\n
\n
\n
\n  \n
\n

Air Jacks

\n
\n
\n

Air jacks, also known as inflatable jacks, are operated by filling them with air, water or oil. They are extremely quick and require minimal space, making them suitable for confined areas that other jacks may struggle with.

\n Shop all Air Jacks\n
\n
\n
\n
\n  \n
\n

Specialty Jacks

\n
\n
\n

Transmission jacks are designed to lift and lower a vehicle’s transmission from below, featuring a large cradle for easy installation, maintenance or replacement.

\n Shop Transmission Jacks\n
\n
\n

Motorcycle jacks are specifically built for motorcycles.

\n Shop Motorcycle Jacks\n
\n
\n

How to Jack Up a Vehicle

\n

Step 1.

\n

The first step is to ensure you have all necessary equipment ready. A jack and jack stands are essential, but wheel chocks and lifting pads are also important to have on hand. Wheel chocks help secure your vehicle, while lifting pads can prevent damage. Additionally, verify that all equipment is in good working order and that you know the proper weight limits. Do not use a jack or jack stands that cannot handle the weight of your vehicle.

\n

Step 2.

\n

Next, create a safe environment. Ensure that you are on level ground and have a stable surface to prevent the vehicle from moving. Block the wheels with wheel chocks in front of each wheel opposite from the end of the car you will be lifting for additional safety. Then make sure the vehicle is in park and the parking brake is engaged.

\n

Step 3.

\n

Arguably, the most important step in lifting the car is deciding where to jack it up. The right location allows safer access underneath the vehicle and prevents damage. When you find a spot, ensure it is not rusted or damaged. There are various locations on a car that can be used to jack the vehicle up, which differ depending on the make and model. Check your owner’s manual for guidance. If that isn’t available, focus on finding a spot on the frame near the wheel that balances the vehicle to prevent tipping. These lifting areas are reinforced to handle the weight of your vehicle. Check your owner's manual or our towing instructions for guidance.

\n

Once you have positioned the jack, the next step is simple: begin to jack your vehicle. Operate the machinery properly to avoid damage or unnecessary risk.

\n

To further avoid damage, place a lifting pad or block of wood between the jack and the car to spread out the load. This does not work with all jacks, but floor jacks, bottle jacks and scissor jacks can benefit from them. While you can start out jacking a bit faster, slow down as the jack makes contact with the vehicle. Raise the vehicle a little higher than you need, but not so high that it risks tipping over.

\n

Step 4.

\n

Once you’ve lifted the vehicle just above where you need it, place jack stands under the appropriate locations, close to where the jack is positioned as they will hold the vehicle's weight. Adjust the jack stands to the proper height, and slowly lower the jack until the vehicle rests on the stands. Ensure your jack stands can handle the vehicle’s weight.

\n

If you plan on lifting all wheels, lift the vehicle one end at a time. For example, if you lift the front left tire first, lift the right front tire next. This helps keep the vehicle stable.

\n

Once the vehicle is properly lifted, perform a final check to catch any issues before working underneath. Verify that the vehicle is level and all stands are at the same height to ensure they do not slip. Then, gently push the vehicle to ensure it is stable.

\n

When the work is done, re-lift the vehicle using your jack until the weight is off the jack stands. Remove the stands and slowly lower the vehicle back down. The vehicle's shocks will absorb the descent, so don’t worry if it seems too quick. You can then remove the jack. If you lifted all wheels, follow the same pattern you used when raising them.

\n

Conclusion

\n

Knowing how to lift your vehicle and choosing the appropriate jack can prevent excessive damage and ensure your safety. Whether you are dealing with a flat tire on the side of the road or performing routine maintenance in your shop, this guide aims to help you lift your vehicle correctly and safely. For all your jacking needs and more, explore our Auto & Truck Service section at zips.com

\n

Shop all Jacks

\n
","postFeaturedImageIfEnabled":"https://48463649.fs1.hubspotusercontent-na1.net/hubfs/48463649/header-Aug-04-2025-08-43-52-1469-PM.png","postListContent":"
\n

Whether you get a flat tire on the road or you want to perform basic car maintenance in your shop, knowing the proper way to jack up a vehicle is vital. This procedure must be done correctly to prevent further damage, injury, or even death. In this guide, we will discuss the different types of jacks and the proper procedure for jacking up your vehicle to avoid catastrophe.

\n

Understanding Your Vehicle Jack

\n

Before discussing specifics, it is important to identify the type of vehicle jack you have. Each type of jack has distinct advantages and disadvantages that influence their use. Regardless of which jack you choose, always consider the weight capacity of the jack in comparison to the weight of the vehicle.

\n

Floor & Trolly Jacks

\n
\n
\n

Floor and trolley jacks are hydraulic jacks operated by a lever mechanism. Although heavier than other types of jacks, their castor wheels provide better mobility. They come in a variety of shapes and sizes to accommodate different vehicle types and are very easy to use, making them a popular choice.

\n

While they're very similar, there are differences between trolley and floor jacks. Trolley jacks tend to be smaller and lift vehicles lower, making them suitable for roadside repairs. Floor jacks, on the other hand, are larger and provide a higher lift, making them used in professional settings more often.

\n Shop all Floor and Trolly Jacks\n
\n
\n
\n
\n  \n
\n

Scissor Jacks

\n
\n
\n

Scissor jacks are mechanical jacks that use two sets of vertical arms contracted by turning a screw. Their simplicity requires minimal maintenance, and the lack of hydraulic components eliminates the risk of leaks. Their compact size allows easy storage in the boot of a car.

\n Shop all Scissor Jacks\n
\n
\n
\n
\n  \n
\n

Bottle Jacks

\n
\n
\n

Bottle jacks, another type of hydraulic jack, operate by forcing pressure from a small-diameter piston to a larger piston chamber when pumped. They are user-friendly and compact for easy storage. However, they typically have a lower weight limit and can be more unstable compared to other jacks.

\n Shop all Bottle Jacks\n
\n
\n
\n
\n  \n
\n

Air Jacks

\n
\n
\n

Air jacks, also known as inflatable jacks, are operated by filling them with air, water or oil. They are extremely quick and require minimal space, making them suitable for confined areas that other jacks may struggle with.

\n Shop all Air Jacks\n
\n
\n
\n
\n  \n
\n

Specialty Jacks

\n
\n
\n

Transmission jacks are designed to lift and lower a vehicle’s transmission from below, featuring a large cradle for easy installation, maintenance or replacement.

\n Shop Transmission Jacks\n
\n
\n

Motorcycle jacks are specifically built for motorcycles.

\n Shop Motorcycle Jacks\n
\n
\n

How to Jack Up a Vehicle

\n

Step 1.

\n

The first step is to ensure you have all necessary equipment ready. A jack and jack stands are essential, but wheel chocks and lifting pads are also important to have on hand. Wheel chocks help secure your vehicle, while lifting pads can prevent damage. Additionally, verify that all equipment is in good working order and that you know the proper weight limits. Do not use a jack or jack stands that cannot handle the weight of your vehicle.

\n

Step 2.

\n

Next, create a safe environment. Ensure that you are on level ground and have a stable surface to prevent the vehicle from moving. Block the wheels with wheel chocks in front of each wheel opposite from the end of the car you will be lifting for additional safety. Then make sure the vehicle is in park and the parking brake is engaged.

\n

Step 3.

\n

Arguably, the most important step in lifting the car is deciding where to jack it up. The right location allows safer access underneath the vehicle and prevents damage. When you find a spot, ensure it is not rusted or damaged. There are various locations on a car that can be used to jack the vehicle up, which differ depending on the make and model. Check your owner’s manual for guidance. If that isn’t available, focus on finding a spot on the frame near the wheel that balances the vehicle to prevent tipping. These lifting areas are reinforced to handle the weight of your vehicle. Check your owner's manual or our towing instructions for guidance.

\n

Once you have positioned the jack, the next step is simple: begin to jack your vehicle. Operate the machinery properly to avoid damage or unnecessary risk.

\n

To further avoid damage, place a lifting pad or block of wood between the jack and the car to spread out the load. This does not work with all jacks, but floor jacks, bottle jacks and scissor jacks can benefit from them. While you can start out jacking a bit faster, slow down as the jack makes contact with the vehicle. Raise the vehicle a little higher than you need, but not so high that it risks tipping over.

\n

Step 4.

\n

Once you’ve lifted the vehicle just above where you need it, place jack stands under the appropriate locations, close to where the jack is positioned as they will hold the vehicle's weight. Adjust the jack stands to the proper height, and slowly lower the jack until the vehicle rests on the stands. Ensure your jack stands can handle the vehicle’s weight.

\n

If you plan on lifting all wheels, lift the vehicle one end at a time. For example, if you lift the front left tire first, lift the right front tire next. This helps keep the vehicle stable.

\n

Once the vehicle is properly lifted, perform a final check to catch any issues before working underneath. Verify that the vehicle is level and all stands are at the same height to ensure they do not slip. Then, gently push the vehicle to ensure it is stable.

\n

When the work is done, re-lift the vehicle using your jack until the weight is off the jack stands. Remove the stands and slowly lower the vehicle back down. The vehicle's shocks will absorb the descent, so don’t worry if it seems too quick. You can then remove the jack. If you lifted all wheels, follow the same pattern you used when raising them.

\n

Conclusion

\n

Knowing how to lift your vehicle and choosing the appropriate jack can prevent excessive damage and ensure your safety. Whether you are dealing with a flat tire on the side of the road or performing routine maintenance in your shop, this guide aims to help you lift your vehicle correctly and safely. For all your jacking needs and more, explore our Auto & Truck Service section at zips.com

\n

Shop all Jacks

\n
","postListSummaryFeaturedImage":"https://48463649.fs1.hubspotusercontent-na1.net/hubfs/48463649/header-Aug-04-2025-08-43-52-1469-PM.png","postRssContent":"
\n

Whether you get a flat tire on the road or you want to perform basic car maintenance in your shop, knowing the proper way to jack up a vehicle is vital. This procedure must be done correctly to prevent further damage, injury, or even death. In this guide, we will discuss the different types of jacks and the proper procedure for jacking up your vehicle to avoid catastrophe.

\n

Understanding Your Vehicle Jack

\n

Before discussing specifics, it is important to identify the type of vehicle jack you have. Each type of jack has distinct advantages and disadvantages that influence their use. Regardless of which jack you choose, always consider the weight capacity of the jack in comparison to the weight of the vehicle.

\n

Floor & Trolly Jacks

\n
\n
\n

Floor and trolley jacks are hydraulic jacks operated by a lever mechanism. Although heavier than other types of jacks, their castor wheels provide better mobility. They come in a variety of shapes and sizes to accommodate different vehicle types and are very easy to use, making them a popular choice.

\n

While they're very similar, there are differences between trolley and floor jacks. Trolley jacks tend to be smaller and lift vehicles lower, making them suitable for roadside repairs. Floor jacks, on the other hand, are larger and provide a higher lift, making them used in professional settings more often.

\n Shop all Floor and Trolly Jacks\n
\n
\n
\n
\n  \n
\n

Scissor Jacks

\n
\n
\n

Scissor jacks are mechanical jacks that use two sets of vertical arms contracted by turning a screw. Their simplicity requires minimal maintenance, and the lack of hydraulic components eliminates the risk of leaks. Their compact size allows easy storage in the boot of a car.

\n Shop all Scissor Jacks\n
\n
\n
\n
\n  \n
\n

Bottle Jacks

\n
\n
\n

Bottle jacks, another type of hydraulic jack, operate by forcing pressure from a small-diameter piston to a larger piston chamber when pumped. They are user-friendly and compact for easy storage. However, they typically have a lower weight limit and can be more unstable compared to other jacks.

\n Shop all Bottle Jacks\n
\n
\n
\n
\n  \n
\n

Air Jacks

\n
\n
\n

Air jacks, also known as inflatable jacks, are operated by filling them with air, water or oil. They are extremely quick and require minimal space, making them suitable for confined areas that other jacks may struggle with.

\n Shop all Air Jacks\n
\n
\n
\n
\n  \n
\n

Specialty Jacks

\n
\n
\n

Transmission jacks are designed to lift and lower a vehicle’s transmission from below, featuring a large cradle for easy installation, maintenance or replacement.

\n Shop Transmission Jacks\n
\n
\n

Motorcycle jacks are specifically built for motorcycles.

\n Shop Motorcycle Jacks\n
\n
\n

How to Jack Up a Vehicle

\n

Step 1.

\n

The first step is to ensure you have all necessary equipment ready. A jack and jack stands are essential, but wheel chocks and lifting pads are also important to have on hand. Wheel chocks help secure your vehicle, while lifting pads can prevent damage. Additionally, verify that all equipment is in good working order and that you know the proper weight limits. Do not use a jack or jack stands that cannot handle the weight of your vehicle.

\n

Step 2.

\n

Next, create a safe environment. Ensure that you are on level ground and have a stable surface to prevent the vehicle from moving. Block the wheels with wheel chocks in front of each wheel opposite from the end of the car you will be lifting for additional safety. Then make sure the vehicle is in park and the parking brake is engaged.

\n

Step 3.

\n

Arguably, the most important step in lifting the car is deciding where to jack it up. The right location allows safer access underneath the vehicle and prevents damage. When you find a spot, ensure it is not rusted or damaged. There are various locations on a car that can be used to jack the vehicle up, which differ depending on the make and model. Check your owner’s manual for guidance. If that isn’t available, focus on finding a spot on the frame near the wheel that balances the vehicle to prevent tipping. These lifting areas are reinforced to handle the weight of your vehicle. Check your owner's manual or our towing instructions for guidance.

\n

Once you have positioned the jack, the next step is simple: begin to jack your vehicle. Operate the machinery properly to avoid damage or unnecessary risk.

\n

To further avoid damage, place a lifting pad or block of wood between the jack and the car to spread out the load. This does not work with all jacks, but floor jacks, bottle jacks and scissor jacks can benefit from them. While you can start out jacking a bit faster, slow down as the jack makes contact with the vehicle. Raise the vehicle a little higher than you need, but not so high that it risks tipping over.

\n

Step 4.

\n

Once you’ve lifted the vehicle just above where you need it, place jack stands under the appropriate locations, close to where the jack is positioned as they will hold the vehicle's weight. Adjust the jack stands to the proper height, and slowly lower the jack until the vehicle rests on the stands. Ensure your jack stands can handle the vehicle’s weight.

\n

If you plan on lifting all wheels, lift the vehicle one end at a time. For example, if you lift the front left tire first, lift the right front tire next. This helps keep the vehicle stable.

\n

Once the vehicle is properly lifted, perform a final check to catch any issues before working underneath. Verify that the vehicle is level and all stands are at the same height to ensure they do not slip. Then, gently push the vehicle to ensure it is stable.

\n

When the work is done, re-lift the vehicle using your jack until the weight is off the jack stands. Remove the stands and slowly lower the vehicle back down. The vehicle's shocks will absorb the descent, so don’t worry if it seems too quick. You can then remove the jack. If you lifted all wheels, follow the same pattern you used when raising them.

\n

Conclusion

\n

Knowing how to lift your vehicle and choosing the appropriate jack can prevent excessive damage and ensure your safety. Whether you are dealing with a flat tire on the side of the road or performing routine maintenance in your shop, this guide aims to help you lift your vehicle correctly and safely. For all your jacking needs and more, explore our Auto & Truck Service section at zips.com

\n

Shop all Jacks

\n
","postRssSummaryFeaturedImage":"https://48463649.fs1.hubspotusercontent-na1.net/hubfs/48463649/header-Aug-04-2025-08-43-52-1469-PM.png","postSummary":"
\n

Whether you get a flat tire on the road or you want to perform basic car maintenance in your shop, knowing the proper way to jack up a vehicle is vital. This procedure must be done correctly to prevent further damage, injury, or even death. In this guide, we will discuss the different types of jacks and the proper procedure for jacking up your vehicle to avoid catastrophe.

\n

Understanding Your Vehicle Jack

\n

Before discussing specifics, it is important to identify the type of vehicle jack you have. Each type of jack has distinct advantages and disadvantages that influence their use. Regardless of which jack you choose, always consider the weight capacity of the jack in comparison to the weight of the vehicle.

\n

Floor & Trolly Jacks

\n
\n
\n

Floor and trolley jacks are hydraulic jacks operated by a lever mechanism. Although heavier than other types of jacks, their castor wheels provide better mobility. They come in a variety of shapes and sizes to accommodate different vehicle types and are very easy to use, making them a popular choice.

\n

While they're very similar, there are differences between trolley and floor jacks. Trolley jacks tend to be smaller and lift vehicles lower, making them suitable for roadside repairs. Floor jacks, on the other hand, are larger and provide a higher lift, making them used in professional settings more often.

\nShop all Floor and Trolly Jacks
\n
\"floor-jack\"
\n
\n
 
\n

Scissor Jacks

\n
\n
\n

Scissor jacks are mechanical jacks that use two sets of vertical arms contracted by turning a screw. Their simplicity requires minimal maintenance, and the lack of hydraulic components eliminates the risk of leaks. Their compact size allows easy storage in the boot of a car.

\nShop all Scissor Jacks
\n
\"scissor-jack\"
\n
\n
 
\n

Bottle Jacks

\n
\n
\n

Bottle jacks, another type of hydraulic jack, operate by forcing pressure from a small-diameter piston to a larger piston chamber when pumped. They are user-friendly and compact for easy storage. However, they typically have a lower weight limit and can be more unstable compared to other jacks.

\nShop all Bottle Jacks
\n
\"bottle-jack\"
\n
\n
 
\n

Air Jacks

\n
\n
\n

Air jacks, also known as inflatable jacks, are operated by filling them with air, water or oil. They are extremely quick and require minimal space, making them suitable for confined areas that other jacks may struggle with.

\nShop all Air Jacks
\n
\"air-jack\"
\n
\n
 
\n

Specialty Jacks

\n
\n
\"specialty-jack-1\"\n

Transmission jacks are designed to lift and lower a vehicle’s transmission from below, featuring a large cradle for easy installation, maintenance or replacement.

\nShop Transmission Jacks
\n
\"specialty-jack-2\"\n

Motorcycle jacks are specifically built for motorcycles.

\nShop Motorcycle Jacks
\n
\n

How to Jack Up a Vehicle

\n

Step 1.

\n

The first step is to ensure you have all necessary equipment ready. A jack and jack stands are essential, but wheel chocks and lifting pads are also important to have on hand. Wheel chocks help secure your vehicle, while lifting pads can prevent damage. Additionally, verify that all equipment is in good working order and that you know the proper weight limits. Do not use a jack or jack stands that cannot handle the weight of your vehicle.

\n

Step 2.

\n

Next, create a safe environment. Ensure that you are on level ground and have a stable surface to prevent the vehicle from moving. Block the wheels with wheel chocks in front of each wheel opposite from the end of the car you will be lifting for additional safety. Then make sure the vehicle is in park and the parking brake is engaged.

\n

Step 3.

\n

Arguably, the most important step in lifting the car is deciding where to jack it up. The right location allows safer access underneath the vehicle and prevents damage. When you find a spot, ensure it is not rusted or damaged. There are various locations on a car that can be used to jack the vehicle up, which differ depending on the make and model. Check your owner’s manual for guidance. If that isn’t available, focus on finding a spot on the frame near the wheel that balances the vehicle to prevent tipping. These lifting areas are reinforced to handle the weight of your vehicle. Check your owner's manual or our towing instructions for guidance.

\n

Once you have positioned the jack, the next step is simple: begin to jack your vehicle. Operate the machinery properly to avoid damage or unnecessary risk. \"underneath-vehicle-chassis\"

\n

To further avoid damage, place a lifting pad or block of wood between the jack and the car to spread out the load. This does not work with all jacks, but floor jacks, bottle jacks and scissor jacks can benefit from them. While you can start out jacking a bit faster, slow down as the jack makes contact with the vehicle. Raise the vehicle a little higher than you need, but not so high that it risks tipping over.

\n

Step 4.

\n

Once you’ve lifted the vehicle just above where you need it, place jack stands under the appropriate locations, close to where the jack is positioned as they will hold the vehicle's weight. Adjust the jack stands to the proper height, and slowly lower the jack until the vehicle rests on the stands. Ensure your jack stands can handle the vehicle’s weight.

\n

If you plan on lifting all wheels, lift the vehicle one end at a time. For example, if you lift the front left tire first, lift the right front tire next. This helps keep the vehicle stable.

\n

Once the vehicle is properly lifted, perform a final check to catch any issues before working underneath. Verify that the vehicle is level and all stands are at the same height to ensure they do not slip. Then, gently push the vehicle to ensure it is stable.

\n

When the work is done, re-lift the vehicle using your jack until the weight is off the jack stands. Remove the stands and slowly lower the vehicle back down. The vehicle's shocks will absorb the descent, so don’t worry if it seems too quick. You can then remove the jack. If you lifted all wheels, follow the same pattern you used when raising them.

\n

Conclusion

\n

Knowing how to lift your vehicle and choosing the appropriate jack can prevent excessive damage and ensure your safety. Whether you are dealing with a flat tire on the side of the road or performing routine maintenance in your shop, this guide aims to help you lift your vehicle correctly and safely. For all your jacking needs and more, explore our Auto & Truck Service section at zips.com

\n

Shop all Jacks

\n
","postSummaryRss":"
\n

Whether you get a flat tire on the road or you want to perform basic car maintenance in your shop, knowing the proper way to jack up a vehicle is vital. This procedure must be done correctly to prevent further damage, injury, or even death. In this guide, we will discuss the different types of jacks and the proper procedure for jacking up your vehicle to avoid catastrophe.

\n

Understanding Your Vehicle Jack

\n

Before discussing specifics, it is important to identify the type of vehicle jack you have. Each type of jack has distinct advantages and disadvantages that influence their use. Regardless of which jack you choose, always consider the weight capacity of the jack in comparison to the weight of the vehicle.

\n

Floor & Trolly Jacks

\n
\n
\n

Floor and trolley jacks are hydraulic jacks operated by a lever mechanism. Although heavier than other types of jacks, their castor wheels provide better mobility. They come in a variety of shapes and sizes to accommodate different vehicle types and are very easy to use, making them a popular choice.

\n

While they're very similar, there are differences between trolley and floor jacks. Trolley jacks tend to be smaller and lift vehicles lower, making them suitable for roadside repairs. Floor jacks, on the other hand, are larger and provide a higher lift, making them used in professional settings more often.

\n Shop all Floor and Trolly Jacks\n
\n
\n
\n
\n  \n
\n

Scissor Jacks

\n
\n
\n

Scissor jacks are mechanical jacks that use two sets of vertical arms contracted by turning a screw. Their simplicity requires minimal maintenance, and the lack of hydraulic components eliminates the risk of leaks. Their compact size allows easy storage in the boot of a car.

\n Shop all Scissor Jacks\n
\n
\n
\n
\n  \n
\n

Bottle Jacks

\n
\n
\n

Bottle jacks, another type of hydraulic jack, operate by forcing pressure from a small-diameter piston to a larger piston chamber when pumped. They are user-friendly and compact for easy storage. However, they typically have a lower weight limit and can be more unstable compared to other jacks.

\n Shop all Bottle Jacks\n
\n
\n
\n
\n  \n
\n

Air Jacks

\n
\n
\n

Air jacks, also known as inflatable jacks, are operated by filling them with air, water or oil. They are extremely quick and require minimal space, making them suitable for confined areas that other jacks may struggle with.

\n Shop all Air Jacks\n
\n
\n
\n
\n  \n
\n

Specialty Jacks

\n
\n
\n

Transmission jacks are designed to lift and lower a vehicle’s transmission from below, featuring a large cradle for easy installation, maintenance or replacement.

\n Shop Transmission Jacks\n
\n
\n

Motorcycle jacks are specifically built for motorcycles.

\n Shop Motorcycle Jacks\n
\n
\n

How to Jack Up a Vehicle

\n

Step 1.

\n

The first step is to ensure you have all necessary equipment ready. A jack and jack stands are essential, but wheel chocks and lifting pads are also important to have on hand. Wheel chocks help secure your vehicle, while lifting pads can prevent damage. Additionally, verify that all equipment is in good working order and that you know the proper weight limits. Do not use a jack or jack stands that cannot handle the weight of your vehicle.

\n

Step 2.

\n

Next, create a safe environment. Ensure that you are on level ground and have a stable surface to prevent the vehicle from moving. Block the wheels with wheel chocks in front of each wheel opposite from the end of the car you will be lifting for additional safety. Then make sure the vehicle is in park and the parking brake is engaged.

\n

Step 3.

\n

Arguably, the most important step in lifting the car is deciding where to jack it up. The right location allows safer access underneath the vehicle and prevents damage. When you find a spot, ensure it is not rusted or damaged. There are various locations on a car that can be used to jack the vehicle up, which differ depending on the make and model. Check your owner’s manual for guidance. If that isn’t available, focus on finding a spot on the frame near the wheel that balances the vehicle to prevent tipping. These lifting areas are reinforced to handle the weight of your vehicle. Check your owner's manual or our towing instructions for guidance.

\n

Once you have positioned the jack, the next step is simple: begin to jack your vehicle. Operate the machinery properly to avoid damage or unnecessary risk.

\n

To further avoid damage, place a lifting pad or block of wood between the jack and the car to spread out the load. This does not work with all jacks, but floor jacks, bottle jacks and scissor jacks can benefit from them. While you can start out jacking a bit faster, slow down as the jack makes contact with the vehicle. Raise the vehicle a little higher than you need, but not so high that it risks tipping over.

\n

Step 4.

\n

Once you’ve lifted the vehicle just above where you need it, place jack stands under the appropriate locations, close to where the jack is positioned as they will hold the vehicle's weight. Adjust the jack stands to the proper height, and slowly lower the jack until the vehicle rests on the stands. Ensure your jack stands can handle the vehicle’s weight.

\n

If you plan on lifting all wheels, lift the vehicle one end at a time. For example, if you lift the front left tire first, lift the right front tire next. This helps keep the vehicle stable.

\n

Once the vehicle is properly lifted, perform a final check to catch any issues before working underneath. Verify that the vehicle is level and all stands are at the same height to ensure they do not slip. Then, gently push the vehicle to ensure it is stable.

\n

When the work is done, re-lift the vehicle using your jack until the weight is off the jack stands. Remove the stands and slowly lower the vehicle back down. The vehicle's shocks will absorb the descent, so don’t worry if it seems too quick. You can then remove the jack. If you lifted all wheels, follow the same pattern you used when raising them.

\n

Conclusion

\n

Knowing how to lift your vehicle and choosing the appropriate jack can prevent excessive damage and ensure your safety. Whether you are dealing with a flat tire on the side of the road or performing routine maintenance in your shop, this guide aims to help you lift your vehicle correctly and safely. For all your jacking needs and more, explore our Auto & Truck Service section at zips.com

\n

Shop all Jacks

\n
","postTemplate":"zips-basic-theme/templates/blog-post.html","previewImageSrc":null,"previewKey":"kqvsHPHd","previousPostFeaturedImage":"https://48463649.fs1.hubspotusercontent-na1.net/hubfs/48463649/Blog/guni-1.png","previousPostFeaturedImageAltText":"GUNI products","previousPostName":"Zip's AW Direct Acquires GUNI Products","previousPostSlug":"blog/zips-aw-direct-acquires-guni-products","processingStatus":"PUBLISHED","propertyForDynamicPageCanonicalUrl":null,"propertyForDynamicPageFeaturedImage":null,"propertyForDynamicPageMetaDescription":null,"propertyForDynamicPageSlug":null,"propertyForDynamicPageTitle":null,"publicAccessRules":[],"publicAccessRulesEnabled":false,"publishDate":1732284000000,"publishDateLocalTime":1732284000000,"publishDateLocalized":{"date":1732284000000,"format":"medium","language":null},"publishImmediately":true,"publishTimezoneOffset":null,"publishedAt":1755715388076,"publishedByEmail":null,"publishedById":79766377,"publishedByName":null,"publishedUrl":"/blog/how-to-choose-use-a-vehicle-jack","resolvedDomain":"www.zips.com","resolvedLanguage":null,"rssBody":"
\n

Whether you get a flat tire on the road or you want to perform basic car maintenance in your shop, knowing the proper way to jack up a vehicle is vital. This procedure must be done correctly to prevent further damage, injury, or even death. In this guide, we will discuss the different types of jacks and the proper procedure for jacking up your vehicle to avoid catastrophe.

\n

Understanding Your Vehicle Jack

\n

Before discussing specifics, it is important to identify the type of vehicle jack you have. Each type of jack has distinct advantages and disadvantages that influence their use. Regardless of which jack you choose, always consider the weight capacity of the jack in comparison to the weight of the vehicle.

\n

Floor & Trolly Jacks

\n
\n
\n

Floor and trolley jacks are hydraulic jacks operated by a lever mechanism. Although heavier than other types of jacks, their castor wheels provide better mobility. They come in a variety of shapes and sizes to accommodate different vehicle types and are very easy to use, making them a popular choice.

\n

While they're very similar, there are differences between trolley and floor jacks. Trolley jacks tend to be smaller and lift vehicles lower, making them suitable for roadside repairs. Floor jacks, on the other hand, are larger and provide a higher lift, making them used in professional settings more often.

\nShop all Floor and Trolly Jacks
\n
\"floor-jack\"
\n
\n
 
\n

Scissor Jacks

\n
\n
\n

Scissor jacks are mechanical jacks that use two sets of vertical arms contracted by turning a screw. Their simplicity requires minimal maintenance, and the lack of hydraulic components eliminates the risk of leaks. Their compact size allows easy storage in the boot of a car.

\nShop all Scissor Jacks
\n
\"scissor-jack\"
\n
\n
 
\n

Bottle Jacks

\n
\n
\n

Bottle jacks, another type of hydraulic jack, operate by forcing pressure from a small-diameter piston to a larger piston chamber when pumped. They are user-friendly and compact for easy storage. However, they typically have a lower weight limit and can be more unstable compared to other jacks.

\nShop all Bottle Jacks
\n
\"bottle-jack\"
\n
\n
 
\n

Air Jacks

\n
\n
\n

Air jacks, also known as inflatable jacks, are operated by filling them with air, water or oil. They are extremely quick and require minimal space, making them suitable for confined areas that other jacks may struggle with.

\nShop all Air Jacks
\n
\"air-jack\"
\n
\n
 
\n

Specialty Jacks

\n
\n
\"specialty-jack-1\"\n

Transmission jacks are designed to lift and lower a vehicle’s transmission from below, featuring a large cradle for easy installation, maintenance or replacement.

\nShop Transmission Jacks
\n
\"specialty-jack-2\"\n

Motorcycle jacks are specifically built for motorcycles.

\nShop Motorcycle Jacks
\n
\n

How to Jack Up a Vehicle

\n

Step 1.

\n

The first step is to ensure you have all necessary equipment ready. A jack and jack stands are essential, but wheel chocks and lifting pads are also important to have on hand. Wheel chocks help secure your vehicle, while lifting pads can prevent damage. Additionally, verify that all equipment is in good working order and that you know the proper weight limits. Do not use a jack or jack stands that cannot handle the weight of your vehicle.

\n

Step 2.

\n

Next, create a safe environment. Ensure that you are on level ground and have a stable surface to prevent the vehicle from moving. Block the wheels with wheel chocks in front of each wheel opposite from the end of the car you will be lifting for additional safety. Then make sure the vehicle is in park and the parking brake is engaged.

\n

Step 3.

\n

Arguably, the most important step in lifting the car is deciding where to jack it up. The right location allows safer access underneath the vehicle and prevents damage. When you find a spot, ensure it is not rusted or damaged. There are various locations on a car that can be used to jack the vehicle up, which differ depending on the make and model. Check your owner’s manual for guidance. If that isn’t available, focus on finding a spot on the frame near the wheel that balances the vehicle to prevent tipping. These lifting areas are reinforced to handle the weight of your vehicle. Check your owner's manual or our towing instructions for guidance.

\n

Once you have positioned the jack, the next step is simple: begin to jack your vehicle. Operate the machinery properly to avoid damage or unnecessary risk. \"underneath-vehicle-chassis\"

\n

To further avoid damage, place a lifting pad or block of wood between the jack and the car to spread out the load. This does not work with all jacks, but floor jacks, bottle jacks and scissor jacks can benefit from them. While you can start out jacking a bit faster, slow down as the jack makes contact with the vehicle. Raise the vehicle a little higher than you need, but not so high that it risks tipping over.

\n

Step 4.

\n

Once you’ve lifted the vehicle just above where you need it, place jack stands under the appropriate locations, close to where the jack is positioned as they will hold the vehicle's weight. Adjust the jack stands to the proper height, and slowly lower the jack until the vehicle rests on the stands. Ensure your jack stands can handle the vehicle’s weight.

\n

If you plan on lifting all wheels, lift the vehicle one end at a time. For example, if you lift the front left tire first, lift the right front tire next. This helps keep the vehicle stable.

\n

Once the vehicle is properly lifted, perform a final check to catch any issues before working underneath. Verify that the vehicle is level and all stands are at the same height to ensure they do not slip. Then, gently push the vehicle to ensure it is stable.

\n

When the work is done, re-lift the vehicle using your jack until the weight is off the jack stands. Remove the stands and slowly lower the vehicle back down. The vehicle's shocks will absorb the descent, so don’t worry if it seems too quick. You can then remove the jack. If you lifted all wheels, follow the same pattern you used when raising them.

\n

Conclusion

\n

Knowing how to lift your vehicle and choosing the appropriate jack can prevent excessive damage and ensure your safety. Whether you are dealing with a flat tire on the side of the road or performing routine maintenance in your shop, this guide aims to help you lift your vehicle correctly and safely. For all your jacking needs and more, explore our Auto & Truck Service section at zips.com

\n

Shop all Jacks

\n
","rssSummary":"
\n

Whether you get a flat tire on the road or you want to perform basic car maintenance in your shop, knowing the proper way to jack up a vehicle is vital. This procedure must be done correctly to prevent further damage, injury, or even death. In this guide, we will discuss the different types of jacks and the proper procedure for jacking up your vehicle to avoid catastrophe.

\n

Understanding Your Vehicle Jack

\n

Before discussing specifics, it is important to identify the type of vehicle jack you have. Each type of jack has distinct advantages and disadvantages that influence their use. Regardless of which jack you choose, always consider the weight capacity of the jack in comparison to the weight of the vehicle.

\n

Floor & Trolly Jacks

\n
\n
\n

Floor and trolley jacks are hydraulic jacks operated by a lever mechanism. Although heavier than other types of jacks, their castor wheels provide better mobility. They come in a variety of shapes and sizes to accommodate different vehicle types and are very easy to use, making them a popular choice.

\n

While they're very similar, there are differences between trolley and floor jacks. Trolley jacks tend to be smaller and lift vehicles lower, making them suitable for roadside repairs. Floor jacks, on the other hand, are larger and provide a higher lift, making them used in professional settings more often.

\nShop all Floor and Trolly Jacks
\n
\"floor-jack\"
\n
\n
 
\n

Scissor Jacks

\n
\n
\n

Scissor jacks are mechanical jacks that use two sets of vertical arms contracted by turning a screw. Their simplicity requires minimal maintenance, and the lack of hydraulic components eliminates the risk of leaks. Their compact size allows easy storage in the boot of a car.

\nShop all Scissor Jacks
\n
\"scissor-jack\"
\n
\n
 
\n

Bottle Jacks

\n
\n
\n

Bottle jacks, another type of hydraulic jack, operate by forcing pressure from a small-diameter piston to a larger piston chamber when pumped. They are user-friendly and compact for easy storage. However, they typically have a lower weight limit and can be more unstable compared to other jacks.

\nShop all Bottle Jacks
\n
\"bottle-jack\"
\n
\n
 
\n

Air Jacks

\n
\n
\n

Air jacks, also known as inflatable jacks, are operated by filling them with air, water or oil. They are extremely quick and require minimal space, making them suitable for confined areas that other jacks may struggle with.

\nShop all Air Jacks
\n
\"air-jack\"
\n
\n
 
\n

Specialty Jacks

\n
\n
\"specialty-jack-1\"\n

Transmission jacks are designed to lift and lower a vehicle’s transmission from below, featuring a large cradle for easy installation, maintenance or replacement.

\nShop Transmission Jacks
\n
\"specialty-jack-2\"\n

Motorcycle jacks are specifically built for motorcycles.

\nShop Motorcycle Jacks
\n
\n

How to Jack Up a Vehicle

\n

Step 1.

\n

The first step is to ensure you have all necessary equipment ready. A jack and jack stands are essential, but wheel chocks and lifting pads are also important to have on hand. Wheel chocks help secure your vehicle, while lifting pads can prevent damage. Additionally, verify that all equipment is in good working order and that you know the proper weight limits. Do not use a jack or jack stands that cannot handle the weight of your vehicle.

\n

Step 2.

\n

Next, create a safe environment. Ensure that you are on level ground and have a stable surface to prevent the vehicle from moving. Block the wheels with wheel chocks in front of each wheel opposite from the end of the car you will be lifting for additional safety. Then make sure the vehicle is in park and the parking brake is engaged.

\n

Step 3.

\n

Arguably, the most important step in lifting the car is deciding where to jack it up. The right location allows safer access underneath the vehicle and prevents damage. When you find a spot, ensure it is not rusted or damaged. There are various locations on a car that can be used to jack the vehicle up, which differ depending on the make and model. Check your owner’s manual for guidance. If that isn’t available, focus on finding a spot on the frame near the wheel that balances the vehicle to prevent tipping. These lifting areas are reinforced to handle the weight of your vehicle. Check your owner's manual or our towing instructions for guidance.

\n

Once you have positioned the jack, the next step is simple: begin to jack your vehicle. Operate the machinery properly to avoid damage or unnecessary risk. \"underneath-vehicle-chassis\"

\n

To further avoid damage, place a lifting pad or block of wood between the jack and the car to spread out the load. This does not work with all jacks, but floor jacks, bottle jacks and scissor jacks can benefit from them. While you can start out jacking a bit faster, slow down as the jack makes contact with the vehicle. Raise the vehicle a little higher than you need, but not so high that it risks tipping over.

\n

Step 4.

\n

Once you’ve lifted the vehicle just above where you need it, place jack stands under the appropriate locations, close to where the jack is positioned as they will hold the vehicle's weight. Adjust the jack stands to the proper height, and slowly lower the jack until the vehicle rests on the stands. Ensure your jack stands can handle the vehicle’s weight.

\n

If you plan on lifting all wheels, lift the vehicle one end at a time. For example, if you lift the front left tire first, lift the right front tire next. This helps keep the vehicle stable.

\n

Once the vehicle is properly lifted, perform a final check to catch any issues before working underneath. Verify that the vehicle is level and all stands are at the same height to ensure they do not slip. Then, gently push the vehicle to ensure it is stable.

\n

When the work is done, re-lift the vehicle using your jack until the weight is off the jack stands. Remove the stands and slowly lower the vehicle back down. The vehicle's shocks will absorb the descent, so don’t worry if it seems too quick. You can then remove the jack. If you lifted all wheels, follow the same pattern you used when raising them.

\n

Conclusion

\n

Knowing how to lift your vehicle and choosing the appropriate jack can prevent excessive damage and ensure your safety. Whether you are dealing with a flat tire on the side of the road or performing routine maintenance in your shop, this guide aims to help you lift your vehicle correctly and safely. For all your jacking needs and more, explore our Auto & Truck Service section at zips.com

\n

Shop all Jacks

\n
","rssSummaryFeaturedImage":"https://48463649.fs1.hubspotusercontent-na1.net/hubfs/48463649/header-Aug-04-2025-08-43-52-1469-PM.png","scheduledUpdateDate":0,"screenshotPreviewTakenAt":1770057787265,"screenshotPreviewUrl":"https://cdn1.hubspot.net/hubshotv3/prod/e/0/1869b9aa-4a77-4d4a-98ec-f408b0217add.png","sections":{},"securityState":"NONE","siteId":null,"slug":"blog/how-to-choose-use-a-vehicle-jack","stagedFrom":null,"state":"PUBLISHED","stateWhenDeleted":null,"structuredContentPageType":null,"structuredContentType":null,"styleOverrideId":null,"subcategory":"normal_blog_post","syncedWithBlogRoot":true,"tagIds":[192174528148,192174572389,194719179289,194719586666],"tagList":[{"categoryId":3,"cdnPurgeEmbargoTime":null,"contentIds":[],"cosObjectType":"TAG","created":1751601475164,"deletedAt":0,"description":"","id":192174528148,"label":"Automotive","language":null,"name":"Automotive","portalId":48463649,"slug":"automotive","translatedFromId":null,"translations":{},"updated":1751601475164},{"categoryId":3,"cdnPurgeEmbargoTime":null,"contentIds":[],"cosObjectType":"TAG","created":1751602285235,"deletedAt":0,"description":"","id":192174572389,"label":"Municipalities","language":null,"name":"Municipalities","portalId":48463649,"slug":"municipalities","translatedFromId":null,"translations":{},"updated":1751602285235},{"categoryId":3,"cdnPurgeEmbargoTime":null,"contentIds":[],"cosObjectType":"TAG","created":1755545213046,"deletedAt":0,"description":"","id":194719179289,"label":"Industry Knowledge & Updates","language":null,"name":"Industry Knowledge & Updates","portalId":48463649,"slug":"industry-knowledge-updates","translatedFromId":null,"translations":{},"updated":1755545213046},{"categoryId":3,"cdnPurgeEmbargoTime":null,"contentIds":[],"cosObjectType":"TAG","created":1755545331471,"deletedAt":0,"description":"","id":194719586666,"label":"Product Guides","language":null,"name":"Product Guides","portalId":48463649,"slug":"product-guides","translatedFromId":null,"translations":{},"updated":1755545331471}],"tagNames":["Automotive","Municipalities","Industry Knowledge & Updates","Product Guides"],"teamPerms":[],"templatePath":"","templatePathForRender":"zips-basic-theme/templates/blog-post.html","textToAudioFileId":null,"textToAudioGenerationRequestId":null,"themePath":null,"themeSettingsValues":null,"title":"How To Choose & Use a Vehicle Jack","tmsId":null,"topicIds":[192174528148,192174572389,194719179289,194719586666],"topicList":[{"categoryId":3,"cdnPurgeEmbargoTime":null,"contentIds":[],"cosObjectType":"TAG","created":1751601475164,"deletedAt":0,"description":"","id":192174528148,"label":"Automotive","language":null,"name":"Automotive","portalId":48463649,"slug":"automotive","translatedFromId":null,"translations":{},"updated":1751601475164},{"categoryId":3,"cdnPurgeEmbargoTime":null,"contentIds":[],"cosObjectType":"TAG","created":1751602285235,"deletedAt":0,"description":"","id":192174572389,"label":"Municipalities","language":null,"name":"Municipalities","portalId":48463649,"slug":"municipalities","translatedFromId":null,"translations":{},"updated":1751602285235},{"categoryId":3,"cdnPurgeEmbargoTime":null,"contentIds":[],"cosObjectType":"TAG","created":1755545213046,"deletedAt":0,"description":"","id":194719179289,"label":"Industry Knowledge & Updates","language":null,"name":"Industry Knowledge & Updates","portalId":48463649,"slug":"industry-knowledge-updates","translatedFromId":null,"translations":{},"updated":1755545213046},{"categoryId":3,"cdnPurgeEmbargoTime":null,"contentIds":[],"cosObjectType":"TAG","created":1755545331471,"deletedAt":0,"description":"","id":194719586666,"label":"Product Guides","language":null,"name":"Product Guides","portalId":48463649,"slug":"product-guides","translatedFromId":null,"translations":{},"updated":1755545331471}],"topicNames":["Automotive","Municipalities","Industry Knowledge & Updates","Product Guides"],"topics":[192174528148,192174572389,194719179289,194719586666],"translatedContent":{},"translatedFromId":null,"translations":{},"tweet":null,"tweetAt":null,"tweetImmediately":false,"unpublishedAt":0,"updated":1755715388080,"updatedById":79766377,"upsizeFeaturedImage":false,"url":"/blog/how-to-choose-use-a-vehicle-jack","useFeaturedImage":true,"userPerms":[],"views":null,"visibleToAll":null,"widgetContainers":{},"widgetcontainers":{},"widgets":{}},{"ab":false,"abStatus":null,"abTestId":null,"abVariation":false,"abVariationAutomated":false,"absoluteUrl":"/blog/dolly-inspection-tips","afterPostBody":null,"aifeatures":null,"allowedSlugConflict":false,"analytics":null,"analyticsPageId":"193393223040","analyticsPageType":"blog-post","approvalStatus":null,"archived":false,"archivedAt":0,"archivedInDashboard":false,"areCommentsAllowed":true,"attachedStylesheets":[],"audienceAccess":"PUBLIC","author":null,"authorName":null,"authorUsername":null,"blogAuthor":{"avatar":"","bio":"","cdnPurgeEmbargoTime":null,"cosObjectType":"BLOG_AUTHOR","created":1750825727422,"deletedAt":0,"displayName":"Zip's","email":null,"facebook":"","fullName":"Zip's","gravatarUrl":null,"hasSocialProfiles":false,"id":191785406258,"label":"Zip's","language":"en","linkedin":"","name":"Zip's","portalId":48463649,"slug":"zips","translatedFromId":null,"translations":{},"twitter":"","twitterUsername":"","updated":1750825727422,"userId":null,"username":null,"website":""},"blogAuthorId":191785406258,"blogAuthorIdList":[191785406258],"blogAuthorList":[{"avatar":"","bio":"","cdnPurgeEmbargoTime":null,"cosObjectType":"BLOG_AUTHOR","created":1750825727422,"deletedAt":0,"displayName":"Zip's","email":null,"facebook":"","fullName":"Zip's","gravatarUrl":null,"hasSocialProfiles":false,"id":191785406258,"label":"Zip's","language":"en","linkedin":"","name":"Zip's","portalId":48463649,"slug":"zips","translatedFromId":null,"translations":{},"twitter":"","twitterUsername":"","updated":1750825727422,"userId":null,"username":null,"website":""}],"blogPostAuthor":{"avatar":"","bio":"","cdnPurgeEmbargoTime":null,"cosObjectType":"BLOG_AUTHOR","created":1750825727422,"deletedAt":0,"displayName":"Zip's","email":null,"facebook":"","fullName":"Zip's","gravatarUrl":null,"hasSocialProfiles":false,"id":191785406258,"label":"Zip's","language":"en","linkedin":"","name":"Zip's","portalId":48463649,"slug":"zips","translatedFromId":null,"translations":{},"twitter":"","twitterUsername":"","updated":1750825727422,"userId":null,"username":null,"website":""},"blogPostScheduleTaskUid":null,"blogPublishInstantEmailCampaignId":null,"blogPublishInstantEmailRetryCount":null,"blogPublishInstantEmailTaskUid":null,"blogPublishToSocialMediaTask":"DONE_NOT_SENT","blueprintTypeId":0,"businessUnitId":null,"campaign":null,"campaignName":null,"campaignUtm":null,"category":3,"categoryId":3,"cdnPurgeEmbargoTime":null,"checkPostLevelAudienceAccessFirst":true,"clonedFrom":null,"composeBody":null,"compositionId":0,"contentAccessRuleIds":[],"contentAccessRuleTypes":[],"contentGroup":190096341139,"contentGroupId":190096341139,"contentTypeCategory":3,"contentTypeCategoryId":3,"contentTypeId":null,"created":1753454811696,"createdByAgent":null,"createdById":76755706,"createdTime":1753454811696,"crmObjectId":null,"css":{},"cssText":"","ctaClicks":null,"ctaViews":null,"currentState":"PUBLISHED","currentlyPublished":true,"deletedAt":0,"deletedBy":null,"deletedByEmail":null,"deletedById":null,"domain":"","dynamicPageDataSourceId":null,"dynamicPageDataSourceType":null,"dynamicPageHubDbTableId":null,"enableDomainStylesheets":null,"enableGoogleAmpOutputOverride":false,"enableLayoutStylesheets":null,"errors":[],"featuredImage":"https://48463649.fs1.hubspotusercontent-na1.net/hubfs/48463649/0007033_gojak_6200_1_web.jpg_900.jpg","featuredImageAltText":"","featuredImageHeight":600,"featuredImageLength":0,"featuredImageWidth":900,"flexAreas":{},"folderId":null,"footerHtml":null,"footerTemplatePath":null,"footerVariantName":null,"freezeDate":1723141800000,"generateJsonLdEnabledOverride":true,"globalBlockOverrides":{},"hasContentAccessRules":false,"hasUserChanges":true,"headHtml":"","header":null,"headerTemplatePath":null,"headerVariantName":null,"htmlTitle":"Dolly Inspection Tips","id":193393223040,"includeDefaultCustomCss":null,"isCaptchaRequired":true,"isCrawlableByBots":false,"isDraft":false,"isInstantEmailEnabled":false,"isPublished":true,"isSocialPublishingEnabled":false,"keywords":[],"label":"Dolly Inspection Tips","language":"en","lastEditSessionId":null,"lastEditUpdateId":null,"layoutSections":{},"legacyBlogTabid":null,"legacyId":null,"legacyPostGuid":null,"linkRelCanonicalUrl":"","listTemplate":"","liveDomain":"www.zips.com","mab":false,"mabExperimentId":null,"mabMaster":false,"mabVariant":false,"marketingCampaignGuids":[],"meta":{"html_title":"Dolly Inspection Tips","public_access_rules":[],"public_access_rules_enabled":false,"use_featured_image":true,"tag_ids":[192169769490,192174528148,194719179289,194719586666],"topic_ids":[192169769490,192174528148,194719179289,194719586666],"post_summary":"
\n","post_body":"
\nShop All Dollies","rss_summary":"
\n","rss_body":"
\nShop All Dollies","enable_google_amp_output_override":false,"generate_json_ld_enabled":true,"blog_post_schedule_task_uid":null,"blog_publish_to_social_media_task":"DONE_NOT_SENT","blog_publish_instant_email_task_uid":null,"blog_publish_instant_email_campaign_id":null,"blog_publish_instant_email_retry_count":null,"keywords":[],"composition_id":0,"is_crawlable_by_bots":false,"header":null,"published_at":1755782365291,"head_html":"","footer_html":null,"attached_stylesheets":[],"enable_domain_stylesheets":null,"include_default_custom_css":null,"layout_sections":{},"past_mab_experiment_ids":[],"deleted_by":null,"featured_image_alt_text":"","enable_layout_stylesheets":null,"tweet":null,"tweet_at":null,"campaign_name":null,"campaign_utm":null,"meta_keywords":null,"meta_description":"Dolly Inspection Tips","tweet_immediately":false,"publish_immediately":true,"security_state":"NONE","scheduled_update_date":0,"placement_guids":[],"header_template_path":null,"header_variant_name":null,"footer_template_path":null,"footer_variant_name":null,"global_block_overrides":{},"property_for_dynamic_page_title":null,"property_for_dynamic_page_slug":null,"property_for_dynamic_page_meta_description":null,"property_for_dynamic_page_featured_image":null,"property_for_dynamic_page_canonical_url":null,"preview_image_src":null,"legacy_blog_tabid":null,"legacy_post_guid":null,"performable_variation_letter":null,"style_override_id":null,"has_user_changes":true,"css":{},"css_text":"","unpublished_at":0,"published_by_id":79766377,"allowed_slug_conflict":false,"ai_features":null,"link_rel_canonical_url":"","page_redirected":false,"page_expiry_enabled":null,"page_expiry_date":null,"page_expiry_redirect_id":null,"page_expiry_redirect_url":null,"deleted_by_id":null,"state_when_deleted":null,"cloned_from":null,"staged_from":null,"personas":[],"compose_body":null,"featured_image":"https://48463649.fs1.hubspotusercontent-na1.net/hubfs/48463649/0007033_gojak_6200_1_web.jpg_900.jpg","featured_image_width":900,"featured_image_height":600,"publish_timezone_offset":null,"theme_settings_values":null,"password":null,"last_edit_session_id":null,"last_edit_update_id":null,"created_by_agent":null},"metaDescription":"Dolly Inspection Tips","metaKeywords":null,"name":"Dolly Inspection Tips","nextPostFeaturedImage":"https://48463649.fs1.hubspotusercontent-na1.net/hubfs/48463649/header-Aug-04-2025-08-49-13-9314-PM.png","nextPostFeaturedImageAltText":"","nextPostName":"How to Maintain Your Winch","nextPostSlug":"blog/how-to-maintain-your-winch","pageExpiryDate":null,"pageExpiryEnabled":null,"pageExpiryRedirectId":null,"pageExpiryRedirectUrl":null,"pageRedirected":false,"pageTitle":"Dolly Inspection Tips","parentBlog":{"absoluteUrl":"/blog","allowComments":true,"ampBodyColor":"#404040","ampBodyFont":"'Helvetica Neue', Helvetica, Arial, sans-serif","ampBodyFontSize":"18","ampCustomCss":"","ampHeaderBackgroundColor":"#ffffff","ampHeaderColor":"#1e1e1e","ampHeaderFont":"'Helvetica Neue', Helvetica, Arial, sans-serif","ampHeaderFontSize":"36","ampLinkColor":"#416bb3","ampLogoAlt":"","ampLogoHeight":0,"ampLogoSrc":"","ampLogoWidth":0,"analyticsPageId":190096341139,"attachedStylesheets":[],"audienceAccess":"PUBLIC","businessUnitId":null,"captchaAfterDays":7,"captchaAlways":false,"categoryId":3,"cdnPurgeEmbargoTime":null,"closeCommentsOlder":0,"commentDateFormat":"medium","commentFormGuid":"a4128401-39db-4c54-a62b-88ff335d3a69","commentMaxThreadDepth":1,"commentModeration":false,"commentNotificationEmails":[],"commentShouldCreateContact":false,"commentVerificationText":"","cosObjectType":"BLOG","created":1747163443999,"createdDateTime":1747163443999,"dailyNotificationEmailId":null,"dateFormattingLanguage":null,"defaultGroupStyleId":"","defaultNotificationFromName":"","defaultNotificationReplyTo":"","deletedAt":0,"description":"","domain":"","domainWhenPublished":"www.zips.com","emailApiSubscriptionId":null,"enableGoogleAmpOutput":true,"enableSocialAutoPublishing":false,"generateJsonLdEnabled":true,"header":null,"htmlFooter":"","htmlFooterIsShared":true,"htmlHead":"","htmlHeadIsShared":true,"htmlKeywords":[],"htmlTitle":"blog","id":190096341139,"ilsSubscriptionListsByType":{},"instantNotificationEmailId":null,"itemLayoutId":null,"itemTemplateIsShared":false,"itemTemplatePath":"zips-basic-theme/templates/blog-post.html","label":"blog","language":"en","legacyGuid":null,"legacyModuleId":null,"legacyTabId":null,"listingLayoutId":null,"listingPageId":190096341141,"listingTemplatePath":"","liveDomain":"www.zips.com","monthFilterFormat":"MMMM yyyy","monthlyNotificationEmailId":null,"name":"blog","parentBlogUpdateTaskId":null,"portalId":48463649,"postHtmlFooter":"","postHtmlHead":"","postsPerListingPage":111,"postsPerRssFeed":10,"publicAccessRules":[],"publicAccessRulesEnabled":false,"publicTitle":"blog","publishDateFormat":"medium","resolvedDomain":"www.zips.com","rootUrl":"/blog","rssCustomFeed":null,"rssDescription":null,"rssItemFooter":null,"rssItemHeader":null,"settingsOverrides":{"itemLayoutId":false,"itemTemplatePath":false,"itemTemplateIsShared":false,"listingLayoutId":false,"listingTemplatePath":false,"postsPerListingPage":false,"showSummaryInListing":false,"useFeaturedImageInSummary":false,"htmlHead":false,"postHtmlHead":false,"htmlHeadIsShared":false,"htmlFooter":false,"listingPageHtmlFooter":false,"postHtmlFooter":false,"htmlFooterIsShared":false,"attachedStylesheets":false,"postsPerRssFeed":false,"showSummaryInRss":false,"showSummaryInEmails":false,"showSummariesInEmails":false,"allowComments":false,"commentShouldCreateContact":false,"commentModeration":false,"closeCommentsOlder":false,"commentNotificationEmails":false,"commentMaxThreadDepth":false,"commentVerificationText":false,"socialAccountTwitter":false,"showSocialLinkTwitter":false,"showSocialLinkLinkedin":false,"showSocialLinkFacebook":false,"enableGoogleAmpOutput":false,"ampLogoSrc":false,"ampLogoHeight":false,"ampLogoWidth":false,"ampLogoAlt":false,"ampHeaderFont":false,"ampHeaderFontSize":false,"ampHeaderColor":false,"ampHeaderBackgroundColor":false,"ampBodyFont":false,"ampBodyFontSize":false,"ampBodyColor":false,"ampLinkColor":false,"generateJsonLdEnabled":false},"showSocialLinkFacebook":true,"showSocialLinkLinkedin":true,"showSocialLinkTwitter":true,"showSummaryInEmails":true,"showSummaryInListing":true,"showSummaryInRss":true,"siteId":null,"slug":"blog","socialAccountTwitter":"","state":null,"subscriptionContactsProperty":null,"subscriptionEmailType":null,"subscriptionFormGuid":null,"subscriptionListsByType":{},"title":null,"translatedFromId":null,"translations":{},"updated":1755110916417,"updatedDateTime":1755110916417,"urlBase":"www.zips.com/blog","urlSegments":{"all":"all","archive":"archive","author":"author","page":"page","tag":"tag"},"useFeaturedImageInSummary":true,"usesDefaultTemplate":false,"weeklyNotificationEmailId":null},"password":null,"pastMabExperimentIds":[],"performableGuid":null,"performableVariationLetter":null,"personalizationStrategyId":null,"personalizationVariantStatus":null,"personas":[],"placementGuids":[],"portableKey":null,"portalId":48463649,"position":null,"postBody":"
\nShop All Dollies","postBodyRss":"
\nShop All Dollies","postEmailContent":"
\n
\n
\n \n
\n
\n
","postFeaturedImageIfEnabled":"https://48463649.fs1.hubspotusercontent-na1.net/hubfs/48463649/0007033_gojak_6200_1_web.jpg_900.jpg","postListContent":"
\n
\n
\n \n
\n
\n
","postListSummaryFeaturedImage":"https://48463649.fs1.hubspotusercontent-na1.net/hubfs/48463649/0007033_gojak_6200_1_web.jpg_900.jpg","postRssContent":"
\n
\n
\n \n
\n
\n
","postRssSummaryFeaturedImage":"https://48463649.fs1.hubspotusercontent-na1.net/hubfs/48463649/0007033_gojak_6200_1_web.jpg_900.jpg","postSummary":"
\n","postSummaryRss":"
\n
\n
\n \n
\n
\n
","postTemplate":"zips-basic-theme/templates/blog-post.html","previewImageSrc":null,"previewKey":"GkbVFlSI","previousPostFeaturedImage":"https://48463649.fs1.hubspotusercontent-na1.net/hubfs/48463649/header-Aug-04-2025-08-43-52-1469-PM.png","previousPostFeaturedImageAltText":"","previousPostName":"How To Choose & Use a Vehicle Jack","previousPostSlug":"blog/how-to-choose-use-a-vehicle-jack","processingStatus":"PUBLISHED","propertyForDynamicPageCanonicalUrl":null,"propertyForDynamicPageFeaturedImage":null,"propertyForDynamicPageMetaDescription":null,"propertyForDynamicPageSlug":null,"propertyForDynamicPageTitle":null,"publicAccessRules":[],"publicAccessRulesEnabled":false,"publishDate":1723141800000,"publishDateLocalTime":1723141800000,"publishDateLocalized":{"date":1723141800000,"format":"medium","language":null},"publishImmediately":true,"publishTimezoneOffset":null,"publishedAt":1755782365291,"publishedByEmail":null,"publishedById":79766377,"publishedByName":null,"publishedUrl":"/blog/dolly-inspection-tips","resolvedDomain":"www.zips.com","resolvedLanguage":null,"rssBody":"
\nShop All Dollies","rssSummary":"
\n","rssSummaryFeaturedImage":"https://48463649.fs1.hubspotusercontent-na1.net/hubfs/48463649/0007033_gojak_6200_1_web.jpg_900.jpg","scheduledUpdateDate":0,"screenshotPreviewTakenAt":1770124764320,"screenshotPreviewUrl":"https://cdn1.hubspot.net/hubshotv3/prod/e/0/42cd4cdf-ac88-4a3b-a833-3e37ecd20658.png","sections":{},"securityState":"NONE","siteId":null,"slug":"blog/dolly-inspection-tips","stagedFrom":null,"state":"PUBLISHED","stateWhenDeleted":null,"structuredContentPageType":null,"structuredContentType":null,"styleOverrideId":null,"subcategory":"normal_blog_post","syncedWithBlogRoot":true,"tagIds":[192169769490,192174528148,194719179289,194719586666],"tagList":[{"categoryId":3,"cdnPurgeEmbargoTime":null,"contentIds":[],"cosObjectType":"TAG","created":1751598346713,"deletedAt":0,"description":"","id":192169769490,"label":"Towing & Recovery","language":null,"name":"Towing & Recovery","portalId":48463649,"slug":"towing-recovery","translatedFromId":null,"translations":{},"updated":1751598346713},{"categoryId":3,"cdnPurgeEmbargoTime":null,"contentIds":[],"cosObjectType":"TAG","created":1751601475164,"deletedAt":0,"description":"","id":192174528148,"label":"Automotive","language":null,"name":"Automotive","portalId":48463649,"slug":"automotive","translatedFromId":null,"translations":{},"updated":1751601475164},{"categoryId":3,"cdnPurgeEmbargoTime":null,"contentIds":[],"cosObjectType":"TAG","created":1755545213046,"deletedAt":0,"description":"","id":194719179289,"label":"Industry Knowledge & Updates","language":null,"name":"Industry Knowledge & Updates","portalId":48463649,"slug":"industry-knowledge-updates","translatedFromId":null,"translations":{},"updated":1755545213046},{"categoryId":3,"cdnPurgeEmbargoTime":null,"contentIds":[],"cosObjectType":"TAG","created":1755545331471,"deletedAt":0,"description":"","id":194719586666,"label":"Product Guides","language":null,"name":"Product Guides","portalId":48463649,"slug":"product-guides","translatedFromId":null,"translations":{},"updated":1755545331471}],"tagNames":["Towing & Recovery","Automotive","Industry Knowledge & Updates","Product Guides"],"teamPerms":[],"templatePath":"","templatePathForRender":"zips-basic-theme/templates/blog-post.html","textToAudioFileId":null,"textToAudioGenerationRequestId":null,"themePath":null,"themeSettingsValues":null,"title":"Dolly Inspection Tips","tmsId":null,"topicIds":[192169769490,192174528148,194719179289,194719586666],"topicList":[{"categoryId":3,"cdnPurgeEmbargoTime":null,"contentIds":[],"cosObjectType":"TAG","created":1751598346713,"deletedAt":0,"description":"","id":192169769490,"label":"Towing & Recovery","language":null,"name":"Towing & Recovery","portalId":48463649,"slug":"towing-recovery","translatedFromId":null,"translations":{},"updated":1751598346713},{"categoryId":3,"cdnPurgeEmbargoTime":null,"contentIds":[],"cosObjectType":"TAG","created":1751601475164,"deletedAt":0,"description":"","id":192174528148,"label":"Automotive","language":null,"name":"Automotive","portalId":48463649,"slug":"automotive","translatedFromId":null,"translations":{},"updated":1751601475164},{"categoryId":3,"cdnPurgeEmbargoTime":null,"contentIds":[],"cosObjectType":"TAG","created":1755545213046,"deletedAt":0,"description":"","id":194719179289,"label":"Industry Knowledge & Updates","language":null,"name":"Industry Knowledge & Updates","portalId":48463649,"slug":"industry-knowledge-updates","translatedFromId":null,"translations":{},"updated":1755545213046},{"categoryId":3,"cdnPurgeEmbargoTime":null,"contentIds":[],"cosObjectType":"TAG","created":1755545331471,"deletedAt":0,"description":"","id":194719586666,"label":"Product Guides","language":null,"name":"Product Guides","portalId":48463649,"slug":"product-guides","translatedFromId":null,"translations":{},"updated":1755545331471}],"topicNames":["Towing & Recovery","Automotive","Industry Knowledge & Updates","Product Guides"],"topics":[192169769490,192174528148,194719179289,194719586666],"translatedContent":{},"translatedFromId":null,"translations":{},"tweet":null,"tweetAt":null,"tweetImmediately":false,"unpublishedAt":0,"updated":1755782365295,"updatedById":79766377,"upsizeFeaturedImage":false,"url":"/blog/dolly-inspection-tips","useFeaturedImage":true,"userPerms":[],"views":null,"visibleToAll":null,"widgetContainers":{},"widgetcontainers":{},"widgets":{}},{"ab":false,"abStatus":null,"abTestId":null,"abVariation":false,"abVariationAutomated":false,"absoluteUrl":"/blog/how-to-maintain-your-winch","afterPostBody":null,"aifeatures":null,"allowedSlugConflict":false,"analytics":null,"analyticsPageId":"192174304873","analyticsPageType":"blog-post","approvalStatus":null,"archived":false,"archivedAt":0,"archivedInDashboard":false,"areCommentsAllowed":true,"attachedStylesheets":[],"audienceAccess":"PUBLIC","author":null,"authorName":null,"authorUsername":null,"blogAuthor":{"avatar":"","bio":"","cdnPurgeEmbargoTime":null,"cosObjectType":"BLOG_AUTHOR","created":1755530565784,"deletedAt":0,"displayName":"Tyler Nestvedt","email":null,"facebook":"","fullName":"Tyler Nestvedt","gravatarUrl":null,"hasSocialProfiles":false,"id":194707404365,"label":"Tyler Nestvedt","language":"en","linkedin":"","name":"Tyler Nestvedt","portalId":48463649,"slug":"tyler-nestvedt","translatedFromId":null,"translations":{},"twitter":"","twitterUsername":"","updated":1755530565784,"userId":null,"username":null,"website":""},"blogAuthorId":194707404365,"blogAuthorIdList":[194707404365],"blogAuthorList":[{"avatar":"","bio":"","cdnPurgeEmbargoTime":null,"cosObjectType":"BLOG_AUTHOR","created":1755530565784,"deletedAt":0,"displayName":"Tyler Nestvedt","email":null,"facebook":"","fullName":"Tyler Nestvedt","gravatarUrl":null,"hasSocialProfiles":false,"id":194707404365,"label":"Tyler Nestvedt","language":"en","linkedin":"","name":"Tyler Nestvedt","portalId":48463649,"slug":"tyler-nestvedt","translatedFromId":null,"translations":{},"twitter":"","twitterUsername":"","updated":1755530565784,"userId":null,"username":null,"website":""}],"blogPostAuthor":{"avatar":"","bio":"","cdnPurgeEmbargoTime":null,"cosObjectType":"BLOG_AUTHOR","created":1755530565784,"deletedAt":0,"displayName":"Tyler Nestvedt","email":null,"facebook":"","fullName":"Tyler Nestvedt","gravatarUrl":null,"hasSocialProfiles":false,"id":194707404365,"label":"Tyler Nestvedt","language":"en","linkedin":"","name":"Tyler Nestvedt","portalId":48463649,"slug":"tyler-nestvedt","translatedFromId":null,"translations":{},"twitter":"","twitterUsername":"","updated":1755530565784,"userId":null,"username":null,"website":""},"blogPostScheduleTaskUid":null,"blogPublishInstantEmailCampaignId":null,"blogPublishInstantEmailRetryCount":null,"blogPublishInstantEmailTaskUid":null,"blogPublishToSocialMediaTask":"DONE_NOT_SENT","blueprintTypeId":0,"businessUnitId":null,"campaign":null,"campaignName":null,"campaignUtm":null,"category":3,"categoryId":3,"cdnPurgeEmbargoTime":null,"checkPostLevelAudienceAccessFirst":true,"clonedFrom":null,"composeBody":null,"compositionId":0,"contentAccessRuleIds":[],"contentAccessRuleTypes":[],"contentGroup":190096341139,"contentGroupId":190096341139,"contentTypeCategory":3,"contentTypeCategoryId":3,"contentTypeId":null,"created":1751601531764,"createdByAgent":null,"createdById":74657203,"createdTime":1751601531764,"crmObjectId":null,"css":{},"cssText":"","ctaClicks":null,"ctaViews":null,"currentState":"PUBLISHED","currentlyPublished":true,"deletedAt":0,"deletedBy":null,"deletedByEmail":null,"deletedById":null,"domain":"","dynamicPageDataSourceId":null,"dynamicPageDataSourceType":null,"dynamicPageHubDbTableId":null,"enableDomainStylesheets":null,"enableGoogleAmpOutputOverride":false,"enableLayoutStylesheets":null,"errors":[],"featuredImage":"https://48463649.fs1.hubspotusercontent-na1.net/hubfs/48463649/header-Aug-04-2025-08-49-13-9314-PM.png","featuredImageAltText":"","featuredImageHeight":1475,"featuredImageLength":0,"featuredImageWidth":3621,"flexAreas":{},"folderId":null,"footerHtml":null,"footerTemplatePath":null,"footerVariantName":null,"freezeDate":1719234000000,"generateJsonLdEnabledOverride":true,"globalBlockOverrides":{},"hasContentAccessRules":false,"hasUserChanges":true,"headHtml":null,"header":null,"headerTemplatePath":null,"headerVariantName":null,"htmlTitle":"How to Maintain Your Winch","id":192174304873,"includeDefaultCustomCss":null,"isCaptchaRequired":true,"isCrawlableByBots":false,"isDraft":false,"isInstantEmailEnabled":false,"isPublished":true,"isSocialPublishingEnabled":false,"keywords":[],"label":"How to Maintain Your Winch","language":"en","lastEditSessionId":null,"lastEditUpdateId":null,"layoutSections":{},"legacyBlogTabid":null,"legacyId":null,"legacyPostGuid":null,"linkRelCanonicalUrl":"","listTemplate":"","liveDomain":"www.zips.com","mab":false,"mabExperimentId":null,"mabMaster":false,"mabVariant":false,"marketingCampaignGuids":[],"meta":{"html_title":"How to Maintain Your Winch","public_access_rules":[],"public_access_rules_enabled":false,"use_featured_image":true,"tag_ids":[192169769490,192174528148,192174529697,194719179289,194719586666],"topic_ids":[192169769490,192174528148,192174529697,194719179289,194719586666],"post_summary":"
\n

Proper care can save your equipment and save you money. With the right maintenance, you can ensure your gear lasts longer, reducing your need to purchase new equipment. We’re here to help teach you how to do exactly that. In today’s blog, we’re looking at how to take care of your winches. We’ll start with a step-by-step guide on what to look at and what you should do before moving on to how often you should go about performing this routine maintenance.

\n

What you need to check:

\n

The first step in maintaining your winch is simple: know how to use it. By reading your owner’s manual, you can learn the ins and outs of your specific winch. This understanding lets you use it the way it was intended to be used. Winches differ from brand to brand and model to model, so knowing what it’s capable of, the proper procedure to use it and the care your specific winch needs will extend its lifespan.

\n

Next, you need to check the fasteners to make sure they are tight and have the proper torque. By ensuring they are tight and ready to use, you can significantly lower the chances of a failure while it’s in use. While you’re at it, be sure to check your mounting bolts to ensure they stay secure. Making sure the winch base is secured is just as important. Of course, if there are any damaged fasteners or mounting bolts, replace them before using the winch.

\n

Third, check the wiring. Be sure to verify that all wiring is correct and that the connections are tight. Check for exposed or bare wires or terminals while also checking for cable insulation damage. If you find any, make sure to cover exposures with terminal boots and repair or replace all damaged electrical cables. This helps prevent electrical issues from faulty wiring. If the winch is hydraulic, check the hoses and connections for cracks and leaks. Ensure that both your hydraulic and electrical connections are secure.

\n\n
\n
\n

Fourth, be sure to check the winch line for damage. We go into more detail in this blog, but to summarize: be sure that your winch ropes are not creased, worn down or damaged in any way. Replace them if they are. Additionally, you'll want to lubricate your wire ropes with winch lubricant to help prevent wear and corrosion. Be sure to store them in the proper conditions and use a tensioner guide to avoid line damage from birdnesting. See photos at right.

\n

Finally, you want to ensure that the gears fully re-engage when taking the winch out of free spool. It is best once the free spool locks in to run it out and then back in to ensure proper engagement. If they don’t fully re-engage, there is a risk that they could let go, causing whatever load you have on the wire rope to be released. This leads to more damage and danger that can easily be avoided.

\n

How often:

\n

Ideally, you should be inspecting your winch before and after each use. However, if you are not using your winch every day, it is a good idea to go through the list above every 90 days. This helps keep the winch in top condition, even when you don’t need it.

\n
\n
\"before\" \"after\"
\n
\n

In conclusion:

\n

Performing basic maintenance is an easy way to keep your equipment in top shape. This helps it stay working for as long as possible while also preventing unnecessary damage and costs. Hopefully, this guide helps keep your winch in great condition.

\n
","post_body":"
\n

Proper care can save your equipment and save you money. With the right maintenance, you can ensure your gear lasts longer, reducing your need to purchase new equipment. We’re here to help teach you how to do exactly that. In today’s blog, we’re looking at how to take care of your winches. We’ll start with a step-by-step guide on what to look at and what you should do before moving on to how often you should go about performing this routine maintenance.

\n

What you need to check:

\n

The first step in maintaining your winch is simple: know how to use it. By reading your owner’s manual, you can learn the ins and outs of your specific winch. This understanding lets you use it the way it was intended to be used. Winches differ from brand to brand and model to model, so knowing what it’s capable of, the proper procedure to use it and the care your specific winch needs will extend its lifespan.

\n

Next, you need to check the fasteners to make sure they are tight and have the proper torque. By ensuring they are tight and ready to use, you can significantly lower the chances of a failure while it’s in use. While you’re at it, be sure to check your mounting bolts to ensure they stay secure. Making sure the winch base is secured is just as important. Of course, if there are any damaged fasteners or mounting bolts, replace them before using the winch.

\n

Third, check the wiring. Be sure to verify that all wiring is correct and that the connections are tight. Check for exposed or bare wires or terminals while also checking for cable insulation damage. If you find any, make sure to cover exposures with terminal boots and repair or replace all damaged electrical cables. This helps prevent electrical issues from faulty wiring. If the winch is hydraulic, check the hoses and connections for cracks and leaks. Ensure that both your hydraulic and electrical connections are secure.

\n\n
\n
\n

Fourth, be sure to check the winch line for damage. We go into more detail in this blog, but to summarize: be sure that your winch ropes are not creased, worn down or damaged in any way. Replace them if they are. Additionally, you'll want to lubricate your wire ropes with winch lubricant to help prevent wear and corrosion. Be sure to store them in the proper conditions and use a tensioner guide to avoid line damage from birdnesting. See photos at right.

\n

Finally, you want to ensure that the gears fully re-engage when taking the winch out of free spool. It is best once the free spool locks in to run it out and then back in to ensure proper engagement. If they don’t fully re-engage, there is a risk that they could let go, causing whatever load you have on the wire rope to be released. This leads to more damage and danger that can easily be avoided.

\n

How often:

\n

Ideally, you should be inspecting your winch before and after each use. However, if you are not using your winch every day, it is a good idea to go through the list above every 90 days. This helps keep the winch in top condition, even when you don’t need it.

\n
\n
\"before\" \"after\"
\n
\n

In conclusion:

\n

Performing basic maintenance is an easy way to keep your equipment in top shape. This helps it stay working for as long as possible while also preventing unnecessary damage and costs. Hopefully, this guide helps keep your winch in great condition.

\n
","rss_summary":"
\n

Proper care can save your equipment and save you money. With the right maintenance, you can ensure your gear lasts longer, reducing your need to purchase new equipment. We’re here to help teach you how to do exactly that. In today’s blog, we’re looking at how to take care of your winches. We’ll start with a step-by-step guide on what to look at and what you should do before moving on to how often you should go about performing this routine maintenance.

\n

What you need to check:

\n

The first step in maintaining your winch is simple: know how to use it. By reading your owner’s manual, you can learn the ins and outs of your specific winch. This understanding lets you use it the way it was intended to be used. Winches differ from brand to brand and model to model, so knowing what it’s capable of, the proper procedure to use it and the care your specific winch needs will extend its lifespan.

\n

Next, you need to check the fasteners to make sure they are tight and have the proper torque. By ensuring they are tight and ready to use, you can significantly lower the chances of a failure while it’s in use. While you’re at it, be sure to check your mounting bolts to ensure they stay secure. Making sure the winch base is secured is just as important. Of course, if there are any damaged fasteners or mounting bolts, replace them before using the winch.

\n

Third, check the wiring. Be sure to verify that all wiring is correct and that the connections are tight. Check for exposed or bare wires or terminals while also checking for cable insulation damage. If you find any, make sure to cover exposures with terminal boots and repair or replace all damaged electrical cables. This helps prevent electrical issues from faulty wiring. If the winch is hydraulic, check the hoses and connections for cracks and leaks. Ensure that both your hydraulic and electrical connections are secure.

\n\n
\n
\n

Fourth, be sure to check the winch line for damage. We go into more detail in this blog, but to summarize: be sure that your winch ropes are not creased, worn down or damaged in any way. Replace them if they are. Additionally, you'll want to lubricate your wire ropes with winch lubricant to help prevent wear and corrosion. Be sure to store them in the proper conditions and use a tensioner guide to avoid line damage from birdnesting. See photos at right.

\n

Finally, you want to ensure that the gears fully re-engage when taking the winch out of free spool. It is best once the free spool locks in to run it out and then back in to ensure proper engagement. If they don’t fully re-engage, there is a risk that they could let go, causing whatever load you have on the wire rope to be released. This leads to more damage and danger that can easily be avoided.

\n

How often:

\n

Ideally, you should be inspecting your winch before and after each use. However, if you are not using your winch every day, it is a good idea to go through the list above every 90 days. This helps keep the winch in top condition, even when you don’t need it.

\n
\n
\"before\" \"after\"
\n
\n

In conclusion:

\n

Performing basic maintenance is an easy way to keep your equipment in top shape. This helps it stay working for as long as possible while also preventing unnecessary damage and costs. Hopefully, this guide helps keep your winch in great condition.

\n
","rss_body":"
\n

Proper care can save your equipment and save you money. With the right maintenance, you can ensure your gear lasts longer, reducing your need to purchase new equipment. We’re here to help teach you how to do exactly that. In today’s blog, we’re looking at how to take care of your winches. We’ll start with a step-by-step guide on what to look at and what you should do before moving on to how often you should go about performing this routine maintenance.

\n

What you need to check:

\n

The first step in maintaining your winch is simple: know how to use it. By reading your owner’s manual, you can learn the ins and outs of your specific winch. This understanding lets you use it the way it was intended to be used. Winches differ from brand to brand and model to model, so knowing what it’s capable of, the proper procedure to use it and the care your specific winch needs will extend its lifespan.

\n

Next, you need to check the fasteners to make sure they are tight and have the proper torque. By ensuring they are tight and ready to use, you can significantly lower the chances of a failure while it’s in use. While you’re at it, be sure to check your mounting bolts to ensure they stay secure. Making sure the winch base is secured is just as important. Of course, if there are any damaged fasteners or mounting bolts, replace them before using the winch.

\n

Third, check the wiring. Be sure to verify that all wiring is correct and that the connections are tight. Check for exposed or bare wires or terminals while also checking for cable insulation damage. If you find any, make sure to cover exposures with terminal boots and repair or replace all damaged electrical cables. This helps prevent electrical issues from faulty wiring. If the winch is hydraulic, check the hoses and connections for cracks and leaks. Ensure that both your hydraulic and electrical connections are secure.

\n\n
\n
\n

Fourth, be sure to check the winch line for damage. We go into more detail in this blog, but to summarize: be sure that your winch ropes are not creased, worn down or damaged in any way. Replace them if they are. Additionally, you'll want to lubricate your wire ropes with winch lubricant to help prevent wear and corrosion. Be sure to store them in the proper conditions and use a tensioner guide to avoid line damage from birdnesting. See photos at right.

\n

Finally, you want to ensure that the gears fully re-engage when taking the winch out of free spool. It is best once the free spool locks in to run it out and then back in to ensure proper engagement. If they don’t fully re-engage, there is a risk that they could let go, causing whatever load you have on the wire rope to be released. This leads to more damage and danger that can easily be avoided.

\n

How often:

\n

Ideally, you should be inspecting your winch before and after each use. However, if you are not using your winch every day, it is a good idea to go through the list above every 90 days. This helps keep the winch in top condition, even when you don’t need it.

\n
\n
\"before\" \"after\"
\n
\n

In conclusion:

\n

Performing basic maintenance is an easy way to keep your equipment in top shape. This helps it stay working for as long as possible while also preventing unnecessary damage and costs. Hopefully, this guide helps keep your winch in great condition.

\n
","enable_google_amp_output_override":false,"generate_json_ld_enabled":true,"blog_post_schedule_task_uid":null,"blog_publish_to_social_media_task":"DONE_NOT_SENT","blog_publish_instant_email_task_uid":null,"blog_publish_instant_email_campaign_id":null,"blog_publish_instant_email_retry_count":null,"keywords":[],"composition_id":0,"is_crawlable_by_bots":false,"header":null,"published_at":1756480109699,"head_html":null,"footer_html":null,"attached_stylesheets":[],"enable_domain_stylesheets":null,"include_default_custom_css":null,"layout_sections":{},"past_mab_experiment_ids":[],"deleted_by":null,"featured_image_alt_text":"","enable_layout_stylesheets":null,"tweet":null,"tweet_at":null,"campaign_name":null,"campaign_utm":null,"meta_keywords":null,"meta_description":"Learn step-by-step how to inspect and care for your winches to keep them in top condition, prevent failures, and extend their lifespan. Discover what to check, how often, and simple maintenance tips.","tweet_immediately":false,"publish_immediately":true,"security_state":"NONE","scheduled_update_date":0,"placement_guids":[],"header_template_path":null,"header_variant_name":null,"footer_template_path":null,"footer_variant_name":null,"global_block_overrides":{},"property_for_dynamic_page_title":null,"property_for_dynamic_page_slug":null,"property_for_dynamic_page_meta_description":null,"property_for_dynamic_page_featured_image":null,"property_for_dynamic_page_canonical_url":null,"preview_image_src":null,"legacy_blog_tabid":null,"legacy_post_guid":null,"performable_variation_letter":null,"style_override_id":null,"has_user_changes":true,"css":{},"css_text":"","unpublished_at":0,"published_by_id":82246321,"allowed_slug_conflict":false,"ai_features":null,"link_rel_canonical_url":"","page_redirected":false,"page_expiry_enabled":null,"page_expiry_date":null,"page_expiry_redirect_id":null,"page_expiry_redirect_url":null,"deleted_by_id":null,"state_when_deleted":null,"cloned_from":null,"staged_from":null,"personas":[],"compose_body":null,"featured_image":"https://48463649.fs1.hubspotusercontent-na1.net/hubfs/48463649/header-Aug-04-2025-08-49-13-9314-PM.png","featured_image_width":3621,"featured_image_height":1475,"publish_timezone_offset":null,"theme_settings_values":null,"password":null,"last_edit_session_id":null,"last_edit_update_id":null,"created_by_agent":null},"metaDescription":"Learn step-by-step how to inspect and care for your winches to keep them in top condition, prevent failures, and extend their lifespan. Discover what to check, how often, and simple maintenance tips.","metaKeywords":null,"name":"How to Maintain Your Winch","nextPostFeaturedImage":"https://48463649.fs1.hubspotusercontent-na1.net/hubfs/48463649/Blog/header-1200x500.jpg","nextPostFeaturedImageAltText":"","nextPostName":"How to Fix or Change a Tire","nextPostSlug":"blog/how-to-fix-or-change-a-tire","pageExpiryDate":null,"pageExpiryEnabled":null,"pageExpiryRedirectId":null,"pageExpiryRedirectUrl":null,"pageRedirected":false,"pageTitle":"How to Maintain Your Winch","parentBlog":{"absoluteUrl":"/blog","allowComments":true,"ampBodyColor":"#404040","ampBodyFont":"'Helvetica Neue', Helvetica, Arial, sans-serif","ampBodyFontSize":"18","ampCustomCss":"","ampHeaderBackgroundColor":"#ffffff","ampHeaderColor":"#1e1e1e","ampHeaderFont":"'Helvetica Neue', Helvetica, Arial, sans-serif","ampHeaderFontSize":"36","ampLinkColor":"#416bb3","ampLogoAlt":"","ampLogoHeight":0,"ampLogoSrc":"","ampLogoWidth":0,"analyticsPageId":190096341139,"attachedStylesheets":[],"audienceAccess":"PUBLIC","businessUnitId":null,"captchaAfterDays":7,"captchaAlways":false,"categoryId":3,"cdnPurgeEmbargoTime":null,"closeCommentsOlder":0,"commentDateFormat":"medium","commentFormGuid":"a4128401-39db-4c54-a62b-88ff335d3a69","commentMaxThreadDepth":1,"commentModeration":false,"commentNotificationEmails":[],"commentShouldCreateContact":false,"commentVerificationText":"","cosObjectType":"BLOG","created":1747163443999,"createdDateTime":1747163443999,"dailyNotificationEmailId":null,"dateFormattingLanguage":null,"defaultGroupStyleId":"","defaultNotificationFromName":"","defaultNotificationReplyTo":"","deletedAt":0,"description":"","domain":"","domainWhenPublished":"www.zips.com","emailApiSubscriptionId":null,"enableGoogleAmpOutput":true,"enableSocialAutoPublishing":false,"generateJsonLdEnabled":true,"header":null,"htmlFooter":"","htmlFooterIsShared":true,"htmlHead":"","htmlHeadIsShared":true,"htmlKeywords":[],"htmlTitle":"blog","id":190096341139,"ilsSubscriptionListsByType":{},"instantNotificationEmailId":null,"itemLayoutId":null,"itemTemplateIsShared":false,"itemTemplatePath":"zips-basic-theme/templates/blog-post.html","label":"blog","language":"en","legacyGuid":null,"legacyModuleId":null,"legacyTabId":null,"listingLayoutId":null,"listingPageId":190096341141,"listingTemplatePath":"","liveDomain":"www.zips.com","monthFilterFormat":"MMMM yyyy","monthlyNotificationEmailId":null,"name":"blog","parentBlogUpdateTaskId":null,"portalId":48463649,"postHtmlFooter":"","postHtmlHead":"","postsPerListingPage":111,"postsPerRssFeed":10,"publicAccessRules":[],"publicAccessRulesEnabled":false,"publicTitle":"blog","publishDateFormat":"medium","resolvedDomain":"www.zips.com","rootUrl":"/blog","rssCustomFeed":null,"rssDescription":null,"rssItemFooter":null,"rssItemHeader":null,"settingsOverrides":{"itemLayoutId":false,"itemTemplatePath":false,"itemTemplateIsShared":false,"listingLayoutId":false,"listingTemplatePath":false,"postsPerListingPage":false,"showSummaryInListing":false,"useFeaturedImageInSummary":false,"htmlHead":false,"postHtmlHead":false,"htmlHeadIsShared":false,"htmlFooter":false,"listingPageHtmlFooter":false,"postHtmlFooter":false,"htmlFooterIsShared":false,"attachedStylesheets":false,"postsPerRssFeed":false,"showSummaryInRss":false,"showSummaryInEmails":false,"showSummariesInEmails":false,"allowComments":false,"commentShouldCreateContact":false,"commentModeration":false,"closeCommentsOlder":false,"commentNotificationEmails":false,"commentMaxThreadDepth":false,"commentVerificationText":false,"socialAccountTwitter":false,"showSocialLinkTwitter":false,"showSocialLinkLinkedin":false,"showSocialLinkFacebook":false,"enableGoogleAmpOutput":false,"ampLogoSrc":false,"ampLogoHeight":false,"ampLogoWidth":false,"ampLogoAlt":false,"ampHeaderFont":false,"ampHeaderFontSize":false,"ampHeaderColor":false,"ampHeaderBackgroundColor":false,"ampBodyFont":false,"ampBodyFontSize":false,"ampBodyColor":false,"ampLinkColor":false,"generateJsonLdEnabled":false},"showSocialLinkFacebook":true,"showSocialLinkLinkedin":true,"showSocialLinkTwitter":true,"showSummaryInEmails":true,"showSummaryInListing":true,"showSummaryInRss":true,"siteId":null,"slug":"blog","socialAccountTwitter":"","state":null,"subscriptionContactsProperty":null,"subscriptionEmailType":null,"subscriptionFormGuid":null,"subscriptionListsByType":{},"title":null,"translatedFromId":null,"translations":{},"updated":1755110916417,"updatedDateTime":1755110916417,"urlBase":"www.zips.com/blog","urlSegments":{"all":"all","archive":"archive","author":"author","page":"page","tag":"tag"},"useFeaturedImageInSummary":true,"usesDefaultTemplate":false,"weeklyNotificationEmailId":null},"password":null,"pastMabExperimentIds":[],"performableGuid":null,"performableVariationLetter":null,"personalizationStrategyId":null,"personalizationVariantStatus":null,"personas":[],"placementGuids":[],"portableKey":null,"portalId":48463649,"position":null,"postBody":"
\n

Proper care can save your equipment and save you money. With the right maintenance, you can ensure your gear lasts longer, reducing your need to purchase new equipment. We’re here to help teach you how to do exactly that. In today’s blog, we’re looking at how to take care of your winches. We’ll start with a step-by-step guide on what to look at and what you should do before moving on to how often you should go about performing this routine maintenance.

\n

What you need to check:

\n

The first step in maintaining your winch is simple: know how to use it. By reading your owner’s manual, you can learn the ins and outs of your specific winch. This understanding lets you use it the way it was intended to be used. Winches differ from brand to brand and model to model, so knowing what it’s capable of, the proper procedure to use it and the care your specific winch needs will extend its lifespan.

\n

Next, you need to check the fasteners to make sure they are tight and have the proper torque. By ensuring they are tight and ready to use, you can significantly lower the chances of a failure while it’s in use. While you’re at it, be sure to check your mounting bolts to ensure they stay secure. Making sure the winch base is secured is just as important. Of course, if there are any damaged fasteners or mounting bolts, replace them before using the winch.

\n

Third, check the wiring. Be sure to verify that all wiring is correct and that the connections are tight. Check for exposed or bare wires or terminals while also checking for cable insulation damage. If you find any, make sure to cover exposures with terminal boots and repair or replace all damaged electrical cables. This helps prevent electrical issues from faulty wiring. If the winch is hydraulic, check the hoses and connections for cracks and leaks. Ensure that both your hydraulic and electrical connections are secure.

\n\n
\n
\n

Fourth, be sure to check the winch line for damage. We go into more detail in this blog, but to summarize: be sure that your winch ropes are not creased, worn down or damaged in any way. Replace them if they are. Additionally, you'll want to lubricate your wire ropes with winch lubricant to help prevent wear and corrosion. Be sure to store them in the proper conditions and use a tensioner guide to avoid line damage from birdnesting. See photos at right.

\n

Finally, you want to ensure that the gears fully re-engage when taking the winch out of free spool. It is best once the free spool locks in to run it out and then back in to ensure proper engagement. If they don’t fully re-engage, there is a risk that they could let go, causing whatever load you have on the wire rope to be released. This leads to more damage and danger that can easily be avoided.

\n

How often:

\n

Ideally, you should be inspecting your winch before and after each use. However, if you are not using your winch every day, it is a good idea to go through the list above every 90 days. This helps keep the winch in top condition, even when you don’t need it.

\n
\n
\"before\" \"after\"
\n
\n

In conclusion:

\n

Performing basic maintenance is an easy way to keep your equipment in top shape. This helps it stay working for as long as possible while also preventing unnecessary damage and costs. Hopefully, this guide helps keep your winch in great condition.

\n
","postBodyRss":"
\n

Proper care can save your equipment and save you money. With the right maintenance, you can ensure your gear lasts longer, reducing your need to purchase new equipment. We’re here to help teach you how to do exactly that. In today’s blog, we’re looking at how to take care of your winches. We’ll start with a step-by-step guide on what to look at and what you should do before moving on to how often you should go about performing this routine maintenance.

\n

What you need to check:

\n

The first step in maintaining your winch is simple: know how to use it. By reading your owner’s manual, you can learn the ins and outs of your specific winch. This understanding lets you use it the way it was intended to be used. Winches differ from brand to brand and model to model, so knowing what it’s capable of, the proper procedure to use it and the care your specific winch needs will extend its lifespan.

\n

Next, you need to check the fasteners to make sure they are tight and have the proper torque. By ensuring they are tight and ready to use, you can significantly lower the chances of a failure while it’s in use. While you’re at it, be sure to check your mounting bolts to ensure they stay secure. Making sure the winch base is secured is just as important. Of course, if there are any damaged fasteners or mounting bolts, replace them before using the winch.

\n

Third, check the wiring. Be sure to verify that all wiring is correct and that the connections are tight. Check for exposed or bare wires or terminals while also checking for cable insulation damage. If you find any, make sure to cover exposures with terminal boots and repair or replace all damaged electrical cables. This helps prevent electrical issues from faulty wiring. If the winch is hydraulic, check the hoses and connections for cracks and leaks. Ensure that both your hydraulic and electrical connections are secure.

\n\n
\n
\n

Fourth, be sure to check the winch line for damage. We go into more detail in this blog, but to summarize: be sure that your winch ropes are not creased, worn down or damaged in any way. Replace them if they are. Additionally, you'll want to lubricate your wire ropes with winch lubricant to help prevent wear and corrosion. Be sure to store them in the proper conditions and use a tensioner guide to avoid line damage from birdnesting. See photos at right.

\n

Finally, you want to ensure that the gears fully re-engage when taking the winch out of free spool. It is best once the free spool locks in to run it out and then back in to ensure proper engagement. If they don’t fully re-engage, there is a risk that they could let go, causing whatever load you have on the wire rope to be released. This leads to more damage and danger that can easily be avoided.

\n

How often:

\n

Ideally, you should be inspecting your winch before and after each use. However, if you are not using your winch every day, it is a good idea to go through the list above every 90 days. This helps keep the winch in top condition, even when you don’t need it.

\n
\n
\"before\" \"after\"
\n
\n

In conclusion:

\n

Performing basic maintenance is an easy way to keep your equipment in top shape. This helps it stay working for as long as possible while also preventing unnecessary damage and costs. Hopefully, this guide helps keep your winch in great condition.

\n
","postEmailContent":"
\n

Proper care can save your equipment and save you money. With the right maintenance, you can ensure your gear lasts longer, reducing your need to purchase new equipment. We’re here to help teach you how to do exactly that. In today’s blog, we’re looking at how to take care of your winches. We’ll start with a step-by-step guide on what to look at and what you should do before moving on to how often you should go about performing this routine maintenance.

\n

What you need to check:

\n

The first step in maintaining your winch is simple: know how to use it. By reading your owner’s manual, you can learn the ins and outs of your specific winch. This understanding lets you use it the way it was intended to be used. Winches differ from brand to brand and model to model, so knowing what it’s capable of, the proper procedure to use it and the care your specific winch needs will extend its lifespan.

\n

Next, you need to check the fasteners to make sure they are tight and have the proper torque. By ensuring they are tight and ready to use, you can significantly lower the chances of a failure while it’s in use. While you’re at it, be sure to check your mounting bolts to ensure they stay secure. Making sure the winch base is secured is just as important. Of course, if there are any damaged fasteners or mounting bolts, replace them before using the winch.

\n

Third, check the wiring. Be sure to verify that all wiring is correct and that the connections are tight. Check for exposed or bare wires or terminals while also checking for cable insulation damage. If you find any, make sure to cover exposures with terminal boots and repair or replace all damaged electrical cables. This helps prevent electrical issues from faulty wiring. If the winch is hydraulic, check the hoses and connections for cracks and leaks. Ensure that both your hydraulic and electrical connections are secure.

\n \n
\n
\n

Fourth, be sure to check the winch line for damage. We go into more detail in this blog, but to summarize: be sure that your winch ropes are not creased, worn down or damaged in any way. Replace them if they are. Additionally, you'll want to lubricate your wire ropes with winch lubricant to help prevent wear and corrosion. Be sure to store them in the proper conditions and use a tensioner guide to avoid line damage from birdnesting. See photos at right.

\n

Finally, you want to ensure that the gears fully re-engage when taking the winch out of free spool. It is best once the free spool locks in to run it out and then back in to ensure proper engagement. If they don’t fully re-engage, there is a risk that they could let go, causing whatever load you have on the wire rope to be released. This leads to more damage and danger that can easily be avoided.

\n

How often:

\n

Ideally, you should be inspecting your winch before and after each use. However, if you are not using your winch every day, it is a good idea to go through the list above every 90 days. This helps keep the winch in top condition, even when you don’t need it.

\n
\n
\n
\n
\n

In conclusion:

\n

Performing basic maintenance is an easy way to keep your equipment in top shape. This helps it stay working for as long as possible while also preventing unnecessary damage and costs. Hopefully, this guide helps keep your winch in great condition.

\n
","postFeaturedImageIfEnabled":"https://48463649.fs1.hubspotusercontent-na1.net/hubfs/48463649/header-Aug-04-2025-08-49-13-9314-PM.png","postListContent":"
\n

Proper care can save your equipment and save you money. With the right maintenance, you can ensure your gear lasts longer, reducing your need to purchase new equipment. We’re here to help teach you how to do exactly that. In today’s blog, we’re looking at how to take care of your winches. We’ll start with a step-by-step guide on what to look at and what you should do before moving on to how often you should go about performing this routine maintenance.

\n

What you need to check:

\n

The first step in maintaining your winch is simple: know how to use it. By reading your owner’s manual, you can learn the ins and outs of your specific winch. This understanding lets you use it the way it was intended to be used. Winches differ from brand to brand and model to model, so knowing what it’s capable of, the proper procedure to use it and the care your specific winch needs will extend its lifespan.

\n

Next, you need to check the fasteners to make sure they are tight and have the proper torque. By ensuring they are tight and ready to use, you can significantly lower the chances of a failure while it’s in use. While you’re at it, be sure to check your mounting bolts to ensure they stay secure. Making sure the winch base is secured is just as important. Of course, if there are any damaged fasteners or mounting bolts, replace them before using the winch.

\n

Third, check the wiring. Be sure to verify that all wiring is correct and that the connections are tight. Check for exposed or bare wires or terminals while also checking for cable insulation damage. If you find any, make sure to cover exposures with terminal boots and repair or replace all damaged electrical cables. This helps prevent electrical issues from faulty wiring. If the winch is hydraulic, check the hoses and connections for cracks and leaks. Ensure that both your hydraulic and electrical connections are secure.

\n \n
\n
\n

Fourth, be sure to check the winch line for damage. We go into more detail in this blog, but to summarize: be sure that your winch ropes are not creased, worn down or damaged in any way. Replace them if they are. Additionally, you'll want to lubricate your wire ropes with winch lubricant to help prevent wear and corrosion. Be sure to store them in the proper conditions and use a tensioner guide to avoid line damage from birdnesting. See photos at right.

\n

Finally, you want to ensure that the gears fully re-engage when taking the winch out of free spool. It is best once the free spool locks in to run it out and then back in to ensure proper engagement. If they don’t fully re-engage, there is a risk that they could let go, causing whatever load you have on the wire rope to be released. This leads to more damage and danger that can easily be avoided.

\n

How often:

\n

Ideally, you should be inspecting your winch before and after each use. However, if you are not using your winch every day, it is a good idea to go through the list above every 90 days. This helps keep the winch in top condition, even when you don’t need it.

\n
\n
\n
\n
\n

In conclusion:

\n

Performing basic maintenance is an easy way to keep your equipment in top shape. This helps it stay working for as long as possible while also preventing unnecessary damage and costs. Hopefully, this guide helps keep your winch in great condition.

\n
","postListSummaryFeaturedImage":"https://48463649.fs1.hubspotusercontent-na1.net/hubfs/48463649/header-Aug-04-2025-08-49-13-9314-PM.png","postRssContent":"
\n

Proper care can save your equipment and save you money. With the right maintenance, you can ensure your gear lasts longer, reducing your need to purchase new equipment. We’re here to help teach you how to do exactly that. In today’s blog, we’re looking at how to take care of your winches. We’ll start with a step-by-step guide on what to look at and what you should do before moving on to how often you should go about performing this routine maintenance.

\n

What you need to check:

\n

The first step in maintaining your winch is simple: know how to use it. By reading your owner’s manual, you can learn the ins and outs of your specific winch. This understanding lets you use it the way it was intended to be used. Winches differ from brand to brand and model to model, so knowing what it’s capable of, the proper procedure to use it and the care your specific winch needs will extend its lifespan.

\n

Next, you need to check the fasteners to make sure they are tight and have the proper torque. By ensuring they are tight and ready to use, you can significantly lower the chances of a failure while it’s in use. While you’re at it, be sure to check your mounting bolts to ensure they stay secure. Making sure the winch base is secured is just as important. Of course, if there are any damaged fasteners or mounting bolts, replace them before using the winch.

\n

Third, check the wiring. Be sure to verify that all wiring is correct and that the connections are tight. Check for exposed or bare wires or terminals while also checking for cable insulation damage. If you find any, make sure to cover exposures with terminal boots and repair or replace all damaged electrical cables. This helps prevent electrical issues from faulty wiring. If the winch is hydraulic, check the hoses and connections for cracks and leaks. Ensure that both your hydraulic and electrical connections are secure.

\n \n
\n
\n

Fourth, be sure to check the winch line for damage. We go into more detail in this blog, but to summarize: be sure that your winch ropes are not creased, worn down or damaged in any way. Replace them if they are. Additionally, you'll want to lubricate your wire ropes with winch lubricant to help prevent wear and corrosion. Be sure to store them in the proper conditions and use a tensioner guide to avoid line damage from birdnesting. See photos at right.

\n

Finally, you want to ensure that the gears fully re-engage when taking the winch out of free spool. It is best once the free spool locks in to run it out and then back in to ensure proper engagement. If they don’t fully re-engage, there is a risk that they could let go, causing whatever load you have on the wire rope to be released. This leads to more damage and danger that can easily be avoided.

\n

How often:

\n

Ideally, you should be inspecting your winch before and after each use. However, if you are not using your winch every day, it is a good idea to go through the list above every 90 days. This helps keep the winch in top condition, even when you don’t need it.

\n
\n
\n
\n
\n

In conclusion:

\n

Performing basic maintenance is an easy way to keep your equipment in top shape. This helps it stay working for as long as possible while also preventing unnecessary damage and costs. Hopefully, this guide helps keep your winch in great condition.

\n
","postRssSummaryFeaturedImage":"https://48463649.fs1.hubspotusercontent-na1.net/hubfs/48463649/header-Aug-04-2025-08-49-13-9314-PM.png","postSummary":"
\n

Proper care can save your equipment and save you money. With the right maintenance, you can ensure your gear lasts longer, reducing your need to purchase new equipment. We’re here to help teach you how to do exactly that. In today’s blog, we’re looking at how to take care of your winches. We’ll start with a step-by-step guide on what to look at and what you should do before moving on to how often you should go about performing this routine maintenance.

\n

What you need to check:

\n

The first step in maintaining your winch is simple: know how to use it. By reading your owner’s manual, you can learn the ins and outs of your specific winch. This understanding lets you use it the way it was intended to be used. Winches differ from brand to brand and model to model, so knowing what it’s capable of, the proper procedure to use it and the care your specific winch needs will extend its lifespan.

\n

Next, you need to check the fasteners to make sure they are tight and have the proper torque. By ensuring they are tight and ready to use, you can significantly lower the chances of a failure while it’s in use. While you’re at it, be sure to check your mounting bolts to ensure they stay secure. Making sure the winch base is secured is just as important. Of course, if there are any damaged fasteners or mounting bolts, replace them before using the winch.

\n

Third, check the wiring. Be sure to verify that all wiring is correct and that the connections are tight. Check for exposed or bare wires or terminals while also checking for cable insulation damage. If you find any, make sure to cover exposures with terminal boots and repair or replace all damaged electrical cables. This helps prevent electrical issues from faulty wiring. If the winch is hydraulic, check the hoses and connections for cracks and leaks. Ensure that both your hydraulic and electrical connections are secure.

\n\n
\n
\n

Fourth, be sure to check the winch line for damage. We go into more detail in this blog, but to summarize: be sure that your winch ropes are not creased, worn down or damaged in any way. Replace them if they are. Additionally, you'll want to lubricate your wire ropes with winch lubricant to help prevent wear and corrosion. Be sure to store them in the proper conditions and use a tensioner guide to avoid line damage from birdnesting. See photos at right.

\n

Finally, you want to ensure that the gears fully re-engage when taking the winch out of free spool. It is best once the free spool locks in to run it out and then back in to ensure proper engagement. If they don’t fully re-engage, there is a risk that they could let go, causing whatever load you have on the wire rope to be released. This leads to more damage and danger that can easily be avoided.

\n

How often:

\n

Ideally, you should be inspecting your winch before and after each use. However, if you are not using your winch every day, it is a good idea to go through the list above every 90 days. This helps keep the winch in top condition, even when you don’t need it.

\n
\n
\"before\" \"after\"
\n
\n

In conclusion:

\n

Performing basic maintenance is an easy way to keep your equipment in top shape. This helps it stay working for as long as possible while also preventing unnecessary damage and costs. Hopefully, this guide helps keep your winch in great condition.

\n
","postSummaryRss":"
\n

Proper care can save your equipment and save you money. With the right maintenance, you can ensure your gear lasts longer, reducing your need to purchase new equipment. We’re here to help teach you how to do exactly that. In today’s blog, we’re looking at how to take care of your winches. We’ll start with a step-by-step guide on what to look at and what you should do before moving on to how often you should go about performing this routine maintenance.

\n

What you need to check:

\n

The first step in maintaining your winch is simple: know how to use it. By reading your owner’s manual, you can learn the ins and outs of your specific winch. This understanding lets you use it the way it was intended to be used. Winches differ from brand to brand and model to model, so knowing what it’s capable of, the proper procedure to use it and the care your specific winch needs will extend its lifespan.

\n

Next, you need to check the fasteners to make sure they are tight and have the proper torque. By ensuring they are tight and ready to use, you can significantly lower the chances of a failure while it’s in use. While you’re at it, be sure to check your mounting bolts to ensure they stay secure. Making sure the winch base is secured is just as important. Of course, if there are any damaged fasteners or mounting bolts, replace them before using the winch.

\n

Third, check the wiring. Be sure to verify that all wiring is correct and that the connections are tight. Check for exposed or bare wires or terminals while also checking for cable insulation damage. If you find any, make sure to cover exposures with terminal boots and repair or replace all damaged electrical cables. This helps prevent electrical issues from faulty wiring. If the winch is hydraulic, check the hoses and connections for cracks and leaks. Ensure that both your hydraulic and electrical connections are secure.

\n \n
\n
\n

Fourth, be sure to check the winch line for damage. We go into more detail in this blog, but to summarize: be sure that your winch ropes are not creased, worn down or damaged in any way. Replace them if they are. Additionally, you'll want to lubricate your wire ropes with winch lubricant to help prevent wear and corrosion. Be sure to store them in the proper conditions and use a tensioner guide to avoid line damage from birdnesting. See photos at right.

\n

Finally, you want to ensure that the gears fully re-engage when taking the winch out of free spool. It is best once the free spool locks in to run it out and then back in to ensure proper engagement. If they don’t fully re-engage, there is a risk that they could let go, causing whatever load you have on the wire rope to be released. This leads to more damage and danger that can easily be avoided.

\n

How often:

\n

Ideally, you should be inspecting your winch before and after each use. However, if you are not using your winch every day, it is a good idea to go through the list above every 90 days. This helps keep the winch in top condition, even when you don’t need it.

\n
\n
\n
\n
\n

In conclusion:

\n

Performing basic maintenance is an easy way to keep your equipment in top shape. This helps it stay working for as long as possible while also preventing unnecessary damage and costs. Hopefully, this guide helps keep your winch in great condition.

\n
","postTemplate":"zips-basic-theme/templates/blog-post.html","previewImageSrc":null,"previewKey":"LtdcreuF","previousPostFeaturedImage":"https://48463649.fs1.hubspotusercontent-na1.net/hubfs/48463649/0007033_gojak_6200_1_web.jpg_900.jpg","previousPostFeaturedImageAltText":"","previousPostName":"Dolly Inspection Tips","previousPostSlug":"blog/dolly-inspection-tips","processingStatus":"PUBLISHED","propertyForDynamicPageCanonicalUrl":null,"propertyForDynamicPageFeaturedImage":null,"propertyForDynamicPageMetaDescription":null,"propertyForDynamicPageSlug":null,"propertyForDynamicPageTitle":null,"publicAccessRules":[],"publicAccessRulesEnabled":false,"publishDate":1719234000000,"publishDateLocalTime":1719234000000,"publishDateLocalized":{"date":1719234000000,"format":"medium","language":null},"publishImmediately":true,"publishTimezoneOffset":null,"publishedAt":1756480109699,"publishedByEmail":null,"publishedById":82246321,"publishedByName":null,"publishedUrl":"/blog/how-to-maintain-your-winch","resolvedDomain":"www.zips.com","resolvedLanguage":null,"rssBody":"
\n

Proper care can save your equipment and save you money. With the right maintenance, you can ensure your gear lasts longer, reducing your need to purchase new equipment. We’re here to help teach you how to do exactly that. In today’s blog, we’re looking at how to take care of your winches. We’ll start with a step-by-step guide on what to look at and what you should do before moving on to how often you should go about performing this routine maintenance.

\n

What you need to check:

\n

The first step in maintaining your winch is simple: know how to use it. By reading your owner’s manual, you can learn the ins and outs of your specific winch. This understanding lets you use it the way it was intended to be used. Winches differ from brand to brand and model to model, so knowing what it’s capable of, the proper procedure to use it and the care your specific winch needs will extend its lifespan.

\n

Next, you need to check the fasteners to make sure they are tight and have the proper torque. By ensuring they are tight and ready to use, you can significantly lower the chances of a failure while it’s in use. While you’re at it, be sure to check your mounting bolts to ensure they stay secure. Making sure the winch base is secured is just as important. Of course, if there are any damaged fasteners or mounting bolts, replace them before using the winch.

\n

Third, check the wiring. Be sure to verify that all wiring is correct and that the connections are tight. Check for exposed or bare wires or terminals while also checking for cable insulation damage. If you find any, make sure to cover exposures with terminal boots and repair or replace all damaged electrical cables. This helps prevent electrical issues from faulty wiring. If the winch is hydraulic, check the hoses and connections for cracks and leaks. Ensure that both your hydraulic and electrical connections are secure.

\n\n
\n
\n

Fourth, be sure to check the winch line for damage. We go into more detail in this blog, but to summarize: be sure that your winch ropes are not creased, worn down or damaged in any way. Replace them if they are. Additionally, you'll want to lubricate your wire ropes with winch lubricant to help prevent wear and corrosion. Be sure to store them in the proper conditions and use a tensioner guide to avoid line damage from birdnesting. See photos at right.

\n

Finally, you want to ensure that the gears fully re-engage when taking the winch out of free spool. It is best once the free spool locks in to run it out and then back in to ensure proper engagement. If they don’t fully re-engage, there is a risk that they could let go, causing whatever load you have on the wire rope to be released. This leads to more damage and danger that can easily be avoided.

\n

How often:

\n

Ideally, you should be inspecting your winch before and after each use. However, if you are not using your winch every day, it is a good idea to go through the list above every 90 days. This helps keep the winch in top condition, even when you don’t need it.

\n
\n
\"before\" \"after\"
\n
\n

In conclusion:

\n

Performing basic maintenance is an easy way to keep your equipment in top shape. This helps it stay working for as long as possible while also preventing unnecessary damage and costs. Hopefully, this guide helps keep your winch in great condition.

\n
","rssSummary":"
\n

Proper care can save your equipment and save you money. With the right maintenance, you can ensure your gear lasts longer, reducing your need to purchase new equipment. We’re here to help teach you how to do exactly that. In today’s blog, we’re looking at how to take care of your winches. We’ll start with a step-by-step guide on what to look at and what you should do before moving on to how often you should go about performing this routine maintenance.

\n

What you need to check:

\n

The first step in maintaining your winch is simple: know how to use it. By reading your owner’s manual, you can learn the ins and outs of your specific winch. This understanding lets you use it the way it was intended to be used. Winches differ from brand to brand and model to model, so knowing what it’s capable of, the proper procedure to use it and the care your specific winch needs will extend its lifespan.

\n

Next, you need to check the fasteners to make sure they are tight and have the proper torque. By ensuring they are tight and ready to use, you can significantly lower the chances of a failure while it’s in use. While you’re at it, be sure to check your mounting bolts to ensure they stay secure. Making sure the winch base is secured is just as important. Of course, if there are any damaged fasteners or mounting bolts, replace them before using the winch.

\n

Third, check the wiring. Be sure to verify that all wiring is correct and that the connections are tight. Check for exposed or bare wires or terminals while also checking for cable insulation damage. If you find any, make sure to cover exposures with terminal boots and repair or replace all damaged electrical cables. This helps prevent electrical issues from faulty wiring. If the winch is hydraulic, check the hoses and connections for cracks and leaks. Ensure that both your hydraulic and electrical connections are secure.

\n\n
\n
\n

Fourth, be sure to check the winch line for damage. We go into more detail in this blog, but to summarize: be sure that your winch ropes are not creased, worn down or damaged in any way. Replace them if they are. Additionally, you'll want to lubricate your wire ropes with winch lubricant to help prevent wear and corrosion. Be sure to store them in the proper conditions and use a tensioner guide to avoid line damage from birdnesting. See photos at right.

\n

Finally, you want to ensure that the gears fully re-engage when taking the winch out of free spool. It is best once the free spool locks in to run it out and then back in to ensure proper engagement. If they don’t fully re-engage, there is a risk that they could let go, causing whatever load you have on the wire rope to be released. This leads to more damage and danger that can easily be avoided.

\n

How often:

\n

Ideally, you should be inspecting your winch before and after each use. However, if you are not using your winch every day, it is a good idea to go through the list above every 90 days. This helps keep the winch in top condition, even when you don’t need it.

\n
\n
\"before\" \"after\"
\n
\n

In conclusion:

\n

Performing basic maintenance is an easy way to keep your equipment in top shape. This helps it stay working for as long as possible while also preventing unnecessary damage and costs. Hopefully, this guide helps keep your winch in great condition.

\n
","rssSummaryFeaturedImage":"https://48463649.fs1.hubspotusercontent-na1.net/hubfs/48463649/header-Aug-04-2025-08-49-13-9314-PM.png","scheduledUpdateDate":0,"screenshotPreviewTakenAt":1770822509773,"screenshotPreviewUrl":"https://cdn1.hubspot.net/hubshotv3/prod/e/0/17da8944-6713-419d-8d61-274d5c128cec.png","sections":{},"securityState":"NONE","siteId":null,"slug":"blog/how-to-maintain-your-winch","stagedFrom":null,"state":"PUBLISHED","stateWhenDeleted":null,"structuredContentPageType":null,"structuredContentType":null,"styleOverrideId":null,"subcategory":"normal_blog_post","syncedWithBlogRoot":true,"tagIds":[192169769490,192174528148,192174529697,194719179289,194719586666],"tagList":[{"categoryId":3,"cdnPurgeEmbargoTime":null,"contentIds":[],"cosObjectType":"TAG","created":1751598346713,"deletedAt":0,"description":"","id":192169769490,"label":"Towing & Recovery","language":null,"name":"Towing & Recovery","portalId":48463649,"slug":"towing-recovery","translatedFromId":null,"translations":{},"updated":1751598346713},{"categoryId":3,"cdnPurgeEmbargoTime":null,"contentIds":[],"cosObjectType":"TAG","created":1751601475164,"deletedAt":0,"description":"","id":192174528148,"label":"Automotive","language":null,"name":"Automotive","portalId":48463649,"slug":"automotive","translatedFromId":null,"translations":{},"updated":1751601475164},{"categoryId":3,"cdnPurgeEmbargoTime":null,"contentIds":[],"cosObjectType":"TAG","created":1751602285139,"deletedAt":0,"description":"","id":192174529697,"label":"Construction","language":null,"name":"Construction","portalId":48463649,"slug":"construction","translatedFromId":null,"translations":{},"updated":1751602285139},{"categoryId":3,"cdnPurgeEmbargoTime":null,"contentIds":[],"cosObjectType":"TAG","created":1755545213046,"deletedAt":0,"description":"","id":194719179289,"label":"Industry Knowledge & Updates","language":null,"name":"Industry Knowledge & Updates","portalId":48463649,"slug":"industry-knowledge-updates","translatedFromId":null,"translations":{},"updated":1755545213046},{"categoryId":3,"cdnPurgeEmbargoTime":null,"contentIds":[],"cosObjectType":"TAG","created":1755545331471,"deletedAt":0,"description":"","id":194719586666,"label":"Product Guides","language":null,"name":"Product Guides","portalId":48463649,"slug":"product-guides","translatedFromId":null,"translations":{},"updated":1755545331471}],"tagNames":["Towing & Recovery","Automotive","Construction","Industry Knowledge & Updates","Product Guides"],"teamPerms":[],"templatePath":"","templatePathForRender":"zips-basic-theme/templates/blog-post.html","textToAudioFileId":null,"textToAudioGenerationRequestId":null,"themePath":null,"themeSettingsValues":null,"title":"How to Maintain Your Winch","tmsId":null,"topicIds":[192169769490,192174528148,192174529697,194719179289,194719586666],"topicList":[{"categoryId":3,"cdnPurgeEmbargoTime":null,"contentIds":[],"cosObjectType":"TAG","created":1751598346713,"deletedAt":0,"description":"","id":192169769490,"label":"Towing & Recovery","language":null,"name":"Towing & Recovery","portalId":48463649,"slug":"towing-recovery","translatedFromId":null,"translations":{},"updated":1751598346713},{"categoryId":3,"cdnPurgeEmbargoTime":null,"contentIds":[],"cosObjectType":"TAG","created":1751601475164,"deletedAt":0,"description":"","id":192174528148,"label":"Automotive","language":null,"name":"Automotive","portalId":48463649,"slug":"automotive","translatedFromId":null,"translations":{},"updated":1751601475164},{"categoryId":3,"cdnPurgeEmbargoTime":null,"contentIds":[],"cosObjectType":"TAG","created":1751602285139,"deletedAt":0,"description":"","id":192174529697,"label":"Construction","language":null,"name":"Construction","portalId":48463649,"slug":"construction","translatedFromId":null,"translations":{},"updated":1751602285139},{"categoryId":3,"cdnPurgeEmbargoTime":null,"contentIds":[],"cosObjectType":"TAG","created":1755545213046,"deletedAt":0,"description":"","id":194719179289,"label":"Industry Knowledge & Updates","language":null,"name":"Industry Knowledge & Updates","portalId":48463649,"slug":"industry-knowledge-updates","translatedFromId":null,"translations":{},"updated":1755545213046},{"categoryId":3,"cdnPurgeEmbargoTime":null,"contentIds":[],"cosObjectType":"TAG","created":1755545331471,"deletedAt":0,"description":"","id":194719586666,"label":"Product Guides","language":null,"name":"Product Guides","portalId":48463649,"slug":"product-guides","translatedFromId":null,"translations":{},"updated":1755545331471}],"topicNames":["Towing & Recovery","Automotive","Construction","Industry Knowledge & Updates","Product Guides"],"topics":[192169769490,192174528148,192174529697,194719179289,194719586666],"translatedContent":{},"translatedFromId":null,"translations":{},"tweet":null,"tweetAt":null,"tweetImmediately":false,"unpublishedAt":0,"updated":1756480109703,"updatedById":82246321,"upsizeFeaturedImage":false,"url":"/blog/how-to-maintain-your-winch","useFeaturedImage":true,"userPerms":[],"views":null,"visibleToAll":null,"widgetContainers":{},"widgetcontainers":{},"widgets":{}},{"ab":false,"abStatus":null,"abTestId":null,"abVariation":false,"abVariationAutomated":false,"absoluteUrl":"/blog/how-to-fix-or-change-a-tire","afterPostBody":null,"aifeatures":null,"allowedSlugConflict":false,"analytics":null,"analyticsPageId":"192174304857","analyticsPageType":"blog-post","approvalStatus":null,"archived":false,"archivedAt":0,"archivedInDashboard":false,"areCommentsAllowed":true,"attachedStylesheets":[],"audienceAccess":"PUBLIC","author":null,"authorName":null,"authorUsername":null,"blogAuthor":{"avatar":"","bio":"","cdnPurgeEmbargoTime":null,"cosObjectType":"BLOG_AUTHOR","created":1755530565784,"deletedAt":0,"displayName":"Tyler Nestvedt","email":null,"facebook":"","fullName":"Tyler Nestvedt","gravatarUrl":null,"hasSocialProfiles":false,"id":194707404365,"label":"Tyler Nestvedt","language":"en","linkedin":"","name":"Tyler Nestvedt","portalId":48463649,"slug":"tyler-nestvedt","translatedFromId":null,"translations":{},"twitter":"","twitterUsername":"","updated":1755530565784,"userId":null,"username":null,"website":""},"blogAuthorId":194707404365,"blogAuthorIdList":[194707404365],"blogAuthorList":[{"avatar":"","bio":"","cdnPurgeEmbargoTime":null,"cosObjectType":"BLOG_AUTHOR","created":1755530565784,"deletedAt":0,"displayName":"Tyler Nestvedt","email":null,"facebook":"","fullName":"Tyler Nestvedt","gravatarUrl":null,"hasSocialProfiles":false,"id":194707404365,"label":"Tyler Nestvedt","language":"en","linkedin":"","name":"Tyler Nestvedt","portalId":48463649,"slug":"tyler-nestvedt","translatedFromId":null,"translations":{},"twitter":"","twitterUsername":"","updated":1755530565784,"userId":null,"username":null,"website":""}],"blogPostAuthor":{"avatar":"","bio":"","cdnPurgeEmbargoTime":null,"cosObjectType":"BLOG_AUTHOR","created":1755530565784,"deletedAt":0,"displayName":"Tyler Nestvedt","email":null,"facebook":"","fullName":"Tyler Nestvedt","gravatarUrl":null,"hasSocialProfiles":false,"id":194707404365,"label":"Tyler Nestvedt","language":"en","linkedin":"","name":"Tyler Nestvedt","portalId":48463649,"slug":"tyler-nestvedt","translatedFromId":null,"translations":{},"twitter":"","twitterUsername":"","updated":1755530565784,"userId":null,"username":null,"website":""},"blogPostScheduleTaskUid":null,"blogPublishInstantEmailCampaignId":null,"blogPublishInstantEmailRetryCount":null,"blogPublishInstantEmailTaskUid":null,"blogPublishToSocialMediaTask":"DONE_NOT_SENT","blueprintTypeId":0,"businessUnitId":null,"campaign":null,"campaignName":null,"campaignUtm":null,"category":3,"categoryId":3,"cdnPurgeEmbargoTime":null,"checkPostLevelAudienceAccessFirst":true,"clonedFrom":null,"composeBody":null,"compositionId":0,"contentAccessRuleIds":[],"contentAccessRuleTypes":[],"contentGroup":190096341139,"contentGroupId":190096341139,"contentTypeCategory":3,"contentTypeCategoryId":3,"contentTypeId":null,"created":1751601511454,"createdByAgent":null,"createdById":74657203,"createdTime":1751601511454,"crmObjectId":null,"css":{},"cssText":"","ctaClicks":null,"ctaViews":null,"currentState":"PUBLISHED","currentlyPublished":true,"deletedAt":0,"deletedBy":null,"deletedByEmail":null,"deletedById":null,"domain":"","dynamicPageDataSourceId":null,"dynamicPageDataSourceType":null,"dynamicPageHubDbTableId":null,"enableDomainStylesheets":null,"enableGoogleAmpOutputOverride":false,"enableLayoutStylesheets":null,"errors":[],"featuredImage":"https://48463649.fs1.hubspotusercontent-na1.net/hubfs/48463649/Blog/header-1200x500.jpg","featuredImageAltText":"","featuredImageHeight":500,"featuredImageLength":0,"featuredImageWidth":1200,"flexAreas":{},"folderId":null,"footerHtml":null,"footerTemplatePath":null,"footerVariantName":null,"freezeDate":1712926800000,"generateJsonLdEnabledOverride":true,"globalBlockOverrides":{},"hasContentAccessRules":false,"hasUserChanges":true,"headHtml":null,"header":null,"headerTemplatePath":null,"headerVariantName":null,"htmlTitle":"How to Fix or Change a Tire","id":192174304857,"includeDefaultCustomCss":null,"isCaptchaRequired":true,"isCrawlableByBots":false,"isDraft":false,"isInstantEmailEnabled":false,"isPublished":true,"isSocialPublishingEnabled":false,"keywords":[],"label":"How to Fix or Change a Tire","language":"en","lastEditSessionId":null,"lastEditUpdateId":null,"layoutSections":{},"legacyBlogTabid":null,"legacyId":null,"legacyPostGuid":null,"linkRelCanonicalUrl":"","listTemplate":"","liveDomain":"www.zips.com","mab":false,"mabExperimentId":null,"mabMaster":false,"mabVariant":false,"marketingCampaignGuids":[],"meta":{"html_title":"How to Fix or Change a Tire","public_access_rules":[],"public_access_rules_enabled":false,"use_featured_image":true,"tag_ids":[192174528148,194719179289,194719586666],"topic_ids":[192174528148,194719179289,194719586666],"post_summary":"

When on the road, anything is possible. One of the most common issues is when you’re driving down the road, and you find out you consistently have low tire pressure. It might be even worse. You might have a flat tire. If your phone is dead, or it would just be too long of a wait for help, you may have to fix the problem yourself.

\n","post_body":"

When on the road, anything is possible. One of the most common issues is when you’re driving down the road, and you find out you consistently have low tire pressure. It might be even worse. You might have a flat tire. If your phone is dead, or it would just be too long of a wait for help, you may have to fix the problem yourself.

\n\n

How to fix a flat tire:

\n\n
\n
\n

Luckily, you don’t need to be an expert in tire repair. You’ll just need a few things before you can start.

\n
\n
\n
    \n
  • Vehicle jack
  • \n
  • Bottle of soapy water
  • \n
  • Tire plugging kit
  • \n
  • Air compressor
  • \n
  • Hand drill
  • \n
\n

Now, here's how you fix a tire:

\n
\n
\"kit-300x230\"
\n
\n
\n
\"man-fixing-car-tire\"
\n
\n
    \n
  1. Get the tire off the ground. Some people say you’ll need to take the tire off, but as long as you have access to the entirety of your tire, you really don’t. However, it might be helpful in the long run. Make sure you get the car off the ground though, so you can freely rotate the tire. It is important to remember that the plugs should only be used in the tread section of the tire. Due to the thinness of the sidewall, it is not recommended to place a plug there and the tire should be replaced.
  2. \n
  3. \n
    \n
    \n

    Once you’ve done that, fill a bottle with soapy water and spray it over the tire. Eventually, you’ll notice bubbles beginning to form. This is where the tire puncture is.

    \n
    \n
    \"image-2-600x200\"
    \n
    \n
  4. \n
  5. Once you’ve located the leak, take your reaming tool and expand the hole. This will make what was probably an uneven hole good enough to actually plug. If you can’t fit the reaming tool into the tire, take a small drill and expand the hole so it's just smaller than the reaming tool.
  6. \n
  7. \n
    \n
    \n

    Put the plug about halfway through the plug insertion tool. With the plug insertion tool, insert the tire plug. Be quick. Then trim the plug so it’s flush with the tire.

    \n
    \n
    \"image-3-600x200\"
    \n
    \n
  8. \n
  9. Refill the tire to the vehicle’s specifications. The proper PSI can be found on a sticker in the driver's door jam. Do not go off of what the tire says on the sidewall.
  10. \n
\n

How to change a tire:

\n

Of course, fixing a tire only works if you actually have the tools and supplies necessary, or the tire punctures are small enough that you can actually plug them. If either of these are a problem, then you may have to change the tire. All you’ll need for that is:

\n
    \n
  • Vehicle jack
  • \n
  • Lug wrench
  • \n
  • Spare tire
  • \n
\n

Changing a tire is fairly simple, here’s how you do it:

\n
    \n
  1. Set the parking brake.
  2. \n
  3. Check the air pressure of the spare tire to be sure it is properly inflated.
  4. \n
  5. Break the lug nuts loose before lifting the vehicle. If the tire is not a drive wheel, the wheel will just spin when you try to break the nuts loose.
  6. \n
  7. Get the tire off the ground. Use your vehicle jack to lift the vehicle up so you can actually remove the tire.
  8. \n
  9. Finish removing the lug nuts with your lug wrench. Set them aside, but keep them close.
  10. \n
  11. Take the flat tire off, and replace it with the spare.
  12. \n
  13. Tighten the lug nuts in a star pattern. Do not tighten them all the way.

    \n
    \n
    \"image-5-600x250\"
    \n
    \"image-4-600x250\"
    \n
    \n
  14. \n
  15. Put the car back on the ground.
  16. \n
  17. Finish tightening the lug nuts. This will ensure they are as tight as they need to be. Reference your owner's manual for proper torque specifications.
  18. \n
\n

Other options

\n

While the options above are the better options, there are a few others to consider. One is tire sealant. This is a great option for quick tire repair. However, it can be messy and harder to fix. It can also freeze.

\n

In conclusion

\n

Now, in both cases, be sure you see a professional mechanic as soon as possible. Both of these solutions to a flat tire are incredibly temporary. However, being prepared for when things go wrong is important. With this knowledge, you can feel safe and confident when out on the road. If you need jacks, lug wrenches, tire repair kits or air compressors, you can find them at zips.com.

","rss_summary":"

When on the road, anything is possible. One of the most common issues is when you’re driving down the road, and you find out you consistently have low tire pressure. It might be even worse. You might have a flat tire. If your phone is dead, or it would just be too long of a wait for help, you may have to fix the problem yourself.

\n","rss_body":"

When on the road, anything is possible. One of the most common issues is when you’re driving down the road, and you find out you consistently have low tire pressure. It might be even worse. You might have a flat tire. If your phone is dead, or it would just be too long of a wait for help, you may have to fix the problem yourself.

\n\n

How to fix a flat tire:

\n\n
\n
\n

Luckily, you don’t need to be an expert in tire repair. You’ll just need a few things before you can start.

\n
\n
\n
    \n
  • Vehicle jack
  • \n
  • Bottle of soapy water
  • \n
  • Tire plugging kit
  • \n
  • Air compressor
  • \n
  • Hand drill
  • \n
\n

Now, here's how you fix a tire:

\n
\n
\"kit-300x230\"
\n
\n
\n
\"man-fixing-car-tire\"
\n
\n
    \n
  1. Get the tire off the ground. Some people say you’ll need to take the tire off, but as long as you have access to the entirety of your tire, you really don’t. However, it might be helpful in the long run. Make sure you get the car off the ground though, so you can freely rotate the tire. It is important to remember that the plugs should only be used in the tread section of the tire. Due to the thinness of the sidewall, it is not recommended to place a plug there and the tire should be replaced.
  2. \n
  3. \n
    \n
    \n

    Once you’ve done that, fill a bottle with soapy water and spray it over the tire. Eventually, you’ll notice bubbles beginning to form. This is where the tire puncture is.

    \n
    \n
    \"image-2-600x200\"
    \n
    \n
  4. \n
  5. Once you’ve located the leak, take your reaming tool and expand the hole. This will make what was probably an uneven hole good enough to actually plug. If you can’t fit the reaming tool into the tire, take a small drill and expand the hole so it's just smaller than the reaming tool.
  6. \n
  7. \n
    \n
    \n

    Put the plug about halfway through the plug insertion tool. With the plug insertion tool, insert the tire plug. Be quick. Then trim the plug so it’s flush with the tire.

    \n
    \n
    \"image-3-600x200\"
    \n
    \n
  8. \n
  9. Refill the tire to the vehicle’s specifications. The proper PSI can be found on a sticker in the driver's door jam. Do not go off of what the tire says on the sidewall.
  10. \n
\n

How to change a tire:

\n

Of course, fixing a tire only works if you actually have the tools and supplies necessary, or the tire punctures are small enough that you can actually plug them. If either of these are a problem, then you may have to change the tire. All you’ll need for that is:

\n
    \n
  • Vehicle jack
  • \n
  • Lug wrench
  • \n
  • Spare tire
  • \n
\n

Changing a tire is fairly simple, here’s how you do it:

\n
    \n
  1. Set the parking brake.
  2. \n
  3. Check the air pressure of the spare tire to be sure it is properly inflated.
  4. \n
  5. Break the lug nuts loose before lifting the vehicle. If the tire is not a drive wheel, the wheel will just spin when you try to break the nuts loose.
  6. \n
  7. Get the tire off the ground. Use your vehicle jack to lift the vehicle up so you can actually remove the tire.
  8. \n
  9. Finish removing the lug nuts with your lug wrench. Set them aside, but keep them close.
  10. \n
  11. Take the flat tire off, and replace it with the spare.
  12. \n
  13. Tighten the lug nuts in a star pattern. Do not tighten them all the way.

    \n
    \n
    \"image-5-600x250\"
    \n
    \"image-4-600x250\"
    \n
    \n
  14. \n
  15. Put the car back on the ground.
  16. \n
  17. Finish tightening the lug nuts. This will ensure they are as tight as they need to be. Reference your owner's manual for proper torque specifications.
  18. \n
\n

Other options

\n

While the options above are the better options, there are a few others to consider. One is tire sealant. This is a great option for quick tire repair. However, it can be messy and harder to fix. It can also freeze.

\n

In conclusion

\n

Now, in both cases, be sure you see a professional mechanic as soon as possible. Both of these solutions to a flat tire are incredibly temporary. However, being prepared for when things go wrong is important. With this knowledge, you can feel safe and confident when out on the road. If you need jacks, lug wrenches, tire repair kits or air compressors, you can find them at zips.com.

","enable_google_amp_output_override":false,"generate_json_ld_enabled":true,"blog_post_schedule_task_uid":null,"blog_publish_to_social_media_task":"DONE_NOT_SENT","blog_publish_instant_email_task_uid":null,"blog_publish_instant_email_campaign_id":null,"blog_publish_instant_email_retry_count":null,"keywords":[],"composition_id":0,"is_crawlable_by_bots":false,"header":null,"published_at":1755715698644,"head_html":null,"footer_html":null,"attached_stylesheets":[],"enable_domain_stylesheets":null,"include_default_custom_css":null,"layout_sections":{},"past_mab_experiment_ids":[],"deleted_by":null,"featured_image_alt_text":"","enable_layout_stylesheets":null,"tweet":null,"tweet_at":null,"campaign_name":null,"campaign_utm":null,"meta_keywords":null,"meta_description":"This guide provides step-by-step instructions for fixing a flat tire or changing it on the road. Learn the tools needed, safety tips, and how to prepare for tire emergencies.","tweet_immediately":false,"publish_immediately":true,"security_state":"NONE","scheduled_update_date":0,"placement_guids":[],"header_template_path":null,"header_variant_name":null,"footer_template_path":null,"footer_variant_name":null,"global_block_overrides":{},"property_for_dynamic_page_title":null,"property_for_dynamic_page_slug":null,"property_for_dynamic_page_meta_description":null,"property_for_dynamic_page_featured_image":null,"property_for_dynamic_page_canonical_url":null,"preview_image_src":null,"legacy_blog_tabid":null,"legacy_post_guid":null,"performable_variation_letter":null,"style_override_id":null,"has_user_changes":true,"css":{},"css_text":"","unpublished_at":0,"published_by_id":79766377,"allowed_slug_conflict":false,"ai_features":null,"link_rel_canonical_url":"","page_redirected":false,"page_expiry_enabled":null,"page_expiry_date":null,"page_expiry_redirect_id":null,"page_expiry_redirect_url":null,"deleted_by_id":null,"state_when_deleted":null,"cloned_from":null,"staged_from":null,"personas":[],"compose_body":null,"featured_image":"https://48463649.fs1.hubspotusercontent-na1.net/hubfs/48463649/Blog/header-1200x500.jpg","featured_image_width":1200,"featured_image_height":500,"publish_timezone_offset":null,"theme_settings_values":null,"password":null,"last_edit_session_id":null,"last_edit_update_id":null,"created_by_agent":null},"metaDescription":"This guide provides step-by-step instructions for fixing a flat tire or changing it on the road. Learn the tools needed, safety tips, and how to prepare for tire emergencies.","metaKeywords":null,"name":"How to Fix or Change a Tire","nextPostFeaturedImage":"https://48463649.fs1.hubspotusercontent-na1.net/hubfs/48463649/0756464_zzsb2t3-zips-snatch-block-swiv-hook-web-1.jpg_900.jpg","nextPostFeaturedImageAltText":"","nextPostName":"Snatch Block Selection Guide: Tips & Considerations for Choosing the Correct Fit","nextPostSlug":"blog/snatch-block-selection-guide-tips-considerations-for-choosing-the-correct-fit","pageExpiryDate":null,"pageExpiryEnabled":null,"pageExpiryRedirectId":null,"pageExpiryRedirectUrl":null,"pageRedirected":false,"pageTitle":"How to Fix or Change a Tire","parentBlog":{"absoluteUrl":"/blog","allowComments":true,"ampBodyColor":"#404040","ampBodyFont":"'Helvetica Neue', Helvetica, Arial, sans-serif","ampBodyFontSize":"18","ampCustomCss":"","ampHeaderBackgroundColor":"#ffffff","ampHeaderColor":"#1e1e1e","ampHeaderFont":"'Helvetica Neue', Helvetica, Arial, sans-serif","ampHeaderFontSize":"36","ampLinkColor":"#416bb3","ampLogoAlt":"","ampLogoHeight":0,"ampLogoSrc":"","ampLogoWidth":0,"analyticsPageId":190096341139,"attachedStylesheets":[],"audienceAccess":"PUBLIC","businessUnitId":null,"captchaAfterDays":7,"captchaAlways":false,"categoryId":3,"cdnPurgeEmbargoTime":null,"closeCommentsOlder":0,"commentDateFormat":"medium","commentFormGuid":"a4128401-39db-4c54-a62b-88ff335d3a69","commentMaxThreadDepth":1,"commentModeration":false,"commentNotificationEmails":[],"commentShouldCreateContact":false,"commentVerificationText":"","cosObjectType":"BLOG","created":1747163443999,"createdDateTime":1747163443999,"dailyNotificationEmailId":null,"dateFormattingLanguage":null,"defaultGroupStyleId":"","defaultNotificationFromName":"","defaultNotificationReplyTo":"","deletedAt":0,"description":"","domain":"","domainWhenPublished":"www.zips.com","emailApiSubscriptionId":null,"enableGoogleAmpOutput":true,"enableSocialAutoPublishing":false,"generateJsonLdEnabled":true,"header":null,"htmlFooter":"","htmlFooterIsShared":true,"htmlHead":"","htmlHeadIsShared":true,"htmlKeywords":[],"htmlTitle":"blog","id":190096341139,"ilsSubscriptionListsByType":{},"instantNotificationEmailId":null,"itemLayoutId":null,"itemTemplateIsShared":false,"itemTemplatePath":"zips-basic-theme/templates/blog-post.html","label":"blog","language":"en","legacyGuid":null,"legacyModuleId":null,"legacyTabId":null,"listingLayoutId":null,"listingPageId":190096341141,"listingTemplatePath":"","liveDomain":"www.zips.com","monthFilterFormat":"MMMM yyyy","monthlyNotificationEmailId":null,"name":"blog","parentBlogUpdateTaskId":null,"portalId":48463649,"postHtmlFooter":"","postHtmlHead":"","postsPerListingPage":111,"postsPerRssFeed":10,"publicAccessRules":[],"publicAccessRulesEnabled":false,"publicTitle":"blog","publishDateFormat":"medium","resolvedDomain":"www.zips.com","rootUrl":"/blog","rssCustomFeed":null,"rssDescription":null,"rssItemFooter":null,"rssItemHeader":null,"settingsOverrides":{"itemLayoutId":false,"itemTemplatePath":false,"itemTemplateIsShared":false,"listingLayoutId":false,"listingTemplatePath":false,"postsPerListingPage":false,"showSummaryInListing":false,"useFeaturedImageInSummary":false,"htmlHead":false,"postHtmlHead":false,"htmlHeadIsShared":false,"htmlFooter":false,"listingPageHtmlFooter":false,"postHtmlFooter":false,"htmlFooterIsShared":false,"attachedStylesheets":false,"postsPerRssFeed":false,"showSummaryInRss":false,"showSummaryInEmails":false,"showSummariesInEmails":false,"allowComments":false,"commentShouldCreateContact":false,"commentModeration":false,"closeCommentsOlder":false,"commentNotificationEmails":false,"commentMaxThreadDepth":false,"commentVerificationText":false,"socialAccountTwitter":false,"showSocialLinkTwitter":false,"showSocialLinkLinkedin":false,"showSocialLinkFacebook":false,"enableGoogleAmpOutput":false,"ampLogoSrc":false,"ampLogoHeight":false,"ampLogoWidth":false,"ampLogoAlt":false,"ampHeaderFont":false,"ampHeaderFontSize":false,"ampHeaderColor":false,"ampHeaderBackgroundColor":false,"ampBodyFont":false,"ampBodyFontSize":false,"ampBodyColor":false,"ampLinkColor":false,"generateJsonLdEnabled":false},"showSocialLinkFacebook":true,"showSocialLinkLinkedin":true,"showSocialLinkTwitter":true,"showSummaryInEmails":true,"showSummaryInListing":true,"showSummaryInRss":true,"siteId":null,"slug":"blog","socialAccountTwitter":"","state":null,"subscriptionContactsProperty":null,"subscriptionEmailType":null,"subscriptionFormGuid":null,"subscriptionListsByType":{},"title":null,"translatedFromId":null,"translations":{},"updated":1755110916417,"updatedDateTime":1755110916417,"urlBase":"www.zips.com/blog","urlSegments":{"all":"all","archive":"archive","author":"author","page":"page","tag":"tag"},"useFeaturedImageInSummary":true,"usesDefaultTemplate":false,"weeklyNotificationEmailId":null},"password":null,"pastMabExperimentIds":[],"performableGuid":null,"performableVariationLetter":null,"personalizationStrategyId":null,"personalizationVariantStatus":null,"personas":[],"placementGuids":[],"portableKey":null,"portalId":48463649,"position":null,"postBody":"

When on the road, anything is possible. One of the most common issues is when you’re driving down the road, and you find out you consistently have low tire pressure. It might be even worse. You might have a flat tire. If your phone is dead, or it would just be too long of a wait for help, you may have to fix the problem yourself.

\n\n

How to fix a flat tire:

\n\n
\n
\n

Luckily, you don’t need to be an expert in tire repair. You’ll just need a few things before you can start.

\n
\n
\n
    \n
  • Vehicle jack
  • \n
  • Bottle of soapy water
  • \n
  • Tire plugging kit
  • \n
  • Air compressor
  • \n
  • Hand drill
  • \n
\n

Now, here's how you fix a tire:

\n
\n
\"kit-300x230\"
\n
\n
\n
\"man-fixing-car-tire\"
\n
\n
    \n
  1. Get the tire off the ground. Some people say you’ll need to take the tire off, but as long as you have access to the entirety of your tire, you really don’t. However, it might be helpful in the long run. Make sure you get the car off the ground though, so you can freely rotate the tire. It is important to remember that the plugs should only be used in the tread section of the tire. Due to the thinness of the sidewall, it is not recommended to place a plug there and the tire should be replaced.
  2. \n
  3. \n
    \n
    \n

    Once you’ve done that, fill a bottle with soapy water and spray it over the tire. Eventually, you’ll notice bubbles beginning to form. This is where the tire puncture is.

    \n
    \n
    \"image-2-600x200\"
    \n
    \n
  4. \n
  5. Once you’ve located the leak, take your reaming tool and expand the hole. This will make what was probably an uneven hole good enough to actually plug. If you can’t fit the reaming tool into the tire, take a small drill and expand the hole so it's just smaller than the reaming tool.
  6. \n
  7. \n
    \n
    \n

    Put the plug about halfway through the plug insertion tool. With the plug insertion tool, insert the tire plug. Be quick. Then trim the plug so it’s flush with the tire.

    \n
    \n
    \"image-3-600x200\"
    \n
    \n
  8. \n
  9. Refill the tire to the vehicle’s specifications. The proper PSI can be found on a sticker in the driver's door jam. Do not go off of what the tire says on the sidewall.
  10. \n
\n

How to change a tire:

\n

Of course, fixing a tire only works if you actually have the tools and supplies necessary, or the tire punctures are small enough that you can actually plug them. If either of these are a problem, then you may have to change the tire. All you’ll need for that is:

\n
    \n
  • Vehicle jack
  • \n
  • Lug wrench
  • \n
  • Spare tire
  • \n
\n

Changing a tire is fairly simple, here’s how you do it:

\n
    \n
  1. Set the parking brake.
  2. \n
  3. Check the air pressure of the spare tire to be sure it is properly inflated.
  4. \n
  5. Break the lug nuts loose before lifting the vehicle. If the tire is not a drive wheel, the wheel will just spin when you try to break the nuts loose.
  6. \n
  7. Get the tire off the ground. Use your vehicle jack to lift the vehicle up so you can actually remove the tire.
  8. \n
  9. Finish removing the lug nuts with your lug wrench. Set them aside, but keep them close.
  10. \n
  11. Take the flat tire off, and replace it with the spare.
  12. \n
  13. Tighten the lug nuts in a star pattern. Do not tighten them all the way.

    \n
    \n
    \"image-5-600x250\"
    \n
    \"image-4-600x250\"
    \n
    \n
  14. \n
  15. Put the car back on the ground.
  16. \n
  17. Finish tightening the lug nuts. This will ensure they are as tight as they need to be. Reference your owner's manual for proper torque specifications.
  18. \n
\n

Other options

\n

While the options above are the better options, there are a few others to consider. One is tire sealant. This is a great option for quick tire repair. However, it can be messy and harder to fix. It can also freeze.

\n

In conclusion

\n

Now, in both cases, be sure you see a professional mechanic as soon as possible. Both of these solutions to a flat tire are incredibly temporary. However, being prepared for when things go wrong is important. With this knowledge, you can feel safe and confident when out on the road. If you need jacks, lug wrenches, tire repair kits or air compressors, you can find them at zips.com.

","postBodyRss":"

When on the road, anything is possible. One of the most common issues is when you’re driving down the road, and you find out you consistently have low tire pressure. It might be even worse. You might have a flat tire. If your phone is dead, or it would just be too long of a wait for help, you may have to fix the problem yourself.

\n\n

How to fix a flat tire:

\n\n
\n
\n

Luckily, you don’t need to be an expert in tire repair. You’ll just need a few things before you can start.

\n
\n
\n
    \n
  • Vehicle jack
  • \n
  • Bottle of soapy water
  • \n
  • Tire plugging kit
  • \n
  • Air compressor
  • \n
  • Hand drill
  • \n
\n

Now, here's how you fix a tire:

\n
\n
\"kit-300x230\"
\n
\n
\n
\"man-fixing-car-tire\"
\n
\n
    \n
  1. Get the tire off the ground. Some people say you’ll need to take the tire off, but as long as you have access to the entirety of your tire, you really don’t. However, it might be helpful in the long run. Make sure you get the car off the ground though, so you can freely rotate the tire. It is important to remember that the plugs should only be used in the tread section of the tire. Due to the thinness of the sidewall, it is not recommended to place a plug there and the tire should be replaced.
  2. \n
  3. \n
    \n
    \n

    Once you’ve done that, fill a bottle with soapy water and spray it over the tire. Eventually, you’ll notice bubbles beginning to form. This is where the tire puncture is.

    \n
    \n
    \"image-2-600x200\"
    \n
    \n
  4. \n
  5. Once you’ve located the leak, take your reaming tool and expand the hole. This will make what was probably an uneven hole good enough to actually plug. If you can’t fit the reaming tool into the tire, take a small drill and expand the hole so it's just smaller than the reaming tool.
  6. \n
  7. \n
    \n
    \n

    Put the plug about halfway through the plug insertion tool. With the plug insertion tool, insert the tire plug. Be quick. Then trim the plug so it’s flush with the tire.

    \n
    \n
    \"image-3-600x200\"
    \n
    \n
  8. \n
  9. Refill the tire to the vehicle’s specifications. The proper PSI can be found on a sticker in the driver's door jam. Do not go off of what the tire says on the sidewall.
  10. \n
\n

How to change a tire:

\n

Of course, fixing a tire only works if you actually have the tools and supplies necessary, or the tire punctures are small enough that you can actually plug them. If either of these are a problem, then you may have to change the tire. All you’ll need for that is:

\n
    \n
  • Vehicle jack
  • \n
  • Lug wrench
  • \n
  • Spare tire
  • \n
\n

Changing a tire is fairly simple, here’s how you do it:

\n
    \n
  1. Set the parking brake.
  2. \n
  3. Check the air pressure of the spare tire to be sure it is properly inflated.
  4. \n
  5. Break the lug nuts loose before lifting the vehicle. If the tire is not a drive wheel, the wheel will just spin when you try to break the nuts loose.
  6. \n
  7. Get the tire off the ground. Use your vehicle jack to lift the vehicle up so you can actually remove the tire.
  8. \n
  9. Finish removing the lug nuts with your lug wrench. Set them aside, but keep them close.
  10. \n
  11. Take the flat tire off, and replace it with the spare.
  12. \n
  13. Tighten the lug nuts in a star pattern. Do not tighten them all the way.

    \n
    \n
    \"image-5-600x250\"
    \n
    \"image-4-600x250\"
    \n
    \n
  14. \n
  15. Put the car back on the ground.
  16. \n
  17. Finish tightening the lug nuts. This will ensure they are as tight as they need to be. Reference your owner's manual for proper torque specifications.
  18. \n
\n

Other options

\n

While the options above are the better options, there are a few others to consider. One is tire sealant. This is a great option for quick tire repair. However, it can be messy and harder to fix. It can also freeze.

\n

In conclusion

\n

Now, in both cases, be sure you see a professional mechanic as soon as possible. Both of these solutions to a flat tire are incredibly temporary. However, being prepared for when things go wrong is important. With this knowledge, you can feel safe and confident when out on the road. If you need jacks, lug wrenches, tire repair kits or air compressors, you can find them at zips.com.

","postEmailContent":"

When on the road, anything is possible. One of the most common issues is when you’re driving down the road, and you find out you consistently have low tire pressure. It might be even worse. You might have a flat tire. If your phone is dead, or it would just be too long of a wait for help, you may have to fix the problem yourself.

","postFeaturedImageIfEnabled":"https://48463649.fs1.hubspotusercontent-na1.net/hubfs/48463649/Blog/header-1200x500.jpg","postListContent":"

When on the road, anything is possible. One of the most common issues is when you’re driving down the road, and you find out you consistently have low tire pressure. It might be even worse. You might have a flat tire. If your phone is dead, or it would just be too long of a wait for help, you may have to fix the problem yourself.

","postListSummaryFeaturedImage":"https://48463649.fs1.hubspotusercontent-na1.net/hubfs/48463649/Blog/header-1200x500.jpg","postRssContent":"

When on the road, anything is possible. One of the most common issues is when you’re driving down the road, and you find out you consistently have low tire pressure. It might be even worse. You might have a flat tire. If your phone is dead, or it would just be too long of a wait for help, you may have to fix the problem yourself.

","postRssSummaryFeaturedImage":"https://48463649.fs1.hubspotusercontent-na1.net/hubfs/48463649/Blog/header-1200x500.jpg","postSummary":"

When on the road, anything is possible. One of the most common issues is when you’re driving down the road, and you find out you consistently have low tire pressure. It might be even worse. You might have a flat tire. If your phone is dead, or it would just be too long of a wait for help, you may have to fix the problem yourself.

\n","postSummaryRss":"

When on the road, anything is possible. One of the most common issues is when you’re driving down the road, and you find out you consistently have low tire pressure. It might be even worse. You might have a flat tire. If your phone is dead, or it would just be too long of a wait for help, you may have to fix the problem yourself.

","postTemplate":"zips-basic-theme/templates/blog-post.html","previewImageSrc":null,"previewKey":"aaIBWOCd","previousPostFeaturedImage":"https://48463649.fs1.hubspotusercontent-na1.net/hubfs/48463649/header-Aug-04-2025-08-49-13-9314-PM.png","previousPostFeaturedImageAltText":"","previousPostName":"How to Maintain Your Winch","previousPostSlug":"blog/how-to-maintain-your-winch","processingStatus":"PUBLISHED","propertyForDynamicPageCanonicalUrl":null,"propertyForDynamicPageFeaturedImage":null,"propertyForDynamicPageMetaDescription":null,"propertyForDynamicPageSlug":null,"propertyForDynamicPageTitle":null,"publicAccessRules":[],"publicAccessRulesEnabled":false,"publishDate":1712926800000,"publishDateLocalTime":1712926800000,"publishDateLocalized":{"date":1712926800000,"format":"medium","language":null},"publishImmediately":true,"publishTimezoneOffset":null,"publishedAt":1755715698644,"publishedByEmail":null,"publishedById":79766377,"publishedByName":null,"publishedUrl":"/blog/how-to-fix-or-change-a-tire","resolvedDomain":"www.zips.com","resolvedLanguage":null,"rssBody":"

When on the road, anything is possible. One of the most common issues is when you’re driving down the road, and you find out you consistently have low tire pressure. It might be even worse. You might have a flat tire. If your phone is dead, or it would just be too long of a wait for help, you may have to fix the problem yourself.

\n\n

How to fix a flat tire:

\n\n
\n
\n

Luckily, you don’t need to be an expert in tire repair. You’ll just need a few things before you can start.

\n
\n
\n
    \n
  • Vehicle jack
  • \n
  • Bottle of soapy water
  • \n
  • Tire plugging kit
  • \n
  • Air compressor
  • \n
  • Hand drill
  • \n
\n

Now, here's how you fix a tire:

\n
\n
\"kit-300x230\"
\n
\n
\n
\"man-fixing-car-tire\"
\n
\n
    \n
  1. Get the tire off the ground. Some people say you’ll need to take the tire off, but as long as you have access to the entirety of your tire, you really don’t. However, it might be helpful in the long run. Make sure you get the car off the ground though, so you can freely rotate the tire. It is important to remember that the plugs should only be used in the tread section of the tire. Due to the thinness of the sidewall, it is not recommended to place a plug there and the tire should be replaced.
  2. \n
  3. \n
    \n
    \n

    Once you’ve done that, fill a bottle with soapy water and spray it over the tire. Eventually, you’ll notice bubbles beginning to form. This is where the tire puncture is.

    \n
    \n
    \"image-2-600x200\"
    \n
    \n
  4. \n
  5. Once you’ve located the leak, take your reaming tool and expand the hole. This will make what was probably an uneven hole good enough to actually plug. If you can’t fit the reaming tool into the tire, take a small drill and expand the hole so it's just smaller than the reaming tool.
  6. \n
  7. \n
    \n
    \n

    Put the plug about halfway through the plug insertion tool. With the plug insertion tool, insert the tire plug. Be quick. Then trim the plug so it’s flush with the tire.

    \n
    \n
    \"image-3-600x200\"
    \n
    \n
  8. \n
  9. Refill the tire to the vehicle’s specifications. The proper PSI can be found on a sticker in the driver's door jam. Do not go off of what the tire says on the sidewall.
  10. \n
\n

How to change a tire:

\n

Of course, fixing a tire only works if you actually have the tools and supplies necessary, or the tire punctures are small enough that you can actually plug them. If either of these are a problem, then you may have to change the tire. All you’ll need for that is:

\n
    \n
  • Vehicle jack
  • \n
  • Lug wrench
  • \n
  • Spare tire
  • \n
\n

Changing a tire is fairly simple, here’s how you do it:

\n
    \n
  1. Set the parking brake.
  2. \n
  3. Check the air pressure of the spare tire to be sure it is properly inflated.
  4. \n
  5. Break the lug nuts loose before lifting the vehicle. If the tire is not a drive wheel, the wheel will just spin when you try to break the nuts loose.
  6. \n
  7. Get the tire off the ground. Use your vehicle jack to lift the vehicle up so you can actually remove the tire.
  8. \n
  9. Finish removing the lug nuts with your lug wrench. Set them aside, but keep them close.
  10. \n
  11. Take the flat tire off, and replace it with the spare.
  12. \n
  13. Tighten the lug nuts in a star pattern. Do not tighten them all the way.

    \n
    \n
    \"image-5-600x250\"
    \n
    \"image-4-600x250\"
    \n
    \n
  14. \n
  15. Put the car back on the ground.
  16. \n
  17. Finish tightening the lug nuts. This will ensure they are as tight as they need to be. Reference your owner's manual for proper torque specifications.
  18. \n
\n

Other options

\n

While the options above are the better options, there are a few others to consider. One is tire sealant. This is a great option for quick tire repair. However, it can be messy and harder to fix. It can also freeze.

\n

In conclusion

\n

Now, in both cases, be sure you see a professional mechanic as soon as possible. Both of these solutions to a flat tire are incredibly temporary. However, being prepared for when things go wrong is important. With this knowledge, you can feel safe and confident when out on the road. If you need jacks, lug wrenches, tire repair kits or air compressors, you can find them at zips.com.

","rssSummary":"

When on the road, anything is possible. One of the most common issues is when you’re driving down the road, and you find out you consistently have low tire pressure. It might be even worse. You might have a flat tire. If your phone is dead, or it would just be too long of a wait for help, you may have to fix the problem yourself.

\n","rssSummaryFeaturedImage":"https://48463649.fs1.hubspotusercontent-na1.net/hubfs/48463649/Blog/header-1200x500.jpg","scheduledUpdateDate":0,"screenshotPreviewTakenAt":1770058099193,"screenshotPreviewUrl":"https://cdn1.hubspot.net/hubshotv3/prod/e/0/bacf5af2-82eb-4be1-acbf-5228df07872d.png","sections":{},"securityState":"NONE","siteId":null,"slug":"blog/how-to-fix-or-change-a-tire","stagedFrom":null,"state":"PUBLISHED","stateWhenDeleted":null,"structuredContentPageType":null,"structuredContentType":null,"styleOverrideId":null,"subcategory":"normal_blog_post","syncedWithBlogRoot":true,"tagIds":[192174528148,194719179289,194719586666],"tagList":[{"categoryId":3,"cdnPurgeEmbargoTime":null,"contentIds":[],"cosObjectType":"TAG","created":1751601475164,"deletedAt":0,"description":"","id":192174528148,"label":"Automotive","language":null,"name":"Automotive","portalId":48463649,"slug":"automotive","translatedFromId":null,"translations":{},"updated":1751601475164},{"categoryId":3,"cdnPurgeEmbargoTime":null,"contentIds":[],"cosObjectType":"TAG","created":1755545213046,"deletedAt":0,"description":"","id":194719179289,"label":"Industry Knowledge & Updates","language":null,"name":"Industry Knowledge & Updates","portalId":48463649,"slug":"industry-knowledge-updates","translatedFromId":null,"translations":{},"updated":1755545213046},{"categoryId":3,"cdnPurgeEmbargoTime":null,"contentIds":[],"cosObjectType":"TAG","created":1755545331471,"deletedAt":0,"description":"","id":194719586666,"label":"Product Guides","language":null,"name":"Product Guides","portalId":48463649,"slug":"product-guides","translatedFromId":null,"translations":{},"updated":1755545331471}],"tagNames":["Automotive","Industry Knowledge & Updates","Product Guides"],"teamPerms":[],"templatePath":"","templatePathForRender":"zips-basic-theme/templates/blog-post.html","textToAudioFileId":null,"textToAudioGenerationRequestId":null,"themePath":null,"themeSettingsValues":null,"title":"How to Fix or Change a Tire","tmsId":null,"topicIds":[192174528148,194719179289,194719586666],"topicList":[{"categoryId":3,"cdnPurgeEmbargoTime":null,"contentIds":[],"cosObjectType":"TAG","created":1751601475164,"deletedAt":0,"description":"","id":192174528148,"label":"Automotive","language":null,"name":"Automotive","portalId":48463649,"slug":"automotive","translatedFromId":null,"translations":{},"updated":1751601475164},{"categoryId":3,"cdnPurgeEmbargoTime":null,"contentIds":[],"cosObjectType":"TAG","created":1755545213046,"deletedAt":0,"description":"","id":194719179289,"label":"Industry Knowledge & Updates","language":null,"name":"Industry Knowledge & Updates","portalId":48463649,"slug":"industry-knowledge-updates","translatedFromId":null,"translations":{},"updated":1755545213046},{"categoryId":3,"cdnPurgeEmbargoTime":null,"contentIds":[],"cosObjectType":"TAG","created":1755545331471,"deletedAt":0,"description":"","id":194719586666,"label":"Product Guides","language":null,"name":"Product Guides","portalId":48463649,"slug":"product-guides","translatedFromId":null,"translations":{},"updated":1755545331471}],"topicNames":["Automotive","Industry Knowledge & Updates","Product Guides"],"topics":[192174528148,194719179289,194719586666],"translatedContent":{},"translatedFromId":null,"translations":{},"tweet":null,"tweetAt":null,"tweetImmediately":false,"unpublishedAt":0,"updated":1755715698649,"updatedById":79766377,"upsizeFeaturedImage":false,"url":"/blog/how-to-fix-or-change-a-tire","useFeaturedImage":true,"userPerms":[],"views":null,"visibleToAll":null,"widgetContainers":{},"widgetcontainers":{},"widgets":{}},{"ab":false,"abStatus":null,"abTestId":null,"abVariation":false,"abVariationAutomated":false,"absoluteUrl":"/blog/snatch-block-selection-guide-tips-considerations-for-choosing-the-correct-fit","afterPostBody":null,"aifeatures":null,"allowedSlugConflict":false,"analytics":null,"analyticsPageId":"193393611877","analyticsPageType":"blog-post","approvalStatus":null,"archived":false,"archivedAt":0,"archivedInDashboard":false,"areCommentsAllowed":true,"attachedStylesheets":[],"audienceAccess":"PUBLIC","author":null,"authorName":null,"authorUsername":null,"blogAuthor":{"avatar":"","bio":"","cdnPurgeEmbargoTime":null,"cosObjectType":"BLOG_AUTHOR","created":1750825727422,"deletedAt":0,"displayName":"Zip's","email":null,"facebook":"","fullName":"Zip's","gravatarUrl":null,"hasSocialProfiles":false,"id":191785406258,"label":"Zip's","language":"en","linkedin":"","name":"Zip's","portalId":48463649,"slug":"zips","translatedFromId":null,"translations":{},"twitter":"","twitterUsername":"","updated":1750825727422,"userId":null,"username":null,"website":""},"blogAuthorId":191785406258,"blogAuthorIdList":[191785406258],"blogAuthorList":[{"avatar":"","bio":"","cdnPurgeEmbargoTime":null,"cosObjectType":"BLOG_AUTHOR","created":1750825727422,"deletedAt":0,"displayName":"Zip's","email":null,"facebook":"","fullName":"Zip's","gravatarUrl":null,"hasSocialProfiles":false,"id":191785406258,"label":"Zip's","language":"en","linkedin":"","name":"Zip's","portalId":48463649,"slug":"zips","translatedFromId":null,"translations":{},"twitter":"","twitterUsername":"","updated":1750825727422,"userId":null,"username":null,"website":""}],"blogPostAuthor":{"avatar":"","bio":"","cdnPurgeEmbargoTime":null,"cosObjectType":"BLOG_AUTHOR","created":1750825727422,"deletedAt":0,"displayName":"Zip's","email":null,"facebook":"","fullName":"Zip's","gravatarUrl":null,"hasSocialProfiles":false,"id":191785406258,"label":"Zip's","language":"en","linkedin":"","name":"Zip's","portalId":48463649,"slug":"zips","translatedFromId":null,"translations":{},"twitter":"","twitterUsername":"","updated":1750825727422,"userId":null,"username":null,"website":""},"blogPostScheduleTaskUid":null,"blogPublishInstantEmailCampaignId":null,"blogPublishInstantEmailRetryCount":0,"blogPublishInstantEmailTaskUid":null,"blogPublishToSocialMediaTask":"DONE_NOT_SENT","blueprintTypeId":0,"businessUnitId":null,"campaign":null,"campaignName":null,"campaignUtm":null,"category":3,"categoryId":3,"cdnPurgeEmbargoTime":null,"checkPostLevelAudienceAccessFirst":true,"clonedFrom":193395269669,"composeBody":null,"compositionId":0,"contentAccessRuleIds":[],"contentAccessRuleTypes":[],"contentGroup":190096341139,"contentGroupId":190096341139,"contentTypeCategory":3,"contentTypeCategoryId":3,"contentTypeId":null,"created":1753456606082,"createdByAgent":null,"createdById":76755706,"createdTime":1753456606082,"crmObjectId":null,"css":{},"cssText":"","ctaClicks":null,"ctaViews":null,"currentState":"PUBLISHED","currentlyPublished":true,"deletedAt":0,"deletedBy":null,"deletedByEmail":null,"deletedById":null,"domain":"","dynamicPageDataSourceId":null,"dynamicPageDataSourceType":null,"dynamicPageHubDbTableId":null,"enableDomainStylesheets":null,"enableGoogleAmpOutputOverride":false,"enableLayoutStylesheets":null,"errors":[],"featuredImage":"https://48463649.fs1.hubspotusercontent-na1.net/hubfs/48463649/0756464_zzsb2t3-zips-snatch-block-swiv-hook-web-1.jpg_900.jpg","featuredImageAltText":"","featuredImageHeight":600,"featuredImageLength":0,"featuredImageWidth":900,"flexAreas":{},"folderId":null,"footerHtml":null,"footerTemplatePath":null,"footerVariantName":null,"freezeDate":1703016000000,"generateJsonLdEnabledOverride":true,"globalBlockOverrides":{},"hasContentAccessRules":false,"hasUserChanges":true,"headHtml":"","header":null,"headerTemplatePath":null,"headerVariantName":null,"htmlTitle":"Snatch Block Selection Guide: Tips & Considerations for Choosing the Correct Fit","id":193393611877,"includeDefaultCustomCss":null,"isCaptchaRequired":true,"isCrawlableByBots":false,"isDraft":false,"isInstantEmailEnabled":false,"isPublished":true,"isSocialPublishingEnabled":false,"keywords":[],"label":"Snatch Block Selection Guide: Tips & Considerations for Choosing the Correct Fit","language":"en","lastEditSessionId":null,"lastEditUpdateId":null,"layoutSections":{},"legacyBlogTabid":null,"legacyId":null,"legacyPostGuid":"","linkRelCanonicalUrl":"","listTemplate":"","liveDomain":"www.zips.com","mab":false,"mabExperimentId":null,"mabMaster":false,"mabVariant":false,"marketingCampaignGuids":[],"meta":{"html_title":"Snatch Block Selection Guide: Tips & Considerations for Choosing the Correct Fit","public_access_rules":[],"public_access_rules_enabled":false,"use_featured_image":true,"tag_ids":[192169769490,192174528148,192174529697,192174572389,192174572390,194719179289,194719586666],"topic_ids":[192169769490,192174528148,192174529697,192174572389,192174572390,194719179289,194719586666],"post_summary":"
\n","post_body":"
\n
\n","rss_summary":"
\n","rss_body":"
\n
\n","enable_google_amp_output_override":false,"generate_json_ld_enabled":true,"blog_post_schedule_task_uid":null,"blog_publish_to_social_media_task":"DONE_NOT_SENT","blog_publish_instant_email_task_uid":null,"blog_publish_instant_email_campaign_id":null,"blog_publish_instant_email_retry_count":0,"keywords":[],"composition_id":0,"is_crawlable_by_bots":false,"header":null,"published_at":1755782495368,"head_html":"","footer_html":null,"attached_stylesheets":[],"enable_domain_stylesheets":null,"include_default_custom_css":null,"layout_sections":{},"past_mab_experiment_ids":[],"deleted_by":null,"featured_image_alt_text":"","enable_layout_stylesheets":null,"tweet":null,"tweet_at":null,"campaign_name":null,"campaign_utm":null,"meta_keywords":null,"meta_description":"Dolly Inspection Tips","tweet_immediately":false,"publish_immediately":true,"security_state":"NONE","scheduled_update_date":0,"placement_guids":[],"header_template_path":null,"header_variant_name":null,"footer_template_path":null,"footer_variant_name":null,"global_block_overrides":{},"property_for_dynamic_page_title":null,"property_for_dynamic_page_slug":null,"property_for_dynamic_page_meta_description":null,"property_for_dynamic_page_featured_image":null,"property_for_dynamic_page_canonical_url":null,"preview_image_src":null,"legacy_blog_tabid":null,"legacy_post_guid":"","performable_variation_letter":null,"style_override_id":null,"has_user_changes":true,"css":{},"css_text":"","unpublished_at":0,"published_by_id":79766377,"allowed_slug_conflict":false,"ai_features":null,"link_rel_canonical_url":"","page_redirected":false,"page_expiry_enabled":false,"page_expiry_date":null,"page_expiry_redirect_id":null,"page_expiry_redirect_url":null,"deleted_by_id":null,"state_when_deleted":null,"cloned_from":193395269669,"staged_from":null,"personas":[],"compose_body":null,"featured_image":"https://48463649.fs1.hubspotusercontent-na1.net/hubfs/48463649/0756464_zzsb2t3-zips-snatch-block-swiv-hook-web-1.jpg_900.jpg","featured_image_width":900,"featured_image_height":600,"publish_timezone_offset":null,"theme_settings_values":null,"password":null,"last_edit_session_id":null,"last_edit_update_id":null,"created_by_agent":null},"metaDescription":"Dolly Inspection Tips","metaKeywords":null,"name":"Snatch Block Selection Guide: Tips & Considerations for Choosing the Correct Fit","nextPostFeaturedImage":"https://48463649.fs1.hubspotusercontent-na1.net/hubfs/48463649/0849409_dp5000-series-web.jpg_900.jpg","nextPostFeaturedImageAltText":"","nextPostName":"How to Choose the Best Hose Reel for You","nextPostSlug":"blog/how-to-choose-the-best-hose-reel-for-you","pageExpiryDate":null,"pageExpiryEnabled":false,"pageExpiryRedirectId":null,"pageExpiryRedirectUrl":null,"pageRedirected":false,"pageTitle":"Snatch Block Selection Guide: Tips & Considerations for Choosing the Correct Fit","parentBlog":{"absoluteUrl":"/blog","allowComments":true,"ampBodyColor":"#404040","ampBodyFont":"'Helvetica Neue', Helvetica, Arial, sans-serif","ampBodyFontSize":"18","ampCustomCss":"","ampHeaderBackgroundColor":"#ffffff","ampHeaderColor":"#1e1e1e","ampHeaderFont":"'Helvetica Neue', Helvetica, Arial, sans-serif","ampHeaderFontSize":"36","ampLinkColor":"#416bb3","ampLogoAlt":"","ampLogoHeight":0,"ampLogoSrc":"","ampLogoWidth":0,"analyticsPageId":190096341139,"attachedStylesheets":[],"audienceAccess":"PUBLIC","businessUnitId":null,"captchaAfterDays":7,"captchaAlways":false,"categoryId":3,"cdnPurgeEmbargoTime":null,"closeCommentsOlder":0,"commentDateFormat":"medium","commentFormGuid":"a4128401-39db-4c54-a62b-88ff335d3a69","commentMaxThreadDepth":1,"commentModeration":false,"commentNotificationEmails":[],"commentShouldCreateContact":false,"commentVerificationText":"","cosObjectType":"BLOG","created":1747163443999,"createdDateTime":1747163443999,"dailyNotificationEmailId":null,"dateFormattingLanguage":null,"defaultGroupStyleId":"","defaultNotificationFromName":"","defaultNotificationReplyTo":"","deletedAt":0,"description":"","domain":"","domainWhenPublished":"www.zips.com","emailApiSubscriptionId":null,"enableGoogleAmpOutput":true,"enableSocialAutoPublishing":false,"generateJsonLdEnabled":true,"header":null,"htmlFooter":"","htmlFooterIsShared":true,"htmlHead":"","htmlHeadIsShared":true,"htmlKeywords":[],"htmlTitle":"blog","id":190096341139,"ilsSubscriptionListsByType":{},"instantNotificationEmailId":null,"itemLayoutId":null,"itemTemplateIsShared":false,"itemTemplatePath":"zips-basic-theme/templates/blog-post.html","label":"blog","language":"en","legacyGuid":null,"legacyModuleId":null,"legacyTabId":null,"listingLayoutId":null,"listingPageId":190096341141,"listingTemplatePath":"","liveDomain":"www.zips.com","monthFilterFormat":"MMMM yyyy","monthlyNotificationEmailId":null,"name":"blog","parentBlogUpdateTaskId":null,"portalId":48463649,"postHtmlFooter":"","postHtmlHead":"","postsPerListingPage":111,"postsPerRssFeed":10,"publicAccessRules":[],"publicAccessRulesEnabled":false,"publicTitle":"blog","publishDateFormat":"medium","resolvedDomain":"www.zips.com","rootUrl":"/blog","rssCustomFeed":null,"rssDescription":null,"rssItemFooter":null,"rssItemHeader":null,"settingsOverrides":{"itemLayoutId":false,"itemTemplatePath":false,"itemTemplateIsShared":false,"listingLayoutId":false,"listingTemplatePath":false,"postsPerListingPage":false,"showSummaryInListing":false,"useFeaturedImageInSummary":false,"htmlHead":false,"postHtmlHead":false,"htmlHeadIsShared":false,"htmlFooter":false,"listingPageHtmlFooter":false,"postHtmlFooter":false,"htmlFooterIsShared":false,"attachedStylesheets":false,"postsPerRssFeed":false,"showSummaryInRss":false,"showSummaryInEmails":false,"showSummariesInEmails":false,"allowComments":false,"commentShouldCreateContact":false,"commentModeration":false,"closeCommentsOlder":false,"commentNotificationEmails":false,"commentMaxThreadDepth":false,"commentVerificationText":false,"socialAccountTwitter":false,"showSocialLinkTwitter":false,"showSocialLinkLinkedin":false,"showSocialLinkFacebook":false,"enableGoogleAmpOutput":false,"ampLogoSrc":false,"ampLogoHeight":false,"ampLogoWidth":false,"ampLogoAlt":false,"ampHeaderFont":false,"ampHeaderFontSize":false,"ampHeaderColor":false,"ampHeaderBackgroundColor":false,"ampBodyFont":false,"ampBodyFontSize":false,"ampBodyColor":false,"ampLinkColor":false,"generateJsonLdEnabled":false},"showSocialLinkFacebook":true,"showSocialLinkLinkedin":true,"showSocialLinkTwitter":true,"showSummaryInEmails":true,"showSummaryInListing":true,"showSummaryInRss":true,"siteId":null,"slug":"blog","socialAccountTwitter":"","state":null,"subscriptionContactsProperty":null,"subscriptionEmailType":null,"subscriptionFormGuid":null,"subscriptionListsByType":{},"title":null,"translatedFromId":null,"translations":{},"updated":1755110916417,"updatedDateTime":1755110916417,"urlBase":"www.zips.com/blog","urlSegments":{"all":"all","archive":"archive","author":"author","page":"page","tag":"tag"},"useFeaturedImageInSummary":true,"usesDefaultTemplate":false,"weeklyNotificationEmailId":null},"password":null,"pastMabExperimentIds":[],"performableGuid":null,"performableVariationLetter":null,"personalizationStrategyId":null,"personalizationVariantStatus":null,"personas":[],"placementGuids":[],"portableKey":null,"portalId":48463649,"position":null,"postBody":"
\n
\n","postBodyRss":"
\n
\n","postEmailContent":"
\n
\n
\n \n
\n
\n
","postFeaturedImageIfEnabled":"https://48463649.fs1.hubspotusercontent-na1.net/hubfs/48463649/0756464_zzsb2t3-zips-snatch-block-swiv-hook-web-1.jpg_900.jpg","postListContent":"
\n
\n
\n \n
\n
\n
","postListSummaryFeaturedImage":"https://48463649.fs1.hubspotusercontent-na1.net/hubfs/48463649/0756464_zzsb2t3-zips-snatch-block-swiv-hook-web-1.jpg_900.jpg","postRssContent":"
\n
\n
\n \n
\n
\n
","postRssSummaryFeaturedImage":"https://48463649.fs1.hubspotusercontent-na1.net/hubfs/48463649/0756464_zzsb2t3-zips-snatch-block-swiv-hook-web-1.jpg_900.jpg","postSummary":"
\n","postSummaryRss":"
\n
\n
\n \n
\n
\n
","postTemplate":"zips-basic-theme/templates/blog-post.html","previewImageSrc":null,"previewKey":"mXdTdHDp","previousPostFeaturedImage":"https://48463649.fs1.hubspotusercontent-na1.net/hubfs/48463649/Blog/header-1200x500.jpg","previousPostFeaturedImageAltText":"","previousPostName":"How to Fix or Change a Tire","previousPostSlug":"blog/how-to-fix-or-change-a-tire","processingStatus":"PUBLISHED","propertyForDynamicPageCanonicalUrl":null,"propertyForDynamicPageFeaturedImage":null,"propertyForDynamicPageMetaDescription":null,"propertyForDynamicPageSlug":null,"propertyForDynamicPageTitle":null,"publicAccessRules":[],"publicAccessRulesEnabled":false,"publishDate":1703016000000,"publishDateLocalTime":1703016000000,"publishDateLocalized":{"date":1703016000000,"format":"medium","language":null},"publishImmediately":true,"publishTimezoneOffset":null,"publishedAt":1755782495368,"publishedByEmail":null,"publishedById":79766377,"publishedByName":null,"publishedUrl":"/blog/snatch-block-selection-guide-tips-considerations-for-choosing-the-correct-fit","resolvedDomain":"www.zips.com","resolvedLanguage":null,"rssBody":"
\n
\n","rssSummary":"
\n","rssSummaryFeaturedImage":"https://48463649.fs1.hubspotusercontent-na1.net/hubfs/48463649/0756464_zzsb2t3-zips-snatch-block-swiv-hook-web-1.jpg_900.jpg","scheduledUpdateDate":0,"screenshotPreviewTakenAt":1770124895158,"screenshotPreviewUrl":"https://cdn1.hubspot.net/hubshotv3/prod/e/0/5b598af6-ebd7-4a48-9acc-fb0a95d6d18e.png","sections":{},"securityState":"NONE","siteId":null,"slug":"blog/snatch-block-selection-guide-tips-considerations-for-choosing-the-correct-fit","stagedFrom":null,"state":"PUBLISHED","stateWhenDeleted":null,"structuredContentPageType":null,"structuredContentType":null,"styleOverrideId":null,"subcategory":"normal_blog_post","syncedWithBlogRoot":true,"tagIds":[192169769490,192174528148,192174529697,192174572389,192174572390,194719179289,194719586666],"tagList":[{"categoryId":3,"cdnPurgeEmbargoTime":null,"contentIds":[],"cosObjectType":"TAG","created":1751598346713,"deletedAt":0,"description":"","id":192169769490,"label":"Towing & Recovery","language":null,"name":"Towing & Recovery","portalId":48463649,"slug":"towing-recovery","translatedFromId":null,"translations":{},"updated":1751598346713},{"categoryId":3,"cdnPurgeEmbargoTime":null,"contentIds":[],"cosObjectType":"TAG","created":1751601475164,"deletedAt":0,"description":"","id":192174528148,"label":"Automotive","language":null,"name":"Automotive","portalId":48463649,"slug":"automotive","translatedFromId":null,"translations":{},"updated":1751601475164},{"categoryId":3,"cdnPurgeEmbargoTime":null,"contentIds":[],"cosObjectType":"TAG","created":1751602285139,"deletedAt":0,"description":"","id":192174529697,"label":"Construction","language":null,"name":"Construction","portalId":48463649,"slug":"construction","translatedFromId":null,"translations":{},"updated":1751602285139},{"categoryId":3,"cdnPurgeEmbargoTime":null,"contentIds":[],"cosObjectType":"TAG","created":1751602285235,"deletedAt":0,"description":"","id":192174572389,"label":"Municipalities","language":null,"name":"Municipalities","portalId":48463649,"slug":"municipalities","translatedFromId":null,"translations":{},"updated":1751602285235},{"categoryId":3,"cdnPurgeEmbargoTime":null,"contentIds":[],"cosObjectType":"TAG","created":1751602285335,"deletedAt":0,"description":"","id":192174572390,"label":"Agriculture","language":null,"name":"Agriculture","portalId":48463649,"slug":"agriculture","translatedFromId":null,"translations":{},"updated":1751602285335},{"categoryId":3,"cdnPurgeEmbargoTime":null,"contentIds":[],"cosObjectType":"TAG","created":1755545213046,"deletedAt":0,"description":"","id":194719179289,"label":"Industry Knowledge & Updates","language":null,"name":"Industry Knowledge & Updates","portalId":48463649,"slug":"industry-knowledge-updates","translatedFromId":null,"translations":{},"updated":1755545213046},{"categoryId":3,"cdnPurgeEmbargoTime":null,"contentIds":[],"cosObjectType":"TAG","created":1755545331471,"deletedAt":0,"description":"","id":194719586666,"label":"Product Guides","language":null,"name":"Product Guides","portalId":48463649,"slug":"product-guides","translatedFromId":null,"translations":{},"updated":1755545331471}],"tagNames":["Towing & Recovery","Automotive","Construction","Municipalities","Agriculture","Industry Knowledge & Updates","Product Guides"],"teamPerms":[],"templatePath":"","templatePathForRender":"zips-basic-theme/templates/blog-post.html","textToAudioFileId":null,"textToAudioGenerationRequestId":null,"themePath":null,"themeSettingsValues":null,"title":"Snatch Block Selection Guide: Tips & Considerations for Choosing the Correct Fit","tmsId":null,"topicIds":[192169769490,192174528148,192174529697,192174572389,192174572390,194719179289,194719586666],"topicList":[{"categoryId":3,"cdnPurgeEmbargoTime":null,"contentIds":[],"cosObjectType":"TAG","created":1751598346713,"deletedAt":0,"description":"","id":192169769490,"label":"Towing & Recovery","language":null,"name":"Towing & Recovery","portalId":48463649,"slug":"towing-recovery","translatedFromId":null,"translations":{},"updated":1751598346713},{"categoryId":3,"cdnPurgeEmbargoTime":null,"contentIds":[],"cosObjectType":"TAG","created":1751601475164,"deletedAt":0,"description":"","id":192174528148,"label":"Automotive","language":null,"name":"Automotive","portalId":48463649,"slug":"automotive","translatedFromId":null,"translations":{},"updated":1751601475164},{"categoryId":3,"cdnPurgeEmbargoTime":null,"contentIds":[],"cosObjectType":"TAG","created":1751602285139,"deletedAt":0,"description":"","id":192174529697,"label":"Construction","language":null,"name":"Construction","portalId":48463649,"slug":"construction","translatedFromId":null,"translations":{},"updated":1751602285139},{"categoryId":3,"cdnPurgeEmbargoTime":null,"contentIds":[],"cosObjectType":"TAG","created":1751602285235,"deletedAt":0,"description":"","id":192174572389,"label":"Municipalities","language":null,"name":"Municipalities","portalId":48463649,"slug":"municipalities","translatedFromId":null,"translations":{},"updated":1751602285235},{"categoryId":3,"cdnPurgeEmbargoTime":null,"contentIds":[],"cosObjectType":"TAG","created":1751602285335,"deletedAt":0,"description":"","id":192174572390,"label":"Agriculture","language":null,"name":"Agriculture","portalId":48463649,"slug":"agriculture","translatedFromId":null,"translations":{},"updated":1751602285335},{"categoryId":3,"cdnPurgeEmbargoTime":null,"contentIds":[],"cosObjectType":"TAG","created":1755545213046,"deletedAt":0,"description":"","id":194719179289,"label":"Industry Knowledge & Updates","language":null,"name":"Industry Knowledge & Updates","portalId":48463649,"slug":"industry-knowledge-updates","translatedFromId":null,"translations":{},"updated":1755545213046},{"categoryId":3,"cdnPurgeEmbargoTime":null,"contentIds":[],"cosObjectType":"TAG","created":1755545331471,"deletedAt":0,"description":"","id":194719586666,"label":"Product Guides","language":null,"name":"Product Guides","portalId":48463649,"slug":"product-guides","translatedFromId":null,"translations":{},"updated":1755545331471}],"topicNames":["Towing & Recovery","Automotive","Construction","Municipalities","Agriculture","Industry Knowledge & Updates","Product Guides"],"topics":[192169769490,192174528148,192174529697,192174572389,192174572390,194719179289,194719586666],"translatedContent":{},"translatedFromId":null,"translations":{},"tweet":null,"tweetAt":null,"tweetImmediately":false,"unpublishedAt":0,"updated":1755782495371,"updatedById":79766377,"upsizeFeaturedImage":false,"url":"/blog/snatch-block-selection-guide-tips-considerations-for-choosing-the-correct-fit","useFeaturedImage":true,"userPerms":[],"views":null,"visibleToAll":null,"widgetContainers":{},"widgetcontainers":{},"widgets":{}},{"ab":false,"abStatus":null,"abTestId":null,"abVariation":false,"abVariationAutomated":false,"absoluteUrl":"/blog/how-to-choose-the-best-hose-reel-for-you","afterPostBody":null,"aifeatures":null,"allowedSlugConflict":false,"analytics":null,"analyticsPageId":"193395275371","analyticsPageType":"blog-post","approvalStatus":null,"archived":false,"archivedAt":0,"archivedInDashboard":false,"areCommentsAllowed":true,"attachedStylesheets":[],"audienceAccess":"PUBLIC","author":null,"authorName":null,"authorUsername":null,"blogAuthor":{"avatar":"","bio":"","cdnPurgeEmbargoTime":null,"cosObjectType":"BLOG_AUTHOR","created":1750825727422,"deletedAt":0,"displayName":"Zip's","email":null,"facebook":"","fullName":"Zip's","gravatarUrl":null,"hasSocialProfiles":false,"id":191785406258,"label":"Zip's","language":"en","linkedin":"","name":"Zip's","portalId":48463649,"slug":"zips","translatedFromId":null,"translations":{},"twitter":"","twitterUsername":"","updated":1750825727422,"userId":null,"username":null,"website":""},"blogAuthorId":191785406258,"blogAuthorIdList":[191785406258],"blogAuthorList":[{"avatar":"","bio":"","cdnPurgeEmbargoTime":null,"cosObjectType":"BLOG_AUTHOR","created":1750825727422,"deletedAt":0,"displayName":"Zip's","email":null,"facebook":"","fullName":"Zip's","gravatarUrl":null,"hasSocialProfiles":false,"id":191785406258,"label":"Zip's","language":"en","linkedin":"","name":"Zip's","portalId":48463649,"slug":"zips","translatedFromId":null,"translations":{},"twitter":"","twitterUsername":"","updated":1750825727422,"userId":null,"username":null,"website":""}],"blogPostAuthor":{"avatar":"","bio":"","cdnPurgeEmbargoTime":null,"cosObjectType":"BLOG_AUTHOR","created":1750825727422,"deletedAt":0,"displayName":"Zip's","email":null,"facebook":"","fullName":"Zip's","gravatarUrl":null,"hasSocialProfiles":false,"id":191785406258,"label":"Zip's","language":"en","linkedin":"","name":"Zip's","portalId":48463649,"slug":"zips","translatedFromId":null,"translations":{},"twitter":"","twitterUsername":"","updated":1750825727422,"userId":null,"username":null,"website":""},"blogPostScheduleTaskUid":null,"blogPublishInstantEmailCampaignId":null,"blogPublishInstantEmailRetryCount":0,"blogPublishInstantEmailTaskUid":null,"blogPublishToSocialMediaTask":"DONE_NOT_SENT","blueprintTypeId":0,"businessUnitId":null,"campaign":null,"campaignName":null,"campaignUtm":null,"category":3,"categoryId":3,"cdnPurgeEmbargoTime":null,"checkPostLevelAudienceAccessFirst":true,"clonedFrom":193393223040,"composeBody":null,"compositionId":0,"contentAccessRuleIds":[],"contentAccessRuleTypes":[],"contentGroup":190096341139,"contentGroupId":190096341139,"contentTypeCategory":3,"contentTypeCategoryId":3,"contentTypeId":null,"created":1753455573663,"createdByAgent":null,"createdById":76755706,"createdTime":1753455573663,"crmObjectId":null,"css":{},"cssText":"","ctaClicks":null,"ctaViews":null,"currentState":"PUBLISHED","currentlyPublished":true,"deletedAt":0,"deletedBy":null,"deletedByEmail":null,"deletedById":null,"domain":"","dynamicPageDataSourceId":null,"dynamicPageDataSourceType":null,"dynamicPageHubDbTableId":null,"enableDomainStylesheets":null,"enableGoogleAmpOutputOverride":false,"enableLayoutStylesheets":null,"errors":[],"featuredImage":"https://48463649.fs1.hubspotusercontent-na1.net/hubfs/48463649/0849409_dp5000-series-web.jpg_900.jpg","featuredImageAltText":"","featuredImageHeight":600,"featuredImageLength":0,"featuredImageWidth":900,"flexAreas":{},"folderId":null,"footerHtml":null,"footerTemplatePath":null,"footerVariantName":null,"freezeDate":1692730800000,"generateJsonLdEnabledOverride":true,"globalBlockOverrides":{},"hasContentAccessRules":false,"hasUserChanges":true,"headHtml":"","header":null,"headerTemplatePath":null,"headerVariantName":null,"htmlTitle":"How to Choose the Best Hose Reel for You","id":193395275371,"includeDefaultCustomCss":null,"isCaptchaRequired":true,"isCrawlableByBots":false,"isDraft":false,"isInstantEmailEnabled":false,"isPublished":true,"isSocialPublishingEnabled":false,"keywords":[],"label":"How to Choose the Best Hose Reel for You","language":"en","lastEditSessionId":null,"lastEditUpdateId":null,"layoutSections":{},"legacyBlogTabid":null,"legacyId":null,"legacyPostGuid":"","linkRelCanonicalUrl":"","listTemplate":"","liveDomain":"www.zips.com","mab":false,"mabExperimentId":null,"mabMaster":false,"mabVariant":false,"marketingCampaignGuids":[],"meta":{"html_title":"How to Choose the Best Hose Reel for You","public_access_rules":[],"public_access_rules_enabled":false,"use_featured_image":true,"tag_ids":[192169769490,192174528148,192174529697,192174572389,192174572390,194719179289,194719586666],"topic_ids":[192169769490,192174528148,192174529697,192174572389,192174572390,194719179289,194719586666],"post_summary":"
\n","post_body":"
\nShop Hoses & Reels","rss_summary":"
\n","rss_body":"
\nShop Hoses & Reels","enable_google_amp_output_override":false,"generate_json_ld_enabled":true,"blog_post_schedule_task_uid":null,"blog_publish_to_social_media_task":"DONE_NOT_SENT","blog_publish_instant_email_task_uid":null,"blog_publish_instant_email_campaign_id":null,"blog_publish_instant_email_retry_count":0,"keywords":[],"composition_id":0,"is_crawlable_by_bots":false,"header":null,"published_at":1755782536304,"head_html":"","footer_html":null,"attached_stylesheets":[],"enable_domain_stylesheets":null,"include_default_custom_css":null,"layout_sections":{},"past_mab_experiment_ids":[],"deleted_by":null,"featured_image_alt_text":"","enable_layout_stylesheets":null,"tweet":null,"tweet_at":null,"campaign_name":null,"campaign_utm":null,"meta_keywords":null,"meta_description":"Dolly Inspection Tips","tweet_immediately":false,"publish_immediately":true,"security_state":"NONE","scheduled_update_date":0,"placement_guids":[],"header_template_path":null,"header_variant_name":null,"footer_template_path":null,"footer_variant_name":null,"global_block_overrides":{},"property_for_dynamic_page_title":null,"property_for_dynamic_page_slug":null,"property_for_dynamic_page_meta_description":null,"property_for_dynamic_page_featured_image":null,"property_for_dynamic_page_canonical_url":null,"preview_image_src":null,"legacy_blog_tabid":null,"legacy_post_guid":"","performable_variation_letter":null,"style_override_id":null,"has_user_changes":true,"css":{},"css_text":"","unpublished_at":0,"published_by_id":79766377,"allowed_slug_conflict":false,"ai_features":null,"link_rel_canonical_url":"","page_redirected":false,"page_expiry_enabled":false,"page_expiry_date":null,"page_expiry_redirect_id":null,"page_expiry_redirect_url":null,"deleted_by_id":null,"state_when_deleted":null,"cloned_from":193393223040,"staged_from":null,"personas":[],"compose_body":null,"featured_image":"https://48463649.fs1.hubspotusercontent-na1.net/hubfs/48463649/0849409_dp5000-series-web.jpg_900.jpg","featured_image_width":900,"featured_image_height":600,"publish_timezone_offset":null,"theme_settings_values":null,"password":null,"last_edit_session_id":null,"last_edit_update_id":null,"created_by_agent":null},"metaDescription":"Dolly Inspection Tips","metaKeywords":null,"name":"How to Choose the Best Hose Reel for You","nextPostFeaturedImage":"https://48463649.fs1.hubspotusercontent-na1.net/hubfs/48463649/0028865_roundsling-tee-web.jpg_900.jpg","nextPostFeaturedImageAltText":"","nextPostName":"Choosing The Right Lifting Sling for The Right Situation","nextPostSlug":"blog/choosing-the-right-lifting-sling-for-the-right-situation","pageExpiryDate":null,"pageExpiryEnabled":false,"pageExpiryRedirectId":null,"pageExpiryRedirectUrl":null,"pageRedirected":false,"pageTitle":"How to Choose the Best Hose Reel for You","parentBlog":{"absoluteUrl":"/blog","allowComments":true,"ampBodyColor":"#404040","ampBodyFont":"'Helvetica Neue', Helvetica, Arial, sans-serif","ampBodyFontSize":"18","ampCustomCss":"","ampHeaderBackgroundColor":"#ffffff","ampHeaderColor":"#1e1e1e","ampHeaderFont":"'Helvetica Neue', Helvetica, Arial, sans-serif","ampHeaderFontSize":"36","ampLinkColor":"#416bb3","ampLogoAlt":"","ampLogoHeight":0,"ampLogoSrc":"","ampLogoWidth":0,"analyticsPageId":190096341139,"attachedStylesheets":[],"audienceAccess":"PUBLIC","businessUnitId":null,"captchaAfterDays":7,"captchaAlways":false,"categoryId":3,"cdnPurgeEmbargoTime":null,"closeCommentsOlder":0,"commentDateFormat":"medium","commentFormGuid":"a4128401-39db-4c54-a62b-88ff335d3a69","commentMaxThreadDepth":1,"commentModeration":false,"commentNotificationEmails":[],"commentShouldCreateContact":false,"commentVerificationText":"","cosObjectType":"BLOG","created":1747163443999,"createdDateTime":1747163443999,"dailyNotificationEmailId":null,"dateFormattingLanguage":null,"defaultGroupStyleId":"","defaultNotificationFromName":"","defaultNotificationReplyTo":"","deletedAt":0,"description":"","domain":"","domainWhenPublished":"www.zips.com","emailApiSubscriptionId":null,"enableGoogleAmpOutput":true,"enableSocialAutoPublishing":false,"generateJsonLdEnabled":true,"header":null,"htmlFooter":"","htmlFooterIsShared":true,"htmlHead":"","htmlHeadIsShared":true,"htmlKeywords":[],"htmlTitle":"blog","id":190096341139,"ilsSubscriptionListsByType":{},"instantNotificationEmailId":null,"itemLayoutId":null,"itemTemplateIsShared":false,"itemTemplatePath":"zips-basic-theme/templates/blog-post.html","label":"blog","language":"en","legacyGuid":null,"legacyModuleId":null,"legacyTabId":null,"listingLayoutId":null,"listingPageId":190096341141,"listingTemplatePath":"","liveDomain":"www.zips.com","monthFilterFormat":"MMMM yyyy","monthlyNotificationEmailId":null,"name":"blog","parentBlogUpdateTaskId":null,"portalId":48463649,"postHtmlFooter":"","postHtmlHead":"","postsPerListingPage":111,"postsPerRssFeed":10,"publicAccessRules":[],"publicAccessRulesEnabled":false,"publicTitle":"blog","publishDateFormat":"medium","resolvedDomain":"www.zips.com","rootUrl":"/blog","rssCustomFeed":null,"rssDescription":null,"rssItemFooter":null,"rssItemHeader":null,"settingsOverrides":{"itemLayoutId":false,"itemTemplatePath":false,"itemTemplateIsShared":false,"listingLayoutId":false,"listingTemplatePath":false,"postsPerListingPage":false,"showSummaryInListing":false,"useFeaturedImageInSummary":false,"htmlHead":false,"postHtmlHead":false,"htmlHeadIsShared":false,"htmlFooter":false,"listingPageHtmlFooter":false,"postHtmlFooter":false,"htmlFooterIsShared":false,"attachedStylesheets":false,"postsPerRssFeed":false,"showSummaryInRss":false,"showSummaryInEmails":false,"showSummariesInEmails":false,"allowComments":false,"commentShouldCreateContact":false,"commentModeration":false,"closeCommentsOlder":false,"commentNotificationEmails":false,"commentMaxThreadDepth":false,"commentVerificationText":false,"socialAccountTwitter":false,"showSocialLinkTwitter":false,"showSocialLinkLinkedin":false,"showSocialLinkFacebook":false,"enableGoogleAmpOutput":false,"ampLogoSrc":false,"ampLogoHeight":false,"ampLogoWidth":false,"ampLogoAlt":false,"ampHeaderFont":false,"ampHeaderFontSize":false,"ampHeaderColor":false,"ampHeaderBackgroundColor":false,"ampBodyFont":false,"ampBodyFontSize":false,"ampBodyColor":false,"ampLinkColor":false,"generateJsonLdEnabled":false},"showSocialLinkFacebook":true,"showSocialLinkLinkedin":true,"showSocialLinkTwitter":true,"showSummaryInEmails":true,"showSummaryInListing":true,"showSummaryInRss":true,"siteId":null,"slug":"blog","socialAccountTwitter":"","state":null,"subscriptionContactsProperty":null,"subscriptionEmailType":null,"subscriptionFormGuid":null,"subscriptionListsByType":{},"title":null,"translatedFromId":null,"translations":{},"updated":1755110916417,"updatedDateTime":1755110916417,"urlBase":"www.zips.com/blog","urlSegments":{"all":"all","archive":"archive","author":"author","page":"page","tag":"tag"},"useFeaturedImageInSummary":true,"usesDefaultTemplate":false,"weeklyNotificationEmailId":null},"password":null,"pastMabExperimentIds":[],"performableGuid":null,"performableVariationLetter":null,"personalizationStrategyId":null,"personalizationVariantStatus":null,"personas":[],"placementGuids":[],"portableKey":null,"portalId":48463649,"position":null,"postBody":"
\nShop Hoses & Reels","postBodyRss":"
\nShop Hoses & Reels","postEmailContent":"
\n
\n
\n \n
\n
\n
","postFeaturedImageIfEnabled":"https://48463649.fs1.hubspotusercontent-na1.net/hubfs/48463649/0849409_dp5000-series-web.jpg_900.jpg","postListContent":"
\n
\n
\n \n
\n
\n
","postListSummaryFeaturedImage":"https://48463649.fs1.hubspotusercontent-na1.net/hubfs/48463649/0849409_dp5000-series-web.jpg_900.jpg","postRssContent":"
\n
\n
\n \n
\n
\n
","postRssSummaryFeaturedImage":"https://48463649.fs1.hubspotusercontent-na1.net/hubfs/48463649/0849409_dp5000-series-web.jpg_900.jpg","postSummary":"
\n","postSummaryRss":"
\n
\n
\n \n
\n
\n
","postTemplate":"zips-basic-theme/templates/blog-post.html","previewImageSrc":null,"previewKey":"XHujWPJe","previousPostFeaturedImage":"https://48463649.fs1.hubspotusercontent-na1.net/hubfs/48463649/0756464_zzsb2t3-zips-snatch-block-swiv-hook-web-1.jpg_900.jpg","previousPostFeaturedImageAltText":"","previousPostName":"Snatch Block Selection Guide: Tips & Considerations for Choosing the Correct Fit","previousPostSlug":"blog/snatch-block-selection-guide-tips-considerations-for-choosing-the-correct-fit","processingStatus":"PUBLISHED","propertyForDynamicPageCanonicalUrl":null,"propertyForDynamicPageFeaturedImage":null,"propertyForDynamicPageMetaDescription":null,"propertyForDynamicPageSlug":null,"propertyForDynamicPageTitle":null,"publicAccessRules":[],"publicAccessRulesEnabled":false,"publishDate":1692730800000,"publishDateLocalTime":1692730800000,"publishDateLocalized":{"date":1692730800000,"format":"medium","language":null},"publishImmediately":true,"publishTimezoneOffset":null,"publishedAt":1755782536304,"publishedByEmail":null,"publishedById":79766377,"publishedByName":null,"publishedUrl":"/blog/how-to-choose-the-best-hose-reel-for-you","resolvedDomain":"www.zips.com","resolvedLanguage":null,"rssBody":"
\nShop Hoses & Reels","rssSummary":"
\n","rssSummaryFeaturedImage":"https://48463649.fs1.hubspotusercontent-na1.net/hubfs/48463649/0849409_dp5000-series-web.jpg_900.jpg","scheduledUpdateDate":0,"screenshotPreviewTakenAt":1770124935777,"screenshotPreviewUrl":"https://cdn1.hubspot.net/hubshotv3/prod/e/0/56312bec-67e0-4d22-9f58-179b934d2a96.png","sections":{},"securityState":"NONE","siteId":null,"slug":"blog/how-to-choose-the-best-hose-reel-for-you","stagedFrom":null,"state":"PUBLISHED","stateWhenDeleted":null,"structuredContentPageType":null,"structuredContentType":null,"styleOverrideId":null,"subcategory":"normal_blog_post","syncedWithBlogRoot":true,"tagIds":[192169769490,192174528148,192174529697,192174572389,192174572390,194719179289,194719586666],"tagList":[{"categoryId":3,"cdnPurgeEmbargoTime":null,"contentIds":[],"cosObjectType":"TAG","created":1751598346713,"deletedAt":0,"description":"","id":192169769490,"label":"Towing & Recovery","language":null,"name":"Towing & Recovery","portalId":48463649,"slug":"towing-recovery","translatedFromId":null,"translations":{},"updated":1751598346713},{"categoryId":3,"cdnPurgeEmbargoTime":null,"contentIds":[],"cosObjectType":"TAG","created":1751601475164,"deletedAt":0,"description":"","id":192174528148,"label":"Automotive","language":null,"name":"Automotive","portalId":48463649,"slug":"automotive","translatedFromId":null,"translations":{},"updated":1751601475164},{"categoryId":3,"cdnPurgeEmbargoTime":null,"contentIds":[],"cosObjectType":"TAG","created":1751602285139,"deletedAt":0,"description":"","id":192174529697,"label":"Construction","language":null,"name":"Construction","portalId":48463649,"slug":"construction","translatedFromId":null,"translations":{},"updated":1751602285139},{"categoryId":3,"cdnPurgeEmbargoTime":null,"contentIds":[],"cosObjectType":"TAG","created":1751602285235,"deletedAt":0,"description":"","id":192174572389,"label":"Municipalities","language":null,"name":"Municipalities","portalId":48463649,"slug":"municipalities","translatedFromId":null,"translations":{},"updated":1751602285235},{"categoryId":3,"cdnPurgeEmbargoTime":null,"contentIds":[],"cosObjectType":"TAG","created":1751602285335,"deletedAt":0,"description":"","id":192174572390,"label":"Agriculture","language":null,"name":"Agriculture","portalId":48463649,"slug":"agriculture","translatedFromId":null,"translations":{},"updated":1751602285335},{"categoryId":3,"cdnPurgeEmbargoTime":null,"contentIds":[],"cosObjectType":"TAG","created":1755545213046,"deletedAt":0,"description":"","id":194719179289,"label":"Industry Knowledge & Updates","language":null,"name":"Industry Knowledge & Updates","portalId":48463649,"slug":"industry-knowledge-updates","translatedFromId":null,"translations":{},"updated":1755545213046},{"categoryId":3,"cdnPurgeEmbargoTime":null,"contentIds":[],"cosObjectType":"TAG","created":1755545331471,"deletedAt":0,"description":"","id":194719586666,"label":"Product Guides","language":null,"name":"Product Guides","portalId":48463649,"slug":"product-guides","translatedFromId":null,"translations":{},"updated":1755545331471}],"tagNames":["Towing & Recovery","Automotive","Construction","Municipalities","Agriculture","Industry Knowledge & Updates","Product Guides"],"teamPerms":[],"templatePath":"","templatePathForRender":"zips-basic-theme/templates/blog-post.html","textToAudioFileId":null,"textToAudioGenerationRequestId":null,"themePath":null,"themeSettingsValues":null,"title":"How to Choose the Best Hose Reel for You","tmsId":null,"topicIds":[192169769490,192174528148,192174529697,192174572389,192174572390,194719179289,194719586666],"topicList":[{"categoryId":3,"cdnPurgeEmbargoTime":null,"contentIds":[],"cosObjectType":"TAG","created":1751598346713,"deletedAt":0,"description":"","id":192169769490,"label":"Towing & Recovery","language":null,"name":"Towing & Recovery","portalId":48463649,"slug":"towing-recovery","translatedFromId":null,"translations":{},"updated":1751598346713},{"categoryId":3,"cdnPurgeEmbargoTime":null,"contentIds":[],"cosObjectType":"TAG","created":1751601475164,"deletedAt":0,"description":"","id":192174528148,"label":"Automotive","language":null,"name":"Automotive","portalId":48463649,"slug":"automotive","translatedFromId":null,"translations":{},"updated":1751601475164},{"categoryId":3,"cdnPurgeEmbargoTime":null,"contentIds":[],"cosObjectType":"TAG","created":1751602285139,"deletedAt":0,"description":"","id":192174529697,"label":"Construction","language":null,"name":"Construction","portalId":48463649,"slug":"construction","translatedFromId":null,"translations":{},"updated":1751602285139},{"categoryId":3,"cdnPurgeEmbargoTime":null,"contentIds":[],"cosObjectType":"TAG","created":1751602285235,"deletedAt":0,"description":"","id":192174572389,"label":"Municipalities","language":null,"name":"Municipalities","portalId":48463649,"slug":"municipalities","translatedFromId":null,"translations":{},"updated":1751602285235},{"categoryId":3,"cdnPurgeEmbargoTime":null,"contentIds":[],"cosObjectType":"TAG","created":1751602285335,"deletedAt":0,"description":"","id":192174572390,"label":"Agriculture","language":null,"name":"Agriculture","portalId":48463649,"slug":"agriculture","translatedFromId":null,"translations":{},"updated":1751602285335},{"categoryId":3,"cdnPurgeEmbargoTime":null,"contentIds":[],"cosObjectType":"TAG","created":1755545213046,"deletedAt":0,"description":"","id":194719179289,"label":"Industry Knowledge & Updates","language":null,"name":"Industry Knowledge & Updates","portalId":48463649,"slug":"industry-knowledge-updates","translatedFromId":null,"translations":{},"updated":1755545213046},{"categoryId":3,"cdnPurgeEmbargoTime":null,"contentIds":[],"cosObjectType":"TAG","created":1755545331471,"deletedAt":0,"description":"","id":194719586666,"label":"Product Guides","language":null,"name":"Product Guides","portalId":48463649,"slug":"product-guides","translatedFromId":null,"translations":{},"updated":1755545331471}],"topicNames":["Towing & Recovery","Automotive","Construction","Municipalities","Agriculture","Industry Knowledge & Updates","Product Guides"],"topics":[192169769490,192174528148,192174529697,192174572389,192174572390,194719179289,194719586666],"translatedContent":{},"translatedFromId":null,"translations":{},"tweet":null,"tweetAt":null,"tweetImmediately":false,"unpublishedAt":0,"updated":1755782536307,"updatedById":79766377,"upsizeFeaturedImage":false,"url":"/blog/how-to-choose-the-best-hose-reel-for-you","useFeaturedImage":true,"userPerms":[],"views":null,"visibleToAll":null,"widgetContainers":{},"widgetcontainers":{},"widgets":{}},{"ab":false,"abStatus":null,"abTestId":null,"abVariation":false,"abVariationAutomated":false,"absoluteUrl":"/blog/choosing-the-right-lifting-sling-for-the-right-situation","afterPostBody":null,"aifeatures":null,"allowedSlugConflict":false,"analytics":null,"analyticsPageId":"193395269669","analyticsPageType":"blog-post","approvalStatus":null,"archived":false,"archivedAt":0,"archivedInDashboard":false,"areCommentsAllowed":true,"attachedStylesheets":[],"audienceAccess":"PUBLIC","author":null,"authorName":null,"authorUsername":null,"blogAuthor":{"avatar":"","bio":"","cdnPurgeEmbargoTime":null,"cosObjectType":"BLOG_AUTHOR","created":1750825727422,"deletedAt":0,"displayName":"Zip's","email":null,"facebook":"","fullName":"Zip's","gravatarUrl":null,"hasSocialProfiles":false,"id":191785406258,"label":"Zip's","language":"en","linkedin":"","name":"Zip's","portalId":48463649,"slug":"zips","translatedFromId":null,"translations":{},"twitter":"","twitterUsername":"","updated":1750825727422,"userId":null,"username":null,"website":""},"blogAuthorId":191785406258,"blogAuthorIdList":[191785406258],"blogAuthorList":[{"avatar":"","bio":"","cdnPurgeEmbargoTime":null,"cosObjectType":"BLOG_AUTHOR","created":1750825727422,"deletedAt":0,"displayName":"Zip's","email":null,"facebook":"","fullName":"Zip's","gravatarUrl":null,"hasSocialProfiles":false,"id":191785406258,"label":"Zip's","language":"en","linkedin":"","name":"Zip's","portalId":48463649,"slug":"zips","translatedFromId":null,"translations":{},"twitter":"","twitterUsername":"","updated":1750825727422,"userId":null,"username":null,"website":""}],"blogPostAuthor":{"avatar":"","bio":"","cdnPurgeEmbargoTime":null,"cosObjectType":"BLOG_AUTHOR","created":1750825727422,"deletedAt":0,"displayName":"Zip's","email":null,"facebook":"","fullName":"Zip's","gravatarUrl":null,"hasSocialProfiles":false,"id":191785406258,"label":"Zip's","language":"en","linkedin":"","name":"Zip's","portalId":48463649,"slug":"zips","translatedFromId":null,"translations":{},"twitter":"","twitterUsername":"","updated":1750825727422,"userId":null,"username":null,"website":""},"blogPostScheduleTaskUid":null,"blogPublishInstantEmailCampaignId":null,"blogPublishInstantEmailRetryCount":0,"blogPublishInstantEmailTaskUid":null,"blogPublishToSocialMediaTask":"DONE_NOT_SENT","blueprintTypeId":0,"businessUnitId":null,"campaign":null,"campaignName":null,"campaignUtm":null,"category":3,"categoryId":3,"cdnPurgeEmbargoTime":null,"checkPostLevelAudienceAccessFirst":true,"clonedFrom":193395275371,"composeBody":null,"compositionId":0,"contentAccessRuleIds":[],"contentAccessRuleTypes":[],"contentGroup":190096341139,"contentGroupId":190096341139,"contentTypeCategory":3,"contentTypeCategoryId":3,"contentTypeId":null,"created":1753455716160,"createdByAgent":null,"createdById":76755706,"createdTime":1753455716160,"crmObjectId":null,"css":{},"cssText":"","ctaClicks":null,"ctaViews":null,"currentState":"PUBLISHED","currentlyPublished":true,"deletedAt":0,"deletedBy":null,"deletedByEmail":null,"deletedById":null,"domain":"","dynamicPageDataSourceId":null,"dynamicPageDataSourceType":null,"dynamicPageHubDbTableId":null,"enableDomainStylesheets":null,"enableGoogleAmpOutputOverride":false,"enableLayoutStylesheets":null,"errors":[],"featuredImage":"https://48463649.fs1.hubspotusercontent-na1.net/hubfs/48463649/0028865_roundsling-tee-web.jpg_900.jpg","featuredImageAltText":"","featuredImageHeight":600,"featuredImageLength":0,"featuredImageWidth":900,"flexAreas":{},"folderId":null,"footerHtml":null,"footerTemplatePath":null,"footerVariantName":null,"freezeDate":1688151600000,"generateJsonLdEnabledOverride":true,"globalBlockOverrides":{},"hasContentAccessRules":false,"hasUserChanges":true,"headHtml":"","header":null,"headerTemplatePath":null,"headerVariantName":null,"htmlTitle":"Choosing The Right Lifting Sling for The Right Situation","id":193395269669,"includeDefaultCustomCss":null,"isCaptchaRequired":true,"isCrawlableByBots":false,"isDraft":false,"isInstantEmailEnabled":false,"isPublished":true,"isSocialPublishingEnabled":false,"keywords":[],"label":"Choosing The Right Lifting Sling for The Right Situation","language":"en","lastEditSessionId":null,"lastEditUpdateId":null,"layoutSections":{},"legacyBlogTabid":null,"legacyId":null,"legacyPostGuid":"","linkRelCanonicalUrl":"","listTemplate":"","liveDomain":"www.zips.com","mab":false,"mabExperimentId":null,"mabMaster":false,"mabVariant":false,"marketingCampaignGuids":[],"meta":{"html_title":"Choosing The Right Lifting Sling for The Right Situation","public_access_rules":[],"public_access_rules_enabled":false,"use_featured_image":true,"tag_ids":[192169769490,192174528148,192174529697,192174572389,192174572390,194719179289,194719586666],"topic_ids":[192169769490,192174528148,192174529697,192174572389,192174572390,194719179289,194719586666],"post_summary":"
\n","post_body":"
\n
\n","rss_summary":"
\n","rss_body":"
\n
\n","enable_google_amp_output_override":false,"generate_json_ld_enabled":true,"blog_post_schedule_task_uid":null,"blog_publish_to_social_media_task":"DONE_NOT_SENT","blog_publish_instant_email_task_uid":null,"blog_publish_instant_email_campaign_id":null,"blog_publish_instant_email_retry_count":0,"keywords":[],"composition_id":0,"is_crawlable_by_bots":false,"header":null,"published_at":1755782577311,"head_html":"","footer_html":null,"attached_stylesheets":[],"enable_domain_stylesheets":null,"include_default_custom_css":null,"layout_sections":{},"past_mab_experiment_ids":[],"deleted_by":null,"featured_image_alt_text":"","enable_layout_stylesheets":null,"tweet":null,"tweet_at":null,"campaign_name":null,"campaign_utm":null,"meta_keywords":null,"meta_description":"Dolly Inspection Tips","tweet_immediately":false,"publish_immediately":true,"security_state":"NONE","scheduled_update_date":0,"placement_guids":[],"header_template_path":null,"header_variant_name":null,"footer_template_path":null,"footer_variant_name":null,"global_block_overrides":{},"property_for_dynamic_page_title":null,"property_for_dynamic_page_slug":null,"property_for_dynamic_page_meta_description":null,"property_for_dynamic_page_featured_image":null,"property_for_dynamic_page_canonical_url":null,"preview_image_src":null,"legacy_blog_tabid":null,"legacy_post_guid":"","performable_variation_letter":null,"style_override_id":null,"has_user_changes":true,"css":{},"css_text":"","unpublished_at":0,"published_by_id":79766377,"allowed_slug_conflict":false,"ai_features":null,"link_rel_canonical_url":"","page_redirected":false,"page_expiry_enabled":false,"page_expiry_date":null,"page_expiry_redirect_id":null,"page_expiry_redirect_url":null,"deleted_by_id":null,"state_when_deleted":null,"cloned_from":193395275371,"staged_from":null,"personas":[],"compose_body":null,"featured_image":"https://48463649.fs1.hubspotusercontent-na1.net/hubfs/48463649/0028865_roundsling-tee-web.jpg_900.jpg","featured_image_width":900,"featured_image_height":600,"publish_timezone_offset":null,"theme_settings_values":null,"password":null,"last_edit_session_id":null,"last_edit_update_id":null,"created_by_agent":null},"metaDescription":"Dolly Inspection Tips","metaKeywords":null,"name":"Choosing The Right Lifting Sling for The Right Situation","nextPostFeaturedImage":"https://48463649.fs1.hubspotusercontent-na1.net/hubfs/48463649/Blog/header-1200x600.png","nextPostFeaturedImageAltText":"","nextPostName":"Limit your liability: Accurately Torque Lugnuts","nextPostSlug":"blog/lugnut-torque","pageExpiryDate":null,"pageExpiryEnabled":false,"pageExpiryRedirectId":null,"pageExpiryRedirectUrl":null,"pageRedirected":false,"pageTitle":"Choosing The Right Lifting Sling for The Right Situation","parentBlog":{"absoluteUrl":"/blog","allowComments":true,"ampBodyColor":"#404040","ampBodyFont":"'Helvetica Neue', Helvetica, Arial, sans-serif","ampBodyFontSize":"18","ampCustomCss":"","ampHeaderBackgroundColor":"#ffffff","ampHeaderColor":"#1e1e1e","ampHeaderFont":"'Helvetica Neue', Helvetica, Arial, sans-serif","ampHeaderFontSize":"36","ampLinkColor":"#416bb3","ampLogoAlt":"","ampLogoHeight":0,"ampLogoSrc":"","ampLogoWidth":0,"analyticsPageId":190096341139,"attachedStylesheets":[],"audienceAccess":"PUBLIC","businessUnitId":null,"captchaAfterDays":7,"captchaAlways":false,"categoryId":3,"cdnPurgeEmbargoTime":null,"closeCommentsOlder":0,"commentDateFormat":"medium","commentFormGuid":"a4128401-39db-4c54-a62b-88ff335d3a69","commentMaxThreadDepth":1,"commentModeration":false,"commentNotificationEmails":[],"commentShouldCreateContact":false,"commentVerificationText":"","cosObjectType":"BLOG","created":1747163443999,"createdDateTime":1747163443999,"dailyNotificationEmailId":null,"dateFormattingLanguage":null,"defaultGroupStyleId":"","defaultNotificationFromName":"","defaultNotificationReplyTo":"","deletedAt":0,"description":"","domain":"","domainWhenPublished":"www.zips.com","emailApiSubscriptionId":null,"enableGoogleAmpOutput":true,"enableSocialAutoPublishing":false,"generateJsonLdEnabled":true,"header":null,"htmlFooter":"","htmlFooterIsShared":true,"htmlHead":"","htmlHeadIsShared":true,"htmlKeywords":[],"htmlTitle":"blog","id":190096341139,"ilsSubscriptionListsByType":{},"instantNotificationEmailId":null,"itemLayoutId":null,"itemTemplateIsShared":false,"itemTemplatePath":"zips-basic-theme/templates/blog-post.html","label":"blog","language":"en","legacyGuid":null,"legacyModuleId":null,"legacyTabId":null,"listingLayoutId":null,"listingPageId":190096341141,"listingTemplatePath":"","liveDomain":"www.zips.com","monthFilterFormat":"MMMM yyyy","monthlyNotificationEmailId":null,"name":"blog","parentBlogUpdateTaskId":null,"portalId":48463649,"postHtmlFooter":"","postHtmlHead":"","postsPerListingPage":111,"postsPerRssFeed":10,"publicAccessRules":[],"publicAccessRulesEnabled":false,"publicTitle":"blog","publishDateFormat":"medium","resolvedDomain":"www.zips.com","rootUrl":"/blog","rssCustomFeed":null,"rssDescription":null,"rssItemFooter":null,"rssItemHeader":null,"settingsOverrides":{"itemLayoutId":false,"itemTemplatePath":false,"itemTemplateIsShared":false,"listingLayoutId":false,"listingTemplatePath":false,"postsPerListingPage":false,"showSummaryInListing":false,"useFeaturedImageInSummary":false,"htmlHead":false,"postHtmlHead":false,"htmlHeadIsShared":false,"htmlFooter":false,"listingPageHtmlFooter":false,"postHtmlFooter":false,"htmlFooterIsShared":false,"attachedStylesheets":false,"postsPerRssFeed":false,"showSummaryInRss":false,"showSummaryInEmails":false,"showSummariesInEmails":false,"allowComments":false,"commentShouldCreateContact":false,"commentModeration":false,"closeCommentsOlder":false,"commentNotificationEmails":false,"commentMaxThreadDepth":false,"commentVerificationText":false,"socialAccountTwitter":false,"showSocialLinkTwitter":false,"showSocialLinkLinkedin":false,"showSocialLinkFacebook":false,"enableGoogleAmpOutput":false,"ampLogoSrc":false,"ampLogoHeight":false,"ampLogoWidth":false,"ampLogoAlt":false,"ampHeaderFont":false,"ampHeaderFontSize":false,"ampHeaderColor":false,"ampHeaderBackgroundColor":false,"ampBodyFont":false,"ampBodyFontSize":false,"ampBodyColor":false,"ampLinkColor":false,"generateJsonLdEnabled":false},"showSocialLinkFacebook":true,"showSocialLinkLinkedin":true,"showSocialLinkTwitter":true,"showSummaryInEmails":true,"showSummaryInListing":true,"showSummaryInRss":true,"siteId":null,"slug":"blog","socialAccountTwitter":"","state":null,"subscriptionContactsProperty":null,"subscriptionEmailType":null,"subscriptionFormGuid":null,"subscriptionListsByType":{},"title":null,"translatedFromId":null,"translations":{},"updated":1755110916417,"updatedDateTime":1755110916417,"urlBase":"www.zips.com/blog","urlSegments":{"all":"all","archive":"archive","author":"author","page":"page","tag":"tag"},"useFeaturedImageInSummary":true,"usesDefaultTemplate":false,"weeklyNotificationEmailId":null},"password":null,"pastMabExperimentIds":[],"performableGuid":null,"performableVariationLetter":null,"personalizationStrategyId":null,"personalizationVariantStatus":null,"personas":[],"placementGuids":[],"portableKey":null,"portalId":48463649,"position":null,"postBody":"
\n
\n","postBodyRss":"
\n
\n","postEmailContent":"
\n
\n
\n \n
\n
\n
","postFeaturedImageIfEnabled":"https://48463649.fs1.hubspotusercontent-na1.net/hubfs/48463649/0028865_roundsling-tee-web.jpg_900.jpg","postListContent":"
\n
\n
\n \n
\n
\n
","postListSummaryFeaturedImage":"https://48463649.fs1.hubspotusercontent-na1.net/hubfs/48463649/0028865_roundsling-tee-web.jpg_900.jpg","postRssContent":"
\n
\n
\n \n
\n
\n
","postRssSummaryFeaturedImage":"https://48463649.fs1.hubspotusercontent-na1.net/hubfs/48463649/0028865_roundsling-tee-web.jpg_900.jpg","postSummary":"
\n","postSummaryRss":"
\n
\n
\n \n
\n
\n
","postTemplate":"zips-basic-theme/templates/blog-post.html","previewImageSrc":null,"previewKey":"WeMCvHQB","previousPostFeaturedImage":"https://48463649.fs1.hubspotusercontent-na1.net/hubfs/48463649/0849409_dp5000-series-web.jpg_900.jpg","previousPostFeaturedImageAltText":"","previousPostName":"How to Choose the Best Hose Reel for You","previousPostSlug":"blog/how-to-choose-the-best-hose-reel-for-you","processingStatus":"PUBLISHED","propertyForDynamicPageCanonicalUrl":null,"propertyForDynamicPageFeaturedImage":null,"propertyForDynamicPageMetaDescription":null,"propertyForDynamicPageSlug":null,"propertyForDynamicPageTitle":null,"publicAccessRules":[],"publicAccessRulesEnabled":false,"publishDate":1688151600000,"publishDateLocalTime":1688151600000,"publishDateLocalized":{"date":1688151600000,"format":"medium","language":null},"publishImmediately":true,"publishTimezoneOffset":null,"publishedAt":1755782577311,"publishedByEmail":null,"publishedById":79766377,"publishedByName":null,"publishedUrl":"/blog/choosing-the-right-lifting-sling-for-the-right-situation","resolvedDomain":"www.zips.com","resolvedLanguage":null,"rssBody":"
\n
\n","rssSummary":"
\n","rssSummaryFeaturedImage":"https://48463649.fs1.hubspotusercontent-na1.net/hubfs/48463649/0028865_roundsling-tee-web.jpg_900.jpg","scheduledUpdateDate":0,"screenshotPreviewTakenAt":1770124977554,"screenshotPreviewUrl":"https://cdn1.hubspot.net/hubshotv3/prod/e/0/41970e31-5641-40de-8523-6c6e7345bec4.png","sections":{},"securityState":"NONE","siteId":null,"slug":"blog/choosing-the-right-lifting-sling-for-the-right-situation","stagedFrom":null,"state":"PUBLISHED","stateWhenDeleted":null,"structuredContentPageType":null,"structuredContentType":null,"styleOverrideId":null,"subcategory":"normal_blog_post","syncedWithBlogRoot":true,"tagIds":[192169769490,192174528148,192174529697,192174572389,192174572390,194719179289,194719586666],"tagList":[{"categoryId":3,"cdnPurgeEmbargoTime":null,"contentIds":[],"cosObjectType":"TAG","created":1751598346713,"deletedAt":0,"description":"","id":192169769490,"label":"Towing & Recovery","language":null,"name":"Towing & Recovery","portalId":48463649,"slug":"towing-recovery","translatedFromId":null,"translations":{},"updated":1751598346713},{"categoryId":3,"cdnPurgeEmbargoTime":null,"contentIds":[],"cosObjectType":"TAG","created":1751601475164,"deletedAt":0,"description":"","id":192174528148,"label":"Automotive","language":null,"name":"Automotive","portalId":48463649,"slug":"automotive","translatedFromId":null,"translations":{},"updated":1751601475164},{"categoryId":3,"cdnPurgeEmbargoTime":null,"contentIds":[],"cosObjectType":"TAG","created":1751602285139,"deletedAt":0,"description":"","id":192174529697,"label":"Construction","language":null,"name":"Construction","portalId":48463649,"slug":"construction","translatedFromId":null,"translations":{},"updated":1751602285139},{"categoryId":3,"cdnPurgeEmbargoTime":null,"contentIds":[],"cosObjectType":"TAG","created":1751602285235,"deletedAt":0,"description":"","id":192174572389,"label":"Municipalities","language":null,"name":"Municipalities","portalId":48463649,"slug":"municipalities","translatedFromId":null,"translations":{},"updated":1751602285235},{"categoryId":3,"cdnPurgeEmbargoTime":null,"contentIds":[],"cosObjectType":"TAG","created":1751602285335,"deletedAt":0,"description":"","id":192174572390,"label":"Agriculture","language":null,"name":"Agriculture","portalId":48463649,"slug":"agriculture","translatedFromId":null,"translations":{},"updated":1751602285335},{"categoryId":3,"cdnPurgeEmbargoTime":null,"contentIds":[],"cosObjectType":"TAG","created":1755545213046,"deletedAt":0,"description":"","id":194719179289,"label":"Industry Knowledge & Updates","language":null,"name":"Industry Knowledge & Updates","portalId":48463649,"slug":"industry-knowledge-updates","translatedFromId":null,"translations":{},"updated":1755545213046},{"categoryId":3,"cdnPurgeEmbargoTime":null,"contentIds":[],"cosObjectType":"TAG","created":1755545331471,"deletedAt":0,"description":"","id":194719586666,"label":"Product Guides","language":null,"name":"Product Guides","portalId":48463649,"slug":"product-guides","translatedFromId":null,"translations":{},"updated":1755545331471}],"tagNames":["Towing & Recovery","Automotive","Construction","Municipalities","Agriculture","Industry Knowledge & Updates","Product Guides"],"teamPerms":[],"templatePath":"","templatePathForRender":"zips-basic-theme/templates/blog-post.html","textToAudioFileId":null,"textToAudioGenerationRequestId":null,"themePath":null,"themeSettingsValues":null,"title":"Choosing The Right Lifting Sling for The Right Situation","tmsId":null,"topicIds":[192169769490,192174528148,192174529697,192174572389,192174572390,194719179289,194719586666],"topicList":[{"categoryId":3,"cdnPurgeEmbargoTime":null,"contentIds":[],"cosObjectType":"TAG","created":1751598346713,"deletedAt":0,"description":"","id":192169769490,"label":"Towing & Recovery","language":null,"name":"Towing & Recovery","portalId":48463649,"slug":"towing-recovery","translatedFromId":null,"translations":{},"updated":1751598346713},{"categoryId":3,"cdnPurgeEmbargoTime":null,"contentIds":[],"cosObjectType":"TAG","created":1751601475164,"deletedAt":0,"description":"","id":192174528148,"label":"Automotive","language":null,"name":"Automotive","portalId":48463649,"slug":"automotive","translatedFromId":null,"translations":{},"updated":1751601475164},{"categoryId":3,"cdnPurgeEmbargoTime":null,"contentIds":[],"cosObjectType":"TAG","created":1751602285139,"deletedAt":0,"description":"","id":192174529697,"label":"Construction","language":null,"name":"Construction","portalId":48463649,"slug":"construction","translatedFromId":null,"translations":{},"updated":1751602285139},{"categoryId":3,"cdnPurgeEmbargoTime":null,"contentIds":[],"cosObjectType":"TAG","created":1751602285235,"deletedAt":0,"description":"","id":192174572389,"label":"Municipalities","language":null,"name":"Municipalities","portalId":48463649,"slug":"municipalities","translatedFromId":null,"translations":{},"updated":1751602285235},{"categoryId":3,"cdnPurgeEmbargoTime":null,"contentIds":[],"cosObjectType":"TAG","created":1751602285335,"deletedAt":0,"description":"","id":192174572390,"label":"Agriculture","language":null,"name":"Agriculture","portalId":48463649,"slug":"agriculture","translatedFromId":null,"translations":{},"updated":1751602285335},{"categoryId":3,"cdnPurgeEmbargoTime":null,"contentIds":[],"cosObjectType":"TAG","created":1755545213046,"deletedAt":0,"description":"","id":194719179289,"label":"Industry Knowledge & Updates","language":null,"name":"Industry Knowledge & Updates","portalId":48463649,"slug":"industry-knowledge-updates","translatedFromId":null,"translations":{},"updated":1755545213046},{"categoryId":3,"cdnPurgeEmbargoTime":null,"contentIds":[],"cosObjectType":"TAG","created":1755545331471,"deletedAt":0,"description":"","id":194719586666,"label":"Product Guides","language":null,"name":"Product Guides","portalId":48463649,"slug":"product-guides","translatedFromId":null,"translations":{},"updated":1755545331471}],"topicNames":["Towing & Recovery","Automotive","Construction","Municipalities","Agriculture","Industry Knowledge & Updates","Product Guides"],"topics":[192169769490,192174528148,192174529697,192174572389,192174572390,194719179289,194719586666],"translatedContent":{},"translatedFromId":null,"translations":{},"tweet":null,"tweetAt":null,"tweetImmediately":false,"unpublishedAt":0,"updated":1755782577314,"updatedById":79766377,"upsizeFeaturedImage":false,"url":"/blog/choosing-the-right-lifting-sling-for-the-right-situation","useFeaturedImage":true,"userPerms":[],"views":null,"visibleToAll":null,"widgetContainers":{},"widgetcontainers":{},"widgets":{}},{"ab":false,"abStatus":null,"abTestId":null,"abVariation":false,"abVariationAutomated":false,"absoluteUrl":"/blog/lugnut-torque","afterPostBody":null,"aifeatures":null,"allowedSlugConflict":false,"analytics":null,"analyticsPageId":"192174305423","analyticsPageType":"blog-post","approvalStatus":null,"archived":false,"archivedAt":0,"archivedInDashboard":false,"areCommentsAllowed":true,"attachedStylesheets":[],"audienceAccess":"PUBLIC","author":null,"authorName":null,"authorUsername":null,"blogAuthor":{"avatar":"","bio":"","cdnPurgeEmbargoTime":null,"cosObjectType":"BLOG_AUTHOR","created":1750825727422,"deletedAt":0,"displayName":"Zip's","email":null,"facebook":"","fullName":"Zip's","gravatarUrl":null,"hasSocialProfiles":false,"id":191785406258,"label":"Zip's","language":"en","linkedin":"","name":"Zip's","portalId":48463649,"slug":"zips","translatedFromId":null,"translations":{},"twitter":"","twitterUsername":"","updated":1750825727422,"userId":null,"username":null,"website":""},"blogAuthorId":191785406258,"blogAuthorIdList":[191785406258],"blogAuthorList":[{"avatar":"","bio":"","cdnPurgeEmbargoTime":null,"cosObjectType":"BLOG_AUTHOR","created":1750825727422,"deletedAt":0,"displayName":"Zip's","email":null,"facebook":"","fullName":"Zip's","gravatarUrl":null,"hasSocialProfiles":false,"id":191785406258,"label":"Zip's","language":"en","linkedin":"","name":"Zip's","portalId":48463649,"slug":"zips","translatedFromId":null,"translations":{},"twitter":"","twitterUsername":"","updated":1750825727422,"userId":null,"username":null,"website":""}],"blogPostAuthor":{"avatar":"","bio":"","cdnPurgeEmbargoTime":null,"cosObjectType":"BLOG_AUTHOR","created":1750825727422,"deletedAt":0,"displayName":"Zip's","email":null,"facebook":"","fullName":"Zip's","gravatarUrl":null,"hasSocialProfiles":false,"id":191785406258,"label":"Zip's","language":"en","linkedin":"","name":"Zip's","portalId":48463649,"slug":"zips","translatedFromId":null,"translations":{},"twitter":"","twitterUsername":"","updated":1750825727422,"userId":null,"username":null,"website":""},"blogPostScheduleTaskUid":null,"blogPublishInstantEmailCampaignId":null,"blogPublishInstantEmailRetryCount":null,"blogPublishInstantEmailTaskUid":null,"blogPublishToSocialMediaTask":"DONE_NOT_SENT","blueprintTypeId":0,"businessUnitId":null,"campaign":null,"campaignName":null,"campaignUtm":null,"category":3,"categoryId":3,"cdnPurgeEmbargoTime":null,"checkPostLevelAudienceAccessFirst":true,"clonedFrom":null,"composeBody":null,"compositionId":0,"contentAccessRuleIds":[],"contentAccessRuleTypes":[],"contentGroup":190096341139,"contentGroupId":190096341139,"contentTypeCategory":3,"contentTypeCategoryId":3,"contentTypeId":null,"created":1751601668232,"createdByAgent":null,"createdById":74657203,"createdTime":1751601668232,"crmObjectId":null,"css":{},"cssText":"","ctaClicks":null,"ctaViews":null,"currentState":"PUBLISHED","currentlyPublished":true,"deletedAt":0,"deletedBy":null,"deletedByEmail":null,"deletedById":null,"domain":"","dynamicPageDataSourceId":null,"dynamicPageDataSourceType":null,"dynamicPageHubDbTableId":null,"enableDomainStylesheets":null,"enableGoogleAmpOutputOverride":false,"enableLayoutStylesheets":null,"errors":[],"featuredImage":"https://48463649.fs1.hubspotusercontent-na1.net/hubfs/48463649/Blog/header-1200x600.png","featuredImageAltText":"","featuredImageHeight":600,"featuredImageLength":0,"featuredImageWidth":1200,"flexAreas":{},"folderId":null,"footerHtml":null,"footerTemplatePath":null,"footerVariantName":null,"freezeDate":1662728400000,"generateJsonLdEnabledOverride":true,"globalBlockOverrides":{},"hasContentAccessRules":false,"hasUserChanges":true,"headHtml":"","header":null,"headerTemplatePath":null,"headerVariantName":null,"htmlTitle":"Limit your liability: Accurately Torque Lugnuts","id":192174305423,"includeDefaultCustomCss":null,"isCaptchaRequired":true,"isCrawlableByBots":false,"isDraft":false,"isInstantEmailEnabled":false,"isPublished":true,"isSocialPublishingEnabled":false,"keywords":[],"label":"Limit your liability: Accurately Torque Lugnuts","language":"en","lastEditSessionId":null,"lastEditUpdateId":null,"layoutSections":{},"legacyBlogTabid":null,"legacyId":null,"legacyPostGuid":null,"linkRelCanonicalUrl":"","listTemplate":"","liveDomain":"www.zips.com","mab":false,"mabExperimentId":null,"mabMaster":false,"mabVariant":false,"marketingCampaignGuids":[],"meta":{"html_title":"Limit your liability: Accurately Torque Lugnuts","public_access_rules":[],"public_access_rules_enabled":false,"use_featured_image":true,"tag_ids":[192174528148,192174529697,194719179289,194719586666],"topic_ids":[192174528148,192174529697,194719179289,194719586666],"post_summary":"

Close enough is not good enough. Don’t rely on your own judgment or the sound of your impact wrench to determine if lugnuts are properly secured. Always torque them to exact vehicle and manufacturer specifications.

\n","post_body":"

Close enough is not good enough. Don’t rely on your own judgment or the sound of your impact wrench to determine if lugnuts are properly secured. Always torque them to exact vehicle and manufacturer specifications.

\n\n

Professionally-torqued lugnuts prevent dangerous wheel separations on the highway and limit a mechanic’s liability. A loose wheel can cause property damage, personal injury or, in the worst case scenario, a fatal accident.

\n

The internet is littered with videos showing close calls with runaway tires on highways and on busy streets, nearly striking emergency personnel, pedestrians and the motoring public. Don’t risk a loose wheel. Invest in a torque wrench and give yourself peace of mind.

\n

Lugnut specifications range by rim size, stud diameter and vehicle ratings. Passenger tires vary from 70 ft./lbs. to more than 100 ft./lbs.

Refer to a vehicle’s owner manual or check available resources online for proper specifications. Here is an example of the torque ranges available with the TorcUP torque wrench.

\n
\n\n\n\n\n\n\n\n\n\n\n\n\n\n\n\n\n\n\n\n\n\n\n\n\n\n\n\n\n\n\n\n\n\n\n\n\n\n\n\n\n\n\n\n\n\n\n\n\n\n\n\n\n\n\n\n\n\n\n\n\n\n\n\n\n\n\n\n\n\n\n\n\n\n\n\n\n\n\n\n\n\n\n\n\n\n\n\n\n\n\n\n\n\n\n\n\n\n\n\n\n\n\n\n\n\n\n\n\n\n\n\n\n\n\n\n\n\n\n\n\n\n\n\n\n\n\n\n\n\n
MODEL NUMBERVOLTA 500VOLTA 1000VOLTA 2000VOLTA 3000
Square Drive3/4\"1\"1\"1\"
Min. Torque (ft/lbs)120240500750
Max. Torque (ft/lbs)500100020003000
Min. Torque (Nm)1653357001025
Max. Torque (Nm)660135527004025
HEIGHT A (w/ battery) (in)10.40”10.40”10.40”10.40”
HEIGHT A (w/ battery) (mm)265265265265
LENGTH C (in)8.86”10.97”11.45”13.94”
LENGTH C (mm)225279291355
DIAMETER D (in)2.56”2.85”3.09”3.75”
DIAMETER D (mm)6572.478.595.3
WEIGHT (w/o reaction arm & battery) (lbs)8.311.513.119.6
WEIGHT (w/o reaction arm & battery) (kg)3.85.25.98.9
WEIGHT (w/ reaction arm & battery) (lbs)10.414.515.922.5
WEIGHT (w/ reaction arm & battery) (kg)4.76.67.210.2
RPM at Min. Torque12220.5
RPM at Max. Torque20852
\n
\n

Improper implications

\n

Undertightening a lugnut will put additional strain on the remaining lugnuts and will eventually cause them to fatigue, loosen and separate. Relaxed lugnuts will also cause the lug holes to elongate and become oblong, thus ruining the rim.

\n

An overtightened lugnut is just as dangerous. Too much force can strip the threads and cause them to stretch, effectively losing their clamping pressure. Over-exertion on the wheel stud can also force them to crack and break off.

\n

The intent behind properly-torqued lugnuts is to prevent wheel separations. One study found “fastener failure” was to blame in 85 percent of reported wheel separation accidents. Don’t become part of that statistic and always follow manufacturer recommendations.

\n

Each time a wheel is removed—whether for tire rotation, new tires or other routine wheel maintenance—the lugnuts need to be torqued accurately before the vehicle leaves the shop. They should also be rechecked two more times in the first 100 miles.

\n

Invest in a quality torque wrench

\n
\n
\n

A properly calibrated torque wrench will prevent wheel separation and avoid any unnecessary exposure to risk. Several torque wrenches are available in the automotive market, from manual “click” wrenches to battery-powered models.

\n

At Zip’s AW Direct, we sell and recommend the TorcUP, a quality, durable cordless unit delivering digital precision and offering reduced user fatigue. Click here for complete details on the six options available.

\n

With the TorcUP, you can accurately tighten a lugnut to exact specifications with less effort and greater convenience. This cordless unit frees yourself from manual lever-type torque wrenches and improves confidence, knowing you’ve accurately tightened a lugnut.

\n
\n
\"tu-vt-500kit-34-torcup-wrench-low-res-28\"
\n
\n

The TorcUP also allows you to reach inside a wheel well without a cumbersome lever getting in the way. For safety, yellow “reaction arms” are available to brace against or lock onto neighboring lugnuts to absorb the force generated by this power-packed wrench.

\n
\n
\n

At a max RPM of 20, the TorcUP wrench spins slowly and deliberately and then stops turning when the torque setting is achieved. To improve your efficiency, you can use a standard impact wrench to tighten the nut and then switch to the TorqUP wrench for the final torque setting.

\n

Please note the TorcUP does not record individual torque settings. We recommend documenting each wheel setting and then listing that information on the customer’s invoice. This will limit your exposure to risk once the vehicle leaves the shop.

\n

Accurate recordkeeping and properly tightening lugnuts are the hallmarks of a professional automotive technician. You don’t cut corners and have the safety and best interest of your customers and the motoring public in mind. Invest in a TorcUP wrench and sleep good at night.

\n
\n
\"tu-vt-500kit-34-torcup-wrench-low-res-37\"
\n
","rss_summary":"

Close enough is not good enough. Don’t rely on your own judgment or the sound of your impact wrench to determine if lugnuts are properly secured. Always torque them to exact vehicle and manufacturer specifications.

\n","rss_body":"

Close enough is not good enough. Don’t rely on your own judgment or the sound of your impact wrench to determine if lugnuts are properly secured. Always torque them to exact vehicle and manufacturer specifications.

\n\n

Professionally-torqued lugnuts prevent dangerous wheel separations on the highway and limit a mechanic’s liability. A loose wheel can cause property damage, personal injury or, in the worst case scenario, a fatal accident.

\n

The internet is littered with videos showing close calls with runaway tires on highways and on busy streets, nearly striking emergency personnel, pedestrians and the motoring public. Don’t risk a loose wheel. Invest in a torque wrench and give yourself peace of mind.

\n

Lugnut specifications range by rim size, stud diameter and vehicle ratings. Passenger tires vary from 70 ft./lbs. to more than 100 ft./lbs.

Refer to a vehicle’s owner manual or check available resources online for proper specifications. Here is an example of the torque ranges available with the TorcUP torque wrench.

\n
\n\n\n\n\n\n\n\n\n\n\n\n\n\n\n\n\n\n\n\n\n\n\n\n\n\n\n\n\n\n\n\n\n\n\n\n\n\n\n\n\n\n\n\n\n\n\n\n\n\n\n\n\n\n\n\n\n\n\n\n\n\n\n\n\n\n\n\n\n\n\n\n\n\n\n\n\n\n\n\n\n\n\n\n\n\n\n\n\n\n\n\n\n\n\n\n\n\n\n\n\n\n\n\n\n\n\n\n\n\n\n\n\n\n\n\n\n\n\n\n\n\n\n\n\n\n\n\n\n\n
MODEL NUMBERVOLTA 500VOLTA 1000VOLTA 2000VOLTA 3000
Square Drive3/4\"1\"1\"1\"
Min. Torque (ft/lbs)120240500750
Max. Torque (ft/lbs)500100020003000
Min. Torque (Nm)1653357001025
Max. Torque (Nm)660135527004025
HEIGHT A (w/ battery) (in)10.40”10.40”10.40”10.40”
HEIGHT A (w/ battery) (mm)265265265265
LENGTH C (in)8.86”10.97”11.45”13.94”
LENGTH C (mm)225279291355
DIAMETER D (in)2.56”2.85”3.09”3.75”
DIAMETER D (mm)6572.478.595.3
WEIGHT (w/o reaction arm & battery) (lbs)8.311.513.119.6
WEIGHT (w/o reaction arm & battery) (kg)3.85.25.98.9
WEIGHT (w/ reaction arm & battery) (lbs)10.414.515.922.5
WEIGHT (w/ reaction arm & battery) (kg)4.76.67.210.2
RPM at Min. Torque12220.5
RPM at Max. Torque20852
\n
\n

Improper implications

\n

Undertightening a lugnut will put additional strain on the remaining lugnuts and will eventually cause them to fatigue, loosen and separate. Relaxed lugnuts will also cause the lug holes to elongate and become oblong, thus ruining the rim.

\n

An overtightened lugnut is just as dangerous. Too much force can strip the threads and cause them to stretch, effectively losing their clamping pressure. Over-exertion on the wheel stud can also force them to crack and break off.

\n

The intent behind properly-torqued lugnuts is to prevent wheel separations. One study found “fastener failure” was to blame in 85 percent of reported wheel separation accidents. Don’t become part of that statistic and always follow manufacturer recommendations.

\n

Each time a wheel is removed—whether for tire rotation, new tires or other routine wheel maintenance—the lugnuts need to be torqued accurately before the vehicle leaves the shop. They should also be rechecked two more times in the first 100 miles.

\n

Invest in a quality torque wrench

\n
\n
\n

A properly calibrated torque wrench will prevent wheel separation and avoid any unnecessary exposure to risk. Several torque wrenches are available in the automotive market, from manual “click” wrenches to battery-powered models.

\n

At Zip’s AW Direct, we sell and recommend the TorcUP, a quality, durable cordless unit delivering digital precision and offering reduced user fatigue. Click here for complete details on the six options available.

\n

With the TorcUP, you can accurately tighten a lugnut to exact specifications with less effort and greater convenience. This cordless unit frees yourself from manual lever-type torque wrenches and improves confidence, knowing you’ve accurately tightened a lugnut.

\n
\n
\"tu-vt-500kit-34-torcup-wrench-low-res-28\"
\n
\n

The TorcUP also allows you to reach inside a wheel well without a cumbersome lever getting in the way. For safety, yellow “reaction arms” are available to brace against or lock onto neighboring lugnuts to absorb the force generated by this power-packed wrench.

\n
\n
\n

At a max RPM of 20, the TorcUP wrench spins slowly and deliberately and then stops turning when the torque setting is achieved. To improve your efficiency, you can use a standard impact wrench to tighten the nut and then switch to the TorqUP wrench for the final torque setting.

\n

Please note the TorcUP does not record individual torque settings. We recommend documenting each wheel setting and then listing that information on the customer’s invoice. This will limit your exposure to risk once the vehicle leaves the shop.

\n

Accurate recordkeeping and properly tightening lugnuts are the hallmarks of a professional automotive technician. You don’t cut corners and have the safety and best interest of your customers and the motoring public in mind. Invest in a TorcUP wrench and sleep good at night.

\n
\n
\"tu-vt-500kit-34-torcup-wrench-low-res-37\"
\n
","enable_google_amp_output_override":false,"generate_json_ld_enabled":true,"blog_post_schedule_task_uid":null,"blog_publish_to_social_media_task":"DONE_NOT_SENT","blog_publish_instant_email_task_uid":null,"blog_publish_instant_email_campaign_id":null,"blog_publish_instant_email_retry_count":null,"keywords":[],"composition_id":0,"is_crawlable_by_bots":false,"header":null,"published_at":1755718033609,"head_html":"","footer_html":null,"attached_stylesheets":[],"enable_domain_stylesheets":null,"include_default_custom_css":null,"layout_sections":{},"past_mab_experiment_ids":[],"deleted_by":null,"featured_image_alt_text":"","enable_layout_stylesheets":null,"tweet":null,"tweet_at":null,"campaign_name":null,"campaign_utm":null,"meta_keywords":null,"meta_description":"Learn why accurate lugnut torque is critical for safety, preventing wheel separations, and limiting your liability in automotive service. Discover proper torque specifications, the dangers of over- and under-tightening, the benefit of a proper torque wrench, and a full table of TorcUP wrench specs.","tweet_immediately":false,"publish_immediately":true,"security_state":"NONE","scheduled_update_date":0,"placement_guids":[],"header_template_path":null,"header_variant_name":null,"footer_template_path":null,"footer_variant_name":null,"global_block_overrides":{},"property_for_dynamic_page_title":null,"property_for_dynamic_page_slug":null,"property_for_dynamic_page_meta_description":null,"property_for_dynamic_page_featured_image":null,"property_for_dynamic_page_canonical_url":null,"preview_image_src":null,"legacy_blog_tabid":null,"legacy_post_guid":null,"performable_variation_letter":null,"style_override_id":null,"has_user_changes":true,"css":{},"css_text":"","unpublished_at":0,"published_by_id":79766377,"allowed_slug_conflict":false,"ai_features":null,"link_rel_canonical_url":"","page_redirected":false,"page_expiry_enabled":null,"page_expiry_date":null,"page_expiry_redirect_id":null,"page_expiry_redirect_url":null,"deleted_by_id":null,"state_when_deleted":null,"cloned_from":null,"staged_from":null,"personas":[],"compose_body":null,"featured_image":"https://48463649.fs1.hubspotusercontent-na1.net/hubfs/48463649/Blog/header-1200x600.png","featured_image_width":1200,"featured_image_height":600,"publish_timezone_offset":null,"theme_settings_values":null,"password":null,"last_edit_session_id":null,"last_edit_update_id":null,"created_by_agent":null},"metaDescription":"Learn why accurate lugnut torque is critical for safety, preventing wheel separations, and limiting your liability in automotive service. Discover proper torque specifications, the dangers of over- and under-tightening, the benefit of a proper torque wrench, and a full table of TorcUP wrench specs.","metaKeywords":null,"name":"Limit your liability: Accurately Torque Lugnuts","nextPostFeaturedImage":"https://48463649.fs1.hubspotusercontent-na1.net/hubfs/48463649/Blog/act-sjpro-access-tools-slim-jim-in-use-june2022-hi-res-5.png","nextPostFeaturedImageAltText":"","nextPostName":"Best Automotive Lockout Kits of 2022","nextPostSlug":"blog/best-automotive-lockout-kits-of-2022","pageExpiryDate":null,"pageExpiryEnabled":null,"pageExpiryRedirectId":null,"pageExpiryRedirectUrl":null,"pageRedirected":false,"pageTitle":"Limit your liability: Accurately Torque Lugnuts","parentBlog":{"absoluteUrl":"/blog","allowComments":true,"ampBodyColor":"#404040","ampBodyFont":"'Helvetica Neue', Helvetica, Arial, sans-serif","ampBodyFontSize":"18","ampCustomCss":"","ampHeaderBackgroundColor":"#ffffff","ampHeaderColor":"#1e1e1e","ampHeaderFont":"'Helvetica Neue', Helvetica, Arial, sans-serif","ampHeaderFontSize":"36","ampLinkColor":"#416bb3","ampLogoAlt":"","ampLogoHeight":0,"ampLogoSrc":"","ampLogoWidth":0,"analyticsPageId":190096341139,"attachedStylesheets":[],"audienceAccess":"PUBLIC","businessUnitId":null,"captchaAfterDays":7,"captchaAlways":false,"categoryId":3,"cdnPurgeEmbargoTime":null,"closeCommentsOlder":0,"commentDateFormat":"medium","commentFormGuid":"a4128401-39db-4c54-a62b-88ff335d3a69","commentMaxThreadDepth":1,"commentModeration":false,"commentNotificationEmails":[],"commentShouldCreateContact":false,"commentVerificationText":"","cosObjectType":"BLOG","created":1747163443999,"createdDateTime":1747163443999,"dailyNotificationEmailId":null,"dateFormattingLanguage":null,"defaultGroupStyleId":"","defaultNotificationFromName":"","defaultNotificationReplyTo":"","deletedAt":0,"description":"","domain":"","domainWhenPublished":"www.zips.com","emailApiSubscriptionId":null,"enableGoogleAmpOutput":true,"enableSocialAutoPublishing":false,"generateJsonLdEnabled":true,"header":null,"htmlFooter":"","htmlFooterIsShared":true,"htmlHead":"","htmlHeadIsShared":true,"htmlKeywords":[],"htmlTitle":"blog","id":190096341139,"ilsSubscriptionListsByType":{},"instantNotificationEmailId":null,"itemLayoutId":null,"itemTemplateIsShared":false,"itemTemplatePath":"zips-basic-theme/templates/blog-post.html","label":"blog","language":"en","legacyGuid":null,"legacyModuleId":null,"legacyTabId":null,"listingLayoutId":null,"listingPageId":190096341141,"listingTemplatePath":"","liveDomain":"www.zips.com","monthFilterFormat":"MMMM yyyy","monthlyNotificationEmailId":null,"name":"blog","parentBlogUpdateTaskId":null,"portalId":48463649,"postHtmlFooter":"","postHtmlHead":"","postsPerListingPage":111,"postsPerRssFeed":10,"publicAccessRules":[],"publicAccessRulesEnabled":false,"publicTitle":"blog","publishDateFormat":"medium","resolvedDomain":"www.zips.com","rootUrl":"/blog","rssCustomFeed":null,"rssDescription":null,"rssItemFooter":null,"rssItemHeader":null,"settingsOverrides":{"itemLayoutId":false,"itemTemplatePath":false,"itemTemplateIsShared":false,"listingLayoutId":false,"listingTemplatePath":false,"postsPerListingPage":false,"showSummaryInListing":false,"useFeaturedImageInSummary":false,"htmlHead":false,"postHtmlHead":false,"htmlHeadIsShared":false,"htmlFooter":false,"listingPageHtmlFooter":false,"postHtmlFooter":false,"htmlFooterIsShared":false,"attachedStylesheets":false,"postsPerRssFeed":false,"showSummaryInRss":false,"showSummaryInEmails":false,"showSummariesInEmails":false,"allowComments":false,"commentShouldCreateContact":false,"commentModeration":false,"closeCommentsOlder":false,"commentNotificationEmails":false,"commentMaxThreadDepth":false,"commentVerificationText":false,"socialAccountTwitter":false,"showSocialLinkTwitter":false,"showSocialLinkLinkedin":false,"showSocialLinkFacebook":false,"enableGoogleAmpOutput":false,"ampLogoSrc":false,"ampLogoHeight":false,"ampLogoWidth":false,"ampLogoAlt":false,"ampHeaderFont":false,"ampHeaderFontSize":false,"ampHeaderColor":false,"ampHeaderBackgroundColor":false,"ampBodyFont":false,"ampBodyFontSize":false,"ampBodyColor":false,"ampLinkColor":false,"generateJsonLdEnabled":false},"showSocialLinkFacebook":true,"showSocialLinkLinkedin":true,"showSocialLinkTwitter":true,"showSummaryInEmails":true,"showSummaryInListing":true,"showSummaryInRss":true,"siteId":null,"slug":"blog","socialAccountTwitter":"","state":null,"subscriptionContactsProperty":null,"subscriptionEmailType":null,"subscriptionFormGuid":null,"subscriptionListsByType":{},"title":null,"translatedFromId":null,"translations":{},"updated":1755110916417,"updatedDateTime":1755110916417,"urlBase":"www.zips.com/blog","urlSegments":{"all":"all","archive":"archive","author":"author","page":"page","tag":"tag"},"useFeaturedImageInSummary":true,"usesDefaultTemplate":false,"weeklyNotificationEmailId":null},"password":null,"pastMabExperimentIds":[],"performableGuid":null,"performableVariationLetter":null,"personalizationStrategyId":null,"personalizationVariantStatus":null,"personas":[],"placementGuids":[],"portableKey":null,"portalId":48463649,"position":null,"postBody":"

Close enough is not good enough. Don’t rely on your own judgment or the sound of your impact wrench to determine if lugnuts are properly secured. Always torque them to exact vehicle and manufacturer specifications.

\n\n

Professionally-torqued lugnuts prevent dangerous wheel separations on the highway and limit a mechanic’s liability. A loose wheel can cause property damage, personal injury or, in the worst case scenario, a fatal accident.

\n

The internet is littered with videos showing close calls with runaway tires on highways and on busy streets, nearly striking emergency personnel, pedestrians and the motoring public. Don’t risk a loose wheel. Invest in a torque wrench and give yourself peace of mind.

\n

Lugnut specifications range by rim size, stud diameter and vehicle ratings. Passenger tires vary from 70 ft./lbs. to more than 100 ft./lbs.

Refer to a vehicle’s owner manual or check available resources online for proper specifications. Here is an example of the torque ranges available with the TorcUP torque wrench.

\n
\n\n\n\n\n\n\n\n\n\n\n\n\n\n\n\n\n\n\n\n\n\n\n\n\n\n\n\n\n\n\n\n\n\n\n\n\n\n\n\n\n\n\n\n\n\n\n\n\n\n\n\n\n\n\n\n\n\n\n\n\n\n\n\n\n\n\n\n\n\n\n\n\n\n\n\n\n\n\n\n\n\n\n\n\n\n\n\n\n\n\n\n\n\n\n\n\n\n\n\n\n\n\n\n\n\n\n\n\n\n\n\n\n\n\n\n\n\n\n\n\n\n\n\n\n\n\n\n\n\n
MODEL NUMBERVOLTA 500VOLTA 1000VOLTA 2000VOLTA 3000
Square Drive3/4\"1\"1\"1\"
Min. Torque (ft/lbs)120240500750
Max. Torque (ft/lbs)500100020003000
Min. Torque (Nm)1653357001025
Max. Torque (Nm)660135527004025
HEIGHT A (w/ battery) (in)10.40”10.40”10.40”10.40”
HEIGHT A (w/ battery) (mm)265265265265
LENGTH C (in)8.86”10.97”11.45”13.94”
LENGTH C (mm)225279291355
DIAMETER D (in)2.56”2.85”3.09”3.75”
DIAMETER D (mm)6572.478.595.3
WEIGHT (w/o reaction arm & battery) (lbs)8.311.513.119.6
WEIGHT (w/o reaction arm & battery) (kg)3.85.25.98.9
WEIGHT (w/ reaction arm & battery) (lbs)10.414.515.922.5
WEIGHT (w/ reaction arm & battery) (kg)4.76.67.210.2
RPM at Min. Torque12220.5
RPM at Max. Torque20852
\n
\n

Improper implications

\n

Undertightening a lugnut will put additional strain on the remaining lugnuts and will eventually cause them to fatigue, loosen and separate. Relaxed lugnuts will also cause the lug holes to elongate and become oblong, thus ruining the rim.

\n

An overtightened lugnut is just as dangerous. Too much force can strip the threads and cause them to stretch, effectively losing their clamping pressure. Over-exertion on the wheel stud can also force them to crack and break off.

\n

The intent behind properly-torqued lugnuts is to prevent wheel separations. One study found “fastener failure” was to blame in 85 percent of reported wheel separation accidents. Don’t become part of that statistic and always follow manufacturer recommendations.

\n

Each time a wheel is removed—whether for tire rotation, new tires or other routine wheel maintenance—the lugnuts need to be torqued accurately before the vehicle leaves the shop. They should also be rechecked two more times in the first 100 miles.

\n

Invest in a quality torque wrench

\n
\n
\n

A properly calibrated torque wrench will prevent wheel separation and avoid any unnecessary exposure to risk. Several torque wrenches are available in the automotive market, from manual “click” wrenches to battery-powered models.

\n

At Zip’s AW Direct, we sell and recommend the TorcUP, a quality, durable cordless unit delivering digital precision and offering reduced user fatigue. Click here for complete details on the six options available.

\n

With the TorcUP, you can accurately tighten a lugnut to exact specifications with less effort and greater convenience. This cordless unit frees yourself from manual lever-type torque wrenches and improves confidence, knowing you’ve accurately tightened a lugnut.

\n
\n
\"tu-vt-500kit-34-torcup-wrench-low-res-28\"
\n
\n

The TorcUP also allows you to reach inside a wheel well without a cumbersome lever getting in the way. For safety, yellow “reaction arms” are available to brace against or lock onto neighboring lugnuts to absorb the force generated by this power-packed wrench.

\n
\n
\n

At a max RPM of 20, the TorcUP wrench spins slowly and deliberately and then stops turning when the torque setting is achieved. To improve your efficiency, you can use a standard impact wrench to tighten the nut and then switch to the TorqUP wrench for the final torque setting.

\n

Please note the TorcUP does not record individual torque settings. We recommend documenting each wheel setting and then listing that information on the customer’s invoice. This will limit your exposure to risk once the vehicle leaves the shop.

\n

Accurate recordkeeping and properly tightening lugnuts are the hallmarks of a professional automotive technician. You don’t cut corners and have the safety and best interest of your customers and the motoring public in mind. Invest in a TorcUP wrench and sleep good at night.

\n
\n
\"tu-vt-500kit-34-torcup-wrench-low-res-37\"
\n
","postBodyRss":"

Close enough is not good enough. Don’t rely on your own judgment or the sound of your impact wrench to determine if lugnuts are properly secured. Always torque them to exact vehicle and manufacturer specifications.

\n\n

Professionally-torqued lugnuts prevent dangerous wheel separations on the highway and limit a mechanic’s liability. A loose wheel can cause property damage, personal injury or, in the worst case scenario, a fatal accident.

\n

The internet is littered with videos showing close calls with runaway tires on highways and on busy streets, nearly striking emergency personnel, pedestrians and the motoring public. Don’t risk a loose wheel. Invest in a torque wrench and give yourself peace of mind.

\n

Lugnut specifications range by rim size, stud diameter and vehicle ratings. Passenger tires vary from 70 ft./lbs. to more than 100 ft./lbs.

Refer to a vehicle’s owner manual or check available resources online for proper specifications. Here is an example of the torque ranges available with the TorcUP torque wrench.

\n
\n\n\n\n\n\n\n\n\n\n\n\n\n\n\n\n\n\n\n\n\n\n\n\n\n\n\n\n\n\n\n\n\n\n\n\n\n\n\n\n\n\n\n\n\n\n\n\n\n\n\n\n\n\n\n\n\n\n\n\n\n\n\n\n\n\n\n\n\n\n\n\n\n\n\n\n\n\n\n\n\n\n\n\n\n\n\n\n\n\n\n\n\n\n\n\n\n\n\n\n\n\n\n\n\n\n\n\n\n\n\n\n\n\n\n\n\n\n\n\n\n\n\n\n\n\n\n\n\n\n
MODEL NUMBERVOLTA 500VOLTA 1000VOLTA 2000VOLTA 3000
Square Drive3/4\"1\"1\"1\"
Min. Torque (ft/lbs)120240500750
Max. Torque (ft/lbs)500100020003000
Min. Torque (Nm)1653357001025
Max. Torque (Nm)660135527004025
HEIGHT A (w/ battery) (in)10.40”10.40”10.40”10.40”
HEIGHT A (w/ battery) (mm)265265265265
LENGTH C (in)8.86”10.97”11.45”13.94”
LENGTH C (mm)225279291355
DIAMETER D (in)2.56”2.85”3.09”3.75”
DIAMETER D (mm)6572.478.595.3
WEIGHT (w/o reaction arm & battery) (lbs)8.311.513.119.6
WEIGHT (w/o reaction arm & battery) (kg)3.85.25.98.9
WEIGHT (w/ reaction arm & battery) (lbs)10.414.515.922.5
WEIGHT (w/ reaction arm & battery) (kg)4.76.67.210.2
RPM at Min. Torque12220.5
RPM at Max. Torque20852
\n
\n

Improper implications

\n

Undertightening a lugnut will put additional strain on the remaining lugnuts and will eventually cause them to fatigue, loosen and separate. Relaxed lugnuts will also cause the lug holes to elongate and become oblong, thus ruining the rim.

\n

An overtightened lugnut is just as dangerous. Too much force can strip the threads and cause them to stretch, effectively losing their clamping pressure. Over-exertion on the wheel stud can also force them to crack and break off.

\n

The intent behind properly-torqued lugnuts is to prevent wheel separations. One study found “fastener failure” was to blame in 85 percent of reported wheel separation accidents. Don’t become part of that statistic and always follow manufacturer recommendations.

\n

Each time a wheel is removed—whether for tire rotation, new tires or other routine wheel maintenance—the lugnuts need to be torqued accurately before the vehicle leaves the shop. They should also be rechecked two more times in the first 100 miles.

\n

Invest in a quality torque wrench

\n
\n
\n

A properly calibrated torque wrench will prevent wheel separation and avoid any unnecessary exposure to risk. Several torque wrenches are available in the automotive market, from manual “click” wrenches to battery-powered models.

\n

At Zip’s AW Direct, we sell and recommend the TorcUP, a quality, durable cordless unit delivering digital precision and offering reduced user fatigue. Click here for complete details on the six options available.

\n

With the TorcUP, you can accurately tighten a lugnut to exact specifications with less effort and greater convenience. This cordless unit frees yourself from manual lever-type torque wrenches and improves confidence, knowing you’ve accurately tightened a lugnut.

\n
\n
\"tu-vt-500kit-34-torcup-wrench-low-res-28\"
\n
\n

The TorcUP also allows you to reach inside a wheel well without a cumbersome lever getting in the way. For safety, yellow “reaction arms” are available to brace against or lock onto neighboring lugnuts to absorb the force generated by this power-packed wrench.

\n
\n
\n

At a max RPM of 20, the TorcUP wrench spins slowly and deliberately and then stops turning when the torque setting is achieved. To improve your efficiency, you can use a standard impact wrench to tighten the nut and then switch to the TorqUP wrench for the final torque setting.

\n

Please note the TorcUP does not record individual torque settings. We recommend documenting each wheel setting and then listing that information on the customer’s invoice. This will limit your exposure to risk once the vehicle leaves the shop.

\n

Accurate recordkeeping and properly tightening lugnuts are the hallmarks of a professional automotive technician. You don’t cut corners and have the safety and best interest of your customers and the motoring public in mind. Invest in a TorcUP wrench and sleep good at night.

\n
\n
\"tu-vt-500kit-34-torcup-wrench-low-res-37\"
\n
","postEmailContent":"

Close enough is not good enough. Don’t rely on your own judgment or the sound of your impact wrench to determine if lugnuts are properly secured. Always torque them to exact vehicle and manufacturer specifications.

","postFeaturedImageIfEnabled":"https://48463649.fs1.hubspotusercontent-na1.net/hubfs/48463649/Blog/header-1200x600.png","postListContent":"

Close enough is not good enough. Don’t rely on your own judgment or the sound of your impact wrench to determine if lugnuts are properly secured. Always torque them to exact vehicle and manufacturer specifications.

","postListSummaryFeaturedImage":"https://48463649.fs1.hubspotusercontent-na1.net/hubfs/48463649/Blog/header-1200x600.png","postRssContent":"

Close enough is not good enough. Don’t rely on your own judgment or the sound of your impact wrench to determine if lugnuts are properly secured. Always torque them to exact vehicle and manufacturer specifications.

","postRssSummaryFeaturedImage":"https://48463649.fs1.hubspotusercontent-na1.net/hubfs/48463649/Blog/header-1200x600.png","postSummary":"

Close enough is not good enough. Don’t rely on your own judgment or the sound of your impact wrench to determine if lugnuts are properly secured. Always torque them to exact vehicle and manufacturer specifications.

\n","postSummaryRss":"

Close enough is not good enough. Don’t rely on your own judgment or the sound of your impact wrench to determine if lugnuts are properly secured. Always torque them to exact vehicle and manufacturer specifications.

","postTemplate":"zips-basic-theme/templates/blog-post.html","previewImageSrc":null,"previewKey":"UolDDoed","previousPostFeaturedImage":"https://48463649.fs1.hubspotusercontent-na1.net/hubfs/48463649/0028865_roundsling-tee-web.jpg_900.jpg","previousPostFeaturedImageAltText":"","previousPostName":"Choosing The Right Lifting Sling for The Right Situation","previousPostSlug":"blog/choosing-the-right-lifting-sling-for-the-right-situation","processingStatus":"PUBLISHED","propertyForDynamicPageCanonicalUrl":null,"propertyForDynamicPageFeaturedImage":null,"propertyForDynamicPageMetaDescription":null,"propertyForDynamicPageSlug":null,"propertyForDynamicPageTitle":null,"publicAccessRules":[],"publicAccessRulesEnabled":false,"publishDate":1662728400000,"publishDateLocalTime":1662728400000,"publishDateLocalized":{"date":1662728400000,"format":"medium","language":null},"publishImmediately":true,"publishTimezoneOffset":null,"publishedAt":1755718033609,"publishedByEmail":null,"publishedById":79766377,"publishedByName":null,"publishedUrl":"/blog/lugnut-torque","resolvedDomain":"www.zips.com","resolvedLanguage":null,"rssBody":"

Close enough is not good enough. Don’t rely on your own judgment or the sound of your impact wrench to determine if lugnuts are properly secured. Always torque them to exact vehicle and manufacturer specifications.

\n\n

Professionally-torqued lugnuts prevent dangerous wheel separations on the highway and limit a mechanic’s liability. A loose wheel can cause property damage, personal injury or, in the worst case scenario, a fatal accident.

\n

The internet is littered with videos showing close calls with runaway tires on highways and on busy streets, nearly striking emergency personnel, pedestrians and the motoring public. Don’t risk a loose wheel. Invest in a torque wrench and give yourself peace of mind.

\n

Lugnut specifications range by rim size, stud diameter and vehicle ratings. Passenger tires vary from 70 ft./lbs. to more than 100 ft./lbs.

Refer to a vehicle’s owner manual or check available resources online for proper specifications. Here is an example of the torque ranges available with the TorcUP torque wrench.

\n
\n\n\n\n\n\n\n\n\n\n\n\n\n\n\n\n\n\n\n\n\n\n\n\n\n\n\n\n\n\n\n\n\n\n\n\n\n\n\n\n\n\n\n\n\n\n\n\n\n\n\n\n\n\n\n\n\n\n\n\n\n\n\n\n\n\n\n\n\n\n\n\n\n\n\n\n\n\n\n\n\n\n\n\n\n\n\n\n\n\n\n\n\n\n\n\n\n\n\n\n\n\n\n\n\n\n\n\n\n\n\n\n\n\n\n\n\n\n\n\n\n\n\n\n\n\n\n\n\n\n
MODEL NUMBERVOLTA 500VOLTA 1000VOLTA 2000VOLTA 3000
Square Drive3/4\"1\"1\"1\"
Min. Torque (ft/lbs)120240500750
Max. Torque (ft/lbs)500100020003000
Min. Torque (Nm)1653357001025
Max. Torque (Nm)660135527004025
HEIGHT A (w/ battery) (in)10.40”10.40”10.40”10.40”
HEIGHT A (w/ battery) (mm)265265265265
LENGTH C (in)8.86”10.97”11.45”13.94”
LENGTH C (mm)225279291355
DIAMETER D (in)2.56”2.85”3.09”3.75”
DIAMETER D (mm)6572.478.595.3
WEIGHT (w/o reaction arm & battery) (lbs)8.311.513.119.6
WEIGHT (w/o reaction arm & battery) (kg)3.85.25.98.9
WEIGHT (w/ reaction arm & battery) (lbs)10.414.515.922.5
WEIGHT (w/ reaction arm & battery) (kg)4.76.67.210.2
RPM at Min. Torque12220.5
RPM at Max. Torque20852
\n
\n

Improper implications

\n

Undertightening a lugnut will put additional strain on the remaining lugnuts and will eventually cause them to fatigue, loosen and separate. Relaxed lugnuts will also cause the lug holes to elongate and become oblong, thus ruining the rim.

\n

An overtightened lugnut is just as dangerous. Too much force can strip the threads and cause them to stretch, effectively losing their clamping pressure. Over-exertion on the wheel stud can also force them to crack and break off.

\n

The intent behind properly-torqued lugnuts is to prevent wheel separations. One study found “fastener failure” was to blame in 85 percent of reported wheel separation accidents. Don’t become part of that statistic and always follow manufacturer recommendations.

\n

Each time a wheel is removed—whether for tire rotation, new tires or other routine wheel maintenance—the lugnuts need to be torqued accurately before the vehicle leaves the shop. They should also be rechecked two more times in the first 100 miles.

\n

Invest in a quality torque wrench

\n
\n
\n

A properly calibrated torque wrench will prevent wheel separation and avoid any unnecessary exposure to risk. Several torque wrenches are available in the automotive market, from manual “click” wrenches to battery-powered models.

\n

At Zip’s AW Direct, we sell and recommend the TorcUP, a quality, durable cordless unit delivering digital precision and offering reduced user fatigue. Click here for complete details on the six options available.

\n

With the TorcUP, you can accurately tighten a lugnut to exact specifications with less effort and greater convenience. This cordless unit frees yourself from manual lever-type torque wrenches and improves confidence, knowing you’ve accurately tightened a lugnut.

\n
\n
\"tu-vt-500kit-34-torcup-wrench-low-res-28\"
\n
\n

The TorcUP also allows you to reach inside a wheel well without a cumbersome lever getting in the way. For safety, yellow “reaction arms” are available to brace against or lock onto neighboring lugnuts to absorb the force generated by this power-packed wrench.

\n
\n
\n

At a max RPM of 20, the TorcUP wrench spins slowly and deliberately and then stops turning when the torque setting is achieved. To improve your efficiency, you can use a standard impact wrench to tighten the nut and then switch to the TorqUP wrench for the final torque setting.

\n

Please note the TorcUP does not record individual torque settings. We recommend documenting each wheel setting and then listing that information on the customer’s invoice. This will limit your exposure to risk once the vehicle leaves the shop.

\n

Accurate recordkeeping and properly tightening lugnuts are the hallmarks of a professional automotive technician. You don’t cut corners and have the safety and best interest of your customers and the motoring public in mind. Invest in a TorcUP wrench and sleep good at night.

\n
\n
\"tu-vt-500kit-34-torcup-wrench-low-res-37\"
\n
","rssSummary":"

Close enough is not good enough. Don’t rely on your own judgment or the sound of your impact wrench to determine if lugnuts are properly secured. Always torque them to exact vehicle and manufacturer specifications.

\n","rssSummaryFeaturedImage":"https://48463649.fs1.hubspotusercontent-na1.net/hubfs/48463649/Blog/header-1200x600.png","scheduledUpdateDate":0,"screenshotPreviewTakenAt":1770060433407,"screenshotPreviewUrl":"https://cdn1.hubspot.net/hubshotv3/prod/e/0/3061241f-2e97-4124-96ce-2b8465fe630b.png","sections":{},"securityState":"NONE","siteId":null,"slug":"blog/lugnut-torque","stagedFrom":null,"state":"PUBLISHED","stateWhenDeleted":null,"structuredContentPageType":null,"structuredContentType":null,"styleOverrideId":null,"subcategory":"normal_blog_post","syncedWithBlogRoot":true,"tagIds":[192174528148,192174529697,194719179289,194719586666],"tagList":[{"categoryId":3,"cdnPurgeEmbargoTime":null,"contentIds":[],"cosObjectType":"TAG","created":1751601475164,"deletedAt":0,"description":"","id":192174528148,"label":"Automotive","language":null,"name":"Automotive","portalId":48463649,"slug":"automotive","translatedFromId":null,"translations":{},"updated":1751601475164},{"categoryId":3,"cdnPurgeEmbargoTime":null,"contentIds":[],"cosObjectType":"TAG","created":1751602285139,"deletedAt":0,"description":"","id":192174529697,"label":"Construction","language":null,"name":"Construction","portalId":48463649,"slug":"construction","translatedFromId":null,"translations":{},"updated":1751602285139},{"categoryId":3,"cdnPurgeEmbargoTime":null,"contentIds":[],"cosObjectType":"TAG","created":1755545213046,"deletedAt":0,"description":"","id":194719179289,"label":"Industry Knowledge & Updates","language":null,"name":"Industry Knowledge & Updates","portalId":48463649,"slug":"industry-knowledge-updates","translatedFromId":null,"translations":{},"updated":1755545213046},{"categoryId":3,"cdnPurgeEmbargoTime":null,"contentIds":[],"cosObjectType":"TAG","created":1755545331471,"deletedAt":0,"description":"","id":194719586666,"label":"Product Guides","language":null,"name":"Product Guides","portalId":48463649,"slug":"product-guides","translatedFromId":null,"translations":{},"updated":1755545331471}],"tagNames":["Automotive","Construction","Industry Knowledge & Updates","Product Guides"],"teamPerms":[],"templatePath":"","templatePathForRender":"zips-basic-theme/templates/blog-post.html","textToAudioFileId":null,"textToAudioGenerationRequestId":null,"themePath":null,"themeSettingsValues":null,"title":"Limit your liability: Accurately Torque Lugnuts","tmsId":null,"topicIds":[192174528148,192174529697,194719179289,194719586666],"topicList":[{"categoryId":3,"cdnPurgeEmbargoTime":null,"contentIds":[],"cosObjectType":"TAG","created":1751601475164,"deletedAt":0,"description":"","id":192174528148,"label":"Automotive","language":null,"name":"Automotive","portalId":48463649,"slug":"automotive","translatedFromId":null,"translations":{},"updated":1751601475164},{"categoryId":3,"cdnPurgeEmbargoTime":null,"contentIds":[],"cosObjectType":"TAG","created":1751602285139,"deletedAt":0,"description":"","id":192174529697,"label":"Construction","language":null,"name":"Construction","portalId":48463649,"slug":"construction","translatedFromId":null,"translations":{},"updated":1751602285139},{"categoryId":3,"cdnPurgeEmbargoTime":null,"contentIds":[],"cosObjectType":"TAG","created":1755545213046,"deletedAt":0,"description":"","id":194719179289,"label":"Industry Knowledge & Updates","language":null,"name":"Industry Knowledge & Updates","portalId":48463649,"slug":"industry-knowledge-updates","translatedFromId":null,"translations":{},"updated":1755545213046},{"categoryId":3,"cdnPurgeEmbargoTime":null,"contentIds":[],"cosObjectType":"TAG","created":1755545331471,"deletedAt":0,"description":"","id":194719586666,"label":"Product Guides","language":null,"name":"Product Guides","portalId":48463649,"slug":"product-guides","translatedFromId":null,"translations":{},"updated":1755545331471}],"topicNames":["Automotive","Construction","Industry Knowledge & Updates","Product Guides"],"topics":[192174528148,192174529697,194719179289,194719586666],"translatedContent":{},"translatedFromId":null,"translations":{},"tweet":null,"tweetAt":null,"tweetImmediately":false,"unpublishedAt":0,"updated":1755718033613,"updatedById":79766377,"upsizeFeaturedImage":false,"url":"/blog/lugnut-torque","useFeaturedImage":true,"userPerms":[],"views":null,"visibleToAll":null,"widgetContainers":{},"widgetcontainers":{},"widgets":{}},{"ab":false,"abStatus":null,"abTestId":null,"abVariation":false,"abVariationAutomated":false,"absoluteUrl":"/blog/best-automotive-lockout-kits-of-2022","afterPostBody":null,"aifeatures":null,"allowedSlugConflict":false,"analytics":null,"analyticsPageId":"192172356948","analyticsPageType":"blog-post","approvalStatus":null,"archived":false,"archivedAt":0,"archivedInDashboard":false,"areCommentsAllowed":true,"attachedStylesheets":[],"audienceAccess":"PUBLIC","author":null,"authorName":null,"authorUsername":null,"blogAuthor":{"avatar":"","bio":"","cdnPurgeEmbargoTime":null,"cosObjectType":"BLOG_AUTHOR","created":1750825727422,"deletedAt":0,"displayName":"Zip's","email":null,"facebook":"","fullName":"Zip's","gravatarUrl":null,"hasSocialProfiles":false,"id":191785406258,"label":"Zip's","language":"en","linkedin":"","name":"Zip's","portalId":48463649,"slug":"zips","translatedFromId":null,"translations":{},"twitter":"","twitterUsername":"","updated":1750825727422,"userId":null,"username":null,"website":""},"blogAuthorId":191785406258,"blogAuthorIdList":[191785406258],"blogAuthorList":[{"avatar":"","bio":"","cdnPurgeEmbargoTime":null,"cosObjectType":"BLOG_AUTHOR","created":1750825727422,"deletedAt":0,"displayName":"Zip's","email":null,"facebook":"","fullName":"Zip's","gravatarUrl":null,"hasSocialProfiles":false,"id":191785406258,"label":"Zip's","language":"en","linkedin":"","name":"Zip's","portalId":48463649,"slug":"zips","translatedFromId":null,"translations":{},"twitter":"","twitterUsername":"","updated":1750825727422,"userId":null,"username":null,"website":""}],"blogPostAuthor":{"avatar":"","bio":"","cdnPurgeEmbargoTime":null,"cosObjectType":"BLOG_AUTHOR","created":1750825727422,"deletedAt":0,"displayName":"Zip's","email":null,"facebook":"","fullName":"Zip's","gravatarUrl":null,"hasSocialProfiles":false,"id":191785406258,"label":"Zip's","language":"en","linkedin":"","name":"Zip's","portalId":48463649,"slug":"zips","translatedFromId":null,"translations":{},"twitter":"","twitterUsername":"","updated":1750825727422,"userId":null,"username":null,"website":""},"blogPostScheduleTaskUid":null,"blogPublishInstantEmailCampaignId":null,"blogPublishInstantEmailRetryCount":null,"blogPublishInstantEmailTaskUid":null,"blogPublishToSocialMediaTask":"DONE_NOT_SENT","blueprintTypeId":0,"businessUnitId":null,"campaign":null,"campaignName":null,"campaignUtm":null,"category":3,"categoryId":3,"cdnPurgeEmbargoTime":null,"checkPostLevelAudienceAccessFirst":true,"clonedFrom":null,"composeBody":null,"compositionId":0,"contentAccessRuleIds":[],"contentAccessRuleTypes":[],"contentGroup":190096341139,"contentGroupId":190096341139,"contentTypeCategory":3,"contentTypeCategoryId":3,"contentTypeId":null,"created":1751604033795,"createdByAgent":null,"createdById":74657203,"createdTime":1751604033795,"crmObjectId":null,"css":{},"cssText":"","ctaClicks":null,"ctaViews":null,"currentState":"PUBLISHED","currentlyPublished":true,"deletedAt":0,"deletedBy":null,"deletedByEmail":null,"deletedById":null,"domain":"","dynamicPageDataSourceId":null,"dynamicPageDataSourceType":null,"dynamicPageHubDbTableId":null,"enableDomainStylesheets":null,"enableGoogleAmpOutputOverride":false,"enableLayoutStylesheets":null,"errors":[],"featuredImage":"https://48463649.fs1.hubspotusercontent-na1.net/hubfs/48463649/Blog/act-sjpro-access-tools-slim-jim-in-use-june2022-hi-res-5.png","featuredImageAltText":"","featuredImageHeight":600,"featuredImageLength":0,"featuredImageWidth":1200,"flexAreas":{},"folderId":null,"footerHtml":null,"footerTemplatePath":null,"footerVariantName":null,"freezeDate":1657285200000,"generateJsonLdEnabledOverride":true,"globalBlockOverrides":{},"hasContentAccessRules":false,"hasUserChanges":true,"headHtml":"","header":null,"headerTemplatePath":null,"headerVariantName":null,"htmlTitle":"Best Automotive Lockout Kits of 2022","id":192172356948,"includeDefaultCustomCss":null,"isCaptchaRequired":true,"isCrawlableByBots":false,"isDraft":false,"isInstantEmailEnabled":false,"isPublished":true,"isSocialPublishingEnabled":false,"keywords":[],"label":"Best Automotive Lockout Kits of 2022","language":"en","lastEditSessionId":null,"lastEditUpdateId":null,"layoutSections":{},"legacyBlogTabid":null,"legacyId":null,"legacyPostGuid":null,"linkRelCanonicalUrl":"","listTemplate":"","liveDomain":"www.zips.com","mab":false,"mabExperimentId":null,"mabMaster":false,"mabVariant":false,"marketingCampaignGuids":[],"meta":{"html_title":"Best Automotive Lockout Kits of 2022","public_access_rules":[],"public_access_rules_enabled":false,"use_featured_image":true,"tag_ids":[192169769490,192174528148,194718191114,194719586666],"topic_ids":[192169769490,192174528148,194718191114,194719586666],"post_summary":"

Doesn’t matter who locked the keys inside the car. What matters is what you’re going to do to get them out. Zip’s AW Direct offers several car-opening kits to help automotive professionals gain access to locked vehicles.

\n","post_body":"

Doesn’t matter who locked the keys inside the car. What matters is what you’re going to do to get them out. Zip’s AW Direct offers several car-opening kits to help automotive professionals gain access to locked vehicles.

\n\n

In today’s blog, we’re going to look at some of our best-selling kits from different manufacturers. We’ll start with basic packages and finish with the most comprehensive kits, going over each lockout kit contents. Each one brings its own value, price-point and distinct lockout advantages.

\n

Steck’s BigEasy Door Tool Kit See Details

\n
\n
\n
    \n
  • (1) 4-1/2' L long reach tool
  • \n
  • (1) Glow-in-the-dark tip
  • \n
  • (1) Window wedge
  • \n
  • (1) Paint protector
  • \n
  • (1) Lock knob plastic strip tool
  • \n
\n

Steck's BigEasy door tool kit includes a fluorescent pink long reach tool with glow-in-the-dark properties. This allows for better visibility in low-light situations. Featuring a T-handle for better maneuvering, the long reach tool will appear white in the daylight and then bright pink at night.

\n
\n
\n

\"at32-1-steck-bigeasy-pink-long-reach-tool-web\"

\n
\n
\n

This kit also features a window wedge and other essential accessories for most unlock scenarios. With customer service in mind, the paint protector, rubber tip and plastic strip all combine to prevent unwanted scratches to the vehicle.

\n

AW Direct Big Blue Long-Reach Door Tool Kit See Details

\n
\n
\n
    \n
  • (1) Rigid plastic window wedge
  • \n
  • (1) Long reach door tool
  • \n
  • (1) Protective rubber tip
  • \n
  • (1) Inflatable air wedge
  • \n
  • (1) Carrying case
  • \n
\n
\n
\n

\"lockout-tools-2\"

\n
\n
\n

This convenient door tool kit from AW Direct includes a zippered, black carrying case so your tools will stay organized, stay together, will be easy to transport and will be ready to go to work when you need them.

\n

Similar to Steck’s BigEasy offering, this kit also features several properties to protect your customer’s vehicle. The inflatable air wedge won’t scratch windows or paint, and the rubber tip on the end of the long reach tool will soften any button or lever action.

\n

Pro-Lok 4 Piece Extra Length Long Arm Lockout Kit See Details

\n
\n
\n
    \n
  • (1) Extra Long Arm tool
  • \n
  • (1) Plastic sleeve
  • \n
  • (1) Pump wedge
  • \n
  • (1) Mini rubber wedge
  • \n
\n
\n
\n

\"lockout-tools-3\"

\n
\n
\n

By now, we’ve established the importance of protecting your customer’s vehicle and finish with soft air wedges, plastic paint protectors and rubber rod tips. What makes this four-piece kit from Pro-Lok different from the first two is the additional length of the long reach tool.

\n

At 76”, the Extra Long Arm tool is nearly two feet longer than the standard 4-1/2' long reach tool. Most of these door tools work alongside the window to reach door control buttons. With Pro-Lok’s kit, you now have the ability to reach across the vehicle’s interior.

\n

With a direct line of sight, you can easily position the long reach tool to depress the unlock button, access the pull handle, lift the lock button and even retrieve the keys. With this improved viewing angle, the only better position would be from inside the vehicle.

\n

Sully Tools Basic Door Tool Kit See Details

\n
\n
\n
    \n
  • (1) Sully Pouch carry case
  • \n
  • (1) Sully Strip
  • \n
  • (1) 2 Handle Wedges
  • \n
  • (1) Sticky L
  • \n
  • (1) Sully J
  • \n
  • (1) Sully Big Foot
  • \n
  • (1) Sully Dipper
  • \n
  • (1) Sully L
  • \n
  • (1) Sully Drop Hook
  • \n
  • (1) Sully Double Dipper
  • \n
\n
\n
\n

\"sul122-sully-tool-basic-door-kit-web-1\"

\n
\n
\n

Unlike the first three kits, Sully Tools’ Basic Door Tool Kit gives us our first look at In The Door tools, a separate category at Zips.com. The previous kits just featured long reach tools, which work well between the door frame and window weatherstripping to access the door controls.

\n

With In The Door tools, the pre-bent rods are inserted into the door cavity and, through careful manipulation, emerge on the inside of the window. The plated shafts are able to hold their shape but remain flexible enough to bend and form to the contour of the door.

\n

When using these tools, auto entry experts use extreme caution to avoid damage to internal door components and also use the Sully strips to prevent scratches on the glass surface. Each tool number is stamped on the handle for easy identification and replacement.

\n

Access Tools Contractor's Lockout Kit See Details

\n
\n
\n
    \n
  • (1) Wonder shield
  • \n
  • (1) Glassman tool
  • \n
  • (1) Wedgee wedge with strip savers
  • \n
  • (1) Standard one-hand jack tool
  • \n
  • (1) Air Jack wedge
  • \n
  • (1) Button Master tool
  • \n
  • (1) Button Strip tool
  • \n
  • (1) Quick Max long reach tool
  • \n
  • (1) Slim Jim
  • \n
  • (1) Carrying case
  • \n
\n
\n
\n

\"actacs-1-access-tools-contractors-kit-web\"

\n
\n
\n

The Contractor’s Lockout Kit from Access Tools is the most popular and best-selling kit at Zips.com. Complete with a soft-sided carrying case to keep everything together, this kit offers several wedge options as well as unique tools for door pulls and unlock buttons.

\n

At 24-1/2\", the Slim Jim tool included in this professional kit is made from stainless steel for added firmness, corrosion resistance and durability. As its name implies, the thin profile slides into the door cavity to reach door linkages for simple opening of any vehicle.

\n

Access Tools’ contractor kit also includes two options to reach the door lock knob. The Button Strip was designed for insertion into narrow gaps for grabbing vertical buttons, and with its handle-operated lasso, the Button Master was specifically created to pull up knobs.

\n

Save your customer’s day

\n

Unintentionally locking keys in a vehicle can be an embarrassing moment for your customers and cause unnecessary delays in their busy lives. Be a hero and come to their rescue with the right lockout tools from Zip’s AW Direct.

\n

Our rundown today of five different types of lockout kits should give you an idea of what you’ll need to respond to your next dispatch. If you don’t get a lot of those calls, a basic set may be right for you. However, if you handle a lot of them, consider a more comprehensive kit.

\n

Several more options are available at Zips.com. Click on the ‘Shop Products’ tab on the top navigation bar and then scroll down to Lockout Tools. Here, you’ll discover more kits and individual tools in a number of different categories.

\n

Find the options that are right for your operation. We also sell how-to manuals and include instructional videos on our product detail pages. These resources will come in handy the next time you head out to a lockout call.

","rss_summary":"

Doesn’t matter who locked the keys inside the car. What matters is what you’re going to do to get them out. Zip’s AW Direct offers several car-opening kits to help automotive professionals gain access to locked vehicles.

\n","rss_body":"

Doesn’t matter who locked the keys inside the car. What matters is what you’re going to do to get them out. Zip’s AW Direct offers several car-opening kits to help automotive professionals gain access to locked vehicles.

\n\n

In today’s blog, we’re going to look at some of our best-selling kits from different manufacturers. We’ll start with basic packages and finish with the most comprehensive kits, going over each lockout kit contents. Each one brings its own value, price-point and distinct lockout advantages.

\n

Steck’s BigEasy Door Tool Kit See Details

\n
\n
\n
    \n
  • (1) 4-1/2' L long reach tool
  • \n
  • (1) Glow-in-the-dark tip
  • \n
  • (1) Window wedge
  • \n
  • (1) Paint protector
  • \n
  • (1) Lock knob plastic strip tool
  • \n
\n

Steck's BigEasy door tool kit includes a fluorescent pink long reach tool with glow-in-the-dark properties. This allows for better visibility in low-light situations. Featuring a T-handle for better maneuvering, the long reach tool will appear white in the daylight and then bright pink at night.

\n
\n
\n

\"at32-1-steck-bigeasy-pink-long-reach-tool-web\"

\n
\n
\n

This kit also features a window wedge and other essential accessories for most unlock scenarios. With customer service in mind, the paint protector, rubber tip and plastic strip all combine to prevent unwanted scratches to the vehicle.

\n

AW Direct Big Blue Long-Reach Door Tool Kit See Details

\n
\n
\n
    \n
  • (1) Rigid plastic window wedge
  • \n
  • (1) Long reach door tool
  • \n
  • (1) Protective rubber tip
  • \n
  • (1) Inflatable air wedge
  • \n
  • (1) Carrying case
  • \n
\n
\n
\n

\"lockout-tools-2\"

\n
\n
\n

This convenient door tool kit from AW Direct includes a zippered, black carrying case so your tools will stay organized, stay together, will be easy to transport and will be ready to go to work when you need them.

\n

Similar to Steck’s BigEasy offering, this kit also features several properties to protect your customer’s vehicle. The inflatable air wedge won’t scratch windows or paint, and the rubber tip on the end of the long reach tool will soften any button or lever action.

\n

Pro-Lok 4 Piece Extra Length Long Arm Lockout Kit See Details

\n
\n
\n
    \n
  • (1) Extra Long Arm tool
  • \n
  • (1) Plastic sleeve
  • \n
  • (1) Pump wedge
  • \n
  • (1) Mini rubber wedge
  • \n
\n
\n
\n

\"lockout-tools-3\"

\n
\n
\n

By now, we’ve established the importance of protecting your customer’s vehicle and finish with soft air wedges, plastic paint protectors and rubber rod tips. What makes this four-piece kit from Pro-Lok different from the first two is the additional length of the long reach tool.

\n

At 76”, the Extra Long Arm tool is nearly two feet longer than the standard 4-1/2' long reach tool. Most of these door tools work alongside the window to reach door control buttons. With Pro-Lok’s kit, you now have the ability to reach across the vehicle’s interior.

\n

With a direct line of sight, you can easily position the long reach tool to depress the unlock button, access the pull handle, lift the lock button and even retrieve the keys. With this improved viewing angle, the only better position would be from inside the vehicle.

\n

Sully Tools Basic Door Tool Kit See Details

\n
\n
\n
    \n
  • (1) Sully Pouch carry case
  • \n
  • (1) Sully Strip
  • \n
  • (1) 2 Handle Wedges
  • \n
  • (1) Sticky L
  • \n
  • (1) Sully J
  • \n
  • (1) Sully Big Foot
  • \n
  • (1) Sully Dipper
  • \n
  • (1) Sully L
  • \n
  • (1) Sully Drop Hook
  • \n
  • (1) Sully Double Dipper
  • \n
\n
\n
\n

\"sul122-sully-tool-basic-door-kit-web-1\"

\n
\n
\n

Unlike the first three kits, Sully Tools’ Basic Door Tool Kit gives us our first look at In The Door tools, a separate category at Zips.com. The previous kits just featured long reach tools, which work well between the door frame and window weatherstripping to access the door controls.

\n

With In The Door tools, the pre-bent rods are inserted into the door cavity and, through careful manipulation, emerge on the inside of the window. The plated shafts are able to hold their shape but remain flexible enough to bend and form to the contour of the door.

\n

When using these tools, auto entry experts use extreme caution to avoid damage to internal door components and also use the Sully strips to prevent scratches on the glass surface. Each tool number is stamped on the handle for easy identification and replacement.

\n

Access Tools Contractor's Lockout Kit See Details

\n
\n
\n
    \n
  • (1) Wonder shield
  • \n
  • (1) Glassman tool
  • \n
  • (1) Wedgee wedge with strip savers
  • \n
  • (1) Standard one-hand jack tool
  • \n
  • (1) Air Jack wedge
  • \n
  • (1) Button Master tool
  • \n
  • (1) Button Strip tool
  • \n
  • (1) Quick Max long reach tool
  • \n
  • (1) Slim Jim
  • \n
  • (1) Carrying case
  • \n
\n
\n
\n

\"actacs-1-access-tools-contractors-kit-web\"

\n
\n
\n

The Contractor’s Lockout Kit from Access Tools is the most popular and best-selling kit at Zips.com. Complete with a soft-sided carrying case to keep everything together, this kit offers several wedge options as well as unique tools for door pulls and unlock buttons.

\n

At 24-1/2\", the Slim Jim tool included in this professional kit is made from stainless steel for added firmness, corrosion resistance and durability. As its name implies, the thin profile slides into the door cavity to reach door linkages for simple opening of any vehicle.

\n

Access Tools’ contractor kit also includes two options to reach the door lock knob. The Button Strip was designed for insertion into narrow gaps for grabbing vertical buttons, and with its handle-operated lasso, the Button Master was specifically created to pull up knobs.

\n

Save your customer’s day

\n

Unintentionally locking keys in a vehicle can be an embarrassing moment for your customers and cause unnecessary delays in their busy lives. Be a hero and come to their rescue with the right lockout tools from Zip’s AW Direct.

\n

Our rundown today of five different types of lockout kits should give you an idea of what you’ll need to respond to your next dispatch. If you don’t get a lot of those calls, a basic set may be right for you. However, if you handle a lot of them, consider a more comprehensive kit.

\n

Several more options are available at Zips.com. Click on the ‘Shop Products’ tab on the top navigation bar and then scroll down to Lockout Tools. Here, you’ll discover more kits and individual tools in a number of different categories.

\n

Find the options that are right for your operation. We also sell how-to manuals and include instructional videos on our product detail pages. These resources will come in handy the next time you head out to a lockout call.

","enable_google_amp_output_override":false,"generate_json_ld_enabled":true,"blog_post_schedule_task_uid":null,"blog_publish_to_social_media_task":"DONE_NOT_SENT","blog_publish_instant_email_task_uid":null,"blog_publish_instant_email_campaign_id":null,"blog_publish_instant_email_retry_count":null,"keywords":[],"composition_id":0,"is_crawlable_by_bots":false,"head_html":"","footer_html":null,"attached_stylesheets":[],"enable_domain_stylesheets":null,"include_default_custom_css":null,"layout_sections":{},"past_mab_experiment_ids":[],"deleted_by":null,"featured_image_alt_text":"","enable_layout_stylesheets":null,"tweet":null,"tweet_at":null,"campaign_name":null,"campaign_utm":null,"meta_keywords":null,"meta_description":"Explore the best automotive lockout kits of 2022. See top picks from Steck, AW Direct, Pro-Lok, Sully Tools, and Access Tools. Compare features, tool lists, and find the kit that's right for your towing or locksmith business.","tweet_immediately":false,"publish_immediately":true,"security_state":"NONE","scheduled_update_date":0,"placement_guids":[],"header_template_path":null,"header_variant_name":null,"footer_template_path":null,"footer_variant_name":null,"global_block_overrides":{},"property_for_dynamic_page_title":null,"property_for_dynamic_page_slug":null,"property_for_dynamic_page_meta_description":null,"property_for_dynamic_page_featured_image":null,"property_for_dynamic_page_canonical_url":null,"preview_image_src":null,"legacy_blog_tabid":null,"legacy_post_guid":null,"performable_variation_letter":null,"style_override_id":null,"has_user_changes":true,"css":{},"css_text":"","unpublished_at":0,"published_by_id":76755706,"allowed_slug_conflict":false,"ai_features":null,"link_rel_canonical_url":"","page_redirected":false,"page_expiry_enabled":null,"page_expiry_date":null,"page_expiry_redirect_id":null,"page_expiry_redirect_url":null,"deleted_by_id":null,"state_when_deleted":null,"cloned_from":null,"staged_from":null,"personas":[],"compose_body":null,"featured_image":"https://48463649.fs1.hubspotusercontent-na1.net/hubfs/48463649/Blog/act-sjpro-access-tools-slim-jim-in-use-june2022-hi-res-5.png","featured_image_width":1200,"featured_image_height":600,"publish_timezone_offset":null,"theme_settings_values":null,"header":null,"password":null,"published_at":1756136206930,"last_edit_session_id":null,"last_edit_update_id":null,"created_by_agent":null},"metaDescription":"Explore the best automotive lockout kits of 2022. See top picks from Steck, AW Direct, Pro-Lok, Sully Tools, and Access Tools. Compare features, tool lists, and find the kit that's right for your towing or locksmith business.","metaKeywords":null,"name":"Best Automotive Lockout Kits of 2022","nextPostFeaturedImage":"https://48463649.fs1.hubspotusercontent-na1.net/hubfs/48463649/Blog/winches_parts_diagram_600x300.png","nextPostFeaturedImageAltText":"","nextPostName":"How to Choose a Winch: Sizes, Motors & Gears","nextPostSlug":"blog/how-to-choose-a-winch-sizes-motors-gears","pageExpiryDate":null,"pageExpiryEnabled":null,"pageExpiryRedirectId":null,"pageExpiryRedirectUrl":null,"pageRedirected":false,"pageTitle":"Best Automotive Lockout Kits of 2022","parentBlog":{"absoluteUrl":"/blog","allowComments":true,"ampBodyColor":"#404040","ampBodyFont":"'Helvetica Neue', Helvetica, Arial, sans-serif","ampBodyFontSize":"18","ampCustomCss":"","ampHeaderBackgroundColor":"#ffffff","ampHeaderColor":"#1e1e1e","ampHeaderFont":"'Helvetica Neue', Helvetica, Arial, sans-serif","ampHeaderFontSize":"36","ampLinkColor":"#416bb3","ampLogoAlt":"","ampLogoHeight":0,"ampLogoSrc":"","ampLogoWidth":0,"analyticsPageId":190096341139,"attachedStylesheets":[],"audienceAccess":"PUBLIC","businessUnitId":null,"captchaAfterDays":7,"captchaAlways":false,"categoryId":3,"cdnPurgeEmbargoTime":null,"closeCommentsOlder":0,"commentDateFormat":"medium","commentFormGuid":"a4128401-39db-4c54-a62b-88ff335d3a69","commentMaxThreadDepth":1,"commentModeration":false,"commentNotificationEmails":[],"commentShouldCreateContact":false,"commentVerificationText":"","cosObjectType":"BLOG","created":1747163443999,"createdDateTime":1747163443999,"dailyNotificationEmailId":null,"dateFormattingLanguage":null,"defaultGroupStyleId":"","defaultNotificationFromName":"","defaultNotificationReplyTo":"","deletedAt":0,"description":"","domain":"","domainWhenPublished":"www.zips.com","emailApiSubscriptionId":null,"enableGoogleAmpOutput":true,"enableSocialAutoPublishing":false,"generateJsonLdEnabled":true,"header":null,"htmlFooter":"","htmlFooterIsShared":true,"htmlHead":"","htmlHeadIsShared":true,"htmlKeywords":[],"htmlTitle":"blog","id":190096341139,"ilsSubscriptionListsByType":{},"instantNotificationEmailId":null,"itemLayoutId":null,"itemTemplateIsShared":false,"itemTemplatePath":"zips-basic-theme/templates/blog-post.html","label":"blog","language":"en","legacyGuid":null,"legacyModuleId":null,"legacyTabId":null,"listingLayoutId":null,"listingPageId":190096341141,"listingTemplatePath":"","liveDomain":"www.zips.com","monthFilterFormat":"MMMM yyyy","monthlyNotificationEmailId":null,"name":"blog","parentBlogUpdateTaskId":null,"portalId":48463649,"postHtmlFooter":"","postHtmlHead":"","postsPerListingPage":111,"postsPerRssFeed":10,"publicAccessRules":[],"publicAccessRulesEnabled":false,"publicTitle":"blog","publishDateFormat":"medium","resolvedDomain":"www.zips.com","rootUrl":"/blog","rssCustomFeed":null,"rssDescription":null,"rssItemFooter":null,"rssItemHeader":null,"settingsOverrides":{"itemLayoutId":false,"itemTemplatePath":false,"itemTemplateIsShared":false,"listingLayoutId":false,"listingTemplatePath":false,"postsPerListingPage":false,"showSummaryInListing":false,"useFeaturedImageInSummary":false,"htmlHead":false,"postHtmlHead":false,"htmlHeadIsShared":false,"htmlFooter":false,"listingPageHtmlFooter":false,"postHtmlFooter":false,"htmlFooterIsShared":false,"attachedStylesheets":false,"postsPerRssFeed":false,"showSummaryInRss":false,"showSummaryInEmails":false,"showSummariesInEmails":false,"allowComments":false,"commentShouldCreateContact":false,"commentModeration":false,"closeCommentsOlder":false,"commentNotificationEmails":false,"commentMaxThreadDepth":false,"commentVerificationText":false,"socialAccountTwitter":false,"showSocialLinkTwitter":false,"showSocialLinkLinkedin":false,"showSocialLinkFacebook":false,"enableGoogleAmpOutput":false,"ampLogoSrc":false,"ampLogoHeight":false,"ampLogoWidth":false,"ampLogoAlt":false,"ampHeaderFont":false,"ampHeaderFontSize":false,"ampHeaderColor":false,"ampHeaderBackgroundColor":false,"ampBodyFont":false,"ampBodyFontSize":false,"ampBodyColor":false,"ampLinkColor":false,"generateJsonLdEnabled":false},"showSocialLinkFacebook":true,"showSocialLinkLinkedin":true,"showSocialLinkTwitter":true,"showSummaryInEmails":true,"showSummaryInListing":true,"showSummaryInRss":true,"siteId":null,"slug":"blog","socialAccountTwitter":"","state":null,"subscriptionContactsProperty":null,"subscriptionEmailType":null,"subscriptionFormGuid":null,"subscriptionListsByType":{},"title":null,"translatedFromId":null,"translations":{},"updated":1755110916417,"updatedDateTime":1755110916417,"urlBase":"www.zips.com/blog","urlSegments":{"all":"all","archive":"archive","author":"author","page":"page","tag":"tag"},"useFeaturedImageInSummary":true,"usesDefaultTemplate":false,"weeklyNotificationEmailId":null},"password":null,"pastMabExperimentIds":[],"performableGuid":null,"performableVariationLetter":null,"personalizationStrategyId":null,"personalizationVariantStatus":null,"personas":[],"placementGuids":[],"portableKey":null,"portalId":48463649,"position":null,"postBody":"

Doesn’t matter who locked the keys inside the car. What matters is what you’re going to do to get them out. Zip’s AW Direct offers several car-opening kits to help automotive professionals gain access to locked vehicles.

\n\n

In today’s blog, we’re going to look at some of our best-selling kits from different manufacturers. We’ll start with basic packages and finish with the most comprehensive kits, going over each lockout kit contents. Each one brings its own value, price-point and distinct lockout advantages.

\n

Steck’s BigEasy Door Tool Kit See Details

\n
\n
\n
    \n
  • (1) 4-1/2' L long reach tool
  • \n
  • (1) Glow-in-the-dark tip
  • \n
  • (1) Window wedge
  • \n
  • (1) Paint protector
  • \n
  • (1) Lock knob plastic strip tool
  • \n
\n

Steck's BigEasy door tool kit includes a fluorescent pink long reach tool with glow-in-the-dark properties. This allows for better visibility in low-light situations. Featuring a T-handle for better maneuvering, the long reach tool will appear white in the daylight and then bright pink at night.

\n
\n
\n

\"at32-1-steck-bigeasy-pink-long-reach-tool-web\"

\n
\n
\n

This kit also features a window wedge and other essential accessories for most unlock scenarios. With customer service in mind, the paint protector, rubber tip and plastic strip all combine to prevent unwanted scratches to the vehicle.

\n

AW Direct Big Blue Long-Reach Door Tool Kit See Details

\n
\n
\n
    \n
  • (1) Rigid plastic window wedge
  • \n
  • (1) Long reach door tool
  • \n
  • (1) Protective rubber tip
  • \n
  • (1) Inflatable air wedge
  • \n
  • (1) Carrying case
  • \n
\n
\n
\n

\"lockout-tools-2\"

\n
\n
\n

This convenient door tool kit from AW Direct includes a zippered, black carrying case so your tools will stay organized, stay together, will be easy to transport and will be ready to go to work when you need them.

\n

Similar to Steck’s BigEasy offering, this kit also features several properties to protect your customer’s vehicle. The inflatable air wedge won’t scratch windows or paint, and the rubber tip on the end of the long reach tool will soften any button or lever action.

\n

Pro-Lok 4 Piece Extra Length Long Arm Lockout Kit See Details

\n
\n
\n
    \n
  • (1) Extra Long Arm tool
  • \n
  • (1) Plastic sleeve
  • \n
  • (1) Pump wedge
  • \n
  • (1) Mini rubber wedge
  • \n
\n
\n
\n

\"lockout-tools-3\"

\n
\n
\n

By now, we’ve established the importance of protecting your customer’s vehicle and finish with soft air wedges, plastic paint protectors and rubber rod tips. What makes this four-piece kit from Pro-Lok different from the first two is the additional length of the long reach tool.

\n

At 76”, the Extra Long Arm tool is nearly two feet longer than the standard 4-1/2' long reach tool. Most of these door tools work alongside the window to reach door control buttons. With Pro-Lok’s kit, you now have the ability to reach across the vehicle’s interior.

\n

With a direct line of sight, you can easily position the long reach tool to depress the unlock button, access the pull handle, lift the lock button and even retrieve the keys. With this improved viewing angle, the only better position would be from inside the vehicle.

\n

Sully Tools Basic Door Tool Kit See Details

\n
\n
\n
    \n
  • (1) Sully Pouch carry case
  • \n
  • (1) Sully Strip
  • \n
  • (1) 2 Handle Wedges
  • \n
  • (1) Sticky L
  • \n
  • (1) Sully J
  • \n
  • (1) Sully Big Foot
  • \n
  • (1) Sully Dipper
  • \n
  • (1) Sully L
  • \n
  • (1) Sully Drop Hook
  • \n
  • (1) Sully Double Dipper
  • \n
\n
\n
\n

\"sul122-sully-tool-basic-door-kit-web-1\"

\n
\n
\n

Unlike the first three kits, Sully Tools’ Basic Door Tool Kit gives us our first look at In The Door tools, a separate category at Zips.com. The previous kits just featured long reach tools, which work well between the door frame and window weatherstripping to access the door controls.

\n

With In The Door tools, the pre-bent rods are inserted into the door cavity and, through careful manipulation, emerge on the inside of the window. The plated shafts are able to hold their shape but remain flexible enough to bend and form to the contour of the door.

\n

When using these tools, auto entry experts use extreme caution to avoid damage to internal door components and also use the Sully strips to prevent scratches on the glass surface. Each tool number is stamped on the handle for easy identification and replacement.

\n

Access Tools Contractor's Lockout Kit See Details

\n
\n
\n
    \n
  • (1) Wonder shield
  • \n
  • (1) Glassman tool
  • \n
  • (1) Wedgee wedge with strip savers
  • \n
  • (1) Standard one-hand jack tool
  • \n
  • (1) Air Jack wedge
  • \n
  • (1) Button Master tool
  • \n
  • (1) Button Strip tool
  • \n
  • (1) Quick Max long reach tool
  • \n
  • (1) Slim Jim
  • \n
  • (1) Carrying case
  • \n
\n
\n
\n

\"actacs-1-access-tools-contractors-kit-web\"

\n
\n
\n

The Contractor’s Lockout Kit from Access Tools is the most popular and best-selling kit at Zips.com. Complete with a soft-sided carrying case to keep everything together, this kit offers several wedge options as well as unique tools for door pulls and unlock buttons.

\n

At 24-1/2\", the Slim Jim tool included in this professional kit is made from stainless steel for added firmness, corrosion resistance and durability. As its name implies, the thin profile slides into the door cavity to reach door linkages for simple opening of any vehicle.

\n

Access Tools’ contractor kit also includes two options to reach the door lock knob. The Button Strip was designed for insertion into narrow gaps for grabbing vertical buttons, and with its handle-operated lasso, the Button Master was specifically created to pull up knobs.

\n

Save your customer’s day

\n

Unintentionally locking keys in a vehicle can be an embarrassing moment for your customers and cause unnecessary delays in their busy lives. Be a hero and come to their rescue with the right lockout tools from Zip’s AW Direct.

\n

Our rundown today of five different types of lockout kits should give you an idea of what you’ll need to respond to your next dispatch. If you don’t get a lot of those calls, a basic set may be right for you. However, if you handle a lot of them, consider a more comprehensive kit.

\n

Several more options are available at Zips.com. Click on the ‘Shop Products’ tab on the top navigation bar and then scroll down to Lockout Tools. Here, you’ll discover more kits and individual tools in a number of different categories.

\n

Find the options that are right for your operation. We also sell how-to manuals and include instructional videos on our product detail pages. These resources will come in handy the next time you head out to a lockout call.

","postBodyRss":"

Doesn’t matter who locked the keys inside the car. What matters is what you’re going to do to get them out. Zip’s AW Direct offers several car-opening kits to help automotive professionals gain access to locked vehicles.

\n\n

In today’s blog, we’re going to look at some of our best-selling kits from different manufacturers. We’ll start with basic packages and finish with the most comprehensive kits, going over each lockout kit contents. Each one brings its own value, price-point and distinct lockout advantages.

\n

Steck’s BigEasy Door Tool Kit See Details

\n
\n
\n
    \n
  • (1) 4-1/2' L long reach tool
  • \n
  • (1) Glow-in-the-dark tip
  • \n
  • (1) Window wedge
  • \n
  • (1) Paint protector
  • \n
  • (1) Lock knob plastic strip tool
  • \n
\n

Steck's BigEasy door tool kit includes a fluorescent pink long reach tool with glow-in-the-dark properties. This allows for better visibility in low-light situations. Featuring a T-handle for better maneuvering, the long reach tool will appear white in the daylight and then bright pink at night.

\n
\n
\n

\"at32-1-steck-bigeasy-pink-long-reach-tool-web\"

\n
\n
\n

This kit also features a window wedge and other essential accessories for most unlock scenarios. With customer service in mind, the paint protector, rubber tip and plastic strip all combine to prevent unwanted scratches to the vehicle.

\n

AW Direct Big Blue Long-Reach Door Tool Kit See Details

\n
\n
\n
    \n
  • (1) Rigid plastic window wedge
  • \n
  • (1) Long reach door tool
  • \n
  • (1) Protective rubber tip
  • \n
  • (1) Inflatable air wedge
  • \n
  • (1) Carrying case
  • \n
\n
\n
\n

\"lockout-tools-2\"

\n
\n
\n

This convenient door tool kit from AW Direct includes a zippered, black carrying case so your tools will stay organized, stay together, will be easy to transport and will be ready to go to work when you need them.

\n

Similar to Steck’s BigEasy offering, this kit also features several properties to protect your customer’s vehicle. The inflatable air wedge won’t scratch windows or paint, and the rubber tip on the end of the long reach tool will soften any button or lever action.

\n

Pro-Lok 4 Piece Extra Length Long Arm Lockout Kit See Details

\n
\n
\n
    \n
  • (1) Extra Long Arm tool
  • \n
  • (1) Plastic sleeve
  • \n
  • (1) Pump wedge
  • \n
  • (1) Mini rubber wedge
  • \n
\n
\n
\n

\"lockout-tools-3\"

\n
\n
\n

By now, we’ve established the importance of protecting your customer’s vehicle and finish with soft air wedges, plastic paint protectors and rubber rod tips. What makes this four-piece kit from Pro-Lok different from the first two is the additional length of the long reach tool.

\n

At 76”, the Extra Long Arm tool is nearly two feet longer than the standard 4-1/2' long reach tool. Most of these door tools work alongside the window to reach door control buttons. With Pro-Lok’s kit, you now have the ability to reach across the vehicle’s interior.

\n

With a direct line of sight, you can easily position the long reach tool to depress the unlock button, access the pull handle, lift the lock button and even retrieve the keys. With this improved viewing angle, the only better position would be from inside the vehicle.

\n

Sully Tools Basic Door Tool Kit See Details

\n
\n
\n
    \n
  • (1) Sully Pouch carry case
  • \n
  • (1) Sully Strip
  • \n
  • (1) 2 Handle Wedges
  • \n
  • (1) Sticky L
  • \n
  • (1) Sully J
  • \n
  • (1) Sully Big Foot
  • \n
  • (1) Sully Dipper
  • \n
  • (1) Sully L
  • \n
  • (1) Sully Drop Hook
  • \n
  • (1) Sully Double Dipper
  • \n
\n
\n
\n

\"sul122-sully-tool-basic-door-kit-web-1\"

\n
\n
\n

Unlike the first three kits, Sully Tools’ Basic Door Tool Kit gives us our first look at In The Door tools, a separate category at Zips.com. The previous kits just featured long reach tools, which work well between the door frame and window weatherstripping to access the door controls.

\n

With In The Door tools, the pre-bent rods are inserted into the door cavity and, through careful manipulation, emerge on the inside of the window. The plated shafts are able to hold their shape but remain flexible enough to bend and form to the contour of the door.

\n

When using these tools, auto entry experts use extreme caution to avoid damage to internal door components and also use the Sully strips to prevent scratches on the glass surface. Each tool number is stamped on the handle for easy identification and replacement.

\n

Access Tools Contractor's Lockout Kit See Details

\n
\n
\n
    \n
  • (1) Wonder shield
  • \n
  • (1) Glassman tool
  • \n
  • (1) Wedgee wedge with strip savers
  • \n
  • (1) Standard one-hand jack tool
  • \n
  • (1) Air Jack wedge
  • \n
  • (1) Button Master tool
  • \n
  • (1) Button Strip tool
  • \n
  • (1) Quick Max long reach tool
  • \n
  • (1) Slim Jim
  • \n
  • (1) Carrying case
  • \n
\n
\n
\n

\"actacs-1-access-tools-contractors-kit-web\"

\n
\n
\n

The Contractor’s Lockout Kit from Access Tools is the most popular and best-selling kit at Zips.com. Complete with a soft-sided carrying case to keep everything together, this kit offers several wedge options as well as unique tools for door pulls and unlock buttons.

\n

At 24-1/2\", the Slim Jim tool included in this professional kit is made from stainless steel for added firmness, corrosion resistance and durability. As its name implies, the thin profile slides into the door cavity to reach door linkages for simple opening of any vehicle.

\n

Access Tools’ contractor kit also includes two options to reach the door lock knob. The Button Strip was designed for insertion into narrow gaps for grabbing vertical buttons, and with its handle-operated lasso, the Button Master was specifically created to pull up knobs.

\n

Save your customer’s day

\n

Unintentionally locking keys in a vehicle can be an embarrassing moment for your customers and cause unnecessary delays in their busy lives. Be a hero and come to their rescue with the right lockout tools from Zip’s AW Direct.

\n

Our rundown today of five different types of lockout kits should give you an idea of what you’ll need to respond to your next dispatch. If you don’t get a lot of those calls, a basic set may be right for you. However, if you handle a lot of them, consider a more comprehensive kit.

\n

Several more options are available at Zips.com. Click on the ‘Shop Products’ tab on the top navigation bar and then scroll down to Lockout Tools. Here, you’ll discover more kits and individual tools in a number of different categories.

\n

Find the options that are right for your operation. We also sell how-to manuals and include instructional videos on our product detail pages. These resources will come in handy the next time you head out to a lockout call.

","postEmailContent":"

Doesn’t matter who locked the keys inside the car. What matters is what you’re going to do to get them out. Zip’s AW Direct offers several car-opening kits to help automotive professionals gain access to locked vehicles.

","postFeaturedImageIfEnabled":"https://48463649.fs1.hubspotusercontent-na1.net/hubfs/48463649/Blog/act-sjpro-access-tools-slim-jim-in-use-june2022-hi-res-5.png","postListContent":"

Doesn’t matter who locked the keys inside the car. What matters is what you’re going to do to get them out. Zip’s AW Direct offers several car-opening kits to help automotive professionals gain access to locked vehicles.

","postListSummaryFeaturedImage":"https://48463649.fs1.hubspotusercontent-na1.net/hubfs/48463649/Blog/act-sjpro-access-tools-slim-jim-in-use-june2022-hi-res-5.png","postRssContent":"

Doesn’t matter who locked the keys inside the car. What matters is what you’re going to do to get them out. Zip’s AW Direct offers several car-opening kits to help automotive professionals gain access to locked vehicles.

","postRssSummaryFeaturedImage":"https://48463649.fs1.hubspotusercontent-na1.net/hubfs/48463649/Blog/act-sjpro-access-tools-slim-jim-in-use-june2022-hi-res-5.png","postSummary":"

Doesn’t matter who locked the keys inside the car. What matters is what you’re going to do to get them out. Zip’s AW Direct offers several car-opening kits to help automotive professionals gain access to locked vehicles.

\n","postSummaryRss":"

Doesn’t matter who locked the keys inside the car. What matters is what you’re going to do to get them out. Zip’s AW Direct offers several car-opening kits to help automotive professionals gain access to locked vehicles.

","postTemplate":"zips-basic-theme/templates/blog-post.html","previewImageSrc":null,"previewKey":"onjAWbYW","previousPostFeaturedImage":"https://48463649.fs1.hubspotusercontent-na1.net/hubfs/48463649/Blog/header-1200x600.png","previousPostFeaturedImageAltText":"","previousPostName":"Limit your liability: Accurately Torque Lugnuts","previousPostSlug":"blog/lugnut-torque","processingStatus":"PUBLISHED","propertyForDynamicPageCanonicalUrl":null,"propertyForDynamicPageFeaturedImage":null,"propertyForDynamicPageMetaDescription":null,"propertyForDynamicPageSlug":null,"propertyForDynamicPageTitle":null,"publicAccessRules":[],"publicAccessRulesEnabled":false,"publishDate":1657285200000,"publishDateLocalTime":1657285200000,"publishDateLocalized":{"date":1657285200000,"format":"medium","language":null},"publishImmediately":true,"publishTimezoneOffset":null,"publishedAt":1756136206930,"publishedByEmail":null,"publishedById":76755706,"publishedByName":null,"publishedUrl":"/blog/best-automotive-lockout-kits-of-2022","resolvedDomain":"www.zips.com","resolvedLanguage":null,"rssBody":"

Doesn’t matter who locked the keys inside the car. What matters is what you’re going to do to get them out. Zip’s AW Direct offers several car-opening kits to help automotive professionals gain access to locked vehicles.

\n\n

In today’s blog, we’re going to look at some of our best-selling kits from different manufacturers. We’ll start with basic packages and finish with the most comprehensive kits, going over each lockout kit contents. Each one brings its own value, price-point and distinct lockout advantages.

\n

Steck’s BigEasy Door Tool Kit See Details

\n
\n
\n
    \n
  • (1) 4-1/2' L long reach tool
  • \n
  • (1) Glow-in-the-dark tip
  • \n
  • (1) Window wedge
  • \n
  • (1) Paint protector
  • \n
  • (1) Lock knob plastic strip tool
  • \n
\n

Steck's BigEasy door tool kit includes a fluorescent pink long reach tool with glow-in-the-dark properties. This allows for better visibility in low-light situations. Featuring a T-handle for better maneuvering, the long reach tool will appear white in the daylight and then bright pink at night.

\n
\n
\n

\"at32-1-steck-bigeasy-pink-long-reach-tool-web\"

\n
\n
\n

This kit also features a window wedge and other essential accessories for most unlock scenarios. With customer service in mind, the paint protector, rubber tip and plastic strip all combine to prevent unwanted scratches to the vehicle.

\n

AW Direct Big Blue Long-Reach Door Tool Kit See Details

\n
\n
\n
    \n
  • (1) Rigid plastic window wedge
  • \n
  • (1) Long reach door tool
  • \n
  • (1) Protective rubber tip
  • \n
  • (1) Inflatable air wedge
  • \n
  • (1) Carrying case
  • \n
\n
\n
\n

\"lockout-tools-2\"

\n
\n
\n

This convenient door tool kit from AW Direct includes a zippered, black carrying case so your tools will stay organized, stay together, will be easy to transport and will be ready to go to work when you need them.

\n

Similar to Steck’s BigEasy offering, this kit also features several properties to protect your customer’s vehicle. The inflatable air wedge won’t scratch windows or paint, and the rubber tip on the end of the long reach tool will soften any button or lever action.

\n

Pro-Lok 4 Piece Extra Length Long Arm Lockout Kit See Details

\n
\n
\n
    \n
  • (1) Extra Long Arm tool
  • \n
  • (1) Plastic sleeve
  • \n
  • (1) Pump wedge
  • \n
  • (1) Mini rubber wedge
  • \n
\n
\n
\n

\"lockout-tools-3\"

\n
\n
\n

By now, we’ve established the importance of protecting your customer’s vehicle and finish with soft air wedges, plastic paint protectors and rubber rod tips. What makes this four-piece kit from Pro-Lok different from the first two is the additional length of the long reach tool.

\n

At 76”, the Extra Long Arm tool is nearly two feet longer than the standard 4-1/2' long reach tool. Most of these door tools work alongside the window to reach door control buttons. With Pro-Lok’s kit, you now have the ability to reach across the vehicle’s interior.

\n

With a direct line of sight, you can easily position the long reach tool to depress the unlock button, access the pull handle, lift the lock button and even retrieve the keys. With this improved viewing angle, the only better position would be from inside the vehicle.

\n

Sully Tools Basic Door Tool Kit See Details

\n
\n
\n
    \n
  • (1) Sully Pouch carry case
  • \n
  • (1) Sully Strip
  • \n
  • (1) 2 Handle Wedges
  • \n
  • (1) Sticky L
  • \n
  • (1) Sully J
  • \n
  • (1) Sully Big Foot
  • \n
  • (1) Sully Dipper
  • \n
  • (1) Sully L
  • \n
  • (1) Sully Drop Hook
  • \n
  • (1) Sully Double Dipper
  • \n
\n
\n
\n

\"sul122-sully-tool-basic-door-kit-web-1\"

\n
\n
\n

Unlike the first three kits, Sully Tools’ Basic Door Tool Kit gives us our first look at In The Door tools, a separate category at Zips.com. The previous kits just featured long reach tools, which work well between the door frame and window weatherstripping to access the door controls.

\n

With In The Door tools, the pre-bent rods are inserted into the door cavity and, through careful manipulation, emerge on the inside of the window. The plated shafts are able to hold their shape but remain flexible enough to bend and form to the contour of the door.

\n

When using these tools, auto entry experts use extreme caution to avoid damage to internal door components and also use the Sully strips to prevent scratches on the glass surface. Each tool number is stamped on the handle for easy identification and replacement.

\n

Access Tools Contractor's Lockout Kit See Details

\n
\n
\n
    \n
  • (1) Wonder shield
  • \n
  • (1) Glassman tool
  • \n
  • (1) Wedgee wedge with strip savers
  • \n
  • (1) Standard one-hand jack tool
  • \n
  • (1) Air Jack wedge
  • \n
  • (1) Button Master tool
  • \n
  • (1) Button Strip tool
  • \n
  • (1) Quick Max long reach tool
  • \n
  • (1) Slim Jim
  • \n
  • (1) Carrying case
  • \n
\n
\n
\n

\"actacs-1-access-tools-contractors-kit-web\"

\n
\n
\n

The Contractor’s Lockout Kit from Access Tools is the most popular and best-selling kit at Zips.com. Complete with a soft-sided carrying case to keep everything together, this kit offers several wedge options as well as unique tools for door pulls and unlock buttons.

\n

At 24-1/2\", the Slim Jim tool included in this professional kit is made from stainless steel for added firmness, corrosion resistance and durability. As its name implies, the thin profile slides into the door cavity to reach door linkages for simple opening of any vehicle.

\n

Access Tools’ contractor kit also includes two options to reach the door lock knob. The Button Strip was designed for insertion into narrow gaps for grabbing vertical buttons, and with its handle-operated lasso, the Button Master was specifically created to pull up knobs.

\n

Save your customer’s day

\n

Unintentionally locking keys in a vehicle can be an embarrassing moment for your customers and cause unnecessary delays in their busy lives. Be a hero and come to their rescue with the right lockout tools from Zip’s AW Direct.

\n

Our rundown today of five different types of lockout kits should give you an idea of what you’ll need to respond to your next dispatch. If you don’t get a lot of those calls, a basic set may be right for you. However, if you handle a lot of them, consider a more comprehensive kit.

\n

Several more options are available at Zips.com. Click on the ‘Shop Products’ tab on the top navigation bar and then scroll down to Lockout Tools. Here, you’ll discover more kits and individual tools in a number of different categories.

\n

Find the options that are right for your operation. We also sell how-to manuals and include instructional videos on our product detail pages. These resources will come in handy the next time you head out to a lockout call.

","rssSummary":"

Doesn’t matter who locked the keys inside the car. What matters is what you’re going to do to get them out. Zip’s AW Direct offers several car-opening kits to help automotive professionals gain access to locked vehicles.

\n","rssSummaryFeaturedImage":"https://48463649.fs1.hubspotusercontent-na1.net/hubfs/48463649/Blog/act-sjpro-access-tools-slim-jim-in-use-june2022-hi-res-5.png","scheduledUpdateDate":0,"screenshotPreviewTakenAt":1770478607177,"screenshotPreviewUrl":"https://cdn1.hubspot.net/hubshotv3/prod/e/0/ba92a0f4-4299-4df1-8732-39c78dabfc28.png","sections":{},"securityState":"NONE","siteId":null,"slug":"blog/best-automotive-lockout-kits-of-2022","stagedFrom":null,"state":"PUBLISHED","stateWhenDeleted":null,"structuredContentPageType":null,"structuredContentType":null,"styleOverrideId":null,"subcategory":"normal_blog_post","syncedWithBlogRoot":true,"tagIds":[192169769490,192174528148,194718191114,194719586666],"tagList":[{"categoryId":3,"cdnPurgeEmbargoTime":null,"contentIds":[],"cosObjectType":"TAG","created":1751598346713,"deletedAt":0,"description":"","id":192169769490,"label":"Towing & Recovery","language":null,"name":"Towing & Recovery","portalId":48463649,"slug":"towing-recovery","translatedFromId":null,"translations":{},"updated":1751598346713},{"categoryId":3,"cdnPurgeEmbargoTime":null,"contentIds":[],"cosObjectType":"TAG","created":1751601475164,"deletedAt":0,"description":"","id":192174528148,"label":"Automotive","language":null,"name":"Automotive","portalId":48463649,"slug":"automotive","translatedFromId":null,"translations":{},"updated":1751601475164},{"categoryId":3,"cdnPurgeEmbargoTime":null,"contentIds":[],"cosObjectType":"TAG","created":1755545220719,"deletedAt":0,"description":"","id":194718191114,"label":"Trending","language":null,"name":"Trending","portalId":48463649,"slug":"trending","translatedFromId":null,"translations":{},"updated":1755545220719},{"categoryId":3,"cdnPurgeEmbargoTime":null,"contentIds":[],"cosObjectType":"TAG","created":1755545331471,"deletedAt":0,"description":"","id":194719586666,"label":"Product Guides","language":null,"name":"Product Guides","portalId":48463649,"slug":"product-guides","translatedFromId":null,"translations":{},"updated":1755545331471}],"tagNames":["Towing & Recovery","Automotive","Trending","Product Guides"],"teamPerms":[],"templatePath":"","templatePathForRender":"zips-basic-theme/templates/blog-post.html","textToAudioFileId":null,"textToAudioGenerationRequestId":null,"themePath":null,"themeSettingsValues":null,"title":"Best Automotive Lockout Kits of 2022","tmsId":null,"topicIds":[192169769490,192174528148,194718191114,194719586666],"topicList":[{"categoryId":3,"cdnPurgeEmbargoTime":null,"contentIds":[],"cosObjectType":"TAG","created":1751598346713,"deletedAt":0,"description":"","id":192169769490,"label":"Towing & Recovery","language":null,"name":"Towing & Recovery","portalId":48463649,"slug":"towing-recovery","translatedFromId":null,"translations":{},"updated":1751598346713},{"categoryId":3,"cdnPurgeEmbargoTime":null,"contentIds":[],"cosObjectType":"TAG","created":1751601475164,"deletedAt":0,"description":"","id":192174528148,"label":"Automotive","language":null,"name":"Automotive","portalId":48463649,"slug":"automotive","translatedFromId":null,"translations":{},"updated":1751601475164},{"categoryId":3,"cdnPurgeEmbargoTime":null,"contentIds":[],"cosObjectType":"TAG","created":1755545220719,"deletedAt":0,"description":"","id":194718191114,"label":"Trending","language":null,"name":"Trending","portalId":48463649,"slug":"trending","translatedFromId":null,"translations":{},"updated":1755545220719},{"categoryId":3,"cdnPurgeEmbargoTime":null,"contentIds":[],"cosObjectType":"TAG","created":1755545331471,"deletedAt":0,"description":"","id":194719586666,"label":"Product Guides","language":null,"name":"Product Guides","portalId":48463649,"slug":"product-guides","translatedFromId":null,"translations":{},"updated":1755545331471}],"topicNames":["Towing & Recovery","Automotive","Trending","Product Guides"],"topics":[192169769490,192174528148,194718191114,194719586666],"translatedContent":{},"translatedFromId":null,"translations":{},"tweet":null,"tweetAt":null,"tweetImmediately":false,"unpublishedAt":0,"updated":1756136206934,"updatedById":76755706,"upsizeFeaturedImage":false,"url":"/blog/best-automotive-lockout-kits-of-2022","useFeaturedImage":true,"userPerms":[],"views":null,"visibleToAll":null,"widgetContainers":{},"widgetcontainers":{},"widgets":{}},{"ab":false,"abStatus":null,"abTestId":null,"abVariation":false,"abVariationAutomated":false,"absoluteUrl":"/blog/how-to-choose-a-winch-sizes-motors-gears","afterPostBody":null,"aifeatures":null,"allowedSlugConflict":false,"analytics":null,"analyticsPageId":"192174528124","analyticsPageType":"blog-post","approvalStatus":null,"archived":false,"archivedAt":0,"archivedInDashboard":false,"areCommentsAllowed":true,"attachedStylesheets":[],"audienceAccess":"PUBLIC","author":null,"authorName":null,"authorUsername":null,"blogAuthor":{"avatar":"","bio":"","cdnPurgeEmbargoTime":null,"cosObjectType":"BLOG_AUTHOR","created":1750825727422,"deletedAt":0,"displayName":"Zip's","email":null,"facebook":"","fullName":"Zip's","gravatarUrl":null,"hasSocialProfiles":false,"id":191785406258,"label":"Zip's","language":"en","linkedin":"","name":"Zip's","portalId":48463649,"slug":"zips","translatedFromId":null,"translations":{},"twitter":"","twitterUsername":"","updated":1750825727422,"userId":null,"username":null,"website":""},"blogAuthorId":191785406258,"blogAuthorIdList":[191785406258],"blogAuthorList":[{"avatar":"","bio":"","cdnPurgeEmbargoTime":null,"cosObjectType":"BLOG_AUTHOR","created":1750825727422,"deletedAt":0,"displayName":"Zip's","email":null,"facebook":"","fullName":"Zip's","gravatarUrl":null,"hasSocialProfiles":false,"id":191785406258,"label":"Zip's","language":"en","linkedin":"","name":"Zip's","portalId":48463649,"slug":"zips","translatedFromId":null,"translations":{},"twitter":"","twitterUsername":"","updated":1750825727422,"userId":null,"username":null,"website":""}],"blogPostAuthor":{"avatar":"","bio":"","cdnPurgeEmbargoTime":null,"cosObjectType":"BLOG_AUTHOR","created":1750825727422,"deletedAt":0,"displayName":"Zip's","email":null,"facebook":"","fullName":"Zip's","gravatarUrl":null,"hasSocialProfiles":false,"id":191785406258,"label":"Zip's","language":"en","linkedin":"","name":"Zip's","portalId":48463649,"slug":"zips","translatedFromId":null,"translations":{},"twitter":"","twitterUsername":"","updated":1750825727422,"userId":null,"username":null,"website":""},"blogPostScheduleTaskUid":null,"blogPublishInstantEmailCampaignId":null,"blogPublishInstantEmailRetryCount":null,"blogPublishInstantEmailTaskUid":null,"blogPublishToSocialMediaTask":"DONE_NOT_SENT","blueprintTypeId":0,"businessUnitId":null,"campaign":null,"campaignName":null,"campaignUtm":null,"category":3,"categoryId":3,"cdnPurgeEmbargoTime":null,"checkPostLevelAudienceAccessFirst":true,"clonedFrom":null,"composeBody":null,"compositionId":0,"contentAccessRuleIds":[],"contentAccessRuleTypes":[],"contentGroup":190096341139,"contentGroupId":190096341139,"contentTypeCategory":3,"contentTypeCategoryId":3,"contentTypeId":null,"created":1751601443194,"createdByAgent":null,"createdById":74657203,"createdTime":1751601443194,"crmObjectId":null,"css":{},"cssText":"","ctaClicks":null,"ctaViews":null,"currentState":"PUBLISHED","currentlyPublished":true,"deletedAt":0,"deletedBy":null,"deletedByEmail":null,"deletedById":null,"domain":"","dynamicPageDataSourceId":null,"dynamicPageDataSourceType":null,"dynamicPageHubDbTableId":null,"enableDomainStylesheets":null,"enableGoogleAmpOutputOverride":false,"enableLayoutStylesheets":null,"errors":[],"featuredImage":"https://48463649.fs1.hubspotusercontent-na1.net/hubfs/48463649/Blog/winches_parts_diagram_600x300.png","featuredImageAltText":"","featuredImageHeight":300,"featuredImageLength":0,"featuredImageWidth":600,"flexAreas":{},"folderId":null,"footerHtml":null,"footerTemplatePath":null,"footerVariantName":null,"freezeDate":1651150800000,"generateJsonLdEnabledOverride":true,"globalBlockOverrides":{},"hasContentAccessRules":false,"hasUserChanges":true,"headHtml":"","header":null,"headerTemplatePath":null,"headerVariantName":null,"htmlTitle":"How to Choose a Winch: Sizes, Motors & Gears","id":192174528124,"includeDefaultCustomCss":null,"isCaptchaRequired":true,"isCrawlableByBots":false,"isDraft":false,"isInstantEmailEnabled":false,"isPublished":true,"isSocialPublishingEnabled":false,"keywords":[],"label":"How to Choose a Winch: Sizes, Motors & Gears","language":"en","lastEditSessionId":null,"lastEditUpdateId":null,"layoutSections":{},"legacyBlogTabid":null,"legacyId":null,"legacyPostGuid":null,"linkRelCanonicalUrl":"","listTemplate":"","liveDomain":"www.zips.com","mab":false,"mabExperimentId":null,"mabMaster":false,"mabVariant":false,"marketingCampaignGuids":[],"meta":{"html_title":"How to Choose a Winch: Sizes, Motors & Gears","public_access_rules":[],"public_access_rules_enabled":false,"use_featured_image":true,"tag_ids":[192169769490,192174528148,192174529697,194719179289,194719586666],"topic_ids":[192169769490,192174528148,192174529697,194719179289,194719586666],"post_summary":"
\n
\n
\n
\n
\n","post_body":"
\n
\n
\n
\n
\n\n

Winches are designed to reduce the workload in many industrial settings and preserve the fun in most off-road recreational activities. Through gear reduction and auxiliary power, they provide extra pulling strength when and where you need it most. This can be off the trail, in the ditch, on the farm or in the water.

\n

In our previous blog, we looked at the different types of winch lines available. Today, we are going to discuss the various options to consider when you want to purchase a new winch. While recognizing the convenience of manual and portable units, we will focus our attention in this blog on the different varieties of permanently-mounted winches available at Zip’s AW Direct:

\n
    \n
  • Power: Hydraulic or electric
  • \n
  • Drive: Planetary or worm gear
  • \n
  • Capacity ratings: Line and speed
  • \n
  • Spool direction: Overwind or underwind
  • \n
\n

Hydraulic planetary winches can be rated as high as 130,000 lbs. However, for the daily demands of towing and recovery, 30,000-lb. rated winches can typically handle the job.

Electric winches stocked by Zip’s are normally used in light-duty applications and range in capacity between 1,000 lbs. and 15,000 lbs.

\n

Electric or Hydraulic

\n

Running off AC or DC power, an electric winch is generally easier to install and operate. Off-road enthusiasts such as ATVers and UTVers rely on the vehicle's battery to power the motor. This is useful for self-recovery if they get into trouble off the trail. Weekend mariners also use electric winches to load their boats onto trailers and to control their sails out on the water.

\n

However, this type of winch requires constant power to operate and needs rest between duty cycles. Conversely, a hydraulic winch requires a pump and additional plumbing to supply oil pressure to the winch motor but offers a longer running time. The trade-off for these additional hoses and components is increased power, improved durability and quieter operation.

\n

Planetary or Worm Gear

\n

Winches produce their pulling power through gear reduction. Although rotating at a higher rate, the motor doesn’t have to work as hard with a larger reduction ratio. This ratio counts the number of times the motor is required to spin to get the shaft and the winch drum to make one revolution.

\n

\"Winches_Parts_Diagram_600x300\"

\n

A planetary gear borrows its name from the solar system. A “sun” gear is connected to the center shaft of the winch motor which then transfers torque to smaller gears “orbiting” around the sun. The smaller gears engage an outer ring gear to turn the drum. This multiple gear configuration translates to greater pulling power and speed.

\n

\"Winches_Parts_Diagram_Worm_Gear_600x300\"

\n

A worm gear consists of a cylindrical bar or worm screw with a spiral thread that drives a toothed gear. The hydraulic worm gears offered at Zips.com can pull up to 30,000 lbs., while electric worm gears can pull up to 9,000 lbs. A worm gear has a low transfer efficiency, increased gear reduction and much slower line speed.

\n

Line Ratings and Speed

\n

As stated earlier, winches are rated for their pulling capacity and line speed. They are the first factors you should consider when purchasing a winch. The maximum pull for a given winch is based on the first layer of spooled line and diminishes by approximately 10 to 12 percent for each additional layer of rope. 

\n

When sizing your winch, you will need to determine which layer will do the most work in your application. The following example of reduced capacity is based on five layers of 3/8” steel rope on an 8,000-lb. rated winch:

\n
    \n
  • First layer: 8,000 lbs.
  • \n
  • Second layer: 6,700 lbs.
  • \n
  • Third layer: 5,700 lbs.
  • \n
  • Fourth layer: 5,000 lbs.
  • \n
  • Fifth layer: 4,500 lbs.
  • \n
\n

According to Ramsey Winch, the rated line pull of the winch must be high enough to pull your vehicle’s gross vehicle weight (GVW.) It also must overcome resistance when stuck or on an incline. This particular winch manufacturer recommends a rated line pull at least 25% greater than your GVW. This helps account for any additional weight–like fuel–in the vehicle you are recovering.

\n

Winches are also rated for line speed, rope diameter and length. Hydraulic planetary winches tend to have a faster line speed, which can be critical to getting tow operators off the road in a timely manner.

Line speeds are typically measured in feet per second under minimal load. For hydraulic units, the flow of hydraulic fluid to the drive—usually 15 gallons per minute maximum--determines the line speed rating.

\n

Spool Direction

\n

Winch lines can also be spooled in an underwind or overwind direction, and winch motors are positioned in either a lefthand or righthand configuration with forward and reverse controls, depending on model. Each winch has a clutch to engage for operation or disengage for free-spooling. Please refer to the winch’s owner’s manual or the rotation decal affixed to the winch housing for proper spool direction.

\n

There are a number of factors to consider when purchasing your next winch. We hope this blog helps in the decision-making process. Be sure to follow manufacturer instructions for installation and maintenance of your new winch. Here are some good tips to follow to ensure a long lifespan, regardless of type and size of winch you choose to purchase:

\n
    \n
  • Lubricate grease fittings on winch, housing and drum monthly.
  • \n
  • Check hydraulic oil level and electrical connections weekly.
  • \n
  • Scan winch line for flat spots, stress and fraying daily.
  • \n
  • Avoid bird’s nesting with power wrapping and cable tensioner.
  • \n
  • Inspect mounting bolts and tighten as necessary
  • \n
\n\"winch-spool\"","rss_summary":"
\n
\n
\n
\n
\n","rss_body":"
\n
\n
\n
\n
\n\n

Winches are designed to reduce the workload in many industrial settings and preserve the fun in most off-road recreational activities. Through gear reduction and auxiliary power, they provide extra pulling strength when and where you need it most. This can be off the trail, in the ditch, on the farm or in the water.

\n

In our previous blog, we looked at the different types of winch lines available. Today, we are going to discuss the various options to consider when you want to purchase a new winch. While recognizing the convenience of manual and portable units, we will focus our attention in this blog on the different varieties of permanently-mounted winches available at Zip’s AW Direct:

\n
    \n
  • Power: Hydraulic or electric
  • \n
  • Drive: Planetary or worm gear
  • \n
  • Capacity ratings: Line and speed
  • \n
  • Spool direction: Overwind or underwind
  • \n
\n

Hydraulic planetary winches can be rated as high as 130,000 lbs. However, for the daily demands of towing and recovery, 30,000-lb. rated winches can typically handle the job.

Electric winches stocked by Zip’s are normally used in light-duty applications and range in capacity between 1,000 lbs. and 15,000 lbs.

\n

Electric or Hydraulic

\n

Running off AC or DC power, an electric winch is generally easier to install and operate. Off-road enthusiasts such as ATVers and UTVers rely on the vehicle's battery to power the motor. This is useful for self-recovery if they get into trouble off the trail. Weekend mariners also use electric winches to load their boats onto trailers and to control their sails out on the water.

\n

However, this type of winch requires constant power to operate and needs rest between duty cycles. Conversely, a hydraulic winch requires a pump and additional plumbing to supply oil pressure to the winch motor but offers a longer running time. The trade-off for these additional hoses and components is increased power, improved durability and quieter operation.

\n

Planetary or Worm Gear

\n

Winches produce their pulling power through gear reduction. Although rotating at a higher rate, the motor doesn’t have to work as hard with a larger reduction ratio. This ratio counts the number of times the motor is required to spin to get the shaft and the winch drum to make one revolution.

\n

\"Winches_Parts_Diagram_600x300\"

\n

A planetary gear borrows its name from the solar system. A “sun” gear is connected to the center shaft of the winch motor which then transfers torque to smaller gears “orbiting” around the sun. The smaller gears engage an outer ring gear to turn the drum. This multiple gear configuration translates to greater pulling power and speed.

\n

\"Winches_Parts_Diagram_Worm_Gear_600x300\"

\n

A worm gear consists of a cylindrical bar or worm screw with a spiral thread that drives a toothed gear. The hydraulic worm gears offered at Zips.com can pull up to 30,000 lbs., while electric worm gears can pull up to 9,000 lbs. A worm gear has a low transfer efficiency, increased gear reduction and much slower line speed.

\n

Line Ratings and Speed

\n

As stated earlier, winches are rated for their pulling capacity and line speed. They are the first factors you should consider when purchasing a winch. The maximum pull for a given winch is based on the first layer of spooled line and diminishes by approximately 10 to 12 percent for each additional layer of rope. 

\n

When sizing your winch, you will need to determine which layer will do the most work in your application. The following example of reduced capacity is based on five layers of 3/8” steel rope on an 8,000-lb. rated winch:

\n
    \n
  • First layer: 8,000 lbs.
  • \n
  • Second layer: 6,700 lbs.
  • \n
  • Third layer: 5,700 lbs.
  • \n
  • Fourth layer: 5,000 lbs.
  • \n
  • Fifth layer: 4,500 lbs.
  • \n
\n

According to Ramsey Winch, the rated line pull of the winch must be high enough to pull your vehicle’s gross vehicle weight (GVW.) It also must overcome resistance when stuck or on an incline. This particular winch manufacturer recommends a rated line pull at least 25% greater than your GVW. This helps account for any additional weight–like fuel–in the vehicle you are recovering.

\n

Winches are also rated for line speed, rope diameter and length. Hydraulic planetary winches tend to have a faster line speed, which can be critical to getting tow operators off the road in a timely manner.

Line speeds are typically measured in feet per second under minimal load. For hydraulic units, the flow of hydraulic fluid to the drive—usually 15 gallons per minute maximum--determines the line speed rating.

\n

Spool Direction

\n

Winch lines can also be spooled in an underwind or overwind direction, and winch motors are positioned in either a lefthand or righthand configuration with forward and reverse controls, depending on model. Each winch has a clutch to engage for operation or disengage for free-spooling. Please refer to the winch’s owner’s manual or the rotation decal affixed to the winch housing for proper spool direction.

\n

There are a number of factors to consider when purchasing your next winch. We hope this blog helps in the decision-making process. Be sure to follow manufacturer instructions for installation and maintenance of your new winch. Here are some good tips to follow to ensure a long lifespan, regardless of type and size of winch you choose to purchase:

\n
    \n
  • Lubricate grease fittings on winch, housing and drum monthly.
  • \n
  • Check hydraulic oil level and electrical connections weekly.
  • \n
  • Scan winch line for flat spots, stress and fraying daily.
  • \n
  • Avoid bird’s nesting with power wrapping and cable tensioner.
  • \n
  • Inspect mounting bolts and tighten as necessary
  • \n
\n\"winch-spool\"","enable_google_amp_output_override":false,"generate_json_ld_enabled":true,"blog_post_schedule_task_uid":null,"blog_publish_to_social_media_task":"DONE_NOT_SENT","blog_publish_instant_email_task_uid":null,"blog_publish_instant_email_campaign_id":null,"blog_publish_instant_email_retry_count":null,"keywords":[],"composition_id":0,"is_crawlable_by_bots":false,"header":null,"published_at":1756157668613,"head_html":"","footer_html":null,"attached_stylesheets":[],"enable_domain_stylesheets":null,"include_default_custom_css":null,"layout_sections":{},"past_mab_experiment_ids":[],"deleted_by":null,"featured_image_alt_text":"","enable_layout_stylesheets":null,"tweet":null,"tweet_at":null,"campaign_name":null,"campaign_utm":null,"meta_keywords":null,"meta_description":"Learn how to choose the right winch for your needs. This guide explains the differences between electric and hydraulic winches, planetary and worm gear drives, winch line ratings, speed, spool direction, and more so you make an informed decision.","tweet_immediately":false,"publish_immediately":true,"security_state":"NONE","scheduled_update_date":0,"placement_guids":[],"header_template_path":null,"header_variant_name":null,"footer_template_path":null,"footer_variant_name":null,"global_block_overrides":{},"property_for_dynamic_page_title":null,"property_for_dynamic_page_slug":null,"property_for_dynamic_page_meta_description":null,"property_for_dynamic_page_featured_image":null,"property_for_dynamic_page_canonical_url":null,"preview_image_src":null,"legacy_blog_tabid":null,"legacy_post_guid":null,"performable_variation_letter":null,"style_override_id":null,"has_user_changes":true,"css":{},"css_text":"","unpublished_at":0,"published_by_id":76755706,"allowed_slug_conflict":false,"ai_features":null,"link_rel_canonical_url":"","page_redirected":false,"page_expiry_enabled":null,"page_expiry_date":null,"page_expiry_redirect_id":null,"page_expiry_redirect_url":null,"deleted_by_id":null,"state_when_deleted":null,"cloned_from":null,"staged_from":null,"personas":[],"compose_body":null,"featured_image":"https://48463649.fs1.hubspotusercontent-na1.net/hubfs/48463649/Blog/winches_parts_diagram_600x300.png","featured_image_width":600,"featured_image_height":300,"publish_timezone_offset":null,"theme_settings_values":null,"password":null,"last_edit_session_id":null,"last_edit_update_id":null,"created_by_agent":null},"metaDescription":"Learn how to choose the right winch for your needs. This guide explains the differences between electric and hydraulic winches, planetary and worm gear drives, winch line ratings, speed, spool direction, and more so you make an informed decision.","metaKeywords":null,"name":"How to Choose a Winch: Sizes, Motors & Gears","nextPostFeaturedImage":"https://48463649.fs1.hubspotusercontent-na1.net/hubfs/48463649/Blog/17121-hd-wrecker-black-mar2021-hi-res-23-400x350.png","nextPostFeaturedImageAltText":"","nextPostName":"Types of Winch Lines: Synthetic vs. Steel","nextPostSlug":"blog/types-of-winch-lines-synthetic-vs-steel","pageExpiryDate":null,"pageExpiryEnabled":null,"pageExpiryRedirectId":null,"pageExpiryRedirectUrl":null,"pageRedirected":false,"pageTitle":"How to Choose a Winch: Sizes, Motors & Gears","parentBlog":{"absoluteUrl":"/blog","allowComments":true,"ampBodyColor":"#404040","ampBodyFont":"'Helvetica Neue', Helvetica, Arial, sans-serif","ampBodyFontSize":"18","ampCustomCss":"","ampHeaderBackgroundColor":"#ffffff","ampHeaderColor":"#1e1e1e","ampHeaderFont":"'Helvetica Neue', Helvetica, Arial, sans-serif","ampHeaderFontSize":"36","ampLinkColor":"#416bb3","ampLogoAlt":"","ampLogoHeight":0,"ampLogoSrc":"","ampLogoWidth":0,"analyticsPageId":190096341139,"attachedStylesheets":[],"audienceAccess":"PUBLIC","businessUnitId":null,"captchaAfterDays":7,"captchaAlways":false,"categoryId":3,"cdnPurgeEmbargoTime":null,"closeCommentsOlder":0,"commentDateFormat":"medium","commentFormGuid":"a4128401-39db-4c54-a62b-88ff335d3a69","commentMaxThreadDepth":1,"commentModeration":false,"commentNotificationEmails":[],"commentShouldCreateContact":false,"commentVerificationText":"","cosObjectType":"BLOG","created":1747163443999,"createdDateTime":1747163443999,"dailyNotificationEmailId":null,"dateFormattingLanguage":null,"defaultGroupStyleId":"","defaultNotificationFromName":"","defaultNotificationReplyTo":"","deletedAt":0,"description":"","domain":"","domainWhenPublished":"www.zips.com","emailApiSubscriptionId":null,"enableGoogleAmpOutput":true,"enableSocialAutoPublishing":false,"generateJsonLdEnabled":true,"header":null,"htmlFooter":"","htmlFooterIsShared":true,"htmlHead":"","htmlHeadIsShared":true,"htmlKeywords":[],"htmlTitle":"blog","id":190096341139,"ilsSubscriptionListsByType":{},"instantNotificationEmailId":null,"itemLayoutId":null,"itemTemplateIsShared":false,"itemTemplatePath":"zips-basic-theme/templates/blog-post.html","label":"blog","language":"en","legacyGuid":null,"legacyModuleId":null,"legacyTabId":null,"listingLayoutId":null,"listingPageId":190096341141,"listingTemplatePath":"","liveDomain":"www.zips.com","monthFilterFormat":"MMMM yyyy","monthlyNotificationEmailId":null,"name":"blog","parentBlogUpdateTaskId":null,"portalId":48463649,"postHtmlFooter":"","postHtmlHead":"","postsPerListingPage":111,"postsPerRssFeed":10,"publicAccessRules":[],"publicAccessRulesEnabled":false,"publicTitle":"blog","publishDateFormat":"medium","resolvedDomain":"www.zips.com","rootUrl":"/blog","rssCustomFeed":null,"rssDescription":null,"rssItemFooter":null,"rssItemHeader":null,"settingsOverrides":{"itemLayoutId":false,"itemTemplatePath":false,"itemTemplateIsShared":false,"listingLayoutId":false,"listingTemplatePath":false,"postsPerListingPage":false,"showSummaryInListing":false,"useFeaturedImageInSummary":false,"htmlHead":false,"postHtmlHead":false,"htmlHeadIsShared":false,"htmlFooter":false,"listingPageHtmlFooter":false,"postHtmlFooter":false,"htmlFooterIsShared":false,"attachedStylesheets":false,"postsPerRssFeed":false,"showSummaryInRss":false,"showSummaryInEmails":false,"showSummariesInEmails":false,"allowComments":false,"commentShouldCreateContact":false,"commentModeration":false,"closeCommentsOlder":false,"commentNotificationEmails":false,"commentMaxThreadDepth":false,"commentVerificationText":false,"socialAccountTwitter":false,"showSocialLinkTwitter":false,"showSocialLinkLinkedin":false,"showSocialLinkFacebook":false,"enableGoogleAmpOutput":false,"ampLogoSrc":false,"ampLogoHeight":false,"ampLogoWidth":false,"ampLogoAlt":false,"ampHeaderFont":false,"ampHeaderFontSize":false,"ampHeaderColor":false,"ampHeaderBackgroundColor":false,"ampBodyFont":false,"ampBodyFontSize":false,"ampBodyColor":false,"ampLinkColor":false,"generateJsonLdEnabled":false},"showSocialLinkFacebook":true,"showSocialLinkLinkedin":true,"showSocialLinkTwitter":true,"showSummaryInEmails":true,"showSummaryInListing":true,"showSummaryInRss":true,"siteId":null,"slug":"blog","socialAccountTwitter":"","state":null,"subscriptionContactsProperty":null,"subscriptionEmailType":null,"subscriptionFormGuid":null,"subscriptionListsByType":{},"title":null,"translatedFromId":null,"translations":{},"updated":1755110916417,"updatedDateTime":1755110916417,"urlBase":"www.zips.com/blog","urlSegments":{"all":"all","archive":"archive","author":"author","page":"page","tag":"tag"},"useFeaturedImageInSummary":true,"usesDefaultTemplate":false,"weeklyNotificationEmailId":null},"password":null,"pastMabExperimentIds":[],"performableGuid":null,"performableVariationLetter":null,"personalizationStrategyId":null,"personalizationVariantStatus":null,"personas":[],"placementGuids":[],"portableKey":null,"portalId":48463649,"position":null,"postBody":"
\n
\n
\n
\n
\n\n

Winches are designed to reduce the workload in many industrial settings and preserve the fun in most off-road recreational activities. Through gear reduction and auxiliary power, they provide extra pulling strength when and where you need it most. This can be off the trail, in the ditch, on the farm or in the water.

\n

In our previous blog, we looked at the different types of winch lines available. Today, we are going to discuss the various options to consider when you want to purchase a new winch. While recognizing the convenience of manual and portable units, we will focus our attention in this blog on the different varieties of permanently-mounted winches available at Zip’s AW Direct:

\n
    \n
  • Power: Hydraulic or electric
  • \n
  • Drive: Planetary or worm gear
  • \n
  • Capacity ratings: Line and speed
  • \n
  • Spool direction: Overwind or underwind
  • \n
\n

Hydraulic planetary winches can be rated as high as 130,000 lbs. However, for the daily demands of towing and recovery, 30,000-lb. rated winches can typically handle the job.

Electric winches stocked by Zip’s are normally used in light-duty applications and range in capacity between 1,000 lbs. and 15,000 lbs.

\n

Electric or Hydraulic

\n

Running off AC or DC power, an electric winch is generally easier to install and operate. Off-road enthusiasts such as ATVers and UTVers rely on the vehicle's battery to power the motor. This is useful for self-recovery if they get into trouble off the trail. Weekend mariners also use electric winches to load their boats onto trailers and to control their sails out on the water.

\n

However, this type of winch requires constant power to operate and needs rest between duty cycles. Conversely, a hydraulic winch requires a pump and additional plumbing to supply oil pressure to the winch motor but offers a longer running time. The trade-off for these additional hoses and components is increased power, improved durability and quieter operation.

\n

Planetary or Worm Gear

\n

Winches produce their pulling power through gear reduction. Although rotating at a higher rate, the motor doesn’t have to work as hard with a larger reduction ratio. This ratio counts the number of times the motor is required to spin to get the shaft and the winch drum to make one revolution.

\n

\"Winches_Parts_Diagram_600x300\"

\n

A planetary gear borrows its name from the solar system. A “sun” gear is connected to the center shaft of the winch motor which then transfers torque to smaller gears “orbiting” around the sun. The smaller gears engage an outer ring gear to turn the drum. This multiple gear configuration translates to greater pulling power and speed.

\n

\"Winches_Parts_Diagram_Worm_Gear_600x300\"

\n

A worm gear consists of a cylindrical bar or worm screw with a spiral thread that drives a toothed gear. The hydraulic worm gears offered at Zips.com can pull up to 30,000 lbs., while electric worm gears can pull up to 9,000 lbs. A worm gear has a low transfer efficiency, increased gear reduction and much slower line speed.

\n

Line Ratings and Speed

\n

As stated earlier, winches are rated for their pulling capacity and line speed. They are the first factors you should consider when purchasing a winch. The maximum pull for a given winch is based on the first layer of spooled line and diminishes by approximately 10 to 12 percent for each additional layer of rope. 

\n

When sizing your winch, you will need to determine which layer will do the most work in your application. The following example of reduced capacity is based on five layers of 3/8” steel rope on an 8,000-lb. rated winch:

\n
    \n
  • First layer: 8,000 lbs.
  • \n
  • Second layer: 6,700 lbs.
  • \n
  • Third layer: 5,700 lbs.
  • \n
  • Fourth layer: 5,000 lbs.
  • \n
  • Fifth layer: 4,500 lbs.
  • \n
\n

According to Ramsey Winch, the rated line pull of the winch must be high enough to pull your vehicle’s gross vehicle weight (GVW.) It also must overcome resistance when stuck or on an incline. This particular winch manufacturer recommends a rated line pull at least 25% greater than your GVW. This helps account for any additional weight–like fuel–in the vehicle you are recovering.

\n

Winches are also rated for line speed, rope diameter and length. Hydraulic planetary winches tend to have a faster line speed, which can be critical to getting tow operators off the road in a timely manner.

Line speeds are typically measured in feet per second under minimal load. For hydraulic units, the flow of hydraulic fluid to the drive—usually 15 gallons per minute maximum--determines the line speed rating.

\n

Spool Direction

\n

Winch lines can also be spooled in an underwind or overwind direction, and winch motors are positioned in either a lefthand or righthand configuration with forward and reverse controls, depending on model. Each winch has a clutch to engage for operation or disengage for free-spooling. Please refer to the winch’s owner’s manual or the rotation decal affixed to the winch housing for proper spool direction.

\n

There are a number of factors to consider when purchasing your next winch. We hope this blog helps in the decision-making process. Be sure to follow manufacturer instructions for installation and maintenance of your new winch. Here are some good tips to follow to ensure a long lifespan, regardless of type and size of winch you choose to purchase:

\n
    \n
  • Lubricate grease fittings on winch, housing and drum monthly.
  • \n
  • Check hydraulic oil level and electrical connections weekly.
  • \n
  • Scan winch line for flat spots, stress and fraying daily.
  • \n
  • Avoid bird’s nesting with power wrapping and cable tensioner.
  • \n
  • Inspect mounting bolts and tighten as necessary
  • \n
\n\"winch-spool\"","postBodyRss":"
\n
\n
\n
\n
\n\n

Winches are designed to reduce the workload in many industrial settings and preserve the fun in most off-road recreational activities. Through gear reduction and auxiliary power, they provide extra pulling strength when and where you need it most. This can be off the trail, in the ditch, on the farm or in the water.

\n

In our previous blog, we looked at the different types of winch lines available. Today, we are going to discuss the various options to consider when you want to purchase a new winch. While recognizing the convenience of manual and portable units, we will focus our attention in this blog on the different varieties of permanently-mounted winches available at Zip’s AW Direct:

\n
    \n
  • Power: Hydraulic or electric
  • \n
  • Drive: Planetary or worm gear
  • \n
  • Capacity ratings: Line and speed
  • \n
  • Spool direction: Overwind or underwind
  • \n
\n

Hydraulic planetary winches can be rated as high as 130,000 lbs. However, for the daily demands of towing and recovery, 30,000-lb. rated winches can typically handle the job.

Electric winches stocked by Zip’s are normally used in light-duty applications and range in capacity between 1,000 lbs. and 15,000 lbs.

\n

Electric or Hydraulic

\n

Running off AC or DC power, an electric winch is generally easier to install and operate. Off-road enthusiasts such as ATVers and UTVers rely on the vehicle's battery to power the motor. This is useful for self-recovery if they get into trouble off the trail. Weekend mariners also use electric winches to load their boats onto trailers and to control their sails out on the water.

\n

However, this type of winch requires constant power to operate and needs rest between duty cycles. Conversely, a hydraulic winch requires a pump and additional plumbing to supply oil pressure to the winch motor but offers a longer running time. The trade-off for these additional hoses and components is increased power, improved durability and quieter operation.

\n

Planetary or Worm Gear

\n

Winches produce their pulling power through gear reduction. Although rotating at a higher rate, the motor doesn’t have to work as hard with a larger reduction ratio. This ratio counts the number of times the motor is required to spin to get the shaft and the winch drum to make one revolution.

\n

\"Winches_Parts_Diagram_600x300\"

\n

A planetary gear borrows its name from the solar system. A “sun” gear is connected to the center shaft of the winch motor which then transfers torque to smaller gears “orbiting” around the sun. The smaller gears engage an outer ring gear to turn the drum. This multiple gear configuration translates to greater pulling power and speed.

\n

\"Winches_Parts_Diagram_Worm_Gear_600x300\"

\n

A worm gear consists of a cylindrical bar or worm screw with a spiral thread that drives a toothed gear. The hydraulic worm gears offered at Zips.com can pull up to 30,000 lbs., while electric worm gears can pull up to 9,000 lbs. A worm gear has a low transfer efficiency, increased gear reduction and much slower line speed.

\n

Line Ratings and Speed

\n

As stated earlier, winches are rated for their pulling capacity and line speed. They are the first factors you should consider when purchasing a winch. The maximum pull for a given winch is based on the first layer of spooled line and diminishes by approximately 10 to 12 percent for each additional layer of rope. 

\n

When sizing your winch, you will need to determine which layer will do the most work in your application. The following example of reduced capacity is based on five layers of 3/8” steel rope on an 8,000-lb. rated winch:

\n
    \n
  • First layer: 8,000 lbs.
  • \n
  • Second layer: 6,700 lbs.
  • \n
  • Third layer: 5,700 lbs.
  • \n
  • Fourth layer: 5,000 lbs.
  • \n
  • Fifth layer: 4,500 lbs.
  • \n
\n

According to Ramsey Winch, the rated line pull of the winch must be high enough to pull your vehicle’s gross vehicle weight (GVW.) It also must overcome resistance when stuck or on an incline. This particular winch manufacturer recommends a rated line pull at least 25% greater than your GVW. This helps account for any additional weight–like fuel–in the vehicle you are recovering.

\n

Winches are also rated for line speed, rope diameter and length. Hydraulic planetary winches tend to have a faster line speed, which can be critical to getting tow operators off the road in a timely manner.

Line speeds are typically measured in feet per second under minimal load. For hydraulic units, the flow of hydraulic fluid to the drive—usually 15 gallons per minute maximum--determines the line speed rating.

\n

Spool Direction

\n

Winch lines can also be spooled in an underwind or overwind direction, and winch motors are positioned in either a lefthand or righthand configuration with forward and reverse controls, depending on model. Each winch has a clutch to engage for operation or disengage for free-spooling. Please refer to the winch’s owner’s manual or the rotation decal affixed to the winch housing for proper spool direction.

\n

There are a number of factors to consider when purchasing your next winch. We hope this blog helps in the decision-making process. Be sure to follow manufacturer instructions for installation and maintenance of your new winch. Here are some good tips to follow to ensure a long lifespan, regardless of type and size of winch you choose to purchase:

\n
    \n
  • Lubricate grease fittings on winch, housing and drum monthly.
  • \n
  • Check hydraulic oil level and electrical connections weekly.
  • \n
  • Scan winch line for flat spots, stress and fraying daily.
  • \n
  • Avoid bird’s nesting with power wrapping and cable tensioner.
  • \n
  • Inspect mounting bolts and tighten as necessary
  • \n
\n\"winch-spool\"","postEmailContent":"
\n
\n
\n \n
\n
\n
","postFeaturedImageIfEnabled":"https://48463649.fs1.hubspotusercontent-na1.net/hubfs/48463649/Blog/winches_parts_diagram_600x300.png","postListContent":"
\n
\n
\n \n
\n
\n
","postListSummaryFeaturedImage":"https://48463649.fs1.hubspotusercontent-na1.net/hubfs/48463649/Blog/winches_parts_diagram_600x300.png","postRssContent":"
\n
\n
\n \n
\n
\n
","postRssSummaryFeaturedImage":"https://48463649.fs1.hubspotusercontent-na1.net/hubfs/48463649/Blog/winches_parts_diagram_600x300.png","postSummary":"
\n
\n
\n
\n
\n","postSummaryRss":"
\n
\n
\n \n
\n
\n
","postTemplate":"zips-basic-theme/templates/blog-post.html","previewImageSrc":null,"previewKey":"YVoUMtge","previousPostFeaturedImage":"https://48463649.fs1.hubspotusercontent-na1.net/hubfs/48463649/Blog/act-sjpro-access-tools-slim-jim-in-use-june2022-hi-res-5.png","previousPostFeaturedImageAltText":"","previousPostName":"Best Automotive Lockout Kits of 2022","previousPostSlug":"blog/best-automotive-lockout-kits-of-2022","processingStatus":"PUBLISHED","propertyForDynamicPageCanonicalUrl":null,"propertyForDynamicPageFeaturedImage":null,"propertyForDynamicPageMetaDescription":null,"propertyForDynamicPageSlug":null,"propertyForDynamicPageTitle":null,"publicAccessRules":[],"publicAccessRulesEnabled":false,"publishDate":1651150800000,"publishDateLocalTime":1651150800000,"publishDateLocalized":{"date":1651150800000,"format":"medium","language":null},"publishImmediately":true,"publishTimezoneOffset":null,"publishedAt":1756157668613,"publishedByEmail":null,"publishedById":76755706,"publishedByName":null,"publishedUrl":"/blog/how-to-choose-a-winch-sizes-motors-gears","resolvedDomain":"www.zips.com","resolvedLanguage":null,"rssBody":"
\n
\n
\n
\n
\n\n

Winches are designed to reduce the workload in many industrial settings and preserve the fun in most off-road recreational activities. Through gear reduction and auxiliary power, they provide extra pulling strength when and where you need it most. This can be off the trail, in the ditch, on the farm or in the water.

\n

In our previous blog, we looked at the different types of winch lines available. Today, we are going to discuss the various options to consider when you want to purchase a new winch. While recognizing the convenience of manual and portable units, we will focus our attention in this blog on the different varieties of permanently-mounted winches available at Zip’s AW Direct:

\n
    \n
  • Power: Hydraulic or electric
  • \n
  • Drive: Planetary or worm gear
  • \n
  • Capacity ratings: Line and speed
  • \n
  • Spool direction: Overwind or underwind
  • \n
\n

Hydraulic planetary winches can be rated as high as 130,000 lbs. However, for the daily demands of towing and recovery, 30,000-lb. rated winches can typically handle the job.

Electric winches stocked by Zip’s are normally used in light-duty applications and range in capacity between 1,000 lbs. and 15,000 lbs.

\n

Electric or Hydraulic

\n

Running off AC or DC power, an electric winch is generally easier to install and operate. Off-road enthusiasts such as ATVers and UTVers rely on the vehicle's battery to power the motor. This is useful for self-recovery if they get into trouble off the trail. Weekend mariners also use electric winches to load their boats onto trailers and to control their sails out on the water.

\n

However, this type of winch requires constant power to operate and needs rest between duty cycles. Conversely, a hydraulic winch requires a pump and additional plumbing to supply oil pressure to the winch motor but offers a longer running time. The trade-off for these additional hoses and components is increased power, improved durability and quieter operation.

\n

Planetary or Worm Gear

\n

Winches produce their pulling power through gear reduction. Although rotating at a higher rate, the motor doesn’t have to work as hard with a larger reduction ratio. This ratio counts the number of times the motor is required to spin to get the shaft and the winch drum to make one revolution.

\n

\"Winches_Parts_Diagram_600x300\"

\n

A planetary gear borrows its name from the solar system. A “sun” gear is connected to the center shaft of the winch motor which then transfers torque to smaller gears “orbiting” around the sun. The smaller gears engage an outer ring gear to turn the drum. This multiple gear configuration translates to greater pulling power and speed.

\n

\"Winches_Parts_Diagram_Worm_Gear_600x300\"

\n

A worm gear consists of a cylindrical bar or worm screw with a spiral thread that drives a toothed gear. The hydraulic worm gears offered at Zips.com can pull up to 30,000 lbs., while electric worm gears can pull up to 9,000 lbs. A worm gear has a low transfer efficiency, increased gear reduction and much slower line speed.

\n

Line Ratings and Speed

\n

As stated earlier, winches are rated for their pulling capacity and line speed. They are the first factors you should consider when purchasing a winch. The maximum pull for a given winch is based on the first layer of spooled line and diminishes by approximately 10 to 12 percent for each additional layer of rope. 

\n

When sizing your winch, you will need to determine which layer will do the most work in your application. The following example of reduced capacity is based on five layers of 3/8” steel rope on an 8,000-lb. rated winch:

\n
    \n
  • First layer: 8,000 lbs.
  • \n
  • Second layer: 6,700 lbs.
  • \n
  • Third layer: 5,700 lbs.
  • \n
  • Fourth layer: 5,000 lbs.
  • \n
  • Fifth layer: 4,500 lbs.
  • \n
\n

According to Ramsey Winch, the rated line pull of the winch must be high enough to pull your vehicle’s gross vehicle weight (GVW.) It also must overcome resistance when stuck or on an incline. This particular winch manufacturer recommends a rated line pull at least 25% greater than your GVW. This helps account for any additional weight–like fuel–in the vehicle you are recovering.

\n

Winches are also rated for line speed, rope diameter and length. Hydraulic planetary winches tend to have a faster line speed, which can be critical to getting tow operators off the road in a timely manner.

Line speeds are typically measured in feet per second under minimal load. For hydraulic units, the flow of hydraulic fluid to the drive—usually 15 gallons per minute maximum--determines the line speed rating.

\n

Spool Direction

\n

Winch lines can also be spooled in an underwind or overwind direction, and winch motors are positioned in either a lefthand or righthand configuration with forward and reverse controls, depending on model. Each winch has a clutch to engage for operation or disengage for free-spooling. Please refer to the winch’s owner’s manual or the rotation decal affixed to the winch housing for proper spool direction.

\n

There are a number of factors to consider when purchasing your next winch. We hope this blog helps in the decision-making process. Be sure to follow manufacturer instructions for installation and maintenance of your new winch. Here are some good tips to follow to ensure a long lifespan, regardless of type and size of winch you choose to purchase:

\n
    \n
  • Lubricate grease fittings on winch, housing and drum monthly.
  • \n
  • Check hydraulic oil level and electrical connections weekly.
  • \n
  • Scan winch line for flat spots, stress and fraying daily.
  • \n
  • Avoid bird’s nesting with power wrapping and cable tensioner.
  • \n
  • Inspect mounting bolts and tighten as necessary
  • \n
\n\"winch-spool\"","rssSummary":"
\n
\n
\n
\n
\n","rssSummaryFeaturedImage":"https://48463649.fs1.hubspotusercontent-na1.net/hubfs/48463649/Blog/winches_parts_diagram_600x300.png","scheduledUpdateDate":0,"screenshotPreviewTakenAt":1770500068302,"screenshotPreviewUrl":"https://cdn1.hubspot.net/hubshotv3/prod/e/0/00eb050a-bfb8-47c9-b5da-364c648371b5.png","sections":{},"securityState":"NONE","siteId":null,"slug":"blog/how-to-choose-a-winch-sizes-motors-gears","stagedFrom":null,"state":"PUBLISHED","stateWhenDeleted":null,"structuredContentPageType":null,"structuredContentType":null,"styleOverrideId":null,"subcategory":"normal_blog_post","syncedWithBlogRoot":true,"tagIds":[192169769490,192174528148,192174529697,194719179289,194719586666],"tagList":[{"categoryId":3,"cdnPurgeEmbargoTime":null,"contentIds":[],"cosObjectType":"TAG","created":1751598346713,"deletedAt":0,"description":"","id":192169769490,"label":"Towing & Recovery","language":null,"name":"Towing & Recovery","portalId":48463649,"slug":"towing-recovery","translatedFromId":null,"translations":{},"updated":1751598346713},{"categoryId":3,"cdnPurgeEmbargoTime":null,"contentIds":[],"cosObjectType":"TAG","created":1751601475164,"deletedAt":0,"description":"","id":192174528148,"label":"Automotive","language":null,"name":"Automotive","portalId":48463649,"slug":"automotive","translatedFromId":null,"translations":{},"updated":1751601475164},{"categoryId":3,"cdnPurgeEmbargoTime":null,"contentIds":[],"cosObjectType":"TAG","created":1751602285139,"deletedAt":0,"description":"","id":192174529697,"label":"Construction","language":null,"name":"Construction","portalId":48463649,"slug":"construction","translatedFromId":null,"translations":{},"updated":1751602285139},{"categoryId":3,"cdnPurgeEmbargoTime":null,"contentIds":[],"cosObjectType":"TAG","created":1755545213046,"deletedAt":0,"description":"","id":194719179289,"label":"Industry Knowledge & Updates","language":null,"name":"Industry Knowledge & Updates","portalId":48463649,"slug":"industry-knowledge-updates","translatedFromId":null,"translations":{},"updated":1755545213046},{"categoryId":3,"cdnPurgeEmbargoTime":null,"contentIds":[],"cosObjectType":"TAG","created":1755545331471,"deletedAt":0,"description":"","id":194719586666,"label":"Product Guides","language":null,"name":"Product Guides","portalId":48463649,"slug":"product-guides","translatedFromId":null,"translations":{},"updated":1755545331471}],"tagNames":["Towing & Recovery","Automotive","Construction","Industry Knowledge & Updates","Product Guides"],"teamPerms":[],"templatePath":"","templatePathForRender":"zips-basic-theme/templates/blog-post.html","textToAudioFileId":null,"textToAudioGenerationRequestId":null,"themePath":null,"themeSettingsValues":null,"title":"How to Choose a Winch: Sizes, Motors & Gears","tmsId":null,"topicIds":[192169769490,192174528148,192174529697,194719179289,194719586666],"topicList":[{"categoryId":3,"cdnPurgeEmbargoTime":null,"contentIds":[],"cosObjectType":"TAG","created":1751598346713,"deletedAt":0,"description":"","id":192169769490,"label":"Towing & Recovery","language":null,"name":"Towing & Recovery","portalId":48463649,"slug":"towing-recovery","translatedFromId":null,"translations":{},"updated":1751598346713},{"categoryId":3,"cdnPurgeEmbargoTime":null,"contentIds":[],"cosObjectType":"TAG","created":1751601475164,"deletedAt":0,"description":"","id":192174528148,"label":"Automotive","language":null,"name":"Automotive","portalId":48463649,"slug":"automotive","translatedFromId":null,"translations":{},"updated":1751601475164},{"categoryId":3,"cdnPurgeEmbargoTime":null,"contentIds":[],"cosObjectType":"TAG","created":1751602285139,"deletedAt":0,"description":"","id":192174529697,"label":"Construction","language":null,"name":"Construction","portalId":48463649,"slug":"construction","translatedFromId":null,"translations":{},"updated":1751602285139},{"categoryId":3,"cdnPurgeEmbargoTime":null,"contentIds":[],"cosObjectType":"TAG","created":1755545213046,"deletedAt":0,"description":"","id":194719179289,"label":"Industry Knowledge & Updates","language":null,"name":"Industry Knowledge & Updates","portalId":48463649,"slug":"industry-knowledge-updates","translatedFromId":null,"translations":{},"updated":1755545213046},{"categoryId":3,"cdnPurgeEmbargoTime":null,"contentIds":[],"cosObjectType":"TAG","created":1755545331471,"deletedAt":0,"description":"","id":194719586666,"label":"Product Guides","language":null,"name":"Product Guides","portalId":48463649,"slug":"product-guides","translatedFromId":null,"translations":{},"updated":1755545331471}],"topicNames":["Towing & Recovery","Automotive","Construction","Industry Knowledge & Updates","Product Guides"],"topics":[192169769490,192174528148,192174529697,194719179289,194719586666],"translatedContent":{},"translatedFromId":null,"translations":{},"tweet":null,"tweetAt":null,"tweetImmediately":false,"unpublishedAt":0,"updated":1756157668615,"updatedById":76755706,"upsizeFeaturedImage":false,"url":"/blog/how-to-choose-a-winch-sizes-motors-gears","useFeaturedImage":true,"userPerms":[],"views":null,"visibleToAll":null,"widgetContainers":{},"widgetcontainers":{},"widgets":{}},{"ab":false,"abStatus":null,"abTestId":null,"abVariation":false,"abVariationAutomated":false,"absoluteUrl":"/blog/types-of-winch-lines-synthetic-vs-steel","afterPostBody":null,"aifeatures":null,"allowedSlugConflict":false,"analytics":null,"analyticsPageId":"192174529674","analyticsPageType":"blog-post","approvalStatus":null,"archived":false,"archivedAt":0,"archivedInDashboard":false,"areCommentsAllowed":true,"attachedStylesheets":[],"audienceAccess":"PUBLIC","author":null,"authorName":null,"authorUsername":null,"blogAuthor":{"avatar":"","bio":"","cdnPurgeEmbargoTime":null,"cosObjectType":"BLOG_AUTHOR","created":1750825727422,"deletedAt":0,"displayName":"Zip's","email":null,"facebook":"","fullName":"Zip's","gravatarUrl":null,"hasSocialProfiles":false,"id":191785406258,"label":"Zip's","language":"en","linkedin":"","name":"Zip's","portalId":48463649,"slug":"zips","translatedFromId":null,"translations":{},"twitter":"","twitterUsername":"","updated":1750825727422,"userId":null,"username":null,"website":""},"blogAuthorId":191785406258,"blogAuthorIdList":[191785406258],"blogAuthorList":[{"avatar":"","bio":"","cdnPurgeEmbargoTime":null,"cosObjectType":"BLOG_AUTHOR","created":1750825727422,"deletedAt":0,"displayName":"Zip's","email":null,"facebook":"","fullName":"Zip's","gravatarUrl":null,"hasSocialProfiles":false,"id":191785406258,"label":"Zip's","language":"en","linkedin":"","name":"Zip's","portalId":48463649,"slug":"zips","translatedFromId":null,"translations":{},"twitter":"","twitterUsername":"","updated":1750825727422,"userId":null,"username":null,"website":""}],"blogPostAuthor":{"avatar":"","bio":"","cdnPurgeEmbargoTime":null,"cosObjectType":"BLOG_AUTHOR","created":1750825727422,"deletedAt":0,"displayName":"Zip's","email":null,"facebook":"","fullName":"Zip's","gravatarUrl":null,"hasSocialProfiles":false,"id":191785406258,"label":"Zip's","language":"en","linkedin":"","name":"Zip's","portalId":48463649,"slug":"zips","translatedFromId":null,"translations":{},"twitter":"","twitterUsername":"","updated":1750825727422,"userId":null,"username":null,"website":""},"blogPostScheduleTaskUid":null,"blogPublishInstantEmailCampaignId":null,"blogPublishInstantEmailRetryCount":null,"blogPublishInstantEmailTaskUid":null,"blogPublishToSocialMediaTask":"DONE_NOT_SENT","blueprintTypeId":0,"businessUnitId":null,"campaign":null,"campaignName":null,"campaignUtm":null,"category":3,"categoryId":3,"cdnPurgeEmbargoTime":null,"checkPostLevelAudienceAccessFirst":true,"clonedFrom":null,"composeBody":null,"compositionId":0,"contentAccessRuleIds":[],"contentAccessRuleTypes":[],"contentGroup":190096341139,"contentGroupId":190096341139,"contentTypeCategory":3,"contentTypeCategoryId":3,"contentTypeId":null,"created":1751602253728,"createdByAgent":null,"createdById":74657203,"createdTime":1751602253728,"crmObjectId":null,"css":{},"cssText":"","ctaClicks":null,"ctaViews":null,"currentState":"PUBLISHED","currentlyPublished":true,"deletedAt":0,"deletedBy":null,"deletedByEmail":null,"deletedById":null,"domain":"","dynamicPageDataSourceId":null,"dynamicPageDataSourceType":null,"dynamicPageHubDbTableId":null,"enableDomainStylesheets":null,"enableGoogleAmpOutputOverride":false,"enableLayoutStylesheets":null,"errors":[],"featuredImage":"https://48463649.fs1.hubspotusercontent-na1.net/hubfs/48463649/Blog/17121-hd-wrecker-black-mar2021-hi-res-23-400x350.png","featuredImageAltText":"","featuredImageHeight":350,"featuredImageLength":0,"featuredImageWidth":400,"flexAreas":{},"folderId":null,"footerHtml":null,"footerTemplatePath":null,"footerVariantName":null,"freezeDate":1649941200000,"generateJsonLdEnabledOverride":true,"globalBlockOverrides":{},"hasContentAccessRules":false,"hasUserChanges":true,"headHtml":null,"header":null,"headerTemplatePath":null,"headerVariantName":null,"htmlTitle":"Types of Winch Lines: Synthetic vs. Steel","id":192174529674,"includeDefaultCustomCss":null,"isCaptchaRequired":true,"isCrawlableByBots":false,"isDraft":false,"isInstantEmailEnabled":false,"isPublished":true,"isSocialPublishingEnabled":false,"keywords":[],"label":"Types of Winch Lines: Synthetic vs. Steel","language":"en","lastEditSessionId":null,"lastEditUpdateId":null,"layoutSections":{},"legacyBlogTabid":null,"legacyId":null,"legacyPostGuid":null,"linkRelCanonicalUrl":"","listTemplate":"","liveDomain":"www.zips.com","mab":false,"mabExperimentId":null,"mabMaster":false,"mabVariant":false,"marketingCampaignGuids":[],"meta":{"html_title":"Types of Winch Lines: Synthetic vs. Steel","public_access_rules":[],"public_access_rules_enabled":false,"use_featured_image":true,"tag_ids":[192169769490,192174528148,192174529697,194719179289,194719586666],"topic_ids":[192169769490,192174528148,192174529697,194719179289,194719586666],"post_summary":"
\n
\n
\n
\n
\n","post_body":"
\n
\n
\n
\n
\n
\n

Winches and winch lines are valuable tools across a variety of industries and applications, including towing and recovery, transportation, agriculture, construction, oil and gas, and off-road recreation.

\n

Over the next couple of weeks, we are going to look at the different types of winches and winch lines out there to discuss what you need to look for when upgrading your equipment or ordering new. Today, we’ll touch on the five winch line types available from Zip's AW Direct.

\n
    \n
  • Synthetic Rope
  • \n
  • Fiber Core Wire Rope
  • \n
  • Steel Core Wire Rope
  • \n
  • Super Swaged Wire Rope
  • \n
  • Super Flex Wire Rope
  • \n
\n


\n

Synthetic Winch Lines

\n

The first kind of winch line we’ll look at is Synthetic. Gaining in popularity in the towing & recovery industry, this braided fiber rope has been around commercial applications for decades with a proven track record in many industries, according to Jeff Lechtenberg, product manager at Zip’s AW Direct.

\n

\"17121-hd-wrecker-black-mar2021-hi-res-23-400x350\"

\n

Zip’s stocks diameter sizes ranging from 5/16” to 7/8” and are available in lengths up to 250 feet. Larger diameters and longer lengths can certainly be accommodated and are used in many applications. Synthetic winch lines can be used with winches installed on endless types of equipment and vehicles. Producing a maximum strength-to-weight ratio, synthetic ropes are equally as strong in pulling capacity but up to eight times lighter than steel.

\n

“Synthetic rope is so lightweight that it floats,” Lechtenberg said. “It doesn’t store as much energy under load as steel lines do, and they do not have sharp burs so it can be handled without gloves. They are also “torque-neutral” so a swivel hook or shackle is not needed - your line won’t twist like a steel line.”

\n

Synthetic rope is also available in a rainbow of colors so you can custom match your rope to your vehicle or you can color coordinate your winch lines to their specific capacity or winch controls. Here are a few more benefits from Lechtenberg to consider with synthetic rope:

\n
    \n
  • Zero corrosion
  • \n
  • Repairable in the field
  • \n
  • Wear resistant
  • \n
  • Sun resistant
  • \n
  • Impervious to many chemicals
  • \n
  • Low stretch
  • \n
  • Reduced flex fatigue
  • \n
\n

Steel Winch Line Varieties

\n

If you are more of a traditionalist, there are several types of steel winch lines to consider, beginning with Fiber Core wire rope. Made from extra improved plow steel, these winch lines ensure a longer life span by excreting lubricant under pressure to minimize wear and corrosion on the wire.

\n

\"EndofWinchLine_Illustration_HowTo_Measure-01-01-400x400\"

\n


\n

Next, Steel Core winch lines are also made with extra improved plow steel, which provides superior strength and flexibility. Steel core winch cables offer greater crush resistance and a higher nominal strength compared to fiber core, but they are not as flexible as fiber core.

\n

Another type of steel winch line is called Super Swaged. Meaning the rope starts off as the next size bigger but, through a process called swaging, is compressed down to the next size smaller. As a result, the outer wires have a larger surface area than standard winch lines.

\n

The working load limit remains the same as the original diameter. The compact design offers greater strength than standard winch lines of the same size. Although less flexible, they also provide better resistance to abrasion, kinking, and drum crushing.

\n

The last type of winch line to review today is Super Flex wire rope. This type of winch line offers better performance and increased longevity. It does so by containing more wires within a given diameter, resulting in less fatigue. This makes the line more resistant to wear and tear.

\n

Ordering and Hardware

\n

All of our replacement winch lines include attachment hardware. However, if you need to replace a hook, thimble, clip, or socket, we have the parts you need in our Hooks and Hardware department at Zips.com. You can also order any type of the five winch lines described earlier here as well.

\n

Before you order your new winch line, double-check your winch’s owner’s manual or its identification plate and find the correct wire rope size. It is recommended to follow the winch manufacturers required diameter and lengths. In the towing and recovery industry, automotive car carriers typically use 3/8\" rope, medium-duty tow trucks typically use 7/16\", 1/2\" or 9/16\" rope and heavy-duty tow trucks typically use 5/8\", 3/4\" and 7/8\" rope.

\n

\"rope-sizing-before-you-order\"

\n

Measure your rope as shown in the diagram above or slip a socket wrench over the plain end for a fast, accurate measurement. Be sure to measure the distance between the outside edges of the two opposite bundles, not the distance between the flat sides.

\n

Lastly, consider the appropriate Working Load Limit (WLL) for your winch and recovery efforts. Winch lines are rated by size capacity and Minimum Breaking Strength (MBS). WLL is determined by a safety factor of the MBS. For example, a 3:1 safety factor means the MBS is three times the WLL.

","rss_summary":"
\n
\n
\n
\n
\n","rss_body":"
\n
\n
\n
\n
\n
\n

Winches and winch lines are valuable tools across a variety of industries and applications, including towing and recovery, transportation, agriculture, construction, oil and gas, and off-road recreation.

\n

Over the next couple of weeks, we are going to look at the different types of winches and winch lines out there to discuss what you need to look for when upgrading your equipment or ordering new. Today, we’ll touch on the five winch line types available from Zip's AW Direct.

\n
    \n
  • Synthetic Rope
  • \n
  • Fiber Core Wire Rope
  • \n
  • Steel Core Wire Rope
  • \n
  • Super Swaged Wire Rope
  • \n
  • Super Flex Wire Rope
  • \n
\n


\n

Synthetic Winch Lines

\n

The first kind of winch line we’ll look at is Synthetic. Gaining in popularity in the towing & recovery industry, this braided fiber rope has been around commercial applications for decades with a proven track record in many industries, according to Jeff Lechtenberg, product manager at Zip’s AW Direct.

\n

\"17121-hd-wrecker-black-mar2021-hi-res-23-400x350\"

\n

Zip’s stocks diameter sizes ranging from 5/16” to 7/8” and are available in lengths up to 250 feet. Larger diameters and longer lengths can certainly be accommodated and are used in many applications. Synthetic winch lines can be used with winches installed on endless types of equipment and vehicles. Producing a maximum strength-to-weight ratio, synthetic ropes are equally as strong in pulling capacity but up to eight times lighter than steel.

\n

“Synthetic rope is so lightweight that it floats,” Lechtenberg said. “It doesn’t store as much energy under load as steel lines do, and they do not have sharp burs so it can be handled without gloves. They are also “torque-neutral” so a swivel hook or shackle is not needed - your line won’t twist like a steel line.”

\n

Synthetic rope is also available in a rainbow of colors so you can custom match your rope to your vehicle or you can color coordinate your winch lines to their specific capacity or winch controls. Here are a few more benefits from Lechtenberg to consider with synthetic rope:

\n
    \n
  • Zero corrosion
  • \n
  • Repairable in the field
  • \n
  • Wear resistant
  • \n
  • Sun resistant
  • \n
  • Impervious to many chemicals
  • \n
  • Low stretch
  • \n
  • Reduced flex fatigue
  • \n
\n

Steel Winch Line Varieties

\n

If you are more of a traditionalist, there are several types of steel winch lines to consider, beginning with Fiber Core wire rope. Made from extra improved plow steel, these winch lines ensure a longer life span by excreting lubricant under pressure to minimize wear and corrosion on the wire.

\n

\"EndofWinchLine_Illustration_HowTo_Measure-01-01-400x400\"

\n


\n

Next, Steel Core winch lines are also made with extra improved plow steel, which provides superior strength and flexibility. Steel core winch cables offer greater crush resistance and a higher nominal strength compared to fiber core, but they are not as flexible as fiber core.

\n

Another type of steel winch line is called Super Swaged. Meaning the rope starts off as the next size bigger but, through a process called swaging, is compressed down to the next size smaller. As a result, the outer wires have a larger surface area than standard winch lines.

\n

The working load limit remains the same as the original diameter. The compact design offers greater strength than standard winch lines of the same size. Although less flexible, they also provide better resistance to abrasion, kinking, and drum crushing.

\n

The last type of winch line to review today is Super Flex wire rope. This type of winch line offers better performance and increased longevity. It does so by containing more wires within a given diameter, resulting in less fatigue. This makes the line more resistant to wear and tear.

\n

Ordering and Hardware

\n

All of our replacement winch lines include attachment hardware. However, if you need to replace a hook, thimble, clip, or socket, we have the parts you need in our Hooks and Hardware department at Zips.com. You can also order any type of the five winch lines described earlier here as well.

\n

Before you order your new winch line, double-check your winch’s owner’s manual or its identification plate and find the correct wire rope size. It is recommended to follow the winch manufacturers required diameter and lengths. In the towing and recovery industry, automotive car carriers typically use 3/8\" rope, medium-duty tow trucks typically use 7/16\", 1/2\" or 9/16\" rope and heavy-duty tow trucks typically use 5/8\", 3/4\" and 7/8\" rope.

\n

\"rope-sizing-before-you-order\"

\n

Measure your rope as shown in the diagram above or slip a socket wrench over the plain end for a fast, accurate measurement. Be sure to measure the distance between the outside edges of the two opposite bundles, not the distance between the flat sides.

\n

Lastly, consider the appropriate Working Load Limit (WLL) for your winch and recovery efforts. Winch lines are rated by size capacity and Minimum Breaking Strength (MBS). WLL is determined by a safety factor of the MBS. For example, a 3:1 safety factor means the MBS is three times the WLL.

","enable_google_amp_output_override":false,"generate_json_ld_enabled":true,"blog_post_schedule_task_uid":null,"blog_publish_to_social_media_task":"DONE_NOT_SENT","blog_publish_instant_email_task_uid":null,"blog_publish_instant_email_campaign_id":null,"blog_publish_instant_email_retry_count":null,"keywords":[],"composition_id":0,"is_crawlable_by_bots":false,"header":null,"published_at":1756479431942,"head_html":null,"footer_html":null,"attached_stylesheets":[],"enable_domain_stylesheets":null,"include_default_custom_css":null,"layout_sections":{},"past_mab_experiment_ids":[],"deleted_by":null,"featured_image_alt_text":"","enable_layout_stylesheets":null,"tweet":null,"tweet_at":null,"campaign_name":null,"campaign_utm":null,"meta_keywords":null,"meta_description":"Explore the differences between synthetic and steel winch lines, their benefits, available varieties, and tips on choosing the right winch line for your needs.","tweet_immediately":false,"publish_immediately":true,"security_state":"NONE","scheduled_update_date":0,"placement_guids":[],"header_template_path":null,"header_variant_name":null,"footer_template_path":null,"footer_variant_name":null,"global_block_overrides":{},"property_for_dynamic_page_title":null,"property_for_dynamic_page_slug":null,"property_for_dynamic_page_meta_description":null,"property_for_dynamic_page_featured_image":null,"property_for_dynamic_page_canonical_url":null,"preview_image_src":null,"legacy_blog_tabid":null,"legacy_post_guid":null,"performable_variation_letter":null,"style_override_id":null,"has_user_changes":true,"css":{},"css_text":"","unpublished_at":0,"published_by_id":82246321,"allowed_slug_conflict":false,"ai_features":null,"link_rel_canonical_url":"","page_redirected":false,"page_expiry_enabled":null,"page_expiry_date":null,"page_expiry_redirect_id":null,"page_expiry_redirect_url":null,"deleted_by_id":null,"state_when_deleted":null,"cloned_from":null,"staged_from":null,"personas":[],"compose_body":null,"featured_image":"https://48463649.fs1.hubspotusercontent-na1.net/hubfs/48463649/Blog/17121-hd-wrecker-black-mar2021-hi-res-23-400x350.png","featured_image_width":400,"featured_image_height":350,"publish_timezone_offset":null,"theme_settings_values":null,"password":null,"last_edit_session_id":null,"last_edit_update_id":null,"created_by_agent":null},"metaDescription":"Explore the differences between synthetic and steel winch lines, their benefits, available varieties, and tips on choosing the right winch line for your needs.","metaKeywords":null,"name":"Types of Winch Lines: Synthetic vs. Steel","nextPostFeaturedImage":"https://48463649.fs1.hubspotusercontent-na1.net/hubfs/48463649/Blog/snatch-blocks-cover-photo-march-2022-hi-res-11-zips-blog.jpg","nextPostFeaturedImageAltText":"","nextPostName":"Get to Know Snatch Blocks: Their Uses, Parts and Care.","nextPostSlug":"blog/get-to-know-snatch-blocks-their-uses-parts-and-care","pageExpiryDate":null,"pageExpiryEnabled":null,"pageExpiryRedirectId":null,"pageExpiryRedirectUrl":null,"pageRedirected":false,"pageTitle":"Types of Winch Lines: Synthetic vs. Steel","parentBlog":{"absoluteUrl":"/blog","allowComments":true,"ampBodyColor":"#404040","ampBodyFont":"'Helvetica Neue', Helvetica, Arial, sans-serif","ampBodyFontSize":"18","ampCustomCss":"","ampHeaderBackgroundColor":"#ffffff","ampHeaderColor":"#1e1e1e","ampHeaderFont":"'Helvetica Neue', Helvetica, Arial, sans-serif","ampHeaderFontSize":"36","ampLinkColor":"#416bb3","ampLogoAlt":"","ampLogoHeight":0,"ampLogoSrc":"","ampLogoWidth":0,"analyticsPageId":190096341139,"attachedStylesheets":[],"audienceAccess":"PUBLIC","businessUnitId":null,"captchaAfterDays":7,"captchaAlways":false,"categoryId":3,"cdnPurgeEmbargoTime":null,"closeCommentsOlder":0,"commentDateFormat":"medium","commentFormGuid":"a4128401-39db-4c54-a62b-88ff335d3a69","commentMaxThreadDepth":1,"commentModeration":false,"commentNotificationEmails":[],"commentShouldCreateContact":false,"commentVerificationText":"","cosObjectType":"BLOG","created":1747163443999,"createdDateTime":1747163443999,"dailyNotificationEmailId":null,"dateFormattingLanguage":null,"defaultGroupStyleId":"","defaultNotificationFromName":"","defaultNotificationReplyTo":"","deletedAt":0,"description":"","domain":"","domainWhenPublished":"www.zips.com","emailApiSubscriptionId":null,"enableGoogleAmpOutput":true,"enableSocialAutoPublishing":false,"generateJsonLdEnabled":true,"header":null,"htmlFooter":"","htmlFooterIsShared":true,"htmlHead":"","htmlHeadIsShared":true,"htmlKeywords":[],"htmlTitle":"blog","id":190096341139,"ilsSubscriptionListsByType":{},"instantNotificationEmailId":null,"itemLayoutId":null,"itemTemplateIsShared":false,"itemTemplatePath":"zips-basic-theme/templates/blog-post.html","label":"blog","language":"en","legacyGuid":null,"legacyModuleId":null,"legacyTabId":null,"listingLayoutId":null,"listingPageId":190096341141,"listingTemplatePath":"","liveDomain":"www.zips.com","monthFilterFormat":"MMMM yyyy","monthlyNotificationEmailId":null,"name":"blog","parentBlogUpdateTaskId":null,"portalId":48463649,"postHtmlFooter":"","postHtmlHead":"","postsPerListingPage":111,"postsPerRssFeed":10,"publicAccessRules":[],"publicAccessRulesEnabled":false,"publicTitle":"blog","publishDateFormat":"medium","resolvedDomain":"www.zips.com","rootUrl":"/blog","rssCustomFeed":null,"rssDescription":null,"rssItemFooter":null,"rssItemHeader":null,"settingsOverrides":{"itemLayoutId":false,"itemTemplatePath":false,"itemTemplateIsShared":false,"listingLayoutId":false,"listingTemplatePath":false,"postsPerListingPage":false,"showSummaryInListing":false,"useFeaturedImageInSummary":false,"htmlHead":false,"postHtmlHead":false,"htmlHeadIsShared":false,"htmlFooter":false,"listingPageHtmlFooter":false,"postHtmlFooter":false,"htmlFooterIsShared":false,"attachedStylesheets":false,"postsPerRssFeed":false,"showSummaryInRss":false,"showSummaryInEmails":false,"showSummariesInEmails":false,"allowComments":false,"commentShouldCreateContact":false,"commentModeration":false,"closeCommentsOlder":false,"commentNotificationEmails":false,"commentMaxThreadDepth":false,"commentVerificationText":false,"socialAccountTwitter":false,"showSocialLinkTwitter":false,"showSocialLinkLinkedin":false,"showSocialLinkFacebook":false,"enableGoogleAmpOutput":false,"ampLogoSrc":false,"ampLogoHeight":false,"ampLogoWidth":false,"ampLogoAlt":false,"ampHeaderFont":false,"ampHeaderFontSize":false,"ampHeaderColor":false,"ampHeaderBackgroundColor":false,"ampBodyFont":false,"ampBodyFontSize":false,"ampBodyColor":false,"ampLinkColor":false,"generateJsonLdEnabled":false},"showSocialLinkFacebook":true,"showSocialLinkLinkedin":true,"showSocialLinkTwitter":true,"showSummaryInEmails":true,"showSummaryInListing":true,"showSummaryInRss":true,"siteId":null,"slug":"blog","socialAccountTwitter":"","state":null,"subscriptionContactsProperty":null,"subscriptionEmailType":null,"subscriptionFormGuid":null,"subscriptionListsByType":{},"title":null,"translatedFromId":null,"translations":{},"updated":1755110916417,"updatedDateTime":1755110916417,"urlBase":"www.zips.com/blog","urlSegments":{"all":"all","archive":"archive","author":"author","page":"page","tag":"tag"},"useFeaturedImageInSummary":true,"usesDefaultTemplate":false,"weeklyNotificationEmailId":null},"password":null,"pastMabExperimentIds":[],"performableGuid":null,"performableVariationLetter":null,"personalizationStrategyId":null,"personalizationVariantStatus":null,"personas":[],"placementGuids":[],"portableKey":null,"portalId":48463649,"position":null,"postBody":"
\n
\n
\n
\n
\n
\n

Winches and winch lines are valuable tools across a variety of industries and applications, including towing and recovery, transportation, agriculture, construction, oil and gas, and off-road recreation.

\n

Over the next couple of weeks, we are going to look at the different types of winches and winch lines out there to discuss what you need to look for when upgrading your equipment or ordering new. Today, we’ll touch on the five winch line types available from Zip's AW Direct.

\n
    \n
  • Synthetic Rope
  • \n
  • Fiber Core Wire Rope
  • \n
  • Steel Core Wire Rope
  • \n
  • Super Swaged Wire Rope
  • \n
  • Super Flex Wire Rope
  • \n
\n


\n

Synthetic Winch Lines

\n

The first kind of winch line we’ll look at is Synthetic. Gaining in popularity in the towing & recovery industry, this braided fiber rope has been around commercial applications for decades with a proven track record in many industries, according to Jeff Lechtenberg, product manager at Zip’s AW Direct.

\n

\"17121-hd-wrecker-black-mar2021-hi-res-23-400x350\"

\n

Zip’s stocks diameter sizes ranging from 5/16” to 7/8” and are available in lengths up to 250 feet. Larger diameters and longer lengths can certainly be accommodated and are used in many applications. Synthetic winch lines can be used with winches installed on endless types of equipment and vehicles. Producing a maximum strength-to-weight ratio, synthetic ropes are equally as strong in pulling capacity but up to eight times lighter than steel.

\n

“Synthetic rope is so lightweight that it floats,” Lechtenberg said. “It doesn’t store as much energy under load as steel lines do, and they do not have sharp burs so it can be handled without gloves. They are also “torque-neutral” so a swivel hook or shackle is not needed - your line won’t twist like a steel line.”

\n

Synthetic rope is also available in a rainbow of colors so you can custom match your rope to your vehicle or you can color coordinate your winch lines to their specific capacity or winch controls. Here are a few more benefits from Lechtenberg to consider with synthetic rope:

\n
    \n
  • Zero corrosion
  • \n
  • Repairable in the field
  • \n
  • Wear resistant
  • \n
  • Sun resistant
  • \n
  • Impervious to many chemicals
  • \n
  • Low stretch
  • \n
  • Reduced flex fatigue
  • \n
\n

Steel Winch Line Varieties

\n

If you are more of a traditionalist, there are several types of steel winch lines to consider, beginning with Fiber Core wire rope. Made from extra improved plow steel, these winch lines ensure a longer life span by excreting lubricant under pressure to minimize wear and corrosion on the wire.

\n

\"EndofWinchLine_Illustration_HowTo_Measure-01-01-400x400\"

\n


\n

Next, Steel Core winch lines are also made with extra improved plow steel, which provides superior strength and flexibility. Steel core winch cables offer greater crush resistance and a higher nominal strength compared to fiber core, but they are not as flexible as fiber core.

\n

Another type of steel winch line is called Super Swaged. Meaning the rope starts off as the next size bigger but, through a process called swaging, is compressed down to the next size smaller. As a result, the outer wires have a larger surface area than standard winch lines.

\n

The working load limit remains the same as the original diameter. The compact design offers greater strength than standard winch lines of the same size. Although less flexible, they also provide better resistance to abrasion, kinking, and drum crushing.

\n

The last type of winch line to review today is Super Flex wire rope. This type of winch line offers better performance and increased longevity. It does so by containing more wires within a given diameter, resulting in less fatigue. This makes the line more resistant to wear and tear.

\n

Ordering and Hardware

\n

All of our replacement winch lines include attachment hardware. However, if you need to replace a hook, thimble, clip, or socket, we have the parts you need in our Hooks and Hardware department at Zips.com. You can also order any type of the five winch lines described earlier here as well.

\n

Before you order your new winch line, double-check your winch’s owner’s manual or its identification plate and find the correct wire rope size. It is recommended to follow the winch manufacturers required diameter and lengths. In the towing and recovery industry, automotive car carriers typically use 3/8\" rope, medium-duty tow trucks typically use 7/16\", 1/2\" or 9/16\" rope and heavy-duty tow trucks typically use 5/8\", 3/4\" and 7/8\" rope.

\n

\"rope-sizing-before-you-order\"

\n

Measure your rope as shown in the diagram above or slip a socket wrench over the plain end for a fast, accurate measurement. Be sure to measure the distance between the outside edges of the two opposite bundles, not the distance between the flat sides.

\n

Lastly, consider the appropriate Working Load Limit (WLL) for your winch and recovery efforts. Winch lines are rated by size capacity and Minimum Breaking Strength (MBS). WLL is determined by a safety factor of the MBS. For example, a 3:1 safety factor means the MBS is three times the WLL.

","postBodyRss":"
\n
\n
\n
\n
\n
\n

Winches and winch lines are valuable tools across a variety of industries and applications, including towing and recovery, transportation, agriculture, construction, oil and gas, and off-road recreation.

\n

Over the next couple of weeks, we are going to look at the different types of winches and winch lines out there to discuss what you need to look for when upgrading your equipment or ordering new. Today, we’ll touch on the five winch line types available from Zip's AW Direct.

\n
    \n
  • Synthetic Rope
  • \n
  • Fiber Core Wire Rope
  • \n
  • Steel Core Wire Rope
  • \n
  • Super Swaged Wire Rope
  • \n
  • Super Flex Wire Rope
  • \n
\n


\n

Synthetic Winch Lines

\n

The first kind of winch line we’ll look at is Synthetic. Gaining in popularity in the towing & recovery industry, this braided fiber rope has been around commercial applications for decades with a proven track record in many industries, according to Jeff Lechtenberg, product manager at Zip’s AW Direct.

\n

\"17121-hd-wrecker-black-mar2021-hi-res-23-400x350\"

\n

Zip’s stocks diameter sizes ranging from 5/16” to 7/8” and are available in lengths up to 250 feet. Larger diameters and longer lengths can certainly be accommodated and are used in many applications. Synthetic winch lines can be used with winches installed on endless types of equipment and vehicles. Producing a maximum strength-to-weight ratio, synthetic ropes are equally as strong in pulling capacity but up to eight times lighter than steel.

\n

“Synthetic rope is so lightweight that it floats,” Lechtenberg said. “It doesn’t store as much energy under load as steel lines do, and they do not have sharp burs so it can be handled without gloves. They are also “torque-neutral” so a swivel hook or shackle is not needed - your line won’t twist like a steel line.”

\n

Synthetic rope is also available in a rainbow of colors so you can custom match your rope to your vehicle or you can color coordinate your winch lines to their specific capacity or winch controls. Here are a few more benefits from Lechtenberg to consider with synthetic rope:

\n
    \n
  • Zero corrosion
  • \n
  • Repairable in the field
  • \n
  • Wear resistant
  • \n
  • Sun resistant
  • \n
  • Impervious to many chemicals
  • \n
  • Low stretch
  • \n
  • Reduced flex fatigue
  • \n
\n

Steel Winch Line Varieties

\n

If you are more of a traditionalist, there are several types of steel winch lines to consider, beginning with Fiber Core wire rope. Made from extra improved plow steel, these winch lines ensure a longer life span by excreting lubricant under pressure to minimize wear and corrosion on the wire.

\n

\"EndofWinchLine_Illustration_HowTo_Measure-01-01-400x400\"

\n


\n

Next, Steel Core winch lines are also made with extra improved plow steel, which provides superior strength and flexibility. Steel core winch cables offer greater crush resistance and a higher nominal strength compared to fiber core, but they are not as flexible as fiber core.

\n

Another type of steel winch line is called Super Swaged. Meaning the rope starts off as the next size bigger but, through a process called swaging, is compressed down to the next size smaller. As a result, the outer wires have a larger surface area than standard winch lines.

\n

The working load limit remains the same as the original diameter. The compact design offers greater strength than standard winch lines of the same size. Although less flexible, they also provide better resistance to abrasion, kinking, and drum crushing.

\n

The last type of winch line to review today is Super Flex wire rope. This type of winch line offers better performance and increased longevity. It does so by containing more wires within a given diameter, resulting in less fatigue. This makes the line more resistant to wear and tear.

\n

Ordering and Hardware

\n

All of our replacement winch lines include attachment hardware. However, if you need to replace a hook, thimble, clip, or socket, we have the parts you need in our Hooks and Hardware department at Zips.com. You can also order any type of the five winch lines described earlier here as well.

\n

Before you order your new winch line, double-check your winch’s owner’s manual or its identification plate and find the correct wire rope size. It is recommended to follow the winch manufacturers required diameter and lengths. In the towing and recovery industry, automotive car carriers typically use 3/8\" rope, medium-duty tow trucks typically use 7/16\", 1/2\" or 9/16\" rope and heavy-duty tow trucks typically use 5/8\", 3/4\" and 7/8\" rope.

\n

\"rope-sizing-before-you-order\"

\n

Measure your rope as shown in the diagram above or slip a socket wrench over the plain end for a fast, accurate measurement. Be sure to measure the distance between the outside edges of the two opposite bundles, not the distance between the flat sides.

\n

Lastly, consider the appropriate Working Load Limit (WLL) for your winch and recovery efforts. Winch lines are rated by size capacity and Minimum Breaking Strength (MBS). WLL is determined by a safety factor of the MBS. For example, a 3:1 safety factor means the MBS is three times the WLL.

","postEmailContent":"
\n
\n
\n \n
\n
\n
","postFeaturedImageIfEnabled":"https://48463649.fs1.hubspotusercontent-na1.net/hubfs/48463649/Blog/17121-hd-wrecker-black-mar2021-hi-res-23-400x350.png","postListContent":"
\n
\n
\n \n
\n
\n
","postListSummaryFeaturedImage":"https://48463649.fs1.hubspotusercontent-na1.net/hubfs/48463649/Blog/17121-hd-wrecker-black-mar2021-hi-res-23-400x350.png","postRssContent":"
\n
\n
\n \n
\n
\n
","postRssSummaryFeaturedImage":"https://48463649.fs1.hubspotusercontent-na1.net/hubfs/48463649/Blog/17121-hd-wrecker-black-mar2021-hi-res-23-400x350.png","postSummary":"
\n
\n
\n
\n
\n","postSummaryRss":"
\n
\n
\n \n
\n
\n
","postTemplate":"zips-basic-theme/templates/blog-post.html","previewImageSrc":null,"previewKey":"OmlFOzUw","previousPostFeaturedImage":"https://48463649.fs1.hubspotusercontent-na1.net/hubfs/48463649/Blog/winches_parts_diagram_600x300.png","previousPostFeaturedImageAltText":"","previousPostName":"How to Choose a Winch: Sizes, Motors & Gears","previousPostSlug":"blog/how-to-choose-a-winch-sizes-motors-gears","processingStatus":"PUBLISHED","propertyForDynamicPageCanonicalUrl":null,"propertyForDynamicPageFeaturedImage":null,"propertyForDynamicPageMetaDescription":null,"propertyForDynamicPageSlug":null,"propertyForDynamicPageTitle":null,"publicAccessRules":[],"publicAccessRulesEnabled":false,"publishDate":1649941200000,"publishDateLocalTime":1649941200000,"publishDateLocalized":{"date":1649941200000,"format":"medium","language":null},"publishImmediately":true,"publishTimezoneOffset":null,"publishedAt":1756479431942,"publishedByEmail":null,"publishedById":82246321,"publishedByName":null,"publishedUrl":"/blog/types-of-winch-lines-synthetic-vs-steel","resolvedDomain":"www.zips.com","resolvedLanguage":null,"rssBody":"
\n
\n
\n
\n
\n
\n

Winches and winch lines are valuable tools across a variety of industries and applications, including towing and recovery, transportation, agriculture, construction, oil and gas, and off-road recreation.

\n

Over the next couple of weeks, we are going to look at the different types of winches and winch lines out there to discuss what you need to look for when upgrading your equipment or ordering new. Today, we’ll touch on the five winch line types available from Zip's AW Direct.

\n
    \n
  • Synthetic Rope
  • \n
  • Fiber Core Wire Rope
  • \n
  • Steel Core Wire Rope
  • \n
  • Super Swaged Wire Rope
  • \n
  • Super Flex Wire Rope
  • \n
\n


\n

Synthetic Winch Lines

\n

The first kind of winch line we’ll look at is Synthetic. Gaining in popularity in the towing & recovery industry, this braided fiber rope has been around commercial applications for decades with a proven track record in many industries, according to Jeff Lechtenberg, product manager at Zip’s AW Direct.

\n

\"17121-hd-wrecker-black-mar2021-hi-res-23-400x350\"

\n

Zip’s stocks diameter sizes ranging from 5/16” to 7/8” and are available in lengths up to 250 feet. Larger diameters and longer lengths can certainly be accommodated and are used in many applications. Synthetic winch lines can be used with winches installed on endless types of equipment and vehicles. Producing a maximum strength-to-weight ratio, synthetic ropes are equally as strong in pulling capacity but up to eight times lighter than steel.

\n

“Synthetic rope is so lightweight that it floats,” Lechtenberg said. “It doesn’t store as much energy under load as steel lines do, and they do not have sharp burs so it can be handled without gloves. They are also “torque-neutral” so a swivel hook or shackle is not needed - your line won’t twist like a steel line.”

\n

Synthetic rope is also available in a rainbow of colors so you can custom match your rope to your vehicle or you can color coordinate your winch lines to their specific capacity or winch controls. Here are a few more benefits from Lechtenberg to consider with synthetic rope:

\n
    \n
  • Zero corrosion
  • \n
  • Repairable in the field
  • \n
  • Wear resistant
  • \n
  • Sun resistant
  • \n
  • Impervious to many chemicals
  • \n
  • Low stretch
  • \n
  • Reduced flex fatigue
  • \n
\n

Steel Winch Line Varieties

\n

If you are more of a traditionalist, there are several types of steel winch lines to consider, beginning with Fiber Core wire rope. Made from extra improved plow steel, these winch lines ensure a longer life span by excreting lubricant under pressure to minimize wear and corrosion on the wire.

\n

\"EndofWinchLine_Illustration_HowTo_Measure-01-01-400x400\"

\n


\n

Next, Steel Core winch lines are also made with extra improved plow steel, which provides superior strength and flexibility. Steel core winch cables offer greater crush resistance and a higher nominal strength compared to fiber core, but they are not as flexible as fiber core.

\n

Another type of steel winch line is called Super Swaged. Meaning the rope starts off as the next size bigger but, through a process called swaging, is compressed down to the next size smaller. As a result, the outer wires have a larger surface area than standard winch lines.

\n

The working load limit remains the same as the original diameter. The compact design offers greater strength than standard winch lines of the same size. Although less flexible, they also provide better resistance to abrasion, kinking, and drum crushing.

\n

The last type of winch line to review today is Super Flex wire rope. This type of winch line offers better performance and increased longevity. It does so by containing more wires within a given diameter, resulting in less fatigue. This makes the line more resistant to wear and tear.

\n

Ordering and Hardware

\n

All of our replacement winch lines include attachment hardware. However, if you need to replace a hook, thimble, clip, or socket, we have the parts you need in our Hooks and Hardware department at Zips.com. You can also order any type of the five winch lines described earlier here as well.

\n

Before you order your new winch line, double-check your winch’s owner’s manual or its identification plate and find the correct wire rope size. It is recommended to follow the winch manufacturers required diameter and lengths. In the towing and recovery industry, automotive car carriers typically use 3/8\" rope, medium-duty tow trucks typically use 7/16\", 1/2\" or 9/16\" rope and heavy-duty tow trucks typically use 5/8\", 3/4\" and 7/8\" rope.

\n

\"rope-sizing-before-you-order\"

\n

Measure your rope as shown in the diagram above or slip a socket wrench over the plain end for a fast, accurate measurement. Be sure to measure the distance between the outside edges of the two opposite bundles, not the distance between the flat sides.

\n

Lastly, consider the appropriate Working Load Limit (WLL) for your winch and recovery efforts. Winch lines are rated by size capacity and Minimum Breaking Strength (MBS). WLL is determined by a safety factor of the MBS. For example, a 3:1 safety factor means the MBS is three times the WLL.

","rssSummary":"
\n
\n
\n
\n
\n","rssSummaryFeaturedImage":"https://48463649.fs1.hubspotusercontent-na1.net/hubfs/48463649/Blog/17121-hd-wrecker-black-mar2021-hi-res-23-400x350.png","scheduledUpdateDate":0,"screenshotPreviewTakenAt":1770821832403,"screenshotPreviewUrl":"https://cdn1.hubspot.net/hubshotv3/prod/e/0/4e0bce01-c331-4d5b-8587-db3c886b5b17.png","sections":{},"securityState":"NONE","siteId":null,"slug":"blog/types-of-winch-lines-synthetic-vs-steel","stagedFrom":null,"state":"PUBLISHED","stateWhenDeleted":null,"structuredContentPageType":null,"structuredContentType":null,"styleOverrideId":null,"subcategory":"normal_blog_post","syncedWithBlogRoot":true,"tagIds":[192169769490,192174528148,192174529697,194719179289,194719586666],"tagList":[{"categoryId":3,"cdnPurgeEmbargoTime":null,"contentIds":[],"cosObjectType":"TAG","created":1751598346713,"deletedAt":0,"description":"","id":192169769490,"label":"Towing & Recovery","language":null,"name":"Towing & Recovery","portalId":48463649,"slug":"towing-recovery","translatedFromId":null,"translations":{},"updated":1751598346713},{"categoryId":3,"cdnPurgeEmbargoTime":null,"contentIds":[],"cosObjectType":"TAG","created":1751601475164,"deletedAt":0,"description":"","id":192174528148,"label":"Automotive","language":null,"name":"Automotive","portalId":48463649,"slug":"automotive","translatedFromId":null,"translations":{},"updated":1751601475164},{"categoryId":3,"cdnPurgeEmbargoTime":null,"contentIds":[],"cosObjectType":"TAG","created":1751602285139,"deletedAt":0,"description":"","id":192174529697,"label":"Construction","language":null,"name":"Construction","portalId":48463649,"slug":"construction","translatedFromId":null,"translations":{},"updated":1751602285139},{"categoryId":3,"cdnPurgeEmbargoTime":null,"contentIds":[],"cosObjectType":"TAG","created":1755545213046,"deletedAt":0,"description":"","id":194719179289,"label":"Industry Knowledge & Updates","language":null,"name":"Industry Knowledge & Updates","portalId":48463649,"slug":"industry-knowledge-updates","translatedFromId":null,"translations":{},"updated":1755545213046},{"categoryId":3,"cdnPurgeEmbargoTime":null,"contentIds":[],"cosObjectType":"TAG","created":1755545331471,"deletedAt":0,"description":"","id":194719586666,"label":"Product Guides","language":null,"name":"Product Guides","portalId":48463649,"slug":"product-guides","translatedFromId":null,"translations":{},"updated":1755545331471}],"tagNames":["Towing & Recovery","Automotive","Construction","Industry Knowledge & Updates","Product Guides"],"teamPerms":[],"templatePath":"","templatePathForRender":"zips-basic-theme/templates/blog-post.html","textToAudioFileId":null,"textToAudioGenerationRequestId":null,"themePath":null,"themeSettingsValues":null,"title":"Types of Winch Lines: Synthetic vs. Steel","tmsId":null,"topicIds":[192169769490,192174528148,192174529697,194719179289,194719586666],"topicList":[{"categoryId":3,"cdnPurgeEmbargoTime":null,"contentIds":[],"cosObjectType":"TAG","created":1751598346713,"deletedAt":0,"description":"","id":192169769490,"label":"Towing & Recovery","language":null,"name":"Towing & Recovery","portalId":48463649,"slug":"towing-recovery","translatedFromId":null,"translations":{},"updated":1751598346713},{"categoryId":3,"cdnPurgeEmbargoTime":null,"contentIds":[],"cosObjectType":"TAG","created":1751601475164,"deletedAt":0,"description":"","id":192174528148,"label":"Automotive","language":null,"name":"Automotive","portalId":48463649,"slug":"automotive","translatedFromId":null,"translations":{},"updated":1751601475164},{"categoryId":3,"cdnPurgeEmbargoTime":null,"contentIds":[],"cosObjectType":"TAG","created":1751602285139,"deletedAt":0,"description":"","id":192174529697,"label":"Construction","language":null,"name":"Construction","portalId":48463649,"slug":"construction","translatedFromId":null,"translations":{},"updated":1751602285139},{"categoryId":3,"cdnPurgeEmbargoTime":null,"contentIds":[],"cosObjectType":"TAG","created":1755545213046,"deletedAt":0,"description":"","id":194719179289,"label":"Industry Knowledge & Updates","language":null,"name":"Industry Knowledge & Updates","portalId":48463649,"slug":"industry-knowledge-updates","translatedFromId":null,"translations":{},"updated":1755545213046},{"categoryId":3,"cdnPurgeEmbargoTime":null,"contentIds":[],"cosObjectType":"TAG","created":1755545331471,"deletedAt":0,"description":"","id":194719586666,"label":"Product Guides","language":null,"name":"Product Guides","portalId":48463649,"slug":"product-guides","translatedFromId":null,"translations":{},"updated":1755545331471}],"topicNames":["Towing & Recovery","Automotive","Construction","Industry Knowledge & Updates","Product Guides"],"topics":[192169769490,192174528148,192174529697,194719179289,194719586666],"translatedContent":{},"translatedFromId":null,"translations":{},"tweet":null,"tweetAt":null,"tweetImmediately":false,"unpublishedAt":0,"updated":1756479431947,"updatedById":82246321,"upsizeFeaturedImage":false,"url":"/blog/types-of-winch-lines-synthetic-vs-steel","useFeaturedImage":true,"userPerms":[],"views":null,"visibleToAll":null,"widgetContainers":{},"widgetcontainers":{},"widgets":{}},{"ab":false,"abStatus":null,"abTestId":null,"abVariation":false,"abVariationAutomated":false,"absoluteUrl":"/blog/get-to-know-snatch-blocks-their-uses-parts-and-care","afterPostBody":null,"aifeatures":null,"allowedSlugConflict":false,"analytics":null,"analyticsPageId":"192172363649","analyticsPageType":"blog-post","approvalStatus":null,"archived":false,"archivedAt":0,"archivedInDashboard":false,"areCommentsAllowed":true,"attachedStylesheets":[],"audienceAccess":"PUBLIC","author":null,"authorName":null,"authorUsername":null,"blogAuthor":{"avatar":"","bio":"","cdnPurgeEmbargoTime":null,"cosObjectType":"BLOG_AUTHOR","created":1750825727422,"deletedAt":0,"displayName":"Zip's","email":null,"facebook":"","fullName":"Zip's","gravatarUrl":null,"hasSocialProfiles":false,"id":191785406258,"label":"Zip's","language":"en","linkedin":"","name":"Zip's","portalId":48463649,"slug":"zips","translatedFromId":null,"translations":{},"twitter":"","twitterUsername":"","updated":1750825727422,"userId":null,"username":null,"website":""},"blogAuthorId":191785406258,"blogAuthorIdList":[191785406258],"blogAuthorList":[{"avatar":"","bio":"","cdnPurgeEmbargoTime":null,"cosObjectType":"BLOG_AUTHOR","created":1750825727422,"deletedAt":0,"displayName":"Zip's","email":null,"facebook":"","fullName":"Zip's","gravatarUrl":null,"hasSocialProfiles":false,"id":191785406258,"label":"Zip's","language":"en","linkedin":"","name":"Zip's","portalId":48463649,"slug":"zips","translatedFromId":null,"translations":{},"twitter":"","twitterUsername":"","updated":1750825727422,"userId":null,"username":null,"website":""}],"blogPostAuthor":{"avatar":"","bio":"","cdnPurgeEmbargoTime":null,"cosObjectType":"BLOG_AUTHOR","created":1750825727422,"deletedAt":0,"displayName":"Zip's","email":null,"facebook":"","fullName":"Zip's","gravatarUrl":null,"hasSocialProfiles":false,"id":191785406258,"label":"Zip's","language":"en","linkedin":"","name":"Zip's","portalId":48463649,"slug":"zips","translatedFromId":null,"translations":{},"twitter":"","twitterUsername":"","updated":1750825727422,"userId":null,"username":null,"website":""},"blogPostScheduleTaskUid":null,"blogPublishInstantEmailCampaignId":null,"blogPublishInstantEmailRetryCount":null,"blogPublishInstantEmailTaskUid":null,"blogPublishToSocialMediaTask":"DONE_NOT_SENT","blueprintTypeId":0,"businessUnitId":null,"campaign":null,"campaignName":null,"campaignUtm":null,"category":3,"categoryId":3,"cdnPurgeEmbargoTime":null,"checkPostLevelAudienceAccessFirst":true,"clonedFrom":null,"composeBody":null,"compositionId":0,"contentAccessRuleIds":[],"contentAccessRuleTypes":[],"contentGroup":190096341139,"contentGroupId":190096341139,"contentTypeCategory":3,"contentTypeCategoryId":3,"contentTypeId":null,"created":1751605880347,"createdByAgent":null,"createdById":74657203,"createdTime":1751605880347,"crmObjectId":null,"css":{},"cssText":"","ctaClicks":null,"ctaViews":null,"currentState":"PUBLISHED","currentlyPublished":true,"deletedAt":0,"deletedBy":null,"deletedByEmail":null,"deletedById":null,"domain":"","dynamicPageDataSourceId":null,"dynamicPageDataSourceType":null,"dynamicPageHubDbTableId":null,"enableDomainStylesheets":null,"enableGoogleAmpOutputOverride":false,"enableLayoutStylesheets":null,"errors":[],"featuredImage":"https://48463649.fs1.hubspotusercontent-na1.net/hubfs/48463649/Blog/snatch-blocks-cover-photo-march-2022-hi-res-11-zips-blog.jpg","featuredImageAltText":"","featuredImageHeight":358,"featuredImageLength":0,"featuredImageWidth":955,"flexAreas":{},"folderId":null,"footerHtml":null,"footerTemplatePath":null,"footerVariantName":null,"freezeDate":1646661600000,"generateJsonLdEnabledOverride":true,"globalBlockOverrides":{},"hasContentAccessRules":false,"hasUserChanges":true,"headHtml":"","header":null,"headerTemplatePath":null,"headerVariantName":null,"htmlTitle":"Get to Know Snatch Blocks: Their Uses, Parts and Care.","id":192172363649,"includeDefaultCustomCss":null,"isCaptchaRequired":true,"isCrawlableByBots":false,"isDraft":false,"isInstantEmailEnabled":false,"isPublished":true,"isSocialPublishingEnabled":false,"keywords":[],"label":"Get to Know Snatch Blocks: Their Uses, Parts and Care.","language":"en","lastEditSessionId":null,"lastEditUpdateId":null,"layoutSections":{},"legacyBlogTabid":null,"legacyId":null,"legacyPostGuid":null,"linkRelCanonicalUrl":"","listTemplate":"","liveDomain":"www.zips.com","mab":false,"mabExperimentId":null,"mabMaster":false,"mabVariant":false,"marketingCampaignGuids":[],"meta":{"html_title":"Get to Know Snatch Blocks: Their Uses, Parts and Care.","public_access_rules":[],"public_access_rules_enabled":false,"use_featured_image":true,"tag_ids":[192169769490,192174528148,192174529697,194719179289,194719586666],"topic_ids":[192169769490,192174528148,192174529697,194719179289,194719586666],"post_summary":"

Snatch blocks are essential rigging and recovery tools. Available in a wide selection of sizes and capacities, these sheaves and attachments provide a critical pivot point to change the angle and direction of a pull or increase the load capacity of a winch line.

\n","post_body":"

Snatch blocks are essential rigging and recovery tools. Available in a wide selection of sizes and capacities, these sheaves and attachments provide a critical pivot point to change the angle and direction of a pull or increase the load capacity of a winch line.

\n\n

Snatch blocks are for use in the recreational market, towing and recovery industry, overhead crane operations and many other industrial applications. They are compatible with both synthetic line and steel cable. Each snatch block is dual labeled with its pulling capacity and acceptable rope size.

\n
\n
\n

\"zsb8t6-4-zips-snatch-block-swivel-hook-8ton-6inch-low-res\"

\n
\n
\n

\"zsb2t3sw-zips-snatch-block-swiv-shackle-low-res-2\"

\n
\n
\n

Moving Parts

\n
\n
\n

Traditional snatch blocks consist of a single pulley or sheave protected by two outer teardrop-shaped side plates.

\n

A release pin with a cotter key sandwiches the plates together over the pulley. To insert the winch cable or line, the pin is removed by turning the nut counterclockwise by hand. This allows access to the inner pulley. Be sure to reinsert the cotter key after screwing the plates back together.

\n

Most snatch blocks come equipped with bronze bushings for longevity and smooth operation. To aid in routine preventative maintenance, a grease zerk is located on the outside of the center sheave pin. Weekly lubrication is suggested.

\n

Daily inspection of each snatch block is recommended prior to use. Snatch blocks should also be stored inside a toolbox or compartment to protect them from the elements when not in use.

\n
\n
\n

\"SnatchBlock_Parts_Diagram\"

\n
\n
\n

Common Attachments

\n
\n
\n

\"snatch-block-blog-hero-1\"

\n
\n
\n

Snatch blocks are available with three common attachments: swivel hook with latch, swivel shackle and chain end with grab hook. Each serves its own unique purpose, depending on the type of application and equipment being used. For this blog, we will focus on usage in the towing and recovery industry.

\n

On a car carrier, a chain link or hook end can be inserted into the keyhole slot on the tailboard to change the direction of the winch line. This is particularly useful when the tow operator is looking to keep a lane of travel open while recovering a casualty from a roadside ditch or tight parking lot.

\n
\n
\n

For example, the other two types of snatch block ends are typically used during heavy-duty recoveries. If the operator is looking to lower the angle of the pull and create downward pressure. This winch line redirection is especially useful while responding to a vehicle rollover or uprighting a tractor-trailer.

\n

“Many tow operators will attach a snatch block to a lower point like a D-ring, stiff leg or wheel lift on their own truck to get the angle pulling down for a rollover situation, versus going straight off the end of their wrecker boom,” explained Ed Peichel, a product sales representative at Zip’s AW Direct.

\n

Safety Always

\n

Besides routine maintenance, operators should position themselves away from the direction of the pull whenever possible during operation for safety in case a winch line should fail. To avoid failure caused by misuse, users should never exceed the rated capacity of the winch line and snatch block.

\n

Capacities typically range from 2 tons to 22 tons, and pulley diameters range from 3 inches to 12 inches. In general, the larger the diameter, the greater the working load limit (WLL), although some pulley sizes can handle multiple WLL ratings. See the chart below for examples of common snatch block sizes in relation to WLL.

\n\n\n\n\n\n\n\n\n\n\n\n\n\n\n\n\n\n\n\n\n\n\n\n\n\n\n\n\n\n
Pulley DiameterWLL
3\"4,000 lbs.
4\"8,000 lbs.
6\"16,000 lbs.
8\"30,000 lbs.
10\"30,000 lbs.
\n

By running winch lines back through snatch blocks, operators can also increase the capacity of their winch lines. Oftentimes this doubles the pulling force. Again, users should refer to their equipment operating manuals and rated capacities to avoid overloading.

\n

“Always calculate the resistance of your pull and use proper rigging to both the casualty and your equipment,” Peichel said.

\n

Best Practices

\n

Snatch blocks are a great tool in towing and recovery scenarios, for recreational use and for overhead lifting applications. Here are a few tips to follow to ensure you get the most of your investment and prevent unintended damage or injury.

\n
    \n
  1. Inspect prior to using your snatch blocks
  2. \n
  3. Lubricate pulley as needed
  4. \n
  5. Protect against the elements
  6. \n
  7. Stand away from winch line & anchor points
  8. \n
  9. Do not exceed rated capacity
  10. \n
  11. Refer to equipment manuals for proper usage
  12. \n
","rss_summary":"

Snatch blocks are essential rigging and recovery tools. Available in a wide selection of sizes and capacities, these sheaves and attachments provide a critical pivot point to change the angle and direction of a pull or increase the load capacity of a winch line.

\n","rss_body":"

Snatch blocks are essential rigging and recovery tools. Available in a wide selection of sizes and capacities, these sheaves and attachments provide a critical pivot point to change the angle and direction of a pull or increase the load capacity of a winch line.

\n\n

Snatch blocks are for use in the recreational market, towing and recovery industry, overhead crane operations and many other industrial applications. They are compatible with both synthetic line and steel cable. Each snatch block is dual labeled with its pulling capacity and acceptable rope size.

\n
\n
\n

\"zsb8t6-4-zips-snatch-block-swivel-hook-8ton-6inch-low-res\"

\n
\n
\n

\"zsb2t3sw-zips-snatch-block-swiv-shackle-low-res-2\"

\n
\n
\n

Moving Parts

\n
\n
\n

Traditional snatch blocks consist of a single pulley or sheave protected by two outer teardrop-shaped side plates.

\n

A release pin with a cotter key sandwiches the plates together over the pulley. To insert the winch cable or line, the pin is removed by turning the nut counterclockwise by hand. This allows access to the inner pulley. Be sure to reinsert the cotter key after screwing the plates back together.

\n

Most snatch blocks come equipped with bronze bushings for longevity and smooth operation. To aid in routine preventative maintenance, a grease zerk is located on the outside of the center sheave pin. Weekly lubrication is suggested.

\n

Daily inspection of each snatch block is recommended prior to use. Snatch blocks should also be stored inside a toolbox or compartment to protect them from the elements when not in use.

\n
\n
\n

\"SnatchBlock_Parts_Diagram\"

\n
\n
\n

Common Attachments

\n
\n
\n

\"snatch-block-blog-hero-1\"

\n
\n
\n

Snatch blocks are available with three common attachments: swivel hook with latch, swivel shackle and chain end with grab hook. Each serves its own unique purpose, depending on the type of application and equipment being used. For this blog, we will focus on usage in the towing and recovery industry.

\n

On a car carrier, a chain link or hook end can be inserted into the keyhole slot on the tailboard to change the direction of the winch line. This is particularly useful when the tow operator is looking to keep a lane of travel open while recovering a casualty from a roadside ditch or tight parking lot.

\n
\n
\n

For example, the other two types of snatch block ends are typically used during heavy-duty recoveries. If the operator is looking to lower the angle of the pull and create downward pressure. This winch line redirection is especially useful while responding to a vehicle rollover or uprighting a tractor-trailer.

\n

“Many tow operators will attach a snatch block to a lower point like a D-ring, stiff leg or wheel lift on their own truck to get the angle pulling down for a rollover situation, versus going straight off the end of their wrecker boom,” explained Ed Peichel, a product sales representative at Zip’s AW Direct.

\n

Safety Always

\n

Besides routine maintenance, operators should position themselves away from the direction of the pull whenever possible during operation for safety in case a winch line should fail. To avoid failure caused by misuse, users should never exceed the rated capacity of the winch line and snatch block.

\n

Capacities typically range from 2 tons to 22 tons, and pulley diameters range from 3 inches to 12 inches. In general, the larger the diameter, the greater the working load limit (WLL), although some pulley sizes can handle multiple WLL ratings. See the chart below for examples of common snatch block sizes in relation to WLL.

\n\n\n\n\n\n\n\n\n\n\n\n\n\n\n\n\n\n\n\n\n\n\n\n\n\n\n\n\n\n
Pulley DiameterWLL
3\"4,000 lbs.
4\"8,000 lbs.
6\"16,000 lbs.
8\"30,000 lbs.
10\"30,000 lbs.
\n

By running winch lines back through snatch blocks, operators can also increase the capacity of their winch lines. Oftentimes this doubles the pulling force. Again, users should refer to their equipment operating manuals and rated capacities to avoid overloading.

\n

“Always calculate the resistance of your pull and use proper rigging to both the casualty and your equipment,” Peichel said.

\n

Best Practices

\n

Snatch blocks are a great tool in towing and recovery scenarios, for recreational use and for overhead lifting applications. Here are a few tips to follow to ensure you get the most of your investment and prevent unintended damage or injury.

\n
    \n
  1. Inspect prior to using your snatch blocks
  2. \n
  3. Lubricate pulley as needed
  4. \n
  5. Protect against the elements
  6. \n
  7. Stand away from winch line & anchor points
  8. \n
  9. Do not exceed rated capacity
  10. \n
  11. Refer to equipment manuals for proper usage
  12. \n
","enable_google_amp_output_override":false,"generate_json_ld_enabled":true,"blog_post_schedule_task_uid":null,"blog_publish_to_social_media_task":"DONE_NOT_SENT","blog_publish_instant_email_task_uid":null,"blog_publish_instant_email_campaign_id":null,"blog_publish_instant_email_retry_count":null,"keywords":[],"composition_id":0,"is_crawlable_by_bots":false,"header":null,"published_at":1756216989543,"head_html":"","footer_html":null,"attached_stylesheets":[],"enable_domain_stylesheets":null,"include_default_custom_css":null,"layout_sections":{},"past_mab_experiment_ids":[],"deleted_by":null,"featured_image_alt_text":"","enable_layout_stylesheets":null,"tweet":null,"tweet_at":null,"campaign_name":null,"campaign_utm":null,"meta_keywords":null,"meta_description":"Learn about snatch blocks, their uses in rigging and recovery, key components, maintenance, safety precautions, and best practices to maximize performance and prevent damage or injury.","tweet_immediately":false,"publish_immediately":true,"security_state":"NONE","scheduled_update_date":0,"placement_guids":[],"header_template_path":null,"header_variant_name":null,"footer_template_path":null,"footer_variant_name":null,"global_block_overrides":{},"property_for_dynamic_page_title":null,"property_for_dynamic_page_slug":null,"property_for_dynamic_page_meta_description":null,"property_for_dynamic_page_featured_image":null,"property_for_dynamic_page_canonical_url":null,"preview_image_src":null,"legacy_blog_tabid":null,"legacy_post_guid":null,"performable_variation_letter":null,"style_override_id":null,"has_user_changes":true,"css":{},"css_text":"","unpublished_at":0,"published_by_id":76755706,"allowed_slug_conflict":false,"ai_features":null,"link_rel_canonical_url":"","page_redirected":false,"page_expiry_enabled":null,"page_expiry_date":null,"page_expiry_redirect_id":null,"page_expiry_redirect_url":null,"deleted_by_id":null,"state_when_deleted":null,"cloned_from":null,"staged_from":null,"personas":[],"compose_body":null,"featured_image":"https://48463649.fs1.hubspotusercontent-na1.net/hubfs/48463649/Blog/snatch-blocks-cover-photo-march-2022-hi-res-11-zips-blog.jpg","featured_image_width":955,"featured_image_height":358,"publish_timezone_offset":null,"theme_settings_values":null,"password":null,"last_edit_session_id":null,"last_edit_update_id":null,"created_by_agent":null},"metaDescription":"Learn about snatch blocks, their uses in rigging and recovery, key components, maintenance, safety precautions, and best practices to maximize performance and prevent damage or injury.","metaKeywords":null,"name":"Get to Know Snatch Blocks: Their Uses, Parts and Care.","nextPostFeaturedImage":"https://48463649.fs1.hubspotusercontent-na1.net/hubfs/48463649/Blog/jump-pack-collage-feb-2020-11139181980.jpg","nextPostFeaturedImageAltText":"","nextPostName":"Batteries don’t like the cold weather either","nextPostSlug":"blog/batteries-don-t-like-the-cold-weather-either","pageExpiryDate":null,"pageExpiryEnabled":null,"pageExpiryRedirectId":null,"pageExpiryRedirectUrl":null,"pageRedirected":false,"pageTitle":"Get to Know Snatch Blocks: Their Uses, Parts and Care.","parentBlog":{"absoluteUrl":"/blog","allowComments":true,"ampBodyColor":"#404040","ampBodyFont":"'Helvetica Neue', Helvetica, Arial, sans-serif","ampBodyFontSize":"18","ampCustomCss":"","ampHeaderBackgroundColor":"#ffffff","ampHeaderColor":"#1e1e1e","ampHeaderFont":"'Helvetica Neue', Helvetica, Arial, sans-serif","ampHeaderFontSize":"36","ampLinkColor":"#416bb3","ampLogoAlt":"","ampLogoHeight":0,"ampLogoSrc":"","ampLogoWidth":0,"analyticsPageId":190096341139,"attachedStylesheets":[],"audienceAccess":"PUBLIC","businessUnitId":null,"captchaAfterDays":7,"captchaAlways":false,"categoryId":3,"cdnPurgeEmbargoTime":null,"closeCommentsOlder":0,"commentDateFormat":"medium","commentFormGuid":"a4128401-39db-4c54-a62b-88ff335d3a69","commentMaxThreadDepth":1,"commentModeration":false,"commentNotificationEmails":[],"commentShouldCreateContact":false,"commentVerificationText":"","cosObjectType":"BLOG","created":1747163443999,"createdDateTime":1747163443999,"dailyNotificationEmailId":null,"dateFormattingLanguage":null,"defaultGroupStyleId":"","defaultNotificationFromName":"","defaultNotificationReplyTo":"","deletedAt":0,"description":"","domain":"","domainWhenPublished":"www.zips.com","emailApiSubscriptionId":null,"enableGoogleAmpOutput":true,"enableSocialAutoPublishing":false,"generateJsonLdEnabled":true,"header":null,"htmlFooter":"","htmlFooterIsShared":true,"htmlHead":"","htmlHeadIsShared":true,"htmlKeywords":[],"htmlTitle":"blog","id":190096341139,"ilsSubscriptionListsByType":{},"instantNotificationEmailId":null,"itemLayoutId":null,"itemTemplateIsShared":false,"itemTemplatePath":"zips-basic-theme/templates/blog-post.html","label":"blog","language":"en","legacyGuid":null,"legacyModuleId":null,"legacyTabId":null,"listingLayoutId":null,"listingPageId":190096341141,"listingTemplatePath":"","liveDomain":"www.zips.com","monthFilterFormat":"MMMM yyyy","monthlyNotificationEmailId":null,"name":"blog","parentBlogUpdateTaskId":null,"portalId":48463649,"postHtmlFooter":"","postHtmlHead":"","postsPerListingPage":111,"postsPerRssFeed":10,"publicAccessRules":[],"publicAccessRulesEnabled":false,"publicTitle":"blog","publishDateFormat":"medium","resolvedDomain":"www.zips.com","rootUrl":"/blog","rssCustomFeed":null,"rssDescription":null,"rssItemFooter":null,"rssItemHeader":null,"settingsOverrides":{"itemLayoutId":false,"itemTemplatePath":false,"itemTemplateIsShared":false,"listingLayoutId":false,"listingTemplatePath":false,"postsPerListingPage":false,"showSummaryInListing":false,"useFeaturedImageInSummary":false,"htmlHead":false,"postHtmlHead":false,"htmlHeadIsShared":false,"htmlFooter":false,"listingPageHtmlFooter":false,"postHtmlFooter":false,"htmlFooterIsShared":false,"attachedStylesheets":false,"postsPerRssFeed":false,"showSummaryInRss":false,"showSummaryInEmails":false,"showSummariesInEmails":false,"allowComments":false,"commentShouldCreateContact":false,"commentModeration":false,"closeCommentsOlder":false,"commentNotificationEmails":false,"commentMaxThreadDepth":false,"commentVerificationText":false,"socialAccountTwitter":false,"showSocialLinkTwitter":false,"showSocialLinkLinkedin":false,"showSocialLinkFacebook":false,"enableGoogleAmpOutput":false,"ampLogoSrc":false,"ampLogoHeight":false,"ampLogoWidth":false,"ampLogoAlt":false,"ampHeaderFont":false,"ampHeaderFontSize":false,"ampHeaderColor":false,"ampHeaderBackgroundColor":false,"ampBodyFont":false,"ampBodyFontSize":false,"ampBodyColor":false,"ampLinkColor":false,"generateJsonLdEnabled":false},"showSocialLinkFacebook":true,"showSocialLinkLinkedin":true,"showSocialLinkTwitter":true,"showSummaryInEmails":true,"showSummaryInListing":true,"showSummaryInRss":true,"siteId":null,"slug":"blog","socialAccountTwitter":"","state":null,"subscriptionContactsProperty":null,"subscriptionEmailType":null,"subscriptionFormGuid":null,"subscriptionListsByType":{},"title":null,"translatedFromId":null,"translations":{},"updated":1755110916417,"updatedDateTime":1755110916417,"urlBase":"www.zips.com/blog","urlSegments":{"all":"all","archive":"archive","author":"author","page":"page","tag":"tag"},"useFeaturedImageInSummary":true,"usesDefaultTemplate":false,"weeklyNotificationEmailId":null},"password":null,"pastMabExperimentIds":[],"performableGuid":null,"performableVariationLetter":null,"personalizationStrategyId":null,"personalizationVariantStatus":null,"personas":[],"placementGuids":[],"portableKey":null,"portalId":48463649,"position":null,"postBody":"

Snatch blocks are essential rigging and recovery tools. Available in a wide selection of sizes and capacities, these sheaves and attachments provide a critical pivot point to change the angle and direction of a pull or increase the load capacity of a winch line.

\n\n

Snatch blocks are for use in the recreational market, towing and recovery industry, overhead crane operations and many other industrial applications. They are compatible with both synthetic line and steel cable. Each snatch block is dual labeled with its pulling capacity and acceptable rope size.

\n
\n
\n

\"zsb8t6-4-zips-snatch-block-swivel-hook-8ton-6inch-low-res\"

\n
\n
\n

\"zsb2t3sw-zips-snatch-block-swiv-shackle-low-res-2\"

\n
\n
\n

Moving Parts

\n
\n
\n

Traditional snatch blocks consist of a single pulley or sheave protected by two outer teardrop-shaped side plates.

\n

A release pin with a cotter key sandwiches the plates together over the pulley. To insert the winch cable or line, the pin is removed by turning the nut counterclockwise by hand. This allows access to the inner pulley. Be sure to reinsert the cotter key after screwing the plates back together.

\n

Most snatch blocks come equipped with bronze bushings for longevity and smooth operation. To aid in routine preventative maintenance, a grease zerk is located on the outside of the center sheave pin. Weekly lubrication is suggested.

\n

Daily inspection of each snatch block is recommended prior to use. Snatch blocks should also be stored inside a toolbox or compartment to protect them from the elements when not in use.

\n
\n
\n

\"SnatchBlock_Parts_Diagram\"

\n
\n
\n

Common Attachments

\n
\n
\n

\"snatch-block-blog-hero-1\"

\n
\n
\n

Snatch blocks are available with three common attachments: swivel hook with latch, swivel shackle and chain end with grab hook. Each serves its own unique purpose, depending on the type of application and equipment being used. For this blog, we will focus on usage in the towing and recovery industry.

\n

On a car carrier, a chain link or hook end can be inserted into the keyhole slot on the tailboard to change the direction of the winch line. This is particularly useful when the tow operator is looking to keep a lane of travel open while recovering a casualty from a roadside ditch or tight parking lot.

\n
\n
\n

For example, the other two types of snatch block ends are typically used during heavy-duty recoveries. If the operator is looking to lower the angle of the pull and create downward pressure. This winch line redirection is especially useful while responding to a vehicle rollover or uprighting a tractor-trailer.

\n

“Many tow operators will attach a snatch block to a lower point like a D-ring, stiff leg or wheel lift on their own truck to get the angle pulling down for a rollover situation, versus going straight off the end of their wrecker boom,” explained Ed Peichel, a product sales representative at Zip’s AW Direct.

\n

Safety Always

\n

Besides routine maintenance, operators should position themselves away from the direction of the pull whenever possible during operation for safety in case a winch line should fail. To avoid failure caused by misuse, users should never exceed the rated capacity of the winch line and snatch block.

\n

Capacities typically range from 2 tons to 22 tons, and pulley diameters range from 3 inches to 12 inches. In general, the larger the diameter, the greater the working load limit (WLL), although some pulley sizes can handle multiple WLL ratings. See the chart below for examples of common snatch block sizes in relation to WLL.

\n\n\n\n\n\n\n\n\n\n\n\n\n\n\n\n\n\n\n\n\n\n\n\n\n\n\n\n\n\n
Pulley DiameterWLL
3\"4,000 lbs.
4\"8,000 lbs.
6\"16,000 lbs.
8\"30,000 lbs.
10\"30,000 lbs.
\n

By running winch lines back through snatch blocks, operators can also increase the capacity of their winch lines. Oftentimes this doubles the pulling force. Again, users should refer to their equipment operating manuals and rated capacities to avoid overloading.

\n

“Always calculate the resistance of your pull and use proper rigging to both the casualty and your equipment,” Peichel said.

\n

Best Practices

\n

Snatch blocks are a great tool in towing and recovery scenarios, for recreational use and for overhead lifting applications. Here are a few tips to follow to ensure you get the most of your investment and prevent unintended damage or injury.

\n
    \n
  1. Inspect prior to using your snatch blocks
  2. \n
  3. Lubricate pulley as needed
  4. \n
  5. Protect against the elements
  6. \n
  7. Stand away from winch line & anchor points
  8. \n
  9. Do not exceed rated capacity
  10. \n
  11. Refer to equipment manuals for proper usage
  12. \n
","postBodyRss":"

Snatch blocks are essential rigging and recovery tools. Available in a wide selection of sizes and capacities, these sheaves and attachments provide a critical pivot point to change the angle and direction of a pull or increase the load capacity of a winch line.

\n\n

Snatch blocks are for use in the recreational market, towing and recovery industry, overhead crane operations and many other industrial applications. They are compatible with both synthetic line and steel cable. Each snatch block is dual labeled with its pulling capacity and acceptable rope size.

\n
\n
\n

\"zsb8t6-4-zips-snatch-block-swivel-hook-8ton-6inch-low-res\"

\n
\n
\n

\"zsb2t3sw-zips-snatch-block-swiv-shackle-low-res-2\"

\n
\n
\n

Moving Parts

\n
\n
\n

Traditional snatch blocks consist of a single pulley or sheave protected by two outer teardrop-shaped side plates.

\n

A release pin with a cotter key sandwiches the plates together over the pulley. To insert the winch cable or line, the pin is removed by turning the nut counterclockwise by hand. This allows access to the inner pulley. Be sure to reinsert the cotter key after screwing the plates back together.

\n

Most snatch blocks come equipped with bronze bushings for longevity and smooth operation. To aid in routine preventative maintenance, a grease zerk is located on the outside of the center sheave pin. Weekly lubrication is suggested.

\n

Daily inspection of each snatch block is recommended prior to use. Snatch blocks should also be stored inside a toolbox or compartment to protect them from the elements when not in use.

\n
\n
\n

\"SnatchBlock_Parts_Diagram\"

\n
\n
\n

Common Attachments

\n
\n
\n

\"snatch-block-blog-hero-1\"

\n
\n
\n

Snatch blocks are available with three common attachments: swivel hook with latch, swivel shackle and chain end with grab hook. Each serves its own unique purpose, depending on the type of application and equipment being used. For this blog, we will focus on usage in the towing and recovery industry.

\n

On a car carrier, a chain link or hook end can be inserted into the keyhole slot on the tailboard to change the direction of the winch line. This is particularly useful when the tow operator is looking to keep a lane of travel open while recovering a casualty from a roadside ditch or tight parking lot.

\n
\n
\n

For example, the other two types of snatch block ends are typically used during heavy-duty recoveries. If the operator is looking to lower the angle of the pull and create downward pressure. This winch line redirection is especially useful while responding to a vehicle rollover or uprighting a tractor-trailer.

\n

“Many tow operators will attach a snatch block to a lower point like a D-ring, stiff leg or wheel lift on their own truck to get the angle pulling down for a rollover situation, versus going straight off the end of their wrecker boom,” explained Ed Peichel, a product sales representative at Zip’s AW Direct.

\n

Safety Always

\n

Besides routine maintenance, operators should position themselves away from the direction of the pull whenever possible during operation for safety in case a winch line should fail. To avoid failure caused by misuse, users should never exceed the rated capacity of the winch line and snatch block.

\n

Capacities typically range from 2 tons to 22 tons, and pulley diameters range from 3 inches to 12 inches. In general, the larger the diameter, the greater the working load limit (WLL), although some pulley sizes can handle multiple WLL ratings. See the chart below for examples of common snatch block sizes in relation to WLL.

\n\n\n\n\n\n\n\n\n\n\n\n\n\n\n\n\n\n\n\n\n\n\n\n\n\n\n\n\n\n
Pulley DiameterWLL
3\"4,000 lbs.
4\"8,000 lbs.
6\"16,000 lbs.
8\"30,000 lbs.
10\"30,000 lbs.
\n

By running winch lines back through snatch blocks, operators can also increase the capacity of their winch lines. Oftentimes this doubles the pulling force. Again, users should refer to their equipment operating manuals and rated capacities to avoid overloading.

\n

“Always calculate the resistance of your pull and use proper rigging to both the casualty and your equipment,” Peichel said.

\n

Best Practices

\n

Snatch blocks are a great tool in towing and recovery scenarios, for recreational use and for overhead lifting applications. Here are a few tips to follow to ensure you get the most of your investment and prevent unintended damage or injury.

\n
    \n
  1. Inspect prior to using your snatch blocks
  2. \n
  3. Lubricate pulley as needed
  4. \n
  5. Protect against the elements
  6. \n
  7. Stand away from winch line & anchor points
  8. \n
  9. Do not exceed rated capacity
  10. \n
  11. Refer to equipment manuals for proper usage
  12. \n
","postEmailContent":"

Snatch blocks are essential rigging and recovery tools. Available in a wide selection of sizes and capacities, these sheaves and attachments provide a critical pivot point to change the angle and direction of a pull or increase the load capacity of a winch line.

","postFeaturedImageIfEnabled":"https://48463649.fs1.hubspotusercontent-na1.net/hubfs/48463649/Blog/snatch-blocks-cover-photo-march-2022-hi-res-11-zips-blog.jpg","postListContent":"

Snatch blocks are essential rigging and recovery tools. Available in a wide selection of sizes and capacities, these sheaves and attachments provide a critical pivot point to change the angle and direction of a pull or increase the load capacity of a winch line.

","postListSummaryFeaturedImage":"https://48463649.fs1.hubspotusercontent-na1.net/hubfs/48463649/Blog/snatch-blocks-cover-photo-march-2022-hi-res-11-zips-blog.jpg","postRssContent":"

Snatch blocks are essential rigging and recovery tools. Available in a wide selection of sizes and capacities, these sheaves and attachments provide a critical pivot point to change the angle and direction of a pull or increase the load capacity of a winch line.

","postRssSummaryFeaturedImage":"https://48463649.fs1.hubspotusercontent-na1.net/hubfs/48463649/Blog/snatch-blocks-cover-photo-march-2022-hi-res-11-zips-blog.jpg","postSummary":"

Snatch blocks are essential rigging and recovery tools. Available in a wide selection of sizes and capacities, these sheaves and attachments provide a critical pivot point to change the angle and direction of a pull or increase the load capacity of a winch line.

\n","postSummaryRss":"

Snatch blocks are essential rigging and recovery tools. Available in a wide selection of sizes and capacities, these sheaves and attachments provide a critical pivot point to change the angle and direction of a pull or increase the load capacity of a winch line.

","postTemplate":"zips-basic-theme/templates/blog-post.html","previewImageSrc":null,"previewKey":"DRmvwNsF","previousPostFeaturedImage":"https://48463649.fs1.hubspotusercontent-na1.net/hubfs/48463649/Blog/17121-hd-wrecker-black-mar2021-hi-res-23-400x350.png","previousPostFeaturedImageAltText":"","previousPostName":"Types of Winch Lines: Synthetic vs. Steel","previousPostSlug":"blog/types-of-winch-lines-synthetic-vs-steel","processingStatus":"PUBLISHED","propertyForDynamicPageCanonicalUrl":null,"propertyForDynamicPageFeaturedImage":null,"propertyForDynamicPageMetaDescription":null,"propertyForDynamicPageSlug":null,"propertyForDynamicPageTitle":null,"publicAccessRules":[],"publicAccessRulesEnabled":false,"publishDate":1646661600000,"publishDateLocalTime":1646661600000,"publishDateLocalized":{"date":1646661600000,"format":"medium","language":null},"publishImmediately":true,"publishTimezoneOffset":null,"publishedAt":1756216989543,"publishedByEmail":null,"publishedById":76755706,"publishedByName":null,"publishedUrl":"/blog/get-to-know-snatch-blocks-their-uses-parts-and-care","resolvedDomain":"www.zips.com","resolvedLanguage":null,"rssBody":"

Snatch blocks are essential rigging and recovery tools. Available in a wide selection of sizes and capacities, these sheaves and attachments provide a critical pivot point to change the angle and direction of a pull or increase the load capacity of a winch line.

\n\n

Snatch blocks are for use in the recreational market, towing and recovery industry, overhead crane operations and many other industrial applications. They are compatible with both synthetic line and steel cable. Each snatch block is dual labeled with its pulling capacity and acceptable rope size.

\n
\n
\n

\"zsb8t6-4-zips-snatch-block-swivel-hook-8ton-6inch-low-res\"

\n
\n
\n

\"zsb2t3sw-zips-snatch-block-swiv-shackle-low-res-2\"

\n
\n
\n

Moving Parts

\n
\n
\n

Traditional snatch blocks consist of a single pulley or sheave protected by two outer teardrop-shaped side plates.

\n

A release pin with a cotter key sandwiches the plates together over the pulley. To insert the winch cable or line, the pin is removed by turning the nut counterclockwise by hand. This allows access to the inner pulley. Be sure to reinsert the cotter key after screwing the plates back together.

\n

Most snatch blocks come equipped with bronze bushings for longevity and smooth operation. To aid in routine preventative maintenance, a grease zerk is located on the outside of the center sheave pin. Weekly lubrication is suggested.

\n

Daily inspection of each snatch block is recommended prior to use. Snatch blocks should also be stored inside a toolbox or compartment to protect them from the elements when not in use.

\n
\n
\n

\"SnatchBlock_Parts_Diagram\"

\n
\n
\n

Common Attachments

\n
\n
\n

\"snatch-block-blog-hero-1\"

\n
\n
\n

Snatch blocks are available with three common attachments: swivel hook with latch, swivel shackle and chain end with grab hook. Each serves its own unique purpose, depending on the type of application and equipment being used. For this blog, we will focus on usage in the towing and recovery industry.

\n

On a car carrier, a chain link or hook end can be inserted into the keyhole slot on the tailboard to change the direction of the winch line. This is particularly useful when the tow operator is looking to keep a lane of travel open while recovering a casualty from a roadside ditch or tight parking lot.

\n
\n
\n

For example, the other two types of snatch block ends are typically used during heavy-duty recoveries. If the operator is looking to lower the angle of the pull and create downward pressure. This winch line redirection is especially useful while responding to a vehicle rollover or uprighting a tractor-trailer.

\n

“Many tow operators will attach a snatch block to a lower point like a D-ring, stiff leg or wheel lift on their own truck to get the angle pulling down for a rollover situation, versus going straight off the end of their wrecker boom,” explained Ed Peichel, a product sales representative at Zip’s AW Direct.

\n

Safety Always

\n

Besides routine maintenance, operators should position themselves away from the direction of the pull whenever possible during operation for safety in case a winch line should fail. To avoid failure caused by misuse, users should never exceed the rated capacity of the winch line and snatch block.

\n

Capacities typically range from 2 tons to 22 tons, and pulley diameters range from 3 inches to 12 inches. In general, the larger the diameter, the greater the working load limit (WLL), although some pulley sizes can handle multiple WLL ratings. See the chart below for examples of common snatch block sizes in relation to WLL.

\n\n\n\n\n\n\n\n\n\n\n\n\n\n\n\n\n\n\n\n\n\n\n\n\n\n\n\n\n\n
Pulley DiameterWLL
3\"4,000 lbs.
4\"8,000 lbs.
6\"16,000 lbs.
8\"30,000 lbs.
10\"30,000 lbs.
\n

By running winch lines back through snatch blocks, operators can also increase the capacity of their winch lines. Oftentimes this doubles the pulling force. Again, users should refer to their equipment operating manuals and rated capacities to avoid overloading.

\n

“Always calculate the resistance of your pull and use proper rigging to both the casualty and your equipment,” Peichel said.

\n

Best Practices

\n

Snatch blocks are a great tool in towing and recovery scenarios, for recreational use and for overhead lifting applications. Here are a few tips to follow to ensure you get the most of your investment and prevent unintended damage or injury.

\n
    \n
  1. Inspect prior to using your snatch blocks
  2. \n
  3. Lubricate pulley as needed
  4. \n
  5. Protect against the elements
  6. \n
  7. Stand away from winch line & anchor points
  8. \n
  9. Do not exceed rated capacity
  10. \n
  11. Refer to equipment manuals for proper usage
  12. \n
","rssSummary":"

Snatch blocks are essential rigging and recovery tools. Available in a wide selection of sizes and capacities, these sheaves and attachments provide a critical pivot point to change the angle and direction of a pull or increase the load capacity of a winch line.

\n","rssSummaryFeaturedImage":"https://48463649.fs1.hubspotusercontent-na1.net/hubfs/48463649/Blog/snatch-blocks-cover-photo-march-2022-hi-res-11-zips-blog.jpg","scheduledUpdateDate":0,"screenshotPreviewTakenAt":1770559388782,"screenshotPreviewUrl":"https://cdn1.hubspot.net/hubshotv3/prod/e/0/2d29b1db-5bc9-4066-9c55-02e1b649bfa8.png","sections":{},"securityState":"NONE","siteId":null,"slug":"blog/get-to-know-snatch-blocks-their-uses-parts-and-care","stagedFrom":null,"state":"PUBLISHED","stateWhenDeleted":null,"structuredContentPageType":null,"structuredContentType":null,"styleOverrideId":null,"subcategory":"normal_blog_post","syncedWithBlogRoot":true,"tagIds":[192169769490,192174528148,192174529697,194719179289,194719586666],"tagList":[{"categoryId":3,"cdnPurgeEmbargoTime":null,"contentIds":[],"cosObjectType":"TAG","created":1751598346713,"deletedAt":0,"description":"","id":192169769490,"label":"Towing & Recovery","language":null,"name":"Towing & Recovery","portalId":48463649,"slug":"towing-recovery","translatedFromId":null,"translations":{},"updated":1751598346713},{"categoryId":3,"cdnPurgeEmbargoTime":null,"contentIds":[],"cosObjectType":"TAG","created":1751601475164,"deletedAt":0,"description":"","id":192174528148,"label":"Automotive","language":null,"name":"Automotive","portalId":48463649,"slug":"automotive","translatedFromId":null,"translations":{},"updated":1751601475164},{"categoryId":3,"cdnPurgeEmbargoTime":null,"contentIds":[],"cosObjectType":"TAG","created":1751602285139,"deletedAt":0,"description":"","id":192174529697,"label":"Construction","language":null,"name":"Construction","portalId":48463649,"slug":"construction","translatedFromId":null,"translations":{},"updated":1751602285139},{"categoryId":3,"cdnPurgeEmbargoTime":null,"contentIds":[],"cosObjectType":"TAG","created":1755545213046,"deletedAt":0,"description":"","id":194719179289,"label":"Industry Knowledge & Updates","language":null,"name":"Industry Knowledge & Updates","portalId":48463649,"slug":"industry-knowledge-updates","translatedFromId":null,"translations":{},"updated":1755545213046},{"categoryId":3,"cdnPurgeEmbargoTime":null,"contentIds":[],"cosObjectType":"TAG","created":1755545331471,"deletedAt":0,"description":"","id":194719586666,"label":"Product Guides","language":null,"name":"Product Guides","portalId":48463649,"slug":"product-guides","translatedFromId":null,"translations":{},"updated":1755545331471}],"tagNames":["Towing & Recovery","Automotive","Construction","Industry Knowledge & Updates","Product Guides"],"teamPerms":[],"templatePath":"","templatePathForRender":"zips-basic-theme/templates/blog-post.html","textToAudioFileId":null,"textToAudioGenerationRequestId":null,"themePath":null,"themeSettingsValues":null,"title":"Get to Know Snatch Blocks: Their Uses, Parts and Care.","tmsId":null,"topicIds":[192169769490,192174528148,192174529697,194719179289,194719586666],"topicList":[{"categoryId":3,"cdnPurgeEmbargoTime":null,"contentIds":[],"cosObjectType":"TAG","created":1751598346713,"deletedAt":0,"description":"","id":192169769490,"label":"Towing & Recovery","language":null,"name":"Towing & Recovery","portalId":48463649,"slug":"towing-recovery","translatedFromId":null,"translations":{},"updated":1751598346713},{"categoryId":3,"cdnPurgeEmbargoTime":null,"contentIds":[],"cosObjectType":"TAG","created":1751601475164,"deletedAt":0,"description":"","id":192174528148,"label":"Automotive","language":null,"name":"Automotive","portalId":48463649,"slug":"automotive","translatedFromId":null,"translations":{},"updated":1751601475164},{"categoryId":3,"cdnPurgeEmbargoTime":null,"contentIds":[],"cosObjectType":"TAG","created":1751602285139,"deletedAt":0,"description":"","id":192174529697,"label":"Construction","language":null,"name":"Construction","portalId":48463649,"slug":"construction","translatedFromId":null,"translations":{},"updated":1751602285139},{"categoryId":3,"cdnPurgeEmbargoTime":null,"contentIds":[],"cosObjectType":"TAG","created":1755545213046,"deletedAt":0,"description":"","id":194719179289,"label":"Industry Knowledge & Updates","language":null,"name":"Industry Knowledge & Updates","portalId":48463649,"slug":"industry-knowledge-updates","translatedFromId":null,"translations":{},"updated":1755545213046},{"categoryId":3,"cdnPurgeEmbargoTime":null,"contentIds":[],"cosObjectType":"TAG","created":1755545331471,"deletedAt":0,"description":"","id":194719586666,"label":"Product Guides","language":null,"name":"Product Guides","portalId":48463649,"slug":"product-guides","translatedFromId":null,"translations":{},"updated":1755545331471}],"topicNames":["Towing & Recovery","Automotive","Construction","Industry Knowledge & Updates","Product Guides"],"topics":[192169769490,192174528148,192174529697,194719179289,194719586666],"translatedContent":{},"translatedFromId":null,"translations":{},"tweet":null,"tweetAt":null,"tweetImmediately":false,"unpublishedAt":0,"updated":1756216989547,"updatedById":76755706,"upsizeFeaturedImage":false,"url":"/blog/get-to-know-snatch-blocks-their-uses-parts-and-care","useFeaturedImage":true,"userPerms":[],"views":null,"visibleToAll":null,"widgetContainers":{},"widgetcontainers":{},"widgets":{}},{"ab":false,"abStatus":null,"abTestId":null,"abVariation":false,"abVariationAutomated":false,"absoluteUrl":"/blog/batteries-don-t-like-the-cold-weather-either","afterPostBody":null,"aifeatures":null,"allowedSlugConflict":false,"analytics":null,"analyticsPageId":"192169769855","analyticsPageType":"blog-post","approvalStatus":null,"archived":false,"archivedAt":0,"archivedInDashboard":false,"areCommentsAllowed":true,"attachedStylesheets":[],"audienceAccess":"PUBLIC","author":null,"authorName":null,"authorUsername":null,"blogAuthor":{"avatar":"","bio":"","cdnPurgeEmbargoTime":null,"cosObjectType":"BLOG_AUTHOR","created":1755187092136,"deletedAt":0,"displayName":"Cameron Hanson","email":null,"facebook":"","fullName":"Cameron Hanson","gravatarUrl":null,"hasSocialProfiles":false,"id":194499322288,"label":"Cameron Hanson","language":"en","linkedin":"","name":" Cameron Hanson","portalId":48463649,"slug":"cameron-hanson","translatedFromId":null,"translations":{},"twitter":"","twitterUsername":"","updated":1755187092136,"userId":null,"username":null,"website":""},"blogAuthorId":194499322288,"blogAuthorIdList":[194499322288],"blogAuthorList":[{"avatar":"","bio":"","cdnPurgeEmbargoTime":null,"cosObjectType":"BLOG_AUTHOR","created":1755187092136,"deletedAt":0,"displayName":"Cameron Hanson","email":null,"facebook":"","fullName":"Cameron Hanson","gravatarUrl":null,"hasSocialProfiles":false,"id":194499322288,"label":"Cameron Hanson","language":"en","linkedin":"","name":" Cameron Hanson","portalId":48463649,"slug":"cameron-hanson","translatedFromId":null,"translations":{},"twitter":"","twitterUsername":"","updated":1755187092136,"userId":null,"username":null,"website":""}],"blogPostAuthor":{"avatar":"","bio":"","cdnPurgeEmbargoTime":null,"cosObjectType":"BLOG_AUTHOR","created":1755187092136,"deletedAt":0,"displayName":"Cameron Hanson","email":null,"facebook":"","fullName":"Cameron Hanson","gravatarUrl":null,"hasSocialProfiles":false,"id":194499322288,"label":"Cameron Hanson","language":"en","linkedin":"","name":" Cameron Hanson","portalId":48463649,"slug":"cameron-hanson","translatedFromId":null,"translations":{},"twitter":"","twitterUsername":"","updated":1755187092136,"userId":null,"username":null,"website":""},"blogPostScheduleTaskUid":null,"blogPublishInstantEmailCampaignId":null,"blogPublishInstantEmailRetryCount":null,"blogPublishInstantEmailTaskUid":null,"blogPublishToSocialMediaTask":"DONE_NOT_SENT","blueprintTypeId":0,"businessUnitId":null,"campaign":null,"campaignName":null,"campaignUtm":null,"category":3,"categoryId":3,"cdnPurgeEmbargoTime":null,"checkPostLevelAudienceAccessFirst":true,"clonedFrom":null,"composeBody":null,"compositionId":0,"contentAccessRuleIds":[],"contentAccessRuleTypes":[],"contentGroup":190096341139,"contentGroupId":190096341139,"contentTypeCategory":3,"contentTypeCategoryId":3,"contentTypeId":null,"created":1751598580522,"createdByAgent":null,"createdById":74657203,"createdTime":1751598580522,"crmObjectId":null,"css":{},"cssText":"","ctaClicks":null,"ctaViews":null,"currentState":"PUBLISHED","currentlyPublished":true,"deletedAt":0,"deletedBy":null,"deletedByEmail":null,"deletedById":null,"domain":"","dynamicPageDataSourceId":null,"dynamicPageDataSourceType":null,"dynamicPageHubDbTableId":null,"enableDomainStylesheets":null,"enableGoogleAmpOutputOverride":false,"enableLayoutStylesheets":null,"errors":[],"featuredImage":"https://48463649.fs1.hubspotusercontent-na1.net/hubfs/48463649/Blog/jump-pack-collage-feb-2020-11139181980.jpg","featuredImageAltText":"","featuredImageHeight":325,"featuredImageLength":0,"featuredImageWidth":900,"flexAreas":{},"folderId":null,"footerHtml":null,"footerTemplatePath":null,"footerVariantName":null,"freezeDate":1580911200000,"generateJsonLdEnabledOverride":true,"globalBlockOverrides":{},"hasContentAccessRules":false,"hasUserChanges":true,"headHtml":null,"header":null,"headerTemplatePath":null,"headerVariantName":null,"htmlTitle":"Batteries don’t like the cold weather either","id":192169769855,"includeDefaultCustomCss":null,"isCaptchaRequired":true,"isCrawlableByBots":false,"isDraft":false,"isInstantEmailEnabled":false,"isPublished":true,"isSocialPublishingEnabled":false,"keywords":[],"label":"Batteries don’t like the cold weather either","language":"en","lastEditSessionId":null,"lastEditUpdateId":null,"layoutSections":{},"legacyBlogTabid":null,"legacyId":null,"legacyPostGuid":null,"linkRelCanonicalUrl":"","listTemplate":"","liveDomain":"www.zips.com","mab":false,"mabExperimentId":null,"mabMaster":false,"mabVariant":false,"marketingCampaignGuids":[],"meta":{"html_title":"Batteries don’t like the cold weather either","public_access_rules":[],"public_access_rules_enabled":false,"use_featured_image":true,"tag_ids":[192169769490,192174528148,194719179289,194719586666],"topic_ids":[192169769490,192174528148,194719179289,194719586666],"post_summary":"

Be prepared the next time your car won’t start with a jump pack from Zip’s AW Direct. We stock handheld chargers for the consumer, and powerful jump packs for the professional. In today’s blog, we are going to review a few of the models we currently have in stock.

\n","post_body":"

Be prepared the next time your car won’t start with a jump pack from Zip’s AW Direct. We stock handheld chargers for the consumer, and powerful jump packs for the professional. In today’s blog, we are going to review a few of the models we currently have in stock.

\n\n

The first item to consider when purchasing a new jump pack is safety. Look for models with reverse polarity protection. This safeguard prevents usage when the cables are not connected correctly. You should also keep an eye out for battery packs that won’t function when the voltage setting is wrong.

\n

Another factor to look at is cable length, especially with a larger jump pack. Be sure to account for adequate clamp reach so the jump pack can rest safely on the ground. This prevents the pack from teetering on engine components or fenders when the hood is open on the disabled vehicle.

\n

Cable length is also important when connecting to terminals located inside of a vehicle. This keeps the power pack away from interior upholstery and prevents an unnecessary mess. Let’s face it. Jump packs only look new and clean once.

\n

Cranking amps and battery ratings are also important items to research when purchasing a jump pack. Handheld models typically have lithium ion batteries. Their ratings are based on engine size. Larger jump packs with internal lead-acid batteries normally list cranking amps for capacity.

\n

Based on size, here are some of the jump packs Zip’s AW Direct has to offer. Be sure to click on each name to link back to its respective product page for complete details.

\n
    \n
  • \n

    On the smaller scale is one of our newest models, the NOCO GB150 Boost Pro. This 4000-amp unit weighs just 7.5 pounds and can handle up to 80 starts per charge. The USB port can also charge personal electronic devices.

    \n
  • \n\n
  • \n

    Perhaps one of our more popular models is the Jump-N-Carry JNC660 jump starter. This low-cost model features 425 cranking amps and 1700 peak amps. The unit weighs 18 pounds and features a DC outlet to power 12V accessories.

    \n
  • \n
  • \n

    A close cousin to the JNC660 is the JNCAIR, which offers the same capacity as the JNC660 but includes an internal air compressor. You can fill one flat tire under eight minutes and up to four tires on a single charge. The coiled air hose stretches to 12 feet and delivers on-demand air.

    \n
  • \n
  • \n

    Two 12V heavy-duty sealed AGM batteries provide \"Best in Class\" performance for Associated Equipment's 6296 jump starter. This unit features 720 CCA of power and has a three-position \"On/Off\" switch with Easy-to-read LED battery status indicators.

    \n
  • \n
  • \n

    The last battery pack we’re going to look at is the Rescue 2100 from Quick Cable. This commercial-grade model offers 900 12V cranking amps and includes a 15-amp circuit breaker, worklight, and warning flasher. The Rescue 2100 does weigh a little bit more but delivers enough charging power for most applications.

    \n
  • \n
\n

We hope you find this quick overview of jump packs at Zip’s AW Direct useful. To view our entire lineup, click on ‘Jump Start Equipment’ under ‘Roadside Assistance’ under our ‘Products’ section at zips.com.

","rss_summary":"

Be prepared the next time your car won’t start with a jump pack from Zip’s AW Direct. We stock handheld chargers for the consumer, and powerful jump packs for the professional. In today’s blog, we are going to review a few of the models we currently have in stock.

\n","rss_body":"

Be prepared the next time your car won’t start with a jump pack from Zip’s AW Direct. We stock handheld chargers for the consumer, and powerful jump packs for the professional. In today’s blog, we are going to review a few of the models we currently have in stock.

\n\n

The first item to consider when purchasing a new jump pack is safety. Look for models with reverse polarity protection. This safeguard prevents usage when the cables are not connected correctly. You should also keep an eye out for battery packs that won’t function when the voltage setting is wrong.

\n

Another factor to look at is cable length, especially with a larger jump pack. Be sure to account for adequate clamp reach so the jump pack can rest safely on the ground. This prevents the pack from teetering on engine components or fenders when the hood is open on the disabled vehicle.

\n

Cable length is also important when connecting to terminals located inside of a vehicle. This keeps the power pack away from interior upholstery and prevents an unnecessary mess. Let’s face it. Jump packs only look new and clean once.

\n

Cranking amps and battery ratings are also important items to research when purchasing a jump pack. Handheld models typically have lithium ion batteries. Their ratings are based on engine size. Larger jump packs with internal lead-acid batteries normally list cranking amps for capacity.

\n

Based on size, here are some of the jump packs Zip’s AW Direct has to offer. Be sure to click on each name to link back to its respective product page for complete details.

\n
    \n
  • \n

    On the smaller scale is one of our newest models, the NOCO GB150 Boost Pro. This 4000-amp unit weighs just 7.5 pounds and can handle up to 80 starts per charge. The USB port can also charge personal electronic devices.

    \n
  • \n\n
  • \n

    Perhaps one of our more popular models is the Jump-N-Carry JNC660 jump starter. This low-cost model features 425 cranking amps and 1700 peak amps. The unit weighs 18 pounds and features a DC outlet to power 12V accessories.

    \n
  • \n
  • \n

    A close cousin to the JNC660 is the JNCAIR, which offers the same capacity as the JNC660 but includes an internal air compressor. You can fill one flat tire under eight minutes and up to four tires on a single charge. The coiled air hose stretches to 12 feet and delivers on-demand air.

    \n
  • \n
  • \n

    Two 12V heavy-duty sealed AGM batteries provide \"Best in Class\" performance for Associated Equipment's 6296 jump starter. This unit features 720 CCA of power and has a three-position \"On/Off\" switch with Easy-to-read LED battery status indicators.

    \n
  • \n
  • \n

    The last battery pack we’re going to look at is the Rescue 2100 from Quick Cable. This commercial-grade model offers 900 12V cranking amps and includes a 15-amp circuit breaker, worklight, and warning flasher. The Rescue 2100 does weigh a little bit more but delivers enough charging power for most applications.

    \n
  • \n
\n

We hope you find this quick overview of jump packs at Zip’s AW Direct useful. To view our entire lineup, click on ‘Jump Start Equipment’ under ‘Roadside Assistance’ under our ‘Products’ section at zips.com.

","enable_google_amp_output_override":false,"generate_json_ld_enabled":true,"blog_post_schedule_task_uid":null,"blog_publish_to_social_media_task":"DONE_NOT_SENT","blog_publish_instant_email_task_uid":null,"blog_publish_instant_email_campaign_id":null,"blog_publish_instant_email_retry_count":null,"keywords":[],"composition_id":0,"is_crawlable_by_bots":false,"header":null,"published_at":1757357835815,"head_html":null,"footer_html":null,"attached_stylesheets":[],"enable_domain_stylesheets":null,"include_default_custom_css":null,"layout_sections":{},"past_mab_experiment_ids":[],"deleted_by":null,"featured_image_alt_text":"","enable_layout_stylesheets":null,"tweet":null,"tweet_at":null,"campaign_name":null,"campaign_utm":null,"meta_keywords":null,"meta_description":"Discover essential tips for buying the right jump pack, safety features to consider, top models, and why cable length and cranking amps matter—featuring Zip's AW Direct's recommended jump starters and accessories.","tweet_immediately":false,"publish_immediately":true,"security_state":"NONE","scheduled_update_date":0,"placement_guids":[],"header_template_path":null,"header_variant_name":null,"footer_template_path":null,"footer_variant_name":null,"global_block_overrides":{},"property_for_dynamic_page_title":null,"property_for_dynamic_page_slug":null,"property_for_dynamic_page_meta_description":null,"property_for_dynamic_page_featured_image":null,"property_for_dynamic_page_canonical_url":null,"preview_image_src":null,"legacy_blog_tabid":null,"legacy_post_guid":null,"performable_variation_letter":null,"style_override_id":null,"has_user_changes":true,"css":{},"css_text":"","unpublished_at":0,"published_by_id":76755706,"allowed_slug_conflict":false,"ai_features":null,"link_rel_canonical_url":"","page_redirected":false,"page_expiry_enabled":null,"page_expiry_date":null,"page_expiry_redirect_id":null,"page_expiry_redirect_url":null,"deleted_by_id":null,"state_when_deleted":null,"cloned_from":null,"staged_from":null,"personas":[],"compose_body":null,"featured_image":"https://48463649.fs1.hubspotusercontent-na1.net/hubfs/48463649/Blog/jump-pack-collage-feb-2020-11139181980.jpg","featured_image_width":900,"featured_image_height":325,"publish_timezone_offset":null,"theme_settings_values":null,"password":null,"last_edit_session_id":null,"last_edit_update_id":null,"created_by_agent":null},"metaDescription":"Discover essential tips for buying the right jump pack, safety features to consider, top models, and why cable length and cranking amps matter—featuring Zip's AW Direct's recommended jump starters and accessories.","metaKeywords":null,"name":"Batteries don’t like the cold weather either","nextPostFeaturedImage":"https://48463649.fs1.hubspotusercontent-na1.net/hubfs/48463649/Blog/16731-power-wrapping-blog-feb-2020-542227042.jpg","nextPostFeaturedImageAltText":"","nextPostName":"Add winch line power wrapping to your weekly maintenance routine","nextPostSlug":"blog/add-winch-line-power-wrapping-to-your-weekly-maintenance-routine","pageExpiryDate":null,"pageExpiryEnabled":null,"pageExpiryRedirectId":null,"pageExpiryRedirectUrl":null,"pageRedirected":false,"pageTitle":"Batteries don’t like the cold weather either","parentBlog":{"absoluteUrl":"/blog","allowComments":true,"ampBodyColor":"#404040","ampBodyFont":"'Helvetica Neue', Helvetica, Arial, sans-serif","ampBodyFontSize":"18","ampCustomCss":"","ampHeaderBackgroundColor":"#ffffff","ampHeaderColor":"#1e1e1e","ampHeaderFont":"'Helvetica Neue', Helvetica, Arial, sans-serif","ampHeaderFontSize":"36","ampLinkColor":"#416bb3","ampLogoAlt":"","ampLogoHeight":0,"ampLogoSrc":"","ampLogoWidth":0,"analyticsPageId":190096341139,"attachedStylesheets":[],"audienceAccess":"PUBLIC","businessUnitId":null,"captchaAfterDays":7,"captchaAlways":false,"categoryId":3,"cdnPurgeEmbargoTime":null,"closeCommentsOlder":0,"commentDateFormat":"medium","commentFormGuid":"a4128401-39db-4c54-a62b-88ff335d3a69","commentMaxThreadDepth":1,"commentModeration":false,"commentNotificationEmails":[],"commentShouldCreateContact":false,"commentVerificationText":"","cosObjectType":"BLOG","created":1747163443999,"createdDateTime":1747163443999,"dailyNotificationEmailId":null,"dateFormattingLanguage":null,"defaultGroupStyleId":"","defaultNotificationFromName":"","defaultNotificationReplyTo":"","deletedAt":0,"description":"","domain":"","domainWhenPublished":"www.zips.com","emailApiSubscriptionId":null,"enableGoogleAmpOutput":true,"enableSocialAutoPublishing":false,"generateJsonLdEnabled":true,"header":null,"htmlFooter":"","htmlFooterIsShared":true,"htmlHead":"","htmlHeadIsShared":true,"htmlKeywords":[],"htmlTitle":"blog","id":190096341139,"ilsSubscriptionListsByType":{},"instantNotificationEmailId":null,"itemLayoutId":null,"itemTemplateIsShared":false,"itemTemplatePath":"zips-basic-theme/templates/blog-post.html","label":"blog","language":"en","legacyGuid":null,"legacyModuleId":null,"legacyTabId":null,"listingLayoutId":null,"listingPageId":190096341141,"listingTemplatePath":"","liveDomain":"www.zips.com","monthFilterFormat":"MMMM yyyy","monthlyNotificationEmailId":null,"name":"blog","parentBlogUpdateTaskId":null,"portalId":48463649,"postHtmlFooter":"","postHtmlHead":"","postsPerListingPage":111,"postsPerRssFeed":10,"publicAccessRules":[],"publicAccessRulesEnabled":false,"publicTitle":"blog","publishDateFormat":"medium","resolvedDomain":"www.zips.com","rootUrl":"/blog","rssCustomFeed":null,"rssDescription":null,"rssItemFooter":null,"rssItemHeader":null,"settingsOverrides":{"itemLayoutId":false,"itemTemplatePath":false,"itemTemplateIsShared":false,"listingLayoutId":false,"listingTemplatePath":false,"postsPerListingPage":false,"showSummaryInListing":false,"useFeaturedImageInSummary":false,"htmlHead":false,"postHtmlHead":false,"htmlHeadIsShared":false,"htmlFooter":false,"listingPageHtmlFooter":false,"postHtmlFooter":false,"htmlFooterIsShared":false,"attachedStylesheets":false,"postsPerRssFeed":false,"showSummaryInRss":false,"showSummaryInEmails":false,"showSummariesInEmails":false,"allowComments":false,"commentShouldCreateContact":false,"commentModeration":false,"closeCommentsOlder":false,"commentNotificationEmails":false,"commentMaxThreadDepth":false,"commentVerificationText":false,"socialAccountTwitter":false,"showSocialLinkTwitter":false,"showSocialLinkLinkedin":false,"showSocialLinkFacebook":false,"enableGoogleAmpOutput":false,"ampLogoSrc":false,"ampLogoHeight":false,"ampLogoWidth":false,"ampLogoAlt":false,"ampHeaderFont":false,"ampHeaderFontSize":false,"ampHeaderColor":false,"ampHeaderBackgroundColor":false,"ampBodyFont":false,"ampBodyFontSize":false,"ampBodyColor":false,"ampLinkColor":false,"generateJsonLdEnabled":false},"showSocialLinkFacebook":true,"showSocialLinkLinkedin":true,"showSocialLinkTwitter":true,"showSummaryInEmails":true,"showSummaryInListing":true,"showSummaryInRss":true,"siteId":null,"slug":"blog","socialAccountTwitter":"","state":null,"subscriptionContactsProperty":null,"subscriptionEmailType":null,"subscriptionFormGuid":null,"subscriptionListsByType":{},"title":null,"translatedFromId":null,"translations":{},"updated":1755110916417,"updatedDateTime":1755110916417,"urlBase":"www.zips.com/blog","urlSegments":{"all":"all","archive":"archive","author":"author","page":"page","tag":"tag"},"useFeaturedImageInSummary":true,"usesDefaultTemplate":false,"weeklyNotificationEmailId":null},"password":null,"pastMabExperimentIds":[],"performableGuid":null,"performableVariationLetter":null,"personalizationStrategyId":null,"personalizationVariantStatus":null,"personas":[],"placementGuids":[],"portableKey":null,"portalId":48463649,"position":null,"postBody":"

Be prepared the next time your car won’t start with a jump pack from Zip’s AW Direct. We stock handheld chargers for the consumer, and powerful jump packs for the professional. In today’s blog, we are going to review a few of the models we currently have in stock.

\n\n

The first item to consider when purchasing a new jump pack is safety. Look for models with reverse polarity protection. This safeguard prevents usage when the cables are not connected correctly. You should also keep an eye out for battery packs that won’t function when the voltage setting is wrong.

\n

Another factor to look at is cable length, especially with a larger jump pack. Be sure to account for adequate clamp reach so the jump pack can rest safely on the ground. This prevents the pack from teetering on engine components or fenders when the hood is open on the disabled vehicle.

\n

Cable length is also important when connecting to terminals located inside of a vehicle. This keeps the power pack away from interior upholstery and prevents an unnecessary mess. Let’s face it. Jump packs only look new and clean once.

\n

Cranking amps and battery ratings are also important items to research when purchasing a jump pack. Handheld models typically have lithium ion batteries. Their ratings are based on engine size. Larger jump packs with internal lead-acid batteries normally list cranking amps for capacity.

\n

Based on size, here are some of the jump packs Zip’s AW Direct has to offer. Be sure to click on each name to link back to its respective product page for complete details.

\n
    \n
  • \n

    On the smaller scale is one of our newest models, the NOCO GB150 Boost Pro. This 4000-amp unit weighs just 7.5 pounds and can handle up to 80 starts per charge. The USB port can also charge personal electronic devices.

    \n
  • \n\n
  • \n

    Perhaps one of our more popular models is the Jump-N-Carry JNC660 jump starter. This low-cost model features 425 cranking amps and 1700 peak amps. The unit weighs 18 pounds and features a DC outlet to power 12V accessories.

    \n
  • \n
  • \n

    A close cousin to the JNC660 is the JNCAIR, which offers the same capacity as the JNC660 but includes an internal air compressor. You can fill one flat tire under eight minutes and up to four tires on a single charge. The coiled air hose stretches to 12 feet and delivers on-demand air.

    \n
  • \n
  • \n

    Two 12V heavy-duty sealed AGM batteries provide \"Best in Class\" performance for Associated Equipment's 6296 jump starter. This unit features 720 CCA of power and has a three-position \"On/Off\" switch with Easy-to-read LED battery status indicators.

    \n
  • \n
  • \n

    The last battery pack we’re going to look at is the Rescue 2100 from Quick Cable. This commercial-grade model offers 900 12V cranking amps and includes a 15-amp circuit breaker, worklight, and warning flasher. The Rescue 2100 does weigh a little bit more but delivers enough charging power for most applications.

    \n
  • \n
\n

We hope you find this quick overview of jump packs at Zip’s AW Direct useful. To view our entire lineup, click on ‘Jump Start Equipment’ under ‘Roadside Assistance’ under our ‘Products’ section at zips.com.

","postBodyRss":"

Be prepared the next time your car won’t start with a jump pack from Zip’s AW Direct. We stock handheld chargers for the consumer, and powerful jump packs for the professional. In today’s blog, we are going to review a few of the models we currently have in stock.

\n\n

The first item to consider when purchasing a new jump pack is safety. Look for models with reverse polarity protection. This safeguard prevents usage when the cables are not connected correctly. You should also keep an eye out for battery packs that won’t function when the voltage setting is wrong.

\n

Another factor to look at is cable length, especially with a larger jump pack. Be sure to account for adequate clamp reach so the jump pack can rest safely on the ground. This prevents the pack from teetering on engine components or fenders when the hood is open on the disabled vehicle.

\n

Cable length is also important when connecting to terminals located inside of a vehicle. This keeps the power pack away from interior upholstery and prevents an unnecessary mess. Let’s face it. Jump packs only look new and clean once.

\n

Cranking amps and battery ratings are also important items to research when purchasing a jump pack. Handheld models typically have lithium ion batteries. Their ratings are based on engine size. Larger jump packs with internal lead-acid batteries normally list cranking amps for capacity.

\n

Based on size, here are some of the jump packs Zip’s AW Direct has to offer. Be sure to click on each name to link back to its respective product page for complete details.

\n
    \n
  • \n

    On the smaller scale is one of our newest models, the NOCO GB150 Boost Pro. This 4000-amp unit weighs just 7.5 pounds and can handle up to 80 starts per charge. The USB port can also charge personal electronic devices.

    \n
  • \n\n
  • \n

    Perhaps one of our more popular models is the Jump-N-Carry JNC660 jump starter. This low-cost model features 425 cranking amps and 1700 peak amps. The unit weighs 18 pounds and features a DC outlet to power 12V accessories.

    \n
  • \n
  • \n

    A close cousin to the JNC660 is the JNCAIR, which offers the same capacity as the JNC660 but includes an internal air compressor. You can fill one flat tire under eight minutes and up to four tires on a single charge. The coiled air hose stretches to 12 feet and delivers on-demand air.

    \n
  • \n
  • \n

    Two 12V heavy-duty sealed AGM batteries provide \"Best in Class\" performance for Associated Equipment's 6296 jump starter. This unit features 720 CCA of power and has a three-position \"On/Off\" switch with Easy-to-read LED battery status indicators.

    \n
  • \n
  • \n

    The last battery pack we’re going to look at is the Rescue 2100 from Quick Cable. This commercial-grade model offers 900 12V cranking amps and includes a 15-amp circuit breaker, worklight, and warning flasher. The Rescue 2100 does weigh a little bit more but delivers enough charging power for most applications.

    \n
  • \n
\n

We hope you find this quick overview of jump packs at Zip’s AW Direct useful. To view our entire lineup, click on ‘Jump Start Equipment’ under ‘Roadside Assistance’ under our ‘Products’ section at zips.com.

","postEmailContent":"

Be prepared the next time your car won’t start with a jump pack from Zip’s AW Direct. We stock handheld chargers for the consumer, and powerful jump packs for the professional. In today’s blog, we are going to review a few of the models we currently have in stock.

","postFeaturedImageIfEnabled":"https://48463649.fs1.hubspotusercontent-na1.net/hubfs/48463649/Blog/jump-pack-collage-feb-2020-11139181980.jpg","postListContent":"

Be prepared the next time your car won’t start with a jump pack from Zip’s AW Direct. We stock handheld chargers for the consumer, and powerful jump packs for the professional. In today’s blog, we are going to review a few of the models we currently have in stock.

","postListSummaryFeaturedImage":"https://48463649.fs1.hubspotusercontent-na1.net/hubfs/48463649/Blog/jump-pack-collage-feb-2020-11139181980.jpg","postRssContent":"

Be prepared the next time your car won’t start with a jump pack from Zip’s AW Direct. We stock handheld chargers for the consumer, and powerful jump packs for the professional. In today’s blog, we are going to review a few of the models we currently have in stock.

","postRssSummaryFeaturedImage":"https://48463649.fs1.hubspotusercontent-na1.net/hubfs/48463649/Blog/jump-pack-collage-feb-2020-11139181980.jpg","postSummary":"

Be prepared the next time your car won’t start with a jump pack from Zip’s AW Direct. We stock handheld chargers for the consumer, and powerful jump packs for the professional. In today’s blog, we are going to review a few of the models we currently have in stock.

\n","postSummaryRss":"

Be prepared the next time your car won’t start with a jump pack from Zip’s AW Direct. We stock handheld chargers for the consumer, and powerful jump packs for the professional. In today’s blog, we are going to review a few of the models we currently have in stock.

","postTemplate":"zips-basic-theme/templates/blog-post.html","previewImageSrc":null,"previewKey":"EfWVBAwn","previousPostFeaturedImage":"https://48463649.fs1.hubspotusercontent-na1.net/hubfs/48463649/Blog/snatch-blocks-cover-photo-march-2022-hi-res-11-zips-blog.jpg","previousPostFeaturedImageAltText":"","previousPostName":"Get to Know Snatch Blocks: Their Uses, Parts and Care.","previousPostSlug":"blog/get-to-know-snatch-blocks-their-uses-parts-and-care","processingStatus":"PUBLISHED","propertyForDynamicPageCanonicalUrl":null,"propertyForDynamicPageFeaturedImage":null,"propertyForDynamicPageMetaDescription":null,"propertyForDynamicPageSlug":null,"propertyForDynamicPageTitle":null,"publicAccessRules":[],"publicAccessRulesEnabled":false,"publishDate":1580911200000,"publishDateLocalTime":1580911200000,"publishDateLocalized":{"date":1580911200000,"format":"medium","language":null},"publishImmediately":true,"publishTimezoneOffset":null,"publishedAt":1757357835815,"publishedByEmail":null,"publishedById":76755706,"publishedByName":null,"publishedUrl":"/blog/batteries-don-t-like-the-cold-weather-either","resolvedDomain":"www.zips.com","resolvedLanguage":null,"rssBody":"

Be prepared the next time your car won’t start with a jump pack from Zip’s AW Direct. We stock handheld chargers for the consumer, and powerful jump packs for the professional. In today’s blog, we are going to review a few of the models we currently have in stock.

\n\n

The first item to consider when purchasing a new jump pack is safety. Look for models with reverse polarity protection. This safeguard prevents usage when the cables are not connected correctly. You should also keep an eye out for battery packs that won’t function when the voltage setting is wrong.

\n

Another factor to look at is cable length, especially with a larger jump pack. Be sure to account for adequate clamp reach so the jump pack can rest safely on the ground. This prevents the pack from teetering on engine components or fenders when the hood is open on the disabled vehicle.

\n

Cable length is also important when connecting to terminals located inside of a vehicle. This keeps the power pack away from interior upholstery and prevents an unnecessary mess. Let’s face it. Jump packs only look new and clean once.

\n

Cranking amps and battery ratings are also important items to research when purchasing a jump pack. Handheld models typically have lithium ion batteries. Their ratings are based on engine size. Larger jump packs with internal lead-acid batteries normally list cranking amps for capacity.

\n

Based on size, here are some of the jump packs Zip’s AW Direct has to offer. Be sure to click on each name to link back to its respective product page for complete details.

\n
    \n
  • \n

    On the smaller scale is one of our newest models, the NOCO GB150 Boost Pro. This 4000-amp unit weighs just 7.5 pounds and can handle up to 80 starts per charge. The USB port can also charge personal electronic devices.

    \n
  • \n\n
  • \n

    Perhaps one of our more popular models is the Jump-N-Carry JNC660 jump starter. This low-cost model features 425 cranking amps and 1700 peak amps. The unit weighs 18 pounds and features a DC outlet to power 12V accessories.

    \n
  • \n
  • \n

    A close cousin to the JNC660 is the JNCAIR, which offers the same capacity as the JNC660 but includes an internal air compressor. You can fill one flat tire under eight minutes and up to four tires on a single charge. The coiled air hose stretches to 12 feet and delivers on-demand air.

    \n
  • \n
  • \n

    Two 12V heavy-duty sealed AGM batteries provide \"Best in Class\" performance for Associated Equipment's 6296 jump starter. This unit features 720 CCA of power and has a three-position \"On/Off\" switch with Easy-to-read LED battery status indicators.

    \n
  • \n
  • \n

    The last battery pack we’re going to look at is the Rescue 2100 from Quick Cable. This commercial-grade model offers 900 12V cranking amps and includes a 15-amp circuit breaker, worklight, and warning flasher. The Rescue 2100 does weigh a little bit more but delivers enough charging power for most applications.

    \n
  • \n
\n

We hope you find this quick overview of jump packs at Zip’s AW Direct useful. To view our entire lineup, click on ‘Jump Start Equipment’ under ‘Roadside Assistance’ under our ‘Products’ section at zips.com.

","rssSummary":"

Be prepared the next time your car won’t start with a jump pack from Zip’s AW Direct. We stock handheld chargers for the consumer, and powerful jump packs for the professional. In today’s blog, we are going to review a few of the models we currently have in stock.

\n","rssSummaryFeaturedImage":"https://48463649.fs1.hubspotusercontent-na1.net/hubfs/48463649/Blog/jump-pack-collage-feb-2020-11139181980.jpg","scheduledUpdateDate":0,"screenshotPreviewTakenAt":1771700235130,"screenshotPreviewUrl":"https://cdn1.hubspot.net/hubshotv3/prod/e/0/fa4efddf-49ae-4516-9e62-60a9b75c014b.png","sections":{},"securityState":"NONE","siteId":null,"slug":"blog/batteries-don-t-like-the-cold-weather-either","stagedFrom":null,"state":"PUBLISHED","stateWhenDeleted":null,"structuredContentPageType":null,"structuredContentType":null,"styleOverrideId":null,"subcategory":"normal_blog_post","syncedWithBlogRoot":true,"tagIds":[192169769490,192174528148,194719179289,194719586666],"tagList":[{"categoryId":3,"cdnPurgeEmbargoTime":null,"contentIds":[],"cosObjectType":"TAG","created":1751598346713,"deletedAt":0,"description":"","id":192169769490,"label":"Towing & Recovery","language":null,"name":"Towing & Recovery","portalId":48463649,"slug":"towing-recovery","translatedFromId":null,"translations":{},"updated":1751598346713},{"categoryId":3,"cdnPurgeEmbargoTime":null,"contentIds":[],"cosObjectType":"TAG","created":1751601475164,"deletedAt":0,"description":"","id":192174528148,"label":"Automotive","language":null,"name":"Automotive","portalId":48463649,"slug":"automotive","translatedFromId":null,"translations":{},"updated":1751601475164},{"categoryId":3,"cdnPurgeEmbargoTime":null,"contentIds":[],"cosObjectType":"TAG","created":1755545213046,"deletedAt":0,"description":"","id":194719179289,"label":"Industry Knowledge & Updates","language":null,"name":"Industry Knowledge & Updates","portalId":48463649,"slug":"industry-knowledge-updates","translatedFromId":null,"translations":{},"updated":1755545213046},{"categoryId":3,"cdnPurgeEmbargoTime":null,"contentIds":[],"cosObjectType":"TAG","created":1755545331471,"deletedAt":0,"description":"","id":194719586666,"label":"Product Guides","language":null,"name":"Product Guides","portalId":48463649,"slug":"product-guides","translatedFromId":null,"translations":{},"updated":1755545331471}],"tagNames":["Towing & Recovery","Automotive","Industry Knowledge & Updates","Product Guides"],"teamPerms":[],"templatePath":"","templatePathForRender":"zips-basic-theme/templates/blog-post.html","textToAudioFileId":null,"textToAudioGenerationRequestId":null,"themePath":null,"themeSettingsValues":null,"title":"Batteries don’t like the cold weather either","tmsId":null,"topicIds":[192169769490,192174528148,194719179289,194719586666],"topicList":[{"categoryId":3,"cdnPurgeEmbargoTime":null,"contentIds":[],"cosObjectType":"TAG","created":1751598346713,"deletedAt":0,"description":"","id":192169769490,"label":"Towing & Recovery","language":null,"name":"Towing & Recovery","portalId":48463649,"slug":"towing-recovery","translatedFromId":null,"translations":{},"updated":1751598346713},{"categoryId":3,"cdnPurgeEmbargoTime":null,"contentIds":[],"cosObjectType":"TAG","created":1751601475164,"deletedAt":0,"description":"","id":192174528148,"label":"Automotive","language":null,"name":"Automotive","portalId":48463649,"slug":"automotive","translatedFromId":null,"translations":{},"updated":1751601475164},{"categoryId":3,"cdnPurgeEmbargoTime":null,"contentIds":[],"cosObjectType":"TAG","created":1755545213046,"deletedAt":0,"description":"","id":194719179289,"label":"Industry Knowledge & Updates","language":null,"name":"Industry Knowledge & Updates","portalId":48463649,"slug":"industry-knowledge-updates","translatedFromId":null,"translations":{},"updated":1755545213046},{"categoryId":3,"cdnPurgeEmbargoTime":null,"contentIds":[],"cosObjectType":"TAG","created":1755545331471,"deletedAt":0,"description":"","id":194719586666,"label":"Product Guides","language":null,"name":"Product Guides","portalId":48463649,"slug":"product-guides","translatedFromId":null,"translations":{},"updated":1755545331471}],"topicNames":["Towing & Recovery","Automotive","Industry Knowledge & Updates","Product Guides"],"topics":[192169769490,192174528148,194719179289,194719586666],"translatedContent":{},"translatedFromId":null,"translations":{},"tweet":null,"tweetAt":null,"tweetImmediately":false,"unpublishedAt":0,"updated":1757357835819,"updatedById":76755706,"upsizeFeaturedImage":false,"url":"/blog/batteries-don-t-like-the-cold-weather-either","useFeaturedImage":true,"userPerms":[],"views":null,"visibleToAll":null,"widgetContainers":{},"widgetcontainers":{},"widgets":{}},{"ab":false,"abStatus":null,"abTestId":null,"abVariation":false,"abVariationAutomated":false,"absoluteUrl":"/blog/add-winch-line-power-wrapping-to-your-weekly-maintenance-routine","afterPostBody":null,"aifeatures":null,"allowedSlugConflict":false,"analytics":null,"analyticsPageId":"192169769290","analyticsPageType":"blog-post","approvalStatus":null,"archived":false,"archivedAt":0,"archivedInDashboard":false,"areCommentsAllowed":true,"attachedStylesheets":[],"audienceAccess":"PUBLIC","author":null,"authorName":null,"authorUsername":null,"blogAuthor":{"avatar":"","bio":"","cdnPurgeEmbargoTime":null,"cosObjectType":"BLOG_AUTHOR","created":1755187092136,"deletedAt":0,"displayName":"Cameron Hanson","email":null,"facebook":"","fullName":"Cameron Hanson","gravatarUrl":null,"hasSocialProfiles":false,"id":194499322288,"label":"Cameron Hanson","language":"en","linkedin":"","name":" Cameron Hanson","portalId":48463649,"slug":"cameron-hanson","translatedFromId":null,"translations":{},"twitter":"","twitterUsername":"","updated":1755187092136,"userId":null,"username":null,"website":""},"blogAuthorId":194499322288,"blogAuthorIdList":[194499322288],"blogAuthorList":[{"avatar":"","bio":"","cdnPurgeEmbargoTime":null,"cosObjectType":"BLOG_AUTHOR","created":1755187092136,"deletedAt":0,"displayName":"Cameron Hanson","email":null,"facebook":"","fullName":"Cameron Hanson","gravatarUrl":null,"hasSocialProfiles":false,"id":194499322288,"label":"Cameron Hanson","language":"en","linkedin":"","name":" Cameron Hanson","portalId":48463649,"slug":"cameron-hanson","translatedFromId":null,"translations":{},"twitter":"","twitterUsername":"","updated":1755187092136,"userId":null,"username":null,"website":""}],"blogPostAuthor":{"avatar":"","bio":"","cdnPurgeEmbargoTime":null,"cosObjectType":"BLOG_AUTHOR","created":1755187092136,"deletedAt":0,"displayName":"Cameron Hanson","email":null,"facebook":"","fullName":"Cameron Hanson","gravatarUrl":null,"hasSocialProfiles":false,"id":194499322288,"label":"Cameron Hanson","language":"en","linkedin":"","name":" Cameron Hanson","portalId":48463649,"slug":"cameron-hanson","translatedFromId":null,"translations":{},"twitter":"","twitterUsername":"","updated":1755187092136,"userId":null,"username":null,"website":""},"blogPostScheduleTaskUid":null,"blogPublishInstantEmailCampaignId":null,"blogPublishInstantEmailRetryCount":null,"blogPublishInstantEmailTaskUid":null,"blogPublishToSocialMediaTask":"DONE_NOT_SENT","blueprintTypeId":0,"businessUnitId":null,"campaign":null,"campaignName":null,"campaignUtm":null,"category":3,"categoryId":3,"cdnPurgeEmbargoTime":null,"checkPostLevelAudienceAccessFirst":true,"clonedFrom":null,"composeBody":null,"compositionId":0,"contentAccessRuleIds":[],"contentAccessRuleTypes":[],"contentGroup":190096341139,"contentGroupId":190096341139,"contentTypeCategory":3,"contentTypeCategoryId":3,"contentTypeId":null,"created":1751598291649,"createdByAgent":null,"createdById":74657203,"createdTime":1751598291649,"crmObjectId":null,"css":{},"cssText":"","ctaClicks":null,"ctaViews":null,"currentState":"PUBLISHED","currentlyPublished":true,"deletedAt":0,"deletedBy":null,"deletedByEmail":null,"deletedById":null,"domain":"","dynamicPageDataSourceId":null,"dynamicPageDataSourceType":null,"dynamicPageHubDbTableId":null,"enableDomainStylesheets":null,"enableGoogleAmpOutputOverride":false,"enableLayoutStylesheets":null,"errors":[],"featuredImage":"https://48463649.fs1.hubspotusercontent-na1.net/hubfs/48463649/Blog/16731-power-wrapping-blog-feb-2020-542227042.jpg","featuredImageAltText":"","featuredImageHeight":381,"featuredImageLength":0,"featuredImageWidth":772,"flexAreas":{},"folderId":null,"footerHtml":null,"footerTemplatePath":null,"footerVariantName":null,"freezeDate":1580911200000,"generateJsonLdEnabledOverride":true,"globalBlockOverrides":{},"hasContentAccessRules":false,"hasUserChanges":true,"headHtml":null,"header":null,"headerTemplatePath":null,"headerVariantName":null,"htmlTitle":"Add winch line power wrapping to your weekly maintenance routine","id":192169769290,"includeDefaultCustomCss":null,"isCaptchaRequired":true,"isCrawlableByBots":false,"isDraft":false,"isInstantEmailEnabled":false,"isPublished":true,"isSocialPublishingEnabled":false,"keywords":[],"label":"Add winch line power wrapping to your weekly maintenance routine","language":"en","lastEditSessionId":null,"lastEditUpdateId":null,"layoutSections":{},"legacyBlogTabid":null,"legacyId":null,"legacyPostGuid":null,"linkRelCanonicalUrl":"","listTemplate":"","liveDomain":"www.zips.com","mab":false,"mabExperimentId":null,"mabMaster":false,"mabVariant":false,"marketingCampaignGuids":[],"meta":{"html_title":"Add winch line power wrapping to your weekly maintenance routine","public_access_rules":[],"public_access_rules_enabled":false,"use_featured_image":true,"tag_ids":[192169769490,192174528148,192174529697,194719179289,194719586666],"topic_ids":[192169769490,192174528148,192174529697,194719179289,194719586666],"post_summary":"

Keep the cable on your winch drum neat and tight through a weekly maintenance procedure known as power wrapping. This exercise will prolong the life of your winch line by preventing weak points caused by unnecessary kinks and flat spots.

\n","post_body":"

Keep the cable on your winch drum neat and tight through a weekly maintenance procedure known as power wrapping. This exercise will prolong the life of your winch line by preventing weak points caused by unnecessary kinks and flat spots.

\n\n

“You should power wrap your winch at least once a week,” recommends Rene Jimenez, a technical advisor at Zip’s AW Direct. “You want to keep your wire rope tight on the spool so it doesn’t dive or kink and start what I call the paper clip effect, where the more it bends, the weaker it gets before eventually failing.”

\n

Power wrapping works in tandem with the cable tensioner. As illustrated in this video from Miller Industries, the procedure is performed by free-spooling the winch line out and then winding it back up under a load by attaching the hook to another vehicle or deadman.

\n

“As you pull the wire rope out, you want to keep at least seven wraps on that last layer so you don’t pull all of the wire rope out of the drum. That would create quite a mess,” explains Miller’s Billy Drane in the video.

\n

Experts say power wrapping should be done regardless of the size of the winch: from car carriers to heavy-duty recovery vehicles. The procedure is effective for both wire and synthetic rope. In fact, according to Jimenez, power wrapping helps “set the braid” on a new synthetic line.

\n

Power wrapping is “something that is very important to do,” Drane said. “What can tend to happen (when you don’t) is the loose wire rope going around the drum will cause the top layers to bury down (or dive) into the inner layers.”

\n

“Once you get in the habit of doing this regularly, it really doesn’t take very long to do,” Jimenez said. “Take a few minutes each week to prevent a headache down the road.”

","rss_summary":"

Keep the cable on your winch drum neat and tight through a weekly maintenance procedure known as power wrapping. This exercise will prolong the life of your winch line by preventing weak points caused by unnecessary kinks and flat spots.

\n","rss_body":"

Keep the cable on your winch drum neat and tight through a weekly maintenance procedure known as power wrapping. This exercise will prolong the life of your winch line by preventing weak points caused by unnecessary kinks and flat spots.

\n\n

“You should power wrap your winch at least once a week,” recommends Rene Jimenez, a technical advisor at Zip’s AW Direct. “You want to keep your wire rope tight on the spool so it doesn’t dive or kink and start what I call the paper clip effect, where the more it bends, the weaker it gets before eventually failing.”

\n

Power wrapping works in tandem with the cable tensioner. As illustrated in this video from Miller Industries, the procedure is performed by free-spooling the winch line out and then winding it back up under a load by attaching the hook to another vehicle or deadman.

\n

“As you pull the wire rope out, you want to keep at least seven wraps on that last layer so you don’t pull all of the wire rope out of the drum. That would create quite a mess,” explains Miller’s Billy Drane in the video.

\n

Experts say power wrapping should be done regardless of the size of the winch: from car carriers to heavy-duty recovery vehicles. The procedure is effective for both wire and synthetic rope. In fact, according to Jimenez, power wrapping helps “set the braid” on a new synthetic line.

\n

Power wrapping is “something that is very important to do,” Drane said. “What can tend to happen (when you don’t) is the loose wire rope going around the drum will cause the top layers to bury down (or dive) into the inner layers.”

\n

“Once you get in the habit of doing this regularly, it really doesn’t take very long to do,” Jimenez said. “Take a few minutes each week to prevent a headache down the road.”

","enable_google_amp_output_override":false,"generate_json_ld_enabled":true,"blog_post_schedule_task_uid":null,"blog_publish_to_social_media_task":"DONE_NOT_SENT","blog_publish_instant_email_task_uid":null,"blog_publish_instant_email_campaign_id":null,"blog_publish_instant_email_retry_count":null,"keywords":[],"composition_id":0,"is_crawlable_by_bots":false,"header":null,"published_at":1755718425772,"head_html":null,"footer_html":null,"attached_stylesheets":[],"enable_domain_stylesheets":null,"include_default_custom_css":null,"layout_sections":{},"past_mab_experiment_ids":[],"deleted_by":null,"featured_image_alt_text":"","enable_layout_stylesheets":null,"tweet":null,"tweet_at":null,"campaign_name":null,"campaign_utm":null,"meta_keywords":null,"meta_description":"Learn how to prolong the life and reliability of your winch line with power wrapping, a simple weekly maintenance procedure that keeps your cable tight and organized.","tweet_immediately":false,"publish_immediately":true,"security_state":"NONE","scheduled_update_date":0,"placement_guids":[],"header_template_path":null,"header_variant_name":null,"footer_template_path":null,"footer_variant_name":null,"global_block_overrides":{},"property_for_dynamic_page_title":null,"property_for_dynamic_page_slug":null,"property_for_dynamic_page_meta_description":null,"property_for_dynamic_page_featured_image":null,"property_for_dynamic_page_canonical_url":null,"preview_image_src":null,"legacy_blog_tabid":null,"legacy_post_guid":null,"performable_variation_letter":null,"style_override_id":null,"has_user_changes":true,"css":{},"css_text":"","unpublished_at":0,"published_by_id":79766377,"allowed_slug_conflict":false,"ai_features":null,"link_rel_canonical_url":"","page_redirected":false,"page_expiry_enabled":null,"page_expiry_date":null,"page_expiry_redirect_id":null,"page_expiry_redirect_url":null,"deleted_by_id":null,"state_when_deleted":null,"cloned_from":null,"staged_from":null,"personas":[],"compose_body":null,"featured_image":"https://48463649.fs1.hubspotusercontent-na1.net/hubfs/48463649/Blog/16731-power-wrapping-blog-feb-2020-542227042.jpg","featured_image_width":772,"featured_image_height":381,"publish_timezone_offset":null,"theme_settings_values":null,"password":null,"last_edit_session_id":null,"last_edit_update_id":null,"created_by_agent":null},"metaDescription":"Learn how to prolong the life and reliability of your winch line with power wrapping, a simple weekly maintenance procedure that keeps your cable tight and organized.","metaKeywords":null,"name":"Add winch line power wrapping to your weekly maintenance routine","nextPostFeaturedImage":"https://48463649.fs1.hubspotusercontent-na1.net/hubfs/48463649/1545635_ITD-2778-xl-dolly-set.jpg_900.avif","nextPostFeaturedImageAltText":"","nextPostName":"Make an Informed Purchase on You Next Tow Dolly","nextPostSlug":"blog/make-an-informed-decision-on-your-next-tow-dolly-purchase","pageExpiryDate":null,"pageExpiryEnabled":null,"pageExpiryRedirectId":null,"pageExpiryRedirectUrl":null,"pageRedirected":false,"pageTitle":"Add winch line power wrapping to your weekly maintenance routine","parentBlog":{"absoluteUrl":"/blog","allowComments":true,"ampBodyColor":"#404040","ampBodyFont":"'Helvetica Neue', Helvetica, Arial, sans-serif","ampBodyFontSize":"18","ampCustomCss":"","ampHeaderBackgroundColor":"#ffffff","ampHeaderColor":"#1e1e1e","ampHeaderFont":"'Helvetica Neue', Helvetica, Arial, sans-serif","ampHeaderFontSize":"36","ampLinkColor":"#416bb3","ampLogoAlt":"","ampLogoHeight":0,"ampLogoSrc":"","ampLogoWidth":0,"analyticsPageId":190096341139,"attachedStylesheets":[],"audienceAccess":"PUBLIC","businessUnitId":null,"captchaAfterDays":7,"captchaAlways":false,"categoryId":3,"cdnPurgeEmbargoTime":null,"closeCommentsOlder":0,"commentDateFormat":"medium","commentFormGuid":"a4128401-39db-4c54-a62b-88ff335d3a69","commentMaxThreadDepth":1,"commentModeration":false,"commentNotificationEmails":[],"commentShouldCreateContact":false,"commentVerificationText":"","cosObjectType":"BLOG","created":1747163443999,"createdDateTime":1747163443999,"dailyNotificationEmailId":null,"dateFormattingLanguage":null,"defaultGroupStyleId":"","defaultNotificationFromName":"","defaultNotificationReplyTo":"","deletedAt":0,"description":"","domain":"","domainWhenPublished":"www.zips.com","emailApiSubscriptionId":null,"enableGoogleAmpOutput":true,"enableSocialAutoPublishing":false,"generateJsonLdEnabled":true,"header":null,"htmlFooter":"","htmlFooterIsShared":true,"htmlHead":"","htmlHeadIsShared":true,"htmlKeywords":[],"htmlTitle":"blog","id":190096341139,"ilsSubscriptionListsByType":{},"instantNotificationEmailId":null,"itemLayoutId":null,"itemTemplateIsShared":false,"itemTemplatePath":"zips-basic-theme/templates/blog-post.html","label":"blog","language":"en","legacyGuid":null,"legacyModuleId":null,"legacyTabId":null,"listingLayoutId":null,"listingPageId":190096341141,"listingTemplatePath":"","liveDomain":"www.zips.com","monthFilterFormat":"MMMM yyyy","monthlyNotificationEmailId":null,"name":"blog","parentBlogUpdateTaskId":null,"portalId":48463649,"postHtmlFooter":"","postHtmlHead":"","postsPerListingPage":111,"postsPerRssFeed":10,"publicAccessRules":[],"publicAccessRulesEnabled":false,"publicTitle":"blog","publishDateFormat":"medium","resolvedDomain":"www.zips.com","rootUrl":"/blog","rssCustomFeed":null,"rssDescription":null,"rssItemFooter":null,"rssItemHeader":null,"settingsOverrides":{"itemLayoutId":false,"itemTemplatePath":false,"itemTemplateIsShared":false,"listingLayoutId":false,"listingTemplatePath":false,"postsPerListingPage":false,"showSummaryInListing":false,"useFeaturedImageInSummary":false,"htmlHead":false,"postHtmlHead":false,"htmlHeadIsShared":false,"htmlFooter":false,"listingPageHtmlFooter":false,"postHtmlFooter":false,"htmlFooterIsShared":false,"attachedStylesheets":false,"postsPerRssFeed":false,"showSummaryInRss":false,"showSummaryInEmails":false,"showSummariesInEmails":false,"allowComments":false,"commentShouldCreateContact":false,"commentModeration":false,"closeCommentsOlder":false,"commentNotificationEmails":false,"commentMaxThreadDepth":false,"commentVerificationText":false,"socialAccountTwitter":false,"showSocialLinkTwitter":false,"showSocialLinkLinkedin":false,"showSocialLinkFacebook":false,"enableGoogleAmpOutput":false,"ampLogoSrc":false,"ampLogoHeight":false,"ampLogoWidth":false,"ampLogoAlt":false,"ampHeaderFont":false,"ampHeaderFontSize":false,"ampHeaderColor":false,"ampHeaderBackgroundColor":false,"ampBodyFont":false,"ampBodyFontSize":false,"ampBodyColor":false,"ampLinkColor":false,"generateJsonLdEnabled":false},"showSocialLinkFacebook":true,"showSocialLinkLinkedin":true,"showSocialLinkTwitter":true,"showSummaryInEmails":true,"showSummaryInListing":true,"showSummaryInRss":true,"siteId":null,"slug":"blog","socialAccountTwitter":"","state":null,"subscriptionContactsProperty":null,"subscriptionEmailType":null,"subscriptionFormGuid":null,"subscriptionListsByType":{},"title":null,"translatedFromId":null,"translations":{},"updated":1755110916417,"updatedDateTime":1755110916417,"urlBase":"www.zips.com/blog","urlSegments":{"all":"all","archive":"archive","author":"author","page":"page","tag":"tag"},"useFeaturedImageInSummary":true,"usesDefaultTemplate":false,"weeklyNotificationEmailId":null},"password":null,"pastMabExperimentIds":[],"performableGuid":null,"performableVariationLetter":null,"personalizationStrategyId":null,"personalizationVariantStatus":null,"personas":[],"placementGuids":[],"portableKey":null,"portalId":48463649,"position":null,"postBody":"

Keep the cable on your winch drum neat and tight through a weekly maintenance procedure known as power wrapping. This exercise will prolong the life of your winch line by preventing weak points caused by unnecessary kinks and flat spots.

\n\n

“You should power wrap your winch at least once a week,” recommends Rene Jimenez, a technical advisor at Zip’s AW Direct. “You want to keep your wire rope tight on the spool so it doesn’t dive or kink and start what I call the paper clip effect, where the more it bends, the weaker it gets before eventually failing.”

\n

Power wrapping works in tandem with the cable tensioner. As illustrated in this video from Miller Industries, the procedure is performed by free-spooling the winch line out and then winding it back up under a load by attaching the hook to another vehicle or deadman.

\n

“As you pull the wire rope out, you want to keep at least seven wraps on that last layer so you don’t pull all of the wire rope out of the drum. That would create quite a mess,” explains Miller’s Billy Drane in the video.

\n

Experts say power wrapping should be done regardless of the size of the winch: from car carriers to heavy-duty recovery vehicles. The procedure is effective for both wire and synthetic rope. In fact, according to Jimenez, power wrapping helps “set the braid” on a new synthetic line.

\n

Power wrapping is “something that is very important to do,” Drane said. “What can tend to happen (when you don’t) is the loose wire rope going around the drum will cause the top layers to bury down (or dive) into the inner layers.”

\n

“Once you get in the habit of doing this regularly, it really doesn’t take very long to do,” Jimenez said. “Take a few minutes each week to prevent a headache down the road.”

","postBodyRss":"

Keep the cable on your winch drum neat and tight through a weekly maintenance procedure known as power wrapping. This exercise will prolong the life of your winch line by preventing weak points caused by unnecessary kinks and flat spots.

\n\n

“You should power wrap your winch at least once a week,” recommends Rene Jimenez, a technical advisor at Zip’s AW Direct. “You want to keep your wire rope tight on the spool so it doesn’t dive or kink and start what I call the paper clip effect, where the more it bends, the weaker it gets before eventually failing.”

\n

Power wrapping works in tandem with the cable tensioner. As illustrated in this video from Miller Industries, the procedure is performed by free-spooling the winch line out and then winding it back up under a load by attaching the hook to another vehicle or deadman.

\n

“As you pull the wire rope out, you want to keep at least seven wraps on that last layer so you don’t pull all of the wire rope out of the drum. That would create quite a mess,” explains Miller’s Billy Drane in the video.

\n

Experts say power wrapping should be done regardless of the size of the winch: from car carriers to heavy-duty recovery vehicles. The procedure is effective for both wire and synthetic rope. In fact, according to Jimenez, power wrapping helps “set the braid” on a new synthetic line.

\n

Power wrapping is “something that is very important to do,” Drane said. “What can tend to happen (when you don’t) is the loose wire rope going around the drum will cause the top layers to bury down (or dive) into the inner layers.”

\n

“Once you get in the habit of doing this regularly, it really doesn’t take very long to do,” Jimenez said. “Take a few minutes each week to prevent a headache down the road.”

","postEmailContent":"

Keep the cable on your winch drum neat and tight through a weekly maintenance procedure known as power wrapping. This exercise will prolong the life of your winch line by preventing weak points caused by unnecessary kinks and flat spots.

","postFeaturedImageIfEnabled":"https://48463649.fs1.hubspotusercontent-na1.net/hubfs/48463649/Blog/16731-power-wrapping-blog-feb-2020-542227042.jpg","postListContent":"

Keep the cable on your winch drum neat and tight through a weekly maintenance procedure known as power wrapping. This exercise will prolong the life of your winch line by preventing weak points caused by unnecessary kinks and flat spots.

","postListSummaryFeaturedImage":"https://48463649.fs1.hubspotusercontent-na1.net/hubfs/48463649/Blog/16731-power-wrapping-blog-feb-2020-542227042.jpg","postRssContent":"

Keep the cable on your winch drum neat and tight through a weekly maintenance procedure known as power wrapping. This exercise will prolong the life of your winch line by preventing weak points caused by unnecessary kinks and flat spots.

","postRssSummaryFeaturedImage":"https://48463649.fs1.hubspotusercontent-na1.net/hubfs/48463649/Blog/16731-power-wrapping-blog-feb-2020-542227042.jpg","postSummary":"

Keep the cable on your winch drum neat and tight through a weekly maintenance procedure known as power wrapping. This exercise will prolong the life of your winch line by preventing weak points caused by unnecessary kinks and flat spots.

\n","postSummaryRss":"

Keep the cable on your winch drum neat and tight through a weekly maintenance procedure known as power wrapping. This exercise will prolong the life of your winch line by preventing weak points caused by unnecessary kinks and flat spots.

","postTemplate":"zips-basic-theme/templates/blog-post.html","previewImageSrc":null,"previewKey":"cwRQEMwt","previousPostFeaturedImage":"https://48463649.fs1.hubspotusercontent-na1.net/hubfs/48463649/Blog/jump-pack-collage-feb-2020-11139181980.jpg","previousPostFeaturedImageAltText":"","previousPostName":"Batteries don’t like the cold weather either","previousPostSlug":"blog/batteries-don-t-like-the-cold-weather-either","processingStatus":"PUBLISHED","propertyForDynamicPageCanonicalUrl":null,"propertyForDynamicPageFeaturedImage":null,"propertyForDynamicPageMetaDescription":null,"propertyForDynamicPageSlug":null,"propertyForDynamicPageTitle":null,"publicAccessRules":[],"publicAccessRulesEnabled":false,"publishDate":1580911200000,"publishDateLocalTime":1580911200000,"publishDateLocalized":{"date":1580911200000,"format":"medium","language":null},"publishImmediately":true,"publishTimezoneOffset":null,"publishedAt":1755718425772,"publishedByEmail":null,"publishedById":79766377,"publishedByName":null,"publishedUrl":"/blog/add-winch-line-power-wrapping-to-your-weekly-maintenance-routine","resolvedDomain":"www.zips.com","resolvedLanguage":null,"rssBody":"

Keep the cable on your winch drum neat and tight through a weekly maintenance procedure known as power wrapping. This exercise will prolong the life of your winch line by preventing weak points caused by unnecessary kinks and flat spots.

\n\n

“You should power wrap your winch at least once a week,” recommends Rene Jimenez, a technical advisor at Zip’s AW Direct. “You want to keep your wire rope tight on the spool so it doesn’t dive or kink and start what I call the paper clip effect, where the more it bends, the weaker it gets before eventually failing.”

\n

Power wrapping works in tandem with the cable tensioner. As illustrated in this video from Miller Industries, the procedure is performed by free-spooling the winch line out and then winding it back up under a load by attaching the hook to another vehicle or deadman.

\n

“As you pull the wire rope out, you want to keep at least seven wraps on that last layer so you don’t pull all of the wire rope out of the drum. That would create quite a mess,” explains Miller’s Billy Drane in the video.

\n

Experts say power wrapping should be done regardless of the size of the winch: from car carriers to heavy-duty recovery vehicles. The procedure is effective for both wire and synthetic rope. In fact, according to Jimenez, power wrapping helps “set the braid” on a new synthetic line.

\n

Power wrapping is “something that is very important to do,” Drane said. “What can tend to happen (when you don’t) is the loose wire rope going around the drum will cause the top layers to bury down (or dive) into the inner layers.”

\n

“Once you get in the habit of doing this regularly, it really doesn’t take very long to do,” Jimenez said. “Take a few minutes each week to prevent a headache down the road.”

","rssSummary":"

Keep the cable on your winch drum neat and tight through a weekly maintenance procedure known as power wrapping. This exercise will prolong the life of your winch line by preventing weak points caused by unnecessary kinks and flat spots.

\n","rssSummaryFeaturedImage":"https://48463649.fs1.hubspotusercontent-na1.net/hubfs/48463649/Blog/16731-power-wrapping-blog-feb-2020-542227042.jpg","scheduledUpdateDate":0,"screenshotPreviewTakenAt":1770060825727,"screenshotPreviewUrl":"https://cdn1.hubspot.net/hubshotv3/prod/e/0/a4d319a0-e4c1-4c1a-b69a-cd531a631cdb.png","sections":{},"securityState":"NONE","siteId":null,"slug":"blog/add-winch-line-power-wrapping-to-your-weekly-maintenance-routine","stagedFrom":null,"state":"PUBLISHED","stateWhenDeleted":null,"structuredContentPageType":null,"structuredContentType":null,"styleOverrideId":null,"subcategory":"normal_blog_post","syncedWithBlogRoot":true,"tagIds":[192169769490,192174528148,192174529697,194719179289,194719586666],"tagList":[{"categoryId":3,"cdnPurgeEmbargoTime":null,"contentIds":[],"cosObjectType":"TAG","created":1751598346713,"deletedAt":0,"description":"","id":192169769490,"label":"Towing & Recovery","language":null,"name":"Towing & Recovery","portalId":48463649,"slug":"towing-recovery","translatedFromId":null,"translations":{},"updated":1751598346713},{"categoryId":3,"cdnPurgeEmbargoTime":null,"contentIds":[],"cosObjectType":"TAG","created":1751601475164,"deletedAt":0,"description":"","id":192174528148,"label":"Automotive","language":null,"name":"Automotive","portalId":48463649,"slug":"automotive","translatedFromId":null,"translations":{},"updated":1751601475164},{"categoryId":3,"cdnPurgeEmbargoTime":null,"contentIds":[],"cosObjectType":"TAG","created":1751602285139,"deletedAt":0,"description":"","id":192174529697,"label":"Construction","language":null,"name":"Construction","portalId":48463649,"slug":"construction","translatedFromId":null,"translations":{},"updated":1751602285139},{"categoryId":3,"cdnPurgeEmbargoTime":null,"contentIds":[],"cosObjectType":"TAG","created":1755545213046,"deletedAt":0,"description":"","id":194719179289,"label":"Industry Knowledge & Updates","language":null,"name":"Industry Knowledge & Updates","portalId":48463649,"slug":"industry-knowledge-updates","translatedFromId":null,"translations":{},"updated":1755545213046},{"categoryId":3,"cdnPurgeEmbargoTime":null,"contentIds":[],"cosObjectType":"TAG","created":1755545331471,"deletedAt":0,"description":"","id":194719586666,"label":"Product Guides","language":null,"name":"Product Guides","portalId":48463649,"slug":"product-guides","translatedFromId":null,"translations":{},"updated":1755545331471}],"tagNames":["Towing & Recovery","Automotive","Construction","Industry Knowledge & Updates","Product Guides"],"teamPerms":[],"templatePath":"","templatePathForRender":"zips-basic-theme/templates/blog-post.html","textToAudioFileId":null,"textToAudioGenerationRequestId":null,"themePath":null,"themeSettingsValues":null,"title":"Add winch line power wrapping to your weekly maintenance routine","tmsId":null,"topicIds":[192169769490,192174528148,192174529697,194719179289,194719586666],"topicList":[{"categoryId":3,"cdnPurgeEmbargoTime":null,"contentIds":[],"cosObjectType":"TAG","created":1751598346713,"deletedAt":0,"description":"","id":192169769490,"label":"Towing & Recovery","language":null,"name":"Towing & Recovery","portalId":48463649,"slug":"towing-recovery","translatedFromId":null,"translations":{},"updated":1751598346713},{"categoryId":3,"cdnPurgeEmbargoTime":null,"contentIds":[],"cosObjectType":"TAG","created":1751601475164,"deletedAt":0,"description":"","id":192174528148,"label":"Automotive","language":null,"name":"Automotive","portalId":48463649,"slug":"automotive","translatedFromId":null,"translations":{},"updated":1751601475164},{"categoryId":3,"cdnPurgeEmbargoTime":null,"contentIds":[],"cosObjectType":"TAG","created":1751602285139,"deletedAt":0,"description":"","id":192174529697,"label":"Construction","language":null,"name":"Construction","portalId":48463649,"slug":"construction","translatedFromId":null,"translations":{},"updated":1751602285139},{"categoryId":3,"cdnPurgeEmbargoTime":null,"contentIds":[],"cosObjectType":"TAG","created":1755545213046,"deletedAt":0,"description":"","id":194719179289,"label":"Industry Knowledge & Updates","language":null,"name":"Industry Knowledge & Updates","portalId":48463649,"slug":"industry-knowledge-updates","translatedFromId":null,"translations":{},"updated":1755545213046},{"categoryId":3,"cdnPurgeEmbargoTime":null,"contentIds":[],"cosObjectType":"TAG","created":1755545331471,"deletedAt":0,"description":"","id":194719586666,"label":"Product Guides","language":null,"name":"Product Guides","portalId":48463649,"slug":"product-guides","translatedFromId":null,"translations":{},"updated":1755545331471}],"topicNames":["Towing & Recovery","Automotive","Construction","Industry Knowledge & Updates","Product Guides"],"topics":[192169769490,192174528148,192174529697,194719179289,194719586666],"translatedContent":{},"translatedFromId":null,"translations":{},"tweet":null,"tweetAt":null,"tweetImmediately":false,"unpublishedAt":0,"updated":1755718425775,"updatedById":79766377,"upsizeFeaturedImage":false,"url":"/blog/add-winch-line-power-wrapping-to-your-weekly-maintenance-routine","useFeaturedImage":true,"userPerms":[],"views":null,"visibleToAll":null,"widgetContainers":{},"widgetcontainers":{},"widgets":{}},{"ab":false,"abStatus":null,"abTestId":null,"abVariation":false,"abVariationAutomated":false,"absoluteUrl":"/blog/make-an-informed-decision-on-your-next-tow-dolly-purchase","afterPostBody":null,"aifeatures":null,"allowedSlugConflict":false,"analytics":null,"analyticsPageId":"192200605212","analyticsPageType":"blog-post","approvalStatus":null,"archived":false,"archivedAt":0,"archivedInDashboard":false,"areCommentsAllowed":true,"attachedStylesheets":[],"audienceAccess":"PUBLIC","author":null,"authorName":null,"authorUsername":null,"blogAuthor":{"avatar":"","bio":"","cdnPurgeEmbargoTime":null,"cosObjectType":"BLOG_AUTHOR","created":1755187092136,"deletedAt":0,"displayName":"Cameron Hanson","email":null,"facebook":"","fullName":"Cameron Hanson","gravatarUrl":null,"hasSocialProfiles":false,"id":194499322288,"label":"Cameron Hanson","language":"en","linkedin":"","name":" Cameron Hanson","portalId":48463649,"slug":"cameron-hanson","translatedFromId":null,"translations":{},"twitter":"","twitterUsername":"","updated":1755187092136,"userId":null,"username":null,"website":""},"blogAuthorId":194499322288,"blogAuthorIdList":[194499322288],"blogAuthorList":[{"avatar":"","bio":"","cdnPurgeEmbargoTime":null,"cosObjectType":"BLOG_AUTHOR","created":1755187092136,"deletedAt":0,"displayName":"Cameron Hanson","email":null,"facebook":"","fullName":"Cameron Hanson","gravatarUrl":null,"hasSocialProfiles":false,"id":194499322288,"label":"Cameron Hanson","language":"en","linkedin":"","name":" Cameron Hanson","portalId":48463649,"slug":"cameron-hanson","translatedFromId":null,"translations":{},"twitter":"","twitterUsername":"","updated":1755187092136,"userId":null,"username":null,"website":""}],"blogPostAuthor":{"avatar":"","bio":"","cdnPurgeEmbargoTime":null,"cosObjectType":"BLOG_AUTHOR","created":1755187092136,"deletedAt":0,"displayName":"Cameron Hanson","email":null,"facebook":"","fullName":"Cameron Hanson","gravatarUrl":null,"hasSocialProfiles":false,"id":194499322288,"label":"Cameron Hanson","language":"en","linkedin":"","name":" Cameron Hanson","portalId":48463649,"slug":"cameron-hanson","translatedFromId":null,"translations":{},"twitter":"","twitterUsername":"","updated":1755187092136,"userId":null,"username":null,"website":""},"blogPostScheduleTaskUid":null,"blogPublishInstantEmailCampaignId":null,"blogPublishInstantEmailRetryCount":null,"blogPublishInstantEmailTaskUid":null,"blogPublishToSocialMediaTask":"DONE_NOT_SENT","blueprintTypeId":0,"businessUnitId":null,"campaign":null,"campaignName":null,"campaignUtm":null,"category":3,"categoryId":3,"cdnPurgeEmbargoTime":null,"checkPostLevelAudienceAccessFirst":true,"clonedFrom":null,"composeBody":null,"compositionId":0,"contentAccessRuleIds":[],"contentAccessRuleTypes":[],"contentGroup":190096341139,"contentGroupId":190096341139,"contentTypeCategory":3,"contentTypeCategoryId":3,"contentTypeId":null,"created":1751647137175,"createdByAgent":null,"createdById":74657203,"createdTime":1751647137175,"crmObjectId":null,"css":{},"cssText":"","ctaClicks":null,"ctaViews":null,"currentState":"PUBLISHED","currentlyPublished":true,"deletedAt":0,"deletedBy":null,"deletedByEmail":null,"deletedById":null,"domain":"","dynamicPageDataSourceId":null,"dynamicPageDataSourceType":null,"dynamicPageHubDbTableId":null,"enableDomainStylesheets":null,"enableGoogleAmpOutputOverride":false,"enableLayoutStylesheets":null,"errors":[],"featuredImage":"https://48463649.fs1.hubspotusercontent-na1.net/hubfs/48463649/1545635_ITD-2778-xl-dolly-set.jpg_900.avif","featuredImageAltText":"","featuredImageHeight":600,"featuredImageLength":0,"featuredImageWidth":900,"flexAreas":{},"folderId":null,"footerHtml":null,"footerTemplatePath":null,"footerVariantName":null,"freezeDate":1579183200000,"generateJsonLdEnabledOverride":true,"globalBlockOverrides":{},"hasContentAccessRules":false,"hasUserChanges":true,"headHtml":null,"header":null,"headerTemplatePath":null,"headerVariantName":null,"htmlTitle":"Make an Informed Purchase on You Next Tow Dolly","id":192200605212,"includeDefaultCustomCss":null,"isCaptchaRequired":true,"isCrawlableByBots":false,"isDraft":false,"isInstantEmailEnabled":false,"isPublished":true,"isSocialPublishingEnabled":false,"keywords":[],"label":"Make an Informed Purchase on You Next Tow Dolly","language":"en","lastEditSessionId":null,"lastEditUpdateId":null,"layoutSections":{},"legacyBlogTabid":null,"legacyId":null,"legacyPostGuid":null,"linkRelCanonicalUrl":"","listTemplate":"","liveDomain":"www.zips.com","mab":false,"mabExperimentId":null,"mabMaster":false,"mabVariant":false,"marketingCampaignGuids":[],"meta":{"html_title":"Make an Informed Purchase on You Next Tow Dolly","public_access_rules":[],"public_access_rules_enabled":false,"use_featured_image":true,"tag_ids":[192169769490,192174528148,194719179289,194719586666],"topic_ids":[192169769490,192174528148,194719179289,194719586666],"post_summary":"
\n
\n
\n
\n
\n","post_body":"
\n
\n
\n
\n
\n
\n

There are numerous factors to contemplate when buying a brand new tow dolly. Zip's AW Direct offers a variety of Collins and In The Ditch dollies. We carry nine different models with capacities listed at either 3,040 pounds or 4,280 pounds, depending on tire size.

Today we break down the components of a tow dolly sets and explore how they relate to durability and maintenance. The blog post and video provide more information on the topic. The blog post provides a detailed outline of the key points.

\n

Each featured part of a dolly offers benefits and limitations, both of which can affect the price range of $1,485 to more than $2,000 per set.

\n

Tow dollies have 8\" utility tires, allowing them to have a maximum road speed of 60 mph. Making them a good choice for short and medium distance travel. However, most operators prefer to stay at or below 50 mph for safety.

Based on your use cases, choose from 5.70 or 4.80 tire sizes with steel or aluminum wheels. Besides speed, tire sizes also affect load capacity: the larger the tire, the greater the load it can handle. Be sure to check tire pressures regularly on your tow dolly tires, for maximum safety and efficiency.

\n

Dolly assemblies are made from steel and are available with aluminum or steel axles. Aluminum axles offer a weight savings that your operators will appreciate. Steel components can be zinc-plated or powder-coated with each offering its own level of durability.

\n

Another item to consider is maintenance, especially this time of year. Tow dollies can often be neglected, and replacing a set may be the reason you've landed here. Zip's AW Direct offers dollies with easy-to-lube grease zerks or with maintenance-free hubs. Featuring automotive sealed hubs and bearings, the latter can save you time and money and extend the life of your dolly. Choose what best fits your operation.

\n

You can compare options and learn more by visiting our tow dolly section online at www.zips.com/towing-accessories. Here you will find detailed product descriptions as well as tables identifying which features accompany each model.

\n

Also, don't forget to check out our replacement dolly parts as well as our deck mounts and storage racks for your dollies when they are not in use.

","rss_summary":"
\n
\n
\n
\n
\n","rss_body":"
\n
\n
\n
\n
\n
\n

There are numerous factors to contemplate when buying a brand new tow dolly. Zip's AW Direct offers a variety of Collins and In The Ditch dollies. We carry nine different models with capacities listed at either 3,040 pounds or 4,280 pounds, depending on tire size.

Today we break down the components of a tow dolly sets and explore how they relate to durability and maintenance. The blog post and video provide more information on the topic. The blog post provides a detailed outline of the key points.

\n

Each featured part of a dolly offers benefits and limitations, both of which can affect the price range of $1,485 to more than $2,000 per set.

\n

Tow dollies have 8\" utility tires, allowing them to have a maximum road speed of 60 mph. Making them a good choice for short and medium distance travel. However, most operators prefer to stay at or below 50 mph for safety.

Based on your use cases, choose from 5.70 or 4.80 tire sizes with steel or aluminum wheels. Besides speed, tire sizes also affect load capacity: the larger the tire, the greater the load it can handle. Be sure to check tire pressures regularly on your tow dolly tires, for maximum safety and efficiency.

\n

Dolly assemblies are made from steel and are available with aluminum or steel axles. Aluminum axles offer a weight savings that your operators will appreciate. Steel components can be zinc-plated or powder-coated with each offering its own level of durability.

\n

Another item to consider is maintenance, especially this time of year. Tow dollies can often be neglected, and replacing a set may be the reason you've landed here. Zip's AW Direct offers dollies with easy-to-lube grease zerks or with maintenance-free hubs. Featuring automotive sealed hubs and bearings, the latter can save you time and money and extend the life of your dolly. Choose what best fits your operation.

\n

You can compare options and learn more by visiting our tow dolly section online at www.zips.com/towing-accessories. Here you will find detailed product descriptions as well as tables identifying which features accompany each model.

\n

Also, don't forget to check out our replacement dolly parts as well as our deck mounts and storage racks for your dollies when they are not in use.

","enable_google_amp_output_override":false,"generate_json_ld_enabled":true,"blog_post_schedule_task_uid":null,"blog_publish_to_social_media_task":"DONE_NOT_SENT","blog_publish_instant_email_task_uid":null,"blog_publish_instant_email_campaign_id":null,"blog_publish_instant_email_retry_count":null,"keywords":[],"composition_id":0,"is_crawlable_by_bots":false,"header":null,"published_at":1756217491158,"head_html":null,"footer_html":null,"attached_stylesheets":[],"enable_domain_stylesheets":null,"include_default_custom_css":null,"layout_sections":{},"past_mab_experiment_ids":[],"deleted_by":null,"featured_image_alt_text":"","enable_layout_stylesheets":null,"tweet":null,"tweet_at":null,"campaign_name":null,"campaign_utm":null,"meta_keywords":null,"meta_description":"A comprehensive guide on selecting the right tow dolly, including important considerations for durability, maintenance, tire size, assembly materials, and where to find additional resources and replacement parts.","tweet_immediately":false,"publish_immediately":true,"security_state":"NONE","scheduled_update_date":0,"placement_guids":[],"header_template_path":null,"header_variant_name":null,"footer_template_path":null,"footer_variant_name":null,"global_block_overrides":{},"property_for_dynamic_page_title":null,"property_for_dynamic_page_slug":null,"property_for_dynamic_page_meta_description":null,"property_for_dynamic_page_featured_image":null,"property_for_dynamic_page_canonical_url":null,"preview_image_src":null,"legacy_blog_tabid":null,"legacy_post_guid":null,"performable_variation_letter":null,"style_override_id":null,"has_user_changes":true,"css":{},"css_text":"","unpublished_at":0,"published_by_id":76755706,"allowed_slug_conflict":false,"ai_features":null,"link_rel_canonical_url":"","page_redirected":false,"page_expiry_enabled":null,"page_expiry_date":null,"page_expiry_redirect_id":null,"page_expiry_redirect_url":null,"deleted_by_id":null,"state_when_deleted":null,"cloned_from":null,"staged_from":null,"personas":[],"compose_body":null,"featured_image":"https://48463649.fs1.hubspotusercontent-na1.net/hubfs/48463649/1545635_ITD-2778-xl-dolly-set.jpg_900.avif","featured_image_width":900,"featured_image_height":600,"publish_timezone_offset":null,"theme_settings_values":null,"password":null,"last_edit_session_id":null,"last_edit_update_id":null,"created_by_agent":null},"metaDescription":"A comprehensive guide on selecting the right tow dolly, including important considerations for durability, maintenance, tire size, assembly materials, and where to find additional resources and replacement parts.","metaKeywords":null,"name":"Make an Informed Purchase on You Next Tow Dolly","nextPostFeaturedImage":"https://48463649.fs1.hubspotusercontent-na1.net/hubfs/48463649/truck-lightbar-cleaning.jpg","nextPostFeaturedImageAltText":"truck with clean lightbar","nextPostName":"Explore Lightbar Cleaning Methods & Tips","nextPostSlug":"blog/lightbar-cleaning-methods","pageExpiryDate":null,"pageExpiryEnabled":null,"pageExpiryRedirectId":null,"pageExpiryRedirectUrl":null,"pageRedirected":false,"pageTitle":"Make an Informed Purchase on You Next Tow Dolly","parentBlog":{"absoluteUrl":"/blog","allowComments":true,"ampBodyColor":"#404040","ampBodyFont":"'Helvetica Neue', Helvetica, Arial, sans-serif","ampBodyFontSize":"18","ampCustomCss":"","ampHeaderBackgroundColor":"#ffffff","ampHeaderColor":"#1e1e1e","ampHeaderFont":"'Helvetica Neue', Helvetica, Arial, sans-serif","ampHeaderFontSize":"36","ampLinkColor":"#416bb3","ampLogoAlt":"","ampLogoHeight":0,"ampLogoSrc":"","ampLogoWidth":0,"analyticsPageId":190096341139,"attachedStylesheets":[],"audienceAccess":"PUBLIC","businessUnitId":null,"captchaAfterDays":7,"captchaAlways":false,"categoryId":3,"cdnPurgeEmbargoTime":null,"closeCommentsOlder":0,"commentDateFormat":"medium","commentFormGuid":"a4128401-39db-4c54-a62b-88ff335d3a69","commentMaxThreadDepth":1,"commentModeration":false,"commentNotificationEmails":[],"commentShouldCreateContact":false,"commentVerificationText":"","cosObjectType":"BLOG","created":1747163443999,"createdDateTime":1747163443999,"dailyNotificationEmailId":null,"dateFormattingLanguage":null,"defaultGroupStyleId":"","defaultNotificationFromName":"","defaultNotificationReplyTo":"","deletedAt":0,"description":"","domain":"","domainWhenPublished":"www.zips.com","emailApiSubscriptionId":null,"enableGoogleAmpOutput":true,"enableSocialAutoPublishing":false,"generateJsonLdEnabled":true,"header":null,"htmlFooter":"","htmlFooterIsShared":true,"htmlHead":"","htmlHeadIsShared":true,"htmlKeywords":[],"htmlTitle":"blog","id":190096341139,"ilsSubscriptionListsByType":{},"instantNotificationEmailId":null,"itemLayoutId":null,"itemTemplateIsShared":false,"itemTemplatePath":"zips-basic-theme/templates/blog-post.html","label":"blog","language":"en","legacyGuid":null,"legacyModuleId":null,"legacyTabId":null,"listingLayoutId":null,"listingPageId":190096341141,"listingTemplatePath":"","liveDomain":"www.zips.com","monthFilterFormat":"MMMM yyyy","monthlyNotificationEmailId":null,"name":"blog","parentBlogUpdateTaskId":null,"portalId":48463649,"postHtmlFooter":"","postHtmlHead":"","postsPerListingPage":111,"postsPerRssFeed":10,"publicAccessRules":[],"publicAccessRulesEnabled":false,"publicTitle":"blog","publishDateFormat":"medium","resolvedDomain":"www.zips.com","rootUrl":"/blog","rssCustomFeed":null,"rssDescription":null,"rssItemFooter":null,"rssItemHeader":null,"settingsOverrides":{"itemLayoutId":false,"itemTemplatePath":false,"itemTemplateIsShared":false,"listingLayoutId":false,"listingTemplatePath":false,"postsPerListingPage":false,"showSummaryInListing":false,"useFeaturedImageInSummary":false,"htmlHead":false,"postHtmlHead":false,"htmlHeadIsShared":false,"htmlFooter":false,"listingPageHtmlFooter":false,"postHtmlFooter":false,"htmlFooterIsShared":false,"attachedStylesheets":false,"postsPerRssFeed":false,"showSummaryInRss":false,"showSummaryInEmails":false,"showSummariesInEmails":false,"allowComments":false,"commentShouldCreateContact":false,"commentModeration":false,"closeCommentsOlder":false,"commentNotificationEmails":false,"commentMaxThreadDepth":false,"commentVerificationText":false,"socialAccountTwitter":false,"showSocialLinkTwitter":false,"showSocialLinkLinkedin":false,"showSocialLinkFacebook":false,"enableGoogleAmpOutput":false,"ampLogoSrc":false,"ampLogoHeight":false,"ampLogoWidth":false,"ampLogoAlt":false,"ampHeaderFont":false,"ampHeaderFontSize":false,"ampHeaderColor":false,"ampHeaderBackgroundColor":false,"ampBodyFont":false,"ampBodyFontSize":false,"ampBodyColor":false,"ampLinkColor":false,"generateJsonLdEnabled":false},"showSocialLinkFacebook":true,"showSocialLinkLinkedin":true,"showSocialLinkTwitter":true,"showSummaryInEmails":true,"showSummaryInListing":true,"showSummaryInRss":true,"siteId":null,"slug":"blog","socialAccountTwitter":"","state":null,"subscriptionContactsProperty":null,"subscriptionEmailType":null,"subscriptionFormGuid":null,"subscriptionListsByType":{},"title":null,"translatedFromId":null,"translations":{},"updated":1755110916417,"updatedDateTime":1755110916417,"urlBase":"www.zips.com/blog","urlSegments":{"all":"all","archive":"archive","author":"author","page":"page","tag":"tag"},"useFeaturedImageInSummary":true,"usesDefaultTemplate":false,"weeklyNotificationEmailId":null},"password":null,"pastMabExperimentIds":[],"performableGuid":null,"performableVariationLetter":null,"personalizationStrategyId":null,"personalizationVariantStatus":null,"personas":[],"placementGuids":[],"portableKey":null,"portalId":48463649,"position":null,"postBody":"
\n
\n
\n
\n
\n
\n

There are numerous factors to contemplate when buying a brand new tow dolly. Zip's AW Direct offers a variety of Collins and In The Ditch dollies. We carry nine different models with capacities listed at either 3,040 pounds or 4,280 pounds, depending on tire size.

Today we break down the components of a tow dolly sets and explore how they relate to durability and maintenance. The blog post and video provide more information on the topic. The blog post provides a detailed outline of the key points.

\n

Each featured part of a dolly offers benefits and limitations, both of which can affect the price range of $1,485 to more than $2,000 per set.

\n

Tow dollies have 8\" utility tires, allowing them to have a maximum road speed of 60 mph. Making them a good choice for short and medium distance travel. However, most operators prefer to stay at or below 50 mph for safety.

Based on your use cases, choose from 5.70 or 4.80 tire sizes with steel or aluminum wheels. Besides speed, tire sizes also affect load capacity: the larger the tire, the greater the load it can handle. Be sure to check tire pressures regularly on your tow dolly tires, for maximum safety and efficiency.

\n

Dolly assemblies are made from steel and are available with aluminum or steel axles. Aluminum axles offer a weight savings that your operators will appreciate. Steel components can be zinc-plated or powder-coated with each offering its own level of durability.

\n

Another item to consider is maintenance, especially this time of year. Tow dollies can often be neglected, and replacing a set may be the reason you've landed here. Zip's AW Direct offers dollies with easy-to-lube grease zerks or with maintenance-free hubs. Featuring automotive sealed hubs and bearings, the latter can save you time and money and extend the life of your dolly. Choose what best fits your operation.

\n

You can compare options and learn more by visiting our tow dolly section online at www.zips.com/towing-accessories. Here you will find detailed product descriptions as well as tables identifying which features accompany each model.

\n

Also, don't forget to check out our replacement dolly parts as well as our deck mounts and storage racks for your dollies when they are not in use.

","postBodyRss":"
\n
\n
\n
\n
\n
\n

There are numerous factors to contemplate when buying a brand new tow dolly. Zip's AW Direct offers a variety of Collins and In The Ditch dollies. We carry nine different models with capacities listed at either 3,040 pounds or 4,280 pounds, depending on tire size.

Today we break down the components of a tow dolly sets and explore how they relate to durability and maintenance. The blog post and video provide more information on the topic. The blog post provides a detailed outline of the key points.

\n

Each featured part of a dolly offers benefits and limitations, both of which can affect the price range of $1,485 to more than $2,000 per set.

\n

Tow dollies have 8\" utility tires, allowing them to have a maximum road speed of 60 mph. Making them a good choice for short and medium distance travel. However, most operators prefer to stay at or below 50 mph for safety.

Based on your use cases, choose from 5.70 or 4.80 tire sizes with steel or aluminum wheels. Besides speed, tire sizes also affect load capacity: the larger the tire, the greater the load it can handle. Be sure to check tire pressures regularly on your tow dolly tires, for maximum safety and efficiency.

\n

Dolly assemblies are made from steel and are available with aluminum or steel axles. Aluminum axles offer a weight savings that your operators will appreciate. Steel components can be zinc-plated or powder-coated with each offering its own level of durability.

\n

Another item to consider is maintenance, especially this time of year. Tow dollies can often be neglected, and replacing a set may be the reason you've landed here. Zip's AW Direct offers dollies with easy-to-lube grease zerks or with maintenance-free hubs. Featuring automotive sealed hubs and bearings, the latter can save you time and money and extend the life of your dolly. Choose what best fits your operation.

\n

You can compare options and learn more by visiting our tow dolly section online at www.zips.com/towing-accessories. Here you will find detailed product descriptions as well as tables identifying which features accompany each model.

\n

Also, don't forget to check out our replacement dolly parts as well as our deck mounts and storage racks for your dollies when they are not in use.

","postEmailContent":"
\n
\n
\n \n
\n
\n
","postFeaturedImageIfEnabled":"https://48463649.fs1.hubspotusercontent-na1.net/hubfs/48463649/1545635_ITD-2778-xl-dolly-set.jpg_900.avif","postListContent":"
\n
\n
\n \n
\n
\n
","postListSummaryFeaturedImage":"https://48463649.fs1.hubspotusercontent-na1.net/hubfs/48463649/1545635_ITD-2778-xl-dolly-set.jpg_900.avif","postRssContent":"
\n
\n
\n \n
\n
\n
","postRssSummaryFeaturedImage":"https://48463649.fs1.hubspotusercontent-na1.net/hubfs/48463649/1545635_ITD-2778-xl-dolly-set.jpg_900.avif","postSummary":"
\n
\n
\n
\n
\n","postSummaryRss":"
\n
\n
\n \n
\n
\n
","postTemplate":"zips-basic-theme/templates/blog-post.html","previewImageSrc":null,"previewKey":"muJmgghS","previousPostFeaturedImage":"https://48463649.fs1.hubspotusercontent-na1.net/hubfs/48463649/Blog/16731-power-wrapping-blog-feb-2020-542227042.jpg","previousPostFeaturedImageAltText":"","previousPostName":"Add winch line power wrapping to your weekly maintenance routine","previousPostSlug":"blog/add-winch-line-power-wrapping-to-your-weekly-maintenance-routine","processingStatus":"PUBLISHED","propertyForDynamicPageCanonicalUrl":null,"propertyForDynamicPageFeaturedImage":null,"propertyForDynamicPageMetaDescription":null,"propertyForDynamicPageSlug":null,"propertyForDynamicPageTitle":null,"publicAccessRules":[],"publicAccessRulesEnabled":false,"publishDate":1579183200000,"publishDateLocalTime":1579183200000,"publishDateLocalized":{"date":1579183200000,"format":"medium","language":null},"publishImmediately":true,"publishTimezoneOffset":null,"publishedAt":1756217491158,"publishedByEmail":null,"publishedById":76755706,"publishedByName":null,"publishedUrl":"/blog/make-an-informed-decision-on-your-next-tow-dolly-purchase","resolvedDomain":"www.zips.com","resolvedLanguage":null,"rssBody":"
\n
\n
\n
\n
\n
\n

There are numerous factors to contemplate when buying a brand new tow dolly. Zip's AW Direct offers a variety of Collins and In The Ditch dollies. We carry nine different models with capacities listed at either 3,040 pounds or 4,280 pounds, depending on tire size.

Today we break down the components of a tow dolly sets and explore how they relate to durability and maintenance. The blog post and video provide more information on the topic. The blog post provides a detailed outline of the key points.

\n

Each featured part of a dolly offers benefits and limitations, both of which can affect the price range of $1,485 to more than $2,000 per set.

\n

Tow dollies have 8\" utility tires, allowing them to have a maximum road speed of 60 mph. Making them a good choice for short and medium distance travel. However, most operators prefer to stay at or below 50 mph for safety.

Based on your use cases, choose from 5.70 or 4.80 tire sizes with steel or aluminum wheels. Besides speed, tire sizes also affect load capacity: the larger the tire, the greater the load it can handle. Be sure to check tire pressures regularly on your tow dolly tires, for maximum safety and efficiency.

\n

Dolly assemblies are made from steel and are available with aluminum or steel axles. Aluminum axles offer a weight savings that your operators will appreciate. Steel components can be zinc-plated or powder-coated with each offering its own level of durability.

\n

Another item to consider is maintenance, especially this time of year. Tow dollies can often be neglected, and replacing a set may be the reason you've landed here. Zip's AW Direct offers dollies with easy-to-lube grease zerks or with maintenance-free hubs. Featuring automotive sealed hubs and bearings, the latter can save you time and money and extend the life of your dolly. Choose what best fits your operation.

\n

You can compare options and learn more by visiting our tow dolly section online at www.zips.com/towing-accessories. Here you will find detailed product descriptions as well as tables identifying which features accompany each model.

\n

Also, don't forget to check out our replacement dolly parts as well as our deck mounts and storage racks for your dollies when they are not in use.

","rssSummary":"
\n
\n
\n
\n
\n","rssSummaryFeaturedImage":"https://48463649.fs1.hubspotusercontent-na1.net/hubfs/48463649/1545635_ITD-2778-xl-dolly-set.jpg_900.avif","scheduledUpdateDate":0,"screenshotPreviewTakenAt":1770559891149,"screenshotPreviewUrl":"https://cdn1.hubspot.net/hubshotv3/prod/e/0/14b57eb3-7db3-496c-bb4f-5b500ef729ad.png","sections":{},"securityState":"NONE","siteId":null,"slug":"blog/make-an-informed-decision-on-your-next-tow-dolly-purchase","stagedFrom":null,"state":"PUBLISHED","stateWhenDeleted":null,"structuredContentPageType":null,"structuredContentType":null,"styleOverrideId":null,"subcategory":"normal_blog_post","syncedWithBlogRoot":true,"tagIds":[192169769490,192174528148,194719179289,194719586666],"tagList":[{"categoryId":3,"cdnPurgeEmbargoTime":null,"contentIds":[],"cosObjectType":"TAG","created":1751598346713,"deletedAt":0,"description":"","id":192169769490,"label":"Towing & Recovery","language":null,"name":"Towing & Recovery","portalId":48463649,"slug":"towing-recovery","translatedFromId":null,"translations":{},"updated":1751598346713},{"categoryId":3,"cdnPurgeEmbargoTime":null,"contentIds":[],"cosObjectType":"TAG","created":1751601475164,"deletedAt":0,"description":"","id":192174528148,"label":"Automotive","language":null,"name":"Automotive","portalId":48463649,"slug":"automotive","translatedFromId":null,"translations":{},"updated":1751601475164},{"categoryId":3,"cdnPurgeEmbargoTime":null,"contentIds":[],"cosObjectType":"TAG","created":1755545213046,"deletedAt":0,"description":"","id":194719179289,"label":"Industry Knowledge & Updates","language":null,"name":"Industry Knowledge & Updates","portalId":48463649,"slug":"industry-knowledge-updates","translatedFromId":null,"translations":{},"updated":1755545213046},{"categoryId":3,"cdnPurgeEmbargoTime":null,"contentIds":[],"cosObjectType":"TAG","created":1755545331471,"deletedAt":0,"description":"","id":194719586666,"label":"Product Guides","language":null,"name":"Product Guides","portalId":48463649,"slug":"product-guides","translatedFromId":null,"translations":{},"updated":1755545331471}],"tagNames":["Towing & Recovery","Automotive","Industry Knowledge & Updates","Product Guides"],"teamPerms":[],"templatePath":"","templatePathForRender":"zips-basic-theme/templates/blog-post.html","textToAudioFileId":null,"textToAudioGenerationRequestId":null,"themePath":null,"themeSettingsValues":null,"title":"Make an Informed Purchase on You Next Tow Dolly","tmsId":null,"topicIds":[192169769490,192174528148,194719179289,194719586666],"topicList":[{"categoryId":3,"cdnPurgeEmbargoTime":null,"contentIds":[],"cosObjectType":"TAG","created":1751598346713,"deletedAt":0,"description":"","id":192169769490,"label":"Towing & Recovery","language":null,"name":"Towing & Recovery","portalId":48463649,"slug":"towing-recovery","translatedFromId":null,"translations":{},"updated":1751598346713},{"categoryId":3,"cdnPurgeEmbargoTime":null,"contentIds":[],"cosObjectType":"TAG","created":1751601475164,"deletedAt":0,"description":"","id":192174528148,"label":"Automotive","language":null,"name":"Automotive","portalId":48463649,"slug":"automotive","translatedFromId":null,"translations":{},"updated":1751601475164},{"categoryId":3,"cdnPurgeEmbargoTime":null,"contentIds":[],"cosObjectType":"TAG","created":1755545213046,"deletedAt":0,"description":"","id":194719179289,"label":"Industry Knowledge & Updates","language":null,"name":"Industry Knowledge & Updates","portalId":48463649,"slug":"industry-knowledge-updates","translatedFromId":null,"translations":{},"updated":1755545213046},{"categoryId":3,"cdnPurgeEmbargoTime":null,"contentIds":[],"cosObjectType":"TAG","created":1755545331471,"deletedAt":0,"description":"","id":194719586666,"label":"Product Guides","language":null,"name":"Product Guides","portalId":48463649,"slug":"product-guides","translatedFromId":null,"translations":{},"updated":1755545331471}],"topicNames":["Towing & Recovery","Automotive","Industry Knowledge & Updates","Product Guides"],"topics":[192169769490,192174528148,194719179289,194719586666],"translatedContent":{},"translatedFromId":null,"translations":{},"tweet":null,"tweetAt":null,"tweetImmediately":false,"unpublishedAt":0,"updated":1756217491163,"updatedById":76755706,"upsizeFeaturedImage":false,"url":"/blog/make-an-informed-decision-on-your-next-tow-dolly-purchase","useFeaturedImage":true,"userPerms":[],"views":null,"visibleToAll":null,"widgetContainers":{},"widgetcontainers":{},"widgets":{}},{"ab":false,"abStatus":null,"abTestId":null,"abVariation":false,"abVariationAutomated":false,"absoluteUrl":"/blog/lightbar-cleaning-methods","afterPostBody":null,"aifeatures":null,"allowedSlugConflict":false,"analytics":null,"analyticsPageId":"192200605278","analyticsPageType":"blog-post","approvalStatus":null,"archived":false,"archivedAt":0,"archivedInDashboard":false,"areCommentsAllowed":true,"attachedStylesheets":[],"audienceAccess":"PUBLIC","author":null,"authorName":null,"authorUsername":null,"blogAuthor":{"avatar":"","bio":"","cdnPurgeEmbargoTime":null,"cosObjectType":"BLOG_AUTHOR","created":1755539431031,"deletedAt":0,"displayName":"Austin Richards","email":null,"facebook":"","fullName":"Austin Richards","gravatarUrl":null,"hasSocialProfiles":false,"id":194712519049,"label":"Austin Richards","language":"en","linkedin":"","name":"Austin Richards","portalId":48463649,"slug":"austin-richards","translatedFromId":null,"translations":{},"twitter":"","twitterUsername":"","updated":1755539431031,"userId":null,"username":null,"website":""},"blogAuthorId":194712519049,"blogAuthorIdList":[194712519049],"blogAuthorList":[{"avatar":"","bio":"","cdnPurgeEmbargoTime":null,"cosObjectType":"BLOG_AUTHOR","created":1755539431031,"deletedAt":0,"displayName":"Austin Richards","email":null,"facebook":"","fullName":"Austin Richards","gravatarUrl":null,"hasSocialProfiles":false,"id":194712519049,"label":"Austin Richards","language":"en","linkedin":"","name":"Austin Richards","portalId":48463649,"slug":"austin-richards","translatedFromId":null,"translations":{},"twitter":"","twitterUsername":"","updated":1755539431031,"userId":null,"username":null,"website":""}],"blogPostAuthor":{"avatar":"","bio":"","cdnPurgeEmbargoTime":null,"cosObjectType":"BLOG_AUTHOR","created":1755539431031,"deletedAt":0,"displayName":"Austin Richards","email":null,"facebook":"","fullName":"Austin Richards","gravatarUrl":null,"hasSocialProfiles":false,"id":194712519049,"label":"Austin Richards","language":"en","linkedin":"","name":"Austin Richards","portalId":48463649,"slug":"austin-richards","translatedFromId":null,"translations":{},"twitter":"","twitterUsername":"","updated":1755539431031,"userId":null,"username":null,"website":""},"blogPostScheduleTaskUid":null,"blogPublishInstantEmailCampaignId":null,"blogPublishInstantEmailRetryCount":null,"blogPublishInstantEmailTaskUid":null,"blogPublishToSocialMediaTask":"DONE_NOT_SENT","blueprintTypeId":0,"businessUnitId":null,"campaign":null,"campaignName":null,"campaignUtm":null,"category":3,"categoryId":3,"cdnPurgeEmbargoTime":null,"checkPostLevelAudienceAccessFirst":true,"clonedFrom":null,"composeBody":null,"compositionId":0,"contentAccessRuleIds":[],"contentAccessRuleTypes":[],"contentGroup":190096341139,"contentGroupId":190096341139,"contentTypeCategory":3,"contentTypeCategoryId":3,"contentTypeId":null,"created":1751647201173,"createdByAgent":null,"createdById":74657203,"createdTime":1751647201173,"crmObjectId":null,"css":{},"cssText":"","ctaClicks":null,"ctaViews":null,"currentState":"PUBLISHED","currentlyPublished":true,"deletedAt":0,"deletedBy":null,"deletedByEmail":null,"deletedById":null,"domain":"","dynamicPageDataSourceId":null,"dynamicPageDataSourceType":null,"dynamicPageHubDbTableId":null,"enableDomainStylesheets":null,"enableGoogleAmpOutputOverride":false,"enableLayoutStylesheets":null,"errors":[],"featuredImage":"https://48463649.fs1.hubspotusercontent-na1.net/hubfs/48463649/truck-lightbar-cleaning.jpg","featuredImageAltText":"truck with clean lightbar","featuredImageHeight":483,"featuredImageLength":0,"featuredImageWidth":900,"flexAreas":{},"folderId":null,"footerHtml":null,"footerTemplatePath":null,"footerVariantName":null,"freezeDate":1554469200000,"generateJsonLdEnabledOverride":true,"globalBlockOverrides":{},"hasContentAccessRules":false,"hasUserChanges":true,"headHtml":"","header":null,"headerTemplatePath":null,"headerVariantName":null,"htmlTitle":"Explore Lightbar Cleaning Methods & Tips","id":192200605278,"includeDefaultCustomCss":null,"isCaptchaRequired":true,"isCrawlableByBots":false,"isDraft":false,"isInstantEmailEnabled":false,"isPublished":true,"isSocialPublishingEnabled":false,"keywords":[],"label":"Explore Lightbar Cleaning Methods & Tips","language":"en","lastEditSessionId":null,"lastEditUpdateId":null,"layoutSections":{},"legacyBlogTabid":null,"legacyId":null,"legacyPostGuid":null,"linkRelCanonicalUrl":"","listTemplate":"","liveDomain":"www.zips.com","mab":false,"mabExperimentId":null,"mabMaster":false,"mabVariant":false,"marketingCampaignGuids":[],"meta":{"html_title":"Explore Lightbar Cleaning Methods & Tips","public_access_rules":[],"public_access_rules_enabled":false,"use_featured_image":true,"tag_ids":[192169769490,192174528148,192174529697,192174572389,194719179289,194719586666],"topic_ids":[192169769490,192174528148,192174529697,192174572389,194719179289,194719586666],"post_summary":"

Keeping wreckers clean and professional looking is part of maintaining a good business reputation. An important part of lightbar maintenance is keeping it clean.

However, the cleaning methods used will vary depending on the components used on our wreckers. For instance, lightbar lenses have specific cleaning requirements depending on the manufacturer. The general steps for cleaning your lightbar are as follows:

\n","post_body":"

Keeping wreckers clean and professional looking is part of maintaining a good business reputation. An important part of lightbar maintenance is keeping it clean.

However, the cleaning methods used will vary depending on the components used on our wreckers. For instance, lightbar lenses have specific cleaning requirements depending on the manufacturer. The general steps for cleaning your lightbar are as follows:

\n\n
    \n
  1. Wet lightbar with gently running water
  2. \n
  3. Use a mild, soapy detergent with a soft cloth to wipe lightbar clean
  4. \n
  5. Rinse lightbar with running water and use your soft cloth to remove water spots
  6. \n
\n

Below are excerpts from the owner's manuals of several of our lightbar manufacturers.

\n

Whelen: Clean the outer lenses of a Whelen lightbar with only soap and water. Do not use any other cleaning products. Using any other cleaning products or solvents, may cause damage to the lenses.

When cleaning, use a soft cloth or sponge to gently scrub away any dirt or debris from the lenses. Rinse the lenses with clean water and then dry completely with a soft, lint-free cloth. Use of other chemicals could result in premature lens cracking (crazing) and discoloration.

Lenses in this condition have significantly reduced effectiveness and should be replaced immediately. After cleaning, inspect and operate this product regularly to confirm its proper operation and mounting. Do not use a pressure washer to clean this product, as it can damage or scratch the lens.

\n

PSE Amber: Clean your lenses with clean water and a soft cloth. Alternatively, use Code 3® lens polish and very soft paper towels or facial tissue. Because plastic scratches easily, cleaning is recommended only when necessary (about every six months). Do not subject the lenses to car washes that use brushes as these will scratch and damage the lenses.

\n

Federal Signal: Crazing (cracking) of the lenses will cause reduced effectiveness of the light. Do not use cleaning agents (which will cause crazing) such as strong detergents, solvents or petroleum products. If crazing of lenses does occur, reliability of the light may be reduced until the lenses are replaced.

Ordinary cleaning of the plastic lenses can be accomplished by using mild soap and a soft rag. Should fine scratches or haze appear on the lens, they can be removed. Remove with a non-abrasive, high-quality, one-step automotive paste cleaner/wax and a soft cloth.

\n

ECCO: Occasional cleaning of the lenses will ensure optimum light output. Take care when cleaning lenses – although tough, polycarbonate scratches easily. Clean the lens and base with soap and water or a lens polish using a soft cloth.

Do not use solvents as they may damage the polycarbonate lens. Do not subject the lightbar to high-pressure washers or automatic car washers.

","rss_summary":"

Keeping wreckers clean and professional looking is part of maintaining a good business reputation. An important part of lightbar maintenance is keeping it clean.

However, the cleaning methods used will vary depending on the components used on our wreckers. For instance, lightbar lenses have specific cleaning requirements depending on the manufacturer. The general steps for cleaning your lightbar are as follows:

\n","rss_body":"

Keeping wreckers clean and professional looking is part of maintaining a good business reputation. An important part of lightbar maintenance is keeping it clean.

However, the cleaning methods used will vary depending on the components used on our wreckers. For instance, lightbar lenses have specific cleaning requirements depending on the manufacturer. The general steps for cleaning your lightbar are as follows:

\n\n
    \n
  1. Wet lightbar with gently running water
  2. \n
  3. Use a mild, soapy detergent with a soft cloth to wipe lightbar clean
  4. \n
  5. Rinse lightbar with running water and use your soft cloth to remove water spots
  6. \n
\n

Below are excerpts from the owner's manuals of several of our lightbar manufacturers.

\n

Whelen: Clean the outer lenses of a Whelen lightbar with only soap and water. Do not use any other cleaning products. Using any other cleaning products or solvents, may cause damage to the lenses.

When cleaning, use a soft cloth or sponge to gently scrub away any dirt or debris from the lenses. Rinse the lenses with clean water and then dry completely with a soft, lint-free cloth. Use of other chemicals could result in premature lens cracking (crazing) and discoloration.

Lenses in this condition have significantly reduced effectiveness and should be replaced immediately. After cleaning, inspect and operate this product regularly to confirm its proper operation and mounting. Do not use a pressure washer to clean this product, as it can damage or scratch the lens.

\n

PSE Amber: Clean your lenses with clean water and a soft cloth. Alternatively, use Code 3® lens polish and very soft paper towels or facial tissue. Because plastic scratches easily, cleaning is recommended only when necessary (about every six months). Do not subject the lenses to car washes that use brushes as these will scratch and damage the lenses.

\n

Federal Signal: Crazing (cracking) of the lenses will cause reduced effectiveness of the light. Do not use cleaning agents (which will cause crazing) such as strong detergents, solvents or petroleum products. If crazing of lenses does occur, reliability of the light may be reduced until the lenses are replaced.

Ordinary cleaning of the plastic lenses can be accomplished by using mild soap and a soft rag. Should fine scratches or haze appear on the lens, they can be removed. Remove with a non-abrasive, high-quality, one-step automotive paste cleaner/wax and a soft cloth.

\n

ECCO: Occasional cleaning of the lenses will ensure optimum light output. Take care when cleaning lenses – although tough, polycarbonate scratches easily. Clean the lens and base with soap and water or a lens polish using a soft cloth.

Do not use solvents as they may damage the polycarbonate lens. Do not subject the lightbar to high-pressure washers or automatic car washers.

","enable_google_amp_output_override":false,"generate_json_ld_enabled":true,"blog_post_schedule_task_uid":null,"blog_publish_to_social_media_task":"DONE_NOT_SENT","blog_publish_instant_email_task_uid":null,"blog_publish_instant_email_campaign_id":null,"blog_publish_instant_email_retry_count":null,"keywords":[],"composition_id":0,"is_crawlable_by_bots":false,"header":null,"published_at":1756217690722,"head_html":"","footer_html":null,"attached_stylesheets":[],"enable_domain_stylesheets":null,"include_default_custom_css":null,"layout_sections":{},"past_mab_experiment_ids":[],"deleted_by":null,"featured_image_alt_text":"truck with clean lightbar","enable_layout_stylesheets":null,"tweet":null,"tweet_at":null,"campaign_name":null,"campaign_utm":null,"meta_keywords":null,"meta_description":"A step-by-step guide and manufacturer recommendations for cleaning lightbars on wreckers. Covers cleaning tips and what to avoid for different brands.","tweet_immediately":false,"publish_immediately":true,"security_state":"NONE","scheduled_update_date":0,"placement_guids":[],"header_template_path":null,"header_variant_name":null,"footer_template_path":null,"footer_variant_name":null,"global_block_overrides":{},"property_for_dynamic_page_title":null,"property_for_dynamic_page_slug":null,"property_for_dynamic_page_meta_description":null,"property_for_dynamic_page_featured_image":null,"property_for_dynamic_page_canonical_url":null,"preview_image_src":null,"legacy_blog_tabid":null,"legacy_post_guid":null,"performable_variation_letter":null,"style_override_id":null,"has_user_changes":true,"css":{},"css_text":"","unpublished_at":0,"published_by_id":76755706,"allowed_slug_conflict":false,"ai_features":null,"link_rel_canonical_url":"","page_redirected":false,"page_expiry_enabled":null,"page_expiry_date":null,"page_expiry_redirect_id":null,"page_expiry_redirect_url":null,"deleted_by_id":null,"state_when_deleted":null,"cloned_from":null,"staged_from":null,"personas":[],"compose_body":null,"featured_image":"https://48463649.fs1.hubspotusercontent-na1.net/hubfs/48463649/truck-lightbar-cleaning.jpg","featured_image_width":900,"featured_image_height":483,"publish_timezone_offset":null,"theme_settings_values":null,"password":null,"last_edit_session_id":null,"last_edit_update_id":null,"created_by_agent":null},"metaDescription":"A step-by-step guide and manufacturer recommendations for cleaning lightbars on wreckers. Covers cleaning tips and what to avoid for different brands.","metaKeywords":null,"name":"Explore Lightbar Cleaning Methods & Tips","nextPostFeaturedImage":"https://48463649.fs1.hubspotusercontent-na1.net/hubfs/48463649/Blog/snatch-blocks.jpg","nextPostFeaturedImageAltText":"","nextPostName":"Snatch Blocks: A Better Way to Winch","nextPostSlug":"blog/snatch-blocks-a-better-way-to-winch","pageExpiryDate":null,"pageExpiryEnabled":null,"pageExpiryRedirectId":null,"pageExpiryRedirectUrl":null,"pageRedirected":false,"pageTitle":"Explore Lightbar Cleaning Methods & Tips","parentBlog":{"absoluteUrl":"/blog","allowComments":true,"ampBodyColor":"#404040","ampBodyFont":"'Helvetica Neue', Helvetica, Arial, sans-serif","ampBodyFontSize":"18","ampCustomCss":"","ampHeaderBackgroundColor":"#ffffff","ampHeaderColor":"#1e1e1e","ampHeaderFont":"'Helvetica Neue', Helvetica, Arial, sans-serif","ampHeaderFontSize":"36","ampLinkColor":"#416bb3","ampLogoAlt":"","ampLogoHeight":0,"ampLogoSrc":"","ampLogoWidth":0,"analyticsPageId":190096341139,"attachedStylesheets":[],"audienceAccess":"PUBLIC","businessUnitId":null,"captchaAfterDays":7,"captchaAlways":false,"categoryId":3,"cdnPurgeEmbargoTime":null,"closeCommentsOlder":0,"commentDateFormat":"medium","commentFormGuid":"a4128401-39db-4c54-a62b-88ff335d3a69","commentMaxThreadDepth":1,"commentModeration":false,"commentNotificationEmails":[],"commentShouldCreateContact":false,"commentVerificationText":"","cosObjectType":"BLOG","created":1747163443999,"createdDateTime":1747163443999,"dailyNotificationEmailId":null,"dateFormattingLanguage":null,"defaultGroupStyleId":"","defaultNotificationFromName":"","defaultNotificationReplyTo":"","deletedAt":0,"description":"","domain":"","domainWhenPublished":"www.zips.com","emailApiSubscriptionId":null,"enableGoogleAmpOutput":true,"enableSocialAutoPublishing":false,"generateJsonLdEnabled":true,"header":null,"htmlFooter":"","htmlFooterIsShared":true,"htmlHead":"","htmlHeadIsShared":true,"htmlKeywords":[],"htmlTitle":"blog","id":190096341139,"ilsSubscriptionListsByType":{},"instantNotificationEmailId":null,"itemLayoutId":null,"itemTemplateIsShared":false,"itemTemplatePath":"zips-basic-theme/templates/blog-post.html","label":"blog","language":"en","legacyGuid":null,"legacyModuleId":null,"legacyTabId":null,"listingLayoutId":null,"listingPageId":190096341141,"listingTemplatePath":"","liveDomain":"www.zips.com","monthFilterFormat":"MMMM yyyy","monthlyNotificationEmailId":null,"name":"blog","parentBlogUpdateTaskId":null,"portalId":48463649,"postHtmlFooter":"","postHtmlHead":"","postsPerListingPage":111,"postsPerRssFeed":10,"publicAccessRules":[],"publicAccessRulesEnabled":false,"publicTitle":"blog","publishDateFormat":"medium","resolvedDomain":"www.zips.com","rootUrl":"/blog","rssCustomFeed":null,"rssDescription":null,"rssItemFooter":null,"rssItemHeader":null,"settingsOverrides":{"itemLayoutId":false,"itemTemplatePath":false,"itemTemplateIsShared":false,"listingLayoutId":false,"listingTemplatePath":false,"postsPerListingPage":false,"showSummaryInListing":false,"useFeaturedImageInSummary":false,"htmlHead":false,"postHtmlHead":false,"htmlHeadIsShared":false,"htmlFooter":false,"listingPageHtmlFooter":false,"postHtmlFooter":false,"htmlFooterIsShared":false,"attachedStylesheets":false,"postsPerRssFeed":false,"showSummaryInRss":false,"showSummaryInEmails":false,"showSummariesInEmails":false,"allowComments":false,"commentShouldCreateContact":false,"commentModeration":false,"closeCommentsOlder":false,"commentNotificationEmails":false,"commentMaxThreadDepth":false,"commentVerificationText":false,"socialAccountTwitter":false,"showSocialLinkTwitter":false,"showSocialLinkLinkedin":false,"showSocialLinkFacebook":false,"enableGoogleAmpOutput":false,"ampLogoSrc":false,"ampLogoHeight":false,"ampLogoWidth":false,"ampLogoAlt":false,"ampHeaderFont":false,"ampHeaderFontSize":false,"ampHeaderColor":false,"ampHeaderBackgroundColor":false,"ampBodyFont":false,"ampBodyFontSize":false,"ampBodyColor":false,"ampLinkColor":false,"generateJsonLdEnabled":false},"showSocialLinkFacebook":true,"showSocialLinkLinkedin":true,"showSocialLinkTwitter":true,"showSummaryInEmails":true,"showSummaryInListing":true,"showSummaryInRss":true,"siteId":null,"slug":"blog","socialAccountTwitter":"","state":null,"subscriptionContactsProperty":null,"subscriptionEmailType":null,"subscriptionFormGuid":null,"subscriptionListsByType":{},"title":null,"translatedFromId":null,"translations":{},"updated":1755110916417,"updatedDateTime":1755110916417,"urlBase":"www.zips.com/blog","urlSegments":{"all":"all","archive":"archive","author":"author","page":"page","tag":"tag"},"useFeaturedImageInSummary":true,"usesDefaultTemplate":false,"weeklyNotificationEmailId":null},"password":null,"pastMabExperimentIds":[],"performableGuid":null,"performableVariationLetter":null,"personalizationStrategyId":null,"personalizationVariantStatus":null,"personas":[],"placementGuids":[],"portableKey":null,"portalId":48463649,"position":null,"postBody":"

Keeping wreckers clean and professional looking is part of maintaining a good business reputation. An important part of lightbar maintenance is keeping it clean.

However, the cleaning methods used will vary depending on the components used on our wreckers. For instance, lightbar lenses have specific cleaning requirements depending on the manufacturer. The general steps for cleaning your lightbar are as follows:

\n\n
    \n
  1. Wet lightbar with gently running water
  2. \n
  3. Use a mild, soapy detergent with a soft cloth to wipe lightbar clean
  4. \n
  5. Rinse lightbar with running water and use your soft cloth to remove water spots
  6. \n
\n

Below are excerpts from the owner's manuals of several of our lightbar manufacturers.

\n

Whelen: Clean the outer lenses of a Whelen lightbar with only soap and water. Do not use any other cleaning products. Using any other cleaning products or solvents, may cause damage to the lenses.

When cleaning, use a soft cloth or sponge to gently scrub away any dirt or debris from the lenses. Rinse the lenses with clean water and then dry completely with a soft, lint-free cloth. Use of other chemicals could result in premature lens cracking (crazing) and discoloration.

Lenses in this condition have significantly reduced effectiveness and should be replaced immediately. After cleaning, inspect and operate this product regularly to confirm its proper operation and mounting. Do not use a pressure washer to clean this product, as it can damage or scratch the lens.

\n

PSE Amber: Clean your lenses with clean water and a soft cloth. Alternatively, use Code 3® lens polish and very soft paper towels or facial tissue. Because plastic scratches easily, cleaning is recommended only when necessary (about every six months). Do not subject the lenses to car washes that use brushes as these will scratch and damage the lenses.

\n

Federal Signal: Crazing (cracking) of the lenses will cause reduced effectiveness of the light. Do not use cleaning agents (which will cause crazing) such as strong detergents, solvents or petroleum products. If crazing of lenses does occur, reliability of the light may be reduced until the lenses are replaced.

Ordinary cleaning of the plastic lenses can be accomplished by using mild soap and a soft rag. Should fine scratches or haze appear on the lens, they can be removed. Remove with a non-abrasive, high-quality, one-step automotive paste cleaner/wax and a soft cloth.

\n

ECCO: Occasional cleaning of the lenses will ensure optimum light output. Take care when cleaning lenses – although tough, polycarbonate scratches easily. Clean the lens and base with soap and water or a lens polish using a soft cloth.

Do not use solvents as they may damage the polycarbonate lens. Do not subject the lightbar to high-pressure washers or automatic car washers.

","postBodyRss":"

Keeping wreckers clean and professional looking is part of maintaining a good business reputation. An important part of lightbar maintenance is keeping it clean.

However, the cleaning methods used will vary depending on the components used on our wreckers. For instance, lightbar lenses have specific cleaning requirements depending on the manufacturer. The general steps for cleaning your lightbar are as follows:

\n\n
    \n
  1. Wet lightbar with gently running water
  2. \n
  3. Use a mild, soapy detergent with a soft cloth to wipe lightbar clean
  4. \n
  5. Rinse lightbar with running water and use your soft cloth to remove water spots
  6. \n
\n

Below are excerpts from the owner's manuals of several of our lightbar manufacturers.

\n

Whelen: Clean the outer lenses of a Whelen lightbar with only soap and water. Do not use any other cleaning products. Using any other cleaning products or solvents, may cause damage to the lenses.

When cleaning, use a soft cloth or sponge to gently scrub away any dirt or debris from the lenses. Rinse the lenses with clean water and then dry completely with a soft, lint-free cloth. Use of other chemicals could result in premature lens cracking (crazing) and discoloration.

Lenses in this condition have significantly reduced effectiveness and should be replaced immediately. After cleaning, inspect and operate this product regularly to confirm its proper operation and mounting. Do not use a pressure washer to clean this product, as it can damage or scratch the lens.

\n

PSE Amber: Clean your lenses with clean water and a soft cloth. Alternatively, use Code 3® lens polish and very soft paper towels or facial tissue. Because plastic scratches easily, cleaning is recommended only when necessary (about every six months). Do not subject the lenses to car washes that use brushes as these will scratch and damage the lenses.

\n

Federal Signal: Crazing (cracking) of the lenses will cause reduced effectiveness of the light. Do not use cleaning agents (which will cause crazing) such as strong detergents, solvents or petroleum products. If crazing of lenses does occur, reliability of the light may be reduced until the lenses are replaced.

Ordinary cleaning of the plastic lenses can be accomplished by using mild soap and a soft rag. Should fine scratches or haze appear on the lens, they can be removed. Remove with a non-abrasive, high-quality, one-step automotive paste cleaner/wax and a soft cloth.

\n

ECCO: Occasional cleaning of the lenses will ensure optimum light output. Take care when cleaning lenses – although tough, polycarbonate scratches easily. Clean the lens and base with soap and water or a lens polish using a soft cloth.

Do not use solvents as they may damage the polycarbonate lens. Do not subject the lightbar to high-pressure washers or automatic car washers.

","postEmailContent":"

Keeping wreckers clean and professional looking is part of maintaining a good business reputation. An important part of lightbar maintenance is keeping it clean.

However, the cleaning methods used will vary depending on the components used on our wreckers. For instance, lightbar lenses have specific cleaning requirements depending on the manufacturer. The general steps for cleaning your lightbar are as follows:

","postFeaturedImageIfEnabled":"https://48463649.fs1.hubspotusercontent-na1.net/hubfs/48463649/truck-lightbar-cleaning.jpg","postListContent":"

Keeping wreckers clean and professional looking is part of maintaining a good business reputation. An important part of lightbar maintenance is keeping it clean.

However, the cleaning methods used will vary depending on the components used on our wreckers. For instance, lightbar lenses have specific cleaning requirements depending on the manufacturer. The general steps for cleaning your lightbar are as follows:

","postListSummaryFeaturedImage":"https://48463649.fs1.hubspotusercontent-na1.net/hubfs/48463649/truck-lightbar-cleaning.jpg","postRssContent":"

Keeping wreckers clean and professional looking is part of maintaining a good business reputation. An important part of lightbar maintenance is keeping it clean.

However, the cleaning methods used will vary depending on the components used on our wreckers. For instance, lightbar lenses have specific cleaning requirements depending on the manufacturer. The general steps for cleaning your lightbar are as follows:

","postRssSummaryFeaturedImage":"https://48463649.fs1.hubspotusercontent-na1.net/hubfs/48463649/truck-lightbar-cleaning.jpg","postSummary":"

Keeping wreckers clean and professional looking is part of maintaining a good business reputation. An important part of lightbar maintenance is keeping it clean.

However, the cleaning methods used will vary depending on the components used on our wreckers. For instance, lightbar lenses have specific cleaning requirements depending on the manufacturer. The general steps for cleaning your lightbar are as follows:

\n","postSummaryRss":"

Keeping wreckers clean and professional looking is part of maintaining a good business reputation. An important part of lightbar maintenance is keeping it clean.

However, the cleaning methods used will vary depending on the components used on our wreckers. For instance, lightbar lenses have specific cleaning requirements depending on the manufacturer. The general steps for cleaning your lightbar are as follows:

","postTemplate":"zips-basic-theme/templates/blog-post.html","previewImageSrc":null,"previewKey":"kiJykglq","previousPostFeaturedImage":"https://48463649.fs1.hubspotusercontent-na1.net/hubfs/48463649/1545635_ITD-2778-xl-dolly-set.jpg_900.avif","previousPostFeaturedImageAltText":"","previousPostName":"Make an Informed Purchase on You Next Tow Dolly","previousPostSlug":"blog/make-an-informed-decision-on-your-next-tow-dolly-purchase","processingStatus":"PUBLISHED","propertyForDynamicPageCanonicalUrl":null,"propertyForDynamicPageFeaturedImage":null,"propertyForDynamicPageMetaDescription":null,"propertyForDynamicPageSlug":null,"propertyForDynamicPageTitle":null,"publicAccessRules":[],"publicAccessRulesEnabled":false,"publishDate":1554469200000,"publishDateLocalTime":1554469200000,"publishDateLocalized":{"date":1554469200000,"format":"medium","language":null},"publishImmediately":true,"publishTimezoneOffset":null,"publishedAt":1756217690722,"publishedByEmail":null,"publishedById":76755706,"publishedByName":null,"publishedUrl":"/blog/lightbar-cleaning-methods","resolvedDomain":"www.zips.com","resolvedLanguage":null,"rssBody":"

Keeping wreckers clean and professional looking is part of maintaining a good business reputation. An important part of lightbar maintenance is keeping it clean.

However, the cleaning methods used will vary depending on the components used on our wreckers. For instance, lightbar lenses have specific cleaning requirements depending on the manufacturer. The general steps for cleaning your lightbar are as follows:

\n\n
    \n
  1. Wet lightbar with gently running water
  2. \n
  3. Use a mild, soapy detergent with a soft cloth to wipe lightbar clean
  4. \n
  5. Rinse lightbar with running water and use your soft cloth to remove water spots
  6. \n
\n

Below are excerpts from the owner's manuals of several of our lightbar manufacturers.

\n

Whelen: Clean the outer lenses of a Whelen lightbar with only soap and water. Do not use any other cleaning products. Using any other cleaning products or solvents, may cause damage to the lenses.

When cleaning, use a soft cloth or sponge to gently scrub away any dirt or debris from the lenses. Rinse the lenses with clean water and then dry completely with a soft, lint-free cloth. Use of other chemicals could result in premature lens cracking (crazing) and discoloration.

Lenses in this condition have significantly reduced effectiveness and should be replaced immediately. After cleaning, inspect and operate this product regularly to confirm its proper operation and mounting. Do not use a pressure washer to clean this product, as it can damage or scratch the lens.

\n

PSE Amber: Clean your lenses with clean water and a soft cloth. Alternatively, use Code 3® lens polish and very soft paper towels or facial tissue. Because plastic scratches easily, cleaning is recommended only when necessary (about every six months). Do not subject the lenses to car washes that use brushes as these will scratch and damage the lenses.

\n

Federal Signal: Crazing (cracking) of the lenses will cause reduced effectiveness of the light. Do not use cleaning agents (which will cause crazing) such as strong detergents, solvents or petroleum products. If crazing of lenses does occur, reliability of the light may be reduced until the lenses are replaced.

Ordinary cleaning of the plastic lenses can be accomplished by using mild soap and a soft rag. Should fine scratches or haze appear on the lens, they can be removed. Remove with a non-abrasive, high-quality, one-step automotive paste cleaner/wax and a soft cloth.

\n

ECCO: Occasional cleaning of the lenses will ensure optimum light output. Take care when cleaning lenses – although tough, polycarbonate scratches easily. Clean the lens and base with soap and water or a lens polish using a soft cloth.

Do not use solvents as they may damage the polycarbonate lens. Do not subject the lightbar to high-pressure washers or automatic car washers.

","rssSummary":"

Keeping wreckers clean and professional looking is part of maintaining a good business reputation. An important part of lightbar maintenance is keeping it clean.

However, the cleaning methods used will vary depending on the components used on our wreckers. For instance, lightbar lenses have specific cleaning requirements depending on the manufacturer. The general steps for cleaning your lightbar are as follows:

\n","rssSummaryFeaturedImage":"https://48463649.fs1.hubspotusercontent-na1.net/hubfs/48463649/truck-lightbar-cleaning.jpg","scheduledUpdateDate":0,"screenshotPreviewTakenAt":1770560090201,"screenshotPreviewUrl":"https://cdn1.hubspot.net/hubshotv3/prod/e/0/cdf08ae9-475e-4f96-a549-c9f2eb54ed99.png","sections":{},"securityState":"NONE","siteId":null,"slug":"blog/lightbar-cleaning-methods","stagedFrom":null,"state":"PUBLISHED","stateWhenDeleted":null,"structuredContentPageType":null,"structuredContentType":null,"styleOverrideId":null,"subcategory":"normal_blog_post","syncedWithBlogRoot":true,"tagIds":[192169769490,192174528148,192174529697,192174572389,194719179289,194719586666],"tagList":[{"categoryId":3,"cdnPurgeEmbargoTime":null,"contentIds":[],"cosObjectType":"TAG","created":1751598346713,"deletedAt":0,"description":"","id":192169769490,"label":"Towing & Recovery","language":null,"name":"Towing & Recovery","portalId":48463649,"slug":"towing-recovery","translatedFromId":null,"translations":{},"updated":1751598346713},{"categoryId":3,"cdnPurgeEmbargoTime":null,"contentIds":[],"cosObjectType":"TAG","created":1751601475164,"deletedAt":0,"description":"","id":192174528148,"label":"Automotive","language":null,"name":"Automotive","portalId":48463649,"slug":"automotive","translatedFromId":null,"translations":{},"updated":1751601475164},{"categoryId":3,"cdnPurgeEmbargoTime":null,"contentIds":[],"cosObjectType":"TAG","created":1751602285139,"deletedAt":0,"description":"","id":192174529697,"label":"Construction","language":null,"name":"Construction","portalId":48463649,"slug":"construction","translatedFromId":null,"translations":{},"updated":1751602285139},{"categoryId":3,"cdnPurgeEmbargoTime":null,"contentIds":[],"cosObjectType":"TAG","created":1751602285235,"deletedAt":0,"description":"","id":192174572389,"label":"Municipalities","language":null,"name":"Municipalities","portalId":48463649,"slug":"municipalities","translatedFromId":null,"translations":{},"updated":1751602285235},{"categoryId":3,"cdnPurgeEmbargoTime":null,"contentIds":[],"cosObjectType":"TAG","created":1755545213046,"deletedAt":0,"description":"","id":194719179289,"label":"Industry Knowledge & Updates","language":null,"name":"Industry Knowledge & Updates","portalId":48463649,"slug":"industry-knowledge-updates","translatedFromId":null,"translations":{},"updated":1755545213046},{"categoryId":3,"cdnPurgeEmbargoTime":null,"contentIds":[],"cosObjectType":"TAG","created":1755545331471,"deletedAt":0,"description":"","id":194719586666,"label":"Product Guides","language":null,"name":"Product Guides","portalId":48463649,"slug":"product-guides","translatedFromId":null,"translations":{},"updated":1755545331471}],"tagNames":["Towing & Recovery","Automotive","Construction","Municipalities","Industry Knowledge & Updates","Product Guides"],"teamPerms":[],"templatePath":"","templatePathForRender":"zips-basic-theme/templates/blog-post.html","textToAudioFileId":null,"textToAudioGenerationRequestId":null,"themePath":null,"themeSettingsValues":null,"title":"Explore Lightbar Cleaning Methods & Tips","tmsId":null,"topicIds":[192169769490,192174528148,192174529697,192174572389,194719179289,194719586666],"topicList":[{"categoryId":3,"cdnPurgeEmbargoTime":null,"contentIds":[],"cosObjectType":"TAG","created":1751598346713,"deletedAt":0,"description":"","id":192169769490,"label":"Towing & Recovery","language":null,"name":"Towing & Recovery","portalId":48463649,"slug":"towing-recovery","translatedFromId":null,"translations":{},"updated":1751598346713},{"categoryId":3,"cdnPurgeEmbargoTime":null,"contentIds":[],"cosObjectType":"TAG","created":1751601475164,"deletedAt":0,"description":"","id":192174528148,"label":"Automotive","language":null,"name":"Automotive","portalId":48463649,"slug":"automotive","translatedFromId":null,"translations":{},"updated":1751601475164},{"categoryId":3,"cdnPurgeEmbargoTime":null,"contentIds":[],"cosObjectType":"TAG","created":1751602285139,"deletedAt":0,"description":"","id":192174529697,"label":"Construction","language":null,"name":"Construction","portalId":48463649,"slug":"construction","translatedFromId":null,"translations":{},"updated":1751602285139},{"categoryId":3,"cdnPurgeEmbargoTime":null,"contentIds":[],"cosObjectType":"TAG","created":1751602285235,"deletedAt":0,"description":"","id":192174572389,"label":"Municipalities","language":null,"name":"Municipalities","portalId":48463649,"slug":"municipalities","translatedFromId":null,"translations":{},"updated":1751602285235},{"categoryId":3,"cdnPurgeEmbargoTime":null,"contentIds":[],"cosObjectType":"TAG","created":1755545213046,"deletedAt":0,"description":"","id":194719179289,"label":"Industry Knowledge & Updates","language":null,"name":"Industry Knowledge & Updates","portalId":48463649,"slug":"industry-knowledge-updates","translatedFromId":null,"translations":{},"updated":1755545213046},{"categoryId":3,"cdnPurgeEmbargoTime":null,"contentIds":[],"cosObjectType":"TAG","created":1755545331471,"deletedAt":0,"description":"","id":194719586666,"label":"Product Guides","language":null,"name":"Product Guides","portalId":48463649,"slug":"product-guides","translatedFromId":null,"translations":{},"updated":1755545331471}],"topicNames":["Towing & Recovery","Automotive","Construction","Municipalities","Industry Knowledge & Updates","Product Guides"],"topics":[192169769490,192174528148,192174529697,192174572389,194719179289,194719586666],"translatedContent":{},"translatedFromId":null,"translations":{},"tweet":null,"tweetAt":null,"tweetImmediately":false,"unpublishedAt":0,"updated":1756217690726,"updatedById":76755706,"upsizeFeaturedImage":false,"url":"/blog/lightbar-cleaning-methods","useFeaturedImage":true,"userPerms":[],"views":null,"visibleToAll":null,"widgetContainers":{},"widgetcontainers":{},"widgets":{}},{"ab":false,"abStatus":null,"abTestId":null,"abVariation":false,"abVariationAutomated":false,"absoluteUrl":"/blog/snatch-blocks-a-better-way-to-winch","afterPostBody":null,"aifeatures":null,"allowedSlugConflict":false,"analytics":null,"analyticsPageId":"192174571540","analyticsPageType":"blog-post","approvalStatus":null,"archived":false,"archivedAt":0,"archivedInDashboard":false,"areCommentsAllowed":true,"attachedStylesheets":[],"audienceAccess":"PUBLIC","author":null,"authorName":null,"authorUsername":null,"blogAuthor":{"avatar":"","bio":"","cdnPurgeEmbargoTime":null,"cosObjectType":"BLOG_AUTHOR","created":1755539431031,"deletedAt":0,"displayName":"Austin Richards","email":null,"facebook":"","fullName":"Austin Richards","gravatarUrl":null,"hasSocialProfiles":false,"id":194712519049,"label":"Austin Richards","language":"en","linkedin":"","name":"Austin Richards","portalId":48463649,"slug":"austin-richards","translatedFromId":null,"translations":{},"twitter":"","twitterUsername":"","updated":1755539431031,"userId":null,"username":null,"website":""},"blogAuthorId":194712519049,"blogAuthorIdList":[194712519049],"blogAuthorList":[{"avatar":"","bio":"","cdnPurgeEmbargoTime":null,"cosObjectType":"BLOG_AUTHOR","created":1755539431031,"deletedAt":0,"displayName":"Austin Richards","email":null,"facebook":"","fullName":"Austin Richards","gravatarUrl":null,"hasSocialProfiles":false,"id":194712519049,"label":"Austin Richards","language":"en","linkedin":"","name":"Austin Richards","portalId":48463649,"slug":"austin-richards","translatedFromId":null,"translations":{},"twitter":"","twitterUsername":"","updated":1755539431031,"userId":null,"username":null,"website":""}],"blogPostAuthor":{"avatar":"","bio":"","cdnPurgeEmbargoTime":null,"cosObjectType":"BLOG_AUTHOR","created":1755539431031,"deletedAt":0,"displayName":"Austin Richards","email":null,"facebook":"","fullName":"Austin Richards","gravatarUrl":null,"hasSocialProfiles":false,"id":194712519049,"label":"Austin Richards","language":"en","linkedin":"","name":"Austin Richards","portalId":48463649,"slug":"austin-richards","translatedFromId":null,"translations":{},"twitter":"","twitterUsername":"","updated":1755539431031,"userId":null,"username":null,"website":""},"blogPostScheduleTaskUid":null,"blogPublishInstantEmailCampaignId":null,"blogPublishInstantEmailRetryCount":null,"blogPublishInstantEmailTaskUid":null,"blogPublishToSocialMediaTask":"DONE_NOT_SENT","blueprintTypeId":0,"businessUnitId":null,"campaign":null,"campaignName":null,"campaignUtm":null,"category":3,"categoryId":3,"cdnPurgeEmbargoTime":null,"checkPostLevelAudienceAccessFirst":true,"clonedFrom":null,"composeBody":null,"compositionId":0,"contentAccessRuleIds":[],"contentAccessRuleTypes":[],"contentGroup":190096341139,"contentGroupId":190096341139,"contentTypeCategory":3,"contentTypeCategoryId":3,"contentTypeId":null,"created":1751602053979,"createdByAgent":null,"createdById":74657203,"createdTime":1751602053979,"crmObjectId":null,"css":{},"cssText":"","ctaClicks":null,"ctaViews":null,"currentState":"PUBLISHED","currentlyPublished":true,"deletedAt":0,"deletedBy":null,"deletedByEmail":null,"deletedById":null,"domain":"","dynamicPageDataSourceId":null,"dynamicPageDataSourceType":null,"dynamicPageHubDbTableId":null,"enableDomainStylesheets":null,"enableGoogleAmpOutputOverride":false,"enableLayoutStylesheets":null,"errors":[],"featuredImage":"https://48463649.fs1.hubspotusercontent-na1.net/hubfs/48463649/Blog/snatch-blocks.jpg","featuredImageAltText":"","featuredImageHeight":483,"featuredImageLength":0,"featuredImageWidth":900,"flexAreas":{},"folderId":null,"footerHtml":null,"footerTemplatePath":null,"footerVariantName":null,"freezeDate":1549634400000,"generateJsonLdEnabledOverride":true,"globalBlockOverrides":{},"hasContentAccessRules":false,"hasUserChanges":true,"headHtml":"","header":null,"headerTemplatePath":null,"headerVariantName":null,"htmlTitle":"Snatch Blocks: A Better Way to Winch","id":192174571540,"includeDefaultCustomCss":null,"isCaptchaRequired":true,"isCrawlableByBots":false,"isDraft":false,"isInstantEmailEnabled":false,"isPublished":true,"isSocialPublishingEnabled":false,"keywords":[],"label":"Snatch Blocks: A Better Way to Winch","language":"en","lastEditSessionId":null,"lastEditUpdateId":null,"layoutSections":{},"legacyBlogTabid":null,"legacyId":null,"legacyPostGuid":null,"linkRelCanonicalUrl":"","listTemplate":"","liveDomain":"www.zips.com","mab":false,"mabExperimentId":null,"mabMaster":false,"mabVariant":false,"marketingCampaignGuids":[],"meta":{"html_title":"Snatch Blocks: A Better Way to Winch","public_access_rules":[],"public_access_rules_enabled":false,"use_featured_image":true,"tag_ids":[192169769490,192174528148,192174529697,194719179289,194719586666],"topic_ids":[192169769490,192174528148,192174529697,194719179289,194719586666],"post_summary":"

Snatch blocks are a common tool on almost every tow truck for good reason. Snatch blocks are useful in difficult recovery scenarios as they can increase the pulling force of a winch line.

\n","post_body":"

Snatch blocks are a common tool on almost every tow truck for good reason. Snatch blocks are useful in difficult recovery scenarios as they can increase the pulling force of a winch line.

\n\n

A snatch block is a type of pulley block. It features a swing-open plate. This makes it suitable for short winch line runs and servicing.

\n

When selecting snatch blocks for your truck, verify that the working load limit (WLL) of the winch line and snatch block are compatible. The snatch block must be at least as strong as your winch line.

Verify that the groove in the snatch block’s sheave wheel is sized for the diameter of your winch line. A groove that is too large won’t fully support the winch line and could cause damaging flat spots. A winch line that’s too large can crack the block.

To determine the proper size sheave wheel, use a 12:1 ratio. For example, a 3/8\" winch line dia. multiplied by 12 yields 4.5\" which is the ideal sheave diameter for a 3/8\" wire rope.

\n

Changing Directions.

\n

Another primary use of a snatch block is to change the direction of pull. Blocks are anchored in a fixed position. The wider the angle at the block, the less force the recovery point has to withstand. One of the most common direction changes is attaching a snatch block to your bed. This allows the wire rope to feed straight into the winch. This ensures that it winds properly on the drum, rather than winding to one side.

\n

Snatch blocks are also used as anchor points to change the winch line direction. Allowing the disabled vehicle or tow truck to increase pulling power. Multiple snatch blocks can even be used for self-extraction. This can be achieved by routing the winch line from the back of the tow truck to several anchored blocks to the front of the tow truck.

\n

Increased Pulling Power

\n

Snatch Blocks can increase pulling power by having a moving vs. fixed snatch block. In this situation, attach a snatch block to the load so it moves with the load as the winch is operated.

The amount of line angle at the moving block determines how much mechanical advantage is gained. Maximum gain is when the input wire rope is parallel, or zero degrees, to the output wire rope. This is called a double line pull.

It comes in handy when your winch is not rated for the amount of weight of your casualty. This setup effectively doubles the capacity of your winch by distributing the load over two lines.

\n

Another situation is when the casualty is heavier than your recovery vehicle. In this instance, the tow truck’s wire rope goes through the snatch block attached to the casualty and back to another fixed snatch block then back to the load. This is a triple line pull and gains a 3:1 advantage. The more lines ran between the tow truck and the casualty, the more the pulling power increases.

\n

Lubrication

\n

When lubricating snatch blocks, use either sodium- or lithium-based grease. Bronze bushed blocks and sheaves generally need to be lubricated after 8 hours of continuous usage or at least every 14 days with intermittent use.

Roller bearing blocks and sheaves can be used for 24 hours continuously before needing lubrication. The same guideline of 14 days applies for intermittent use. Swivels follow the roller bearing lubrication schedule. Always follow your particular manufacturer’s lubrication timeline.

\n

Snatch Block Inspection

\n

Wear is a fact of life and will eventually affect the load a snatch block can handle. This means that regular and frequent inspection is needed. During inspection, keep the following in mind:

\n
    \n
  • Deformation of any part is an indication of overload and the snatch block must be replaced immediately.
  • \n
  • Swivel end-play of more than 1/16\" is a danger sign. Replace the snatch block immediately.
  • \n
  • Spreading side plates are caused by overload and must be repaired or replaced.
  • \n
  • Looseness in the side plates are a sign of loose retaining nuts.
  • \n
  • Sheave alignment issues such as wobbly sheaves are caused by bearing wear.
  • \n
  • Groove wear in the sheave is caused by cable wear and can prematurely reduce wire rope life. Replace grooved sheaves immediately.
  • \n
  • Hook latches are designed to hold loose rigging under slack conditions. Replace any damaged latches.
  • \n
  • Any hook deformation, crack, gouge or distortion needs to be replaced immediately.
  • \n
\n

Having several snatch blocks on your tow truck can provide options when faced with challenging recoveries. Keeping them in proper working order will ensure they are ready when you need them most.

\n

Before using any equipment described, be sure to read, understand and follow all manufacturers instructions and guidelines.

","rss_summary":"

Snatch blocks are a common tool on almost every tow truck for good reason. Snatch blocks are useful in difficult recovery scenarios as they can increase the pulling force of a winch line.

\n","rss_body":"

Snatch blocks are a common tool on almost every tow truck for good reason. Snatch blocks are useful in difficult recovery scenarios as they can increase the pulling force of a winch line.

\n\n

A snatch block is a type of pulley block. It features a swing-open plate. This makes it suitable for short winch line runs and servicing.

\n

When selecting snatch blocks for your truck, verify that the working load limit (WLL) of the winch line and snatch block are compatible. The snatch block must be at least as strong as your winch line.

Verify that the groove in the snatch block’s sheave wheel is sized for the diameter of your winch line. A groove that is too large won’t fully support the winch line and could cause damaging flat spots. A winch line that’s too large can crack the block.

To determine the proper size sheave wheel, use a 12:1 ratio. For example, a 3/8\" winch line dia. multiplied by 12 yields 4.5\" which is the ideal sheave diameter for a 3/8\" wire rope.

\n

Changing Directions.

\n

Another primary use of a snatch block is to change the direction of pull. Blocks are anchored in a fixed position. The wider the angle at the block, the less force the recovery point has to withstand. One of the most common direction changes is attaching a snatch block to your bed. This allows the wire rope to feed straight into the winch. This ensures that it winds properly on the drum, rather than winding to one side.

\n

Snatch blocks are also used as anchor points to change the winch line direction. Allowing the disabled vehicle or tow truck to increase pulling power. Multiple snatch blocks can even be used for self-extraction. This can be achieved by routing the winch line from the back of the tow truck to several anchored blocks to the front of the tow truck.

\n

Increased Pulling Power

\n

Snatch Blocks can increase pulling power by having a moving vs. fixed snatch block. In this situation, attach a snatch block to the load so it moves with the load as the winch is operated.

The amount of line angle at the moving block determines how much mechanical advantage is gained. Maximum gain is when the input wire rope is parallel, or zero degrees, to the output wire rope. This is called a double line pull.

It comes in handy when your winch is not rated for the amount of weight of your casualty. This setup effectively doubles the capacity of your winch by distributing the load over two lines.

\n

Another situation is when the casualty is heavier than your recovery vehicle. In this instance, the tow truck’s wire rope goes through the snatch block attached to the casualty and back to another fixed snatch block then back to the load. This is a triple line pull and gains a 3:1 advantage. The more lines ran between the tow truck and the casualty, the more the pulling power increases.

\n

Lubrication

\n

When lubricating snatch blocks, use either sodium- or lithium-based grease. Bronze bushed blocks and sheaves generally need to be lubricated after 8 hours of continuous usage or at least every 14 days with intermittent use.

Roller bearing blocks and sheaves can be used for 24 hours continuously before needing lubrication. The same guideline of 14 days applies for intermittent use. Swivels follow the roller bearing lubrication schedule. Always follow your particular manufacturer’s lubrication timeline.

\n

Snatch Block Inspection

\n

Wear is a fact of life and will eventually affect the load a snatch block can handle. This means that regular and frequent inspection is needed. During inspection, keep the following in mind:

\n
    \n
  • Deformation of any part is an indication of overload and the snatch block must be replaced immediately.
  • \n
  • Swivel end-play of more than 1/16\" is a danger sign. Replace the snatch block immediately.
  • \n
  • Spreading side plates are caused by overload and must be repaired or replaced.
  • \n
  • Looseness in the side plates are a sign of loose retaining nuts.
  • \n
  • Sheave alignment issues such as wobbly sheaves are caused by bearing wear.
  • \n
  • Groove wear in the sheave is caused by cable wear and can prematurely reduce wire rope life. Replace grooved sheaves immediately.
  • \n
  • Hook latches are designed to hold loose rigging under slack conditions. Replace any damaged latches.
  • \n
  • Any hook deformation, crack, gouge or distortion needs to be replaced immediately.
  • \n
\n

Having several snatch blocks on your tow truck can provide options when faced with challenging recoveries. Keeping them in proper working order will ensure they are ready when you need them most.

\n

Before using any equipment described, be sure to read, understand and follow all manufacturers instructions and guidelines.

","enable_google_amp_output_override":false,"generate_json_ld_enabled":true,"blog_post_schedule_task_uid":null,"blog_publish_to_social_media_task":"DONE_NOT_SENT","blog_publish_instant_email_task_uid":null,"blog_publish_instant_email_campaign_id":null,"blog_publish_instant_email_retry_count":null,"keywords":[],"composition_id":0,"is_crawlable_by_bots":false,"header":null,"published_at":1756217839785,"head_html":"","footer_html":null,"attached_stylesheets":[],"enable_domain_stylesheets":null,"include_default_custom_css":null,"layout_sections":{},"past_mab_experiment_ids":[],"deleted_by":null,"featured_image_alt_text":"","enable_layout_stylesheets":null,"tweet":null,"tweet_at":null,"campaign_name":null,"campaign_utm":null,"meta_keywords":null,"meta_description":"Snatch blocks are a common tool for tow trucks, offering increased pulling force and flexible winch line routing. Learn how to choose, use, lubricate, and inspect snatch blocks for safe and effective vehicle recovery.","tweet_immediately":false,"publish_immediately":true,"security_state":"NONE","scheduled_update_date":0,"placement_guids":[],"header_template_path":null,"header_variant_name":null,"footer_template_path":null,"footer_variant_name":null,"global_block_overrides":{},"property_for_dynamic_page_title":null,"property_for_dynamic_page_slug":null,"property_for_dynamic_page_meta_description":null,"property_for_dynamic_page_featured_image":null,"property_for_dynamic_page_canonical_url":null,"preview_image_src":null,"legacy_blog_tabid":null,"legacy_post_guid":null,"performable_variation_letter":null,"style_override_id":null,"has_user_changes":true,"css":{},"css_text":"","unpublished_at":0,"published_by_id":76755706,"allowed_slug_conflict":false,"ai_features":null,"link_rel_canonical_url":"","page_redirected":false,"page_expiry_enabled":null,"page_expiry_date":null,"page_expiry_redirect_id":null,"page_expiry_redirect_url":null,"deleted_by_id":null,"state_when_deleted":null,"cloned_from":null,"staged_from":null,"personas":[],"compose_body":null,"featured_image":"https://48463649.fs1.hubspotusercontent-na1.net/hubfs/48463649/Blog/snatch-blocks.jpg","featured_image_width":900,"featured_image_height":483,"publish_timezone_offset":null,"theme_settings_values":null,"password":null,"last_edit_session_id":null,"last_edit_update_id":null,"created_by_agent":null},"metaDescription":"Snatch blocks are a common tool for tow trucks, offering increased pulling force and flexible winch line routing. Learn how to choose, use, lubricate, and inspect snatch blocks for safe and effective vehicle recovery.","metaKeywords":null,"name":"Snatch Blocks: A Better Way to Winch","nextPostFeaturedImage":"https://48463649.fs1.hubspotusercontent-na1.net/hubfs/48463649/Blog/winch-lines.jpg","nextPostFeaturedImageAltText":"","nextPostName":"Choosing & Caring for Winch Lines","nextPostSlug":"blog/choosing-caring-for-winch-lines","pageExpiryDate":null,"pageExpiryEnabled":null,"pageExpiryRedirectId":null,"pageExpiryRedirectUrl":null,"pageRedirected":false,"pageTitle":"Snatch Blocks: A Better Way to Winch","parentBlog":{"absoluteUrl":"/blog","allowComments":true,"ampBodyColor":"#404040","ampBodyFont":"'Helvetica Neue', Helvetica, Arial, sans-serif","ampBodyFontSize":"18","ampCustomCss":"","ampHeaderBackgroundColor":"#ffffff","ampHeaderColor":"#1e1e1e","ampHeaderFont":"'Helvetica Neue', Helvetica, Arial, sans-serif","ampHeaderFontSize":"36","ampLinkColor":"#416bb3","ampLogoAlt":"","ampLogoHeight":0,"ampLogoSrc":"","ampLogoWidth":0,"analyticsPageId":190096341139,"attachedStylesheets":[],"audienceAccess":"PUBLIC","businessUnitId":null,"captchaAfterDays":7,"captchaAlways":false,"categoryId":3,"cdnPurgeEmbargoTime":null,"closeCommentsOlder":0,"commentDateFormat":"medium","commentFormGuid":"a4128401-39db-4c54-a62b-88ff335d3a69","commentMaxThreadDepth":1,"commentModeration":false,"commentNotificationEmails":[],"commentShouldCreateContact":false,"commentVerificationText":"","cosObjectType":"BLOG","created":1747163443999,"createdDateTime":1747163443999,"dailyNotificationEmailId":null,"dateFormattingLanguage":null,"defaultGroupStyleId":"","defaultNotificationFromName":"","defaultNotificationReplyTo":"","deletedAt":0,"description":"","domain":"","domainWhenPublished":"www.zips.com","emailApiSubscriptionId":null,"enableGoogleAmpOutput":true,"enableSocialAutoPublishing":false,"generateJsonLdEnabled":true,"header":null,"htmlFooter":"","htmlFooterIsShared":true,"htmlHead":"","htmlHeadIsShared":true,"htmlKeywords":[],"htmlTitle":"blog","id":190096341139,"ilsSubscriptionListsByType":{},"instantNotificationEmailId":null,"itemLayoutId":null,"itemTemplateIsShared":false,"itemTemplatePath":"zips-basic-theme/templates/blog-post.html","label":"blog","language":"en","legacyGuid":null,"legacyModuleId":null,"legacyTabId":null,"listingLayoutId":null,"listingPageId":190096341141,"listingTemplatePath":"","liveDomain":"www.zips.com","monthFilterFormat":"MMMM yyyy","monthlyNotificationEmailId":null,"name":"blog","parentBlogUpdateTaskId":null,"portalId":48463649,"postHtmlFooter":"","postHtmlHead":"","postsPerListingPage":111,"postsPerRssFeed":10,"publicAccessRules":[],"publicAccessRulesEnabled":false,"publicTitle":"blog","publishDateFormat":"medium","resolvedDomain":"www.zips.com","rootUrl":"/blog","rssCustomFeed":null,"rssDescription":null,"rssItemFooter":null,"rssItemHeader":null,"settingsOverrides":{"itemLayoutId":false,"itemTemplatePath":false,"itemTemplateIsShared":false,"listingLayoutId":false,"listingTemplatePath":false,"postsPerListingPage":false,"showSummaryInListing":false,"useFeaturedImageInSummary":false,"htmlHead":false,"postHtmlHead":false,"htmlHeadIsShared":false,"htmlFooter":false,"listingPageHtmlFooter":false,"postHtmlFooter":false,"htmlFooterIsShared":false,"attachedStylesheets":false,"postsPerRssFeed":false,"showSummaryInRss":false,"showSummaryInEmails":false,"showSummariesInEmails":false,"allowComments":false,"commentShouldCreateContact":false,"commentModeration":false,"closeCommentsOlder":false,"commentNotificationEmails":false,"commentMaxThreadDepth":false,"commentVerificationText":false,"socialAccountTwitter":false,"showSocialLinkTwitter":false,"showSocialLinkLinkedin":false,"showSocialLinkFacebook":false,"enableGoogleAmpOutput":false,"ampLogoSrc":false,"ampLogoHeight":false,"ampLogoWidth":false,"ampLogoAlt":false,"ampHeaderFont":false,"ampHeaderFontSize":false,"ampHeaderColor":false,"ampHeaderBackgroundColor":false,"ampBodyFont":false,"ampBodyFontSize":false,"ampBodyColor":false,"ampLinkColor":false,"generateJsonLdEnabled":false},"showSocialLinkFacebook":true,"showSocialLinkLinkedin":true,"showSocialLinkTwitter":true,"showSummaryInEmails":true,"showSummaryInListing":true,"showSummaryInRss":true,"siteId":null,"slug":"blog","socialAccountTwitter":"","state":null,"subscriptionContactsProperty":null,"subscriptionEmailType":null,"subscriptionFormGuid":null,"subscriptionListsByType":{},"title":null,"translatedFromId":null,"translations":{},"updated":1755110916417,"updatedDateTime":1755110916417,"urlBase":"www.zips.com/blog","urlSegments":{"all":"all","archive":"archive","author":"author","page":"page","tag":"tag"},"useFeaturedImageInSummary":true,"usesDefaultTemplate":false,"weeklyNotificationEmailId":null},"password":null,"pastMabExperimentIds":[],"performableGuid":null,"performableVariationLetter":null,"personalizationStrategyId":null,"personalizationVariantStatus":null,"personas":[],"placementGuids":[],"portableKey":null,"portalId":48463649,"position":null,"postBody":"

Snatch blocks are a common tool on almost every tow truck for good reason. Snatch blocks are useful in difficult recovery scenarios as they can increase the pulling force of a winch line.

\n\n

A snatch block is a type of pulley block. It features a swing-open plate. This makes it suitable for short winch line runs and servicing.

\n

When selecting snatch blocks for your truck, verify that the working load limit (WLL) of the winch line and snatch block are compatible. The snatch block must be at least as strong as your winch line.

Verify that the groove in the snatch block’s sheave wheel is sized for the diameter of your winch line. A groove that is too large won’t fully support the winch line and could cause damaging flat spots. A winch line that’s too large can crack the block.

To determine the proper size sheave wheel, use a 12:1 ratio. For example, a 3/8\" winch line dia. multiplied by 12 yields 4.5\" which is the ideal sheave diameter for a 3/8\" wire rope.

\n

Changing Directions.

\n

Another primary use of a snatch block is to change the direction of pull. Blocks are anchored in a fixed position. The wider the angle at the block, the less force the recovery point has to withstand. One of the most common direction changes is attaching a snatch block to your bed. This allows the wire rope to feed straight into the winch. This ensures that it winds properly on the drum, rather than winding to one side.

\n

Snatch blocks are also used as anchor points to change the winch line direction. Allowing the disabled vehicle or tow truck to increase pulling power. Multiple snatch blocks can even be used for self-extraction. This can be achieved by routing the winch line from the back of the tow truck to several anchored blocks to the front of the tow truck.

\n

Increased Pulling Power

\n

Snatch Blocks can increase pulling power by having a moving vs. fixed snatch block. In this situation, attach a snatch block to the load so it moves with the load as the winch is operated.

The amount of line angle at the moving block determines how much mechanical advantage is gained. Maximum gain is when the input wire rope is parallel, or zero degrees, to the output wire rope. This is called a double line pull.

It comes in handy when your winch is not rated for the amount of weight of your casualty. This setup effectively doubles the capacity of your winch by distributing the load over two lines.

\n

Another situation is when the casualty is heavier than your recovery vehicle. In this instance, the tow truck’s wire rope goes through the snatch block attached to the casualty and back to another fixed snatch block then back to the load. This is a triple line pull and gains a 3:1 advantage. The more lines ran between the tow truck and the casualty, the more the pulling power increases.

\n

Lubrication

\n

When lubricating snatch blocks, use either sodium- or lithium-based grease. Bronze bushed blocks and sheaves generally need to be lubricated after 8 hours of continuous usage or at least every 14 days with intermittent use.

Roller bearing blocks and sheaves can be used for 24 hours continuously before needing lubrication. The same guideline of 14 days applies for intermittent use. Swivels follow the roller bearing lubrication schedule. Always follow your particular manufacturer’s lubrication timeline.

\n

Snatch Block Inspection

\n

Wear is a fact of life and will eventually affect the load a snatch block can handle. This means that regular and frequent inspection is needed. During inspection, keep the following in mind:

\n
    \n
  • Deformation of any part is an indication of overload and the snatch block must be replaced immediately.
  • \n
  • Swivel end-play of more than 1/16\" is a danger sign. Replace the snatch block immediately.
  • \n
  • Spreading side plates are caused by overload and must be repaired or replaced.
  • \n
  • Looseness in the side plates are a sign of loose retaining nuts.
  • \n
  • Sheave alignment issues such as wobbly sheaves are caused by bearing wear.
  • \n
  • Groove wear in the sheave is caused by cable wear and can prematurely reduce wire rope life. Replace grooved sheaves immediately.
  • \n
  • Hook latches are designed to hold loose rigging under slack conditions. Replace any damaged latches.
  • \n
  • Any hook deformation, crack, gouge or distortion needs to be replaced immediately.
  • \n
\n

Having several snatch blocks on your tow truck can provide options when faced with challenging recoveries. Keeping them in proper working order will ensure they are ready when you need them most.

\n

Before using any equipment described, be sure to read, understand and follow all manufacturers instructions and guidelines.

","postBodyRss":"

Snatch blocks are a common tool on almost every tow truck for good reason. Snatch blocks are useful in difficult recovery scenarios as they can increase the pulling force of a winch line.

\n\n

A snatch block is a type of pulley block. It features a swing-open plate. This makes it suitable for short winch line runs and servicing.

\n

When selecting snatch blocks for your truck, verify that the working load limit (WLL) of the winch line and snatch block are compatible. The snatch block must be at least as strong as your winch line.

Verify that the groove in the snatch block’s sheave wheel is sized for the diameter of your winch line. A groove that is too large won’t fully support the winch line and could cause damaging flat spots. A winch line that’s too large can crack the block.

To determine the proper size sheave wheel, use a 12:1 ratio. For example, a 3/8\" winch line dia. multiplied by 12 yields 4.5\" which is the ideal sheave diameter for a 3/8\" wire rope.

\n

Changing Directions.

\n

Another primary use of a snatch block is to change the direction of pull. Blocks are anchored in a fixed position. The wider the angle at the block, the less force the recovery point has to withstand. One of the most common direction changes is attaching a snatch block to your bed. This allows the wire rope to feed straight into the winch. This ensures that it winds properly on the drum, rather than winding to one side.

\n

Snatch blocks are also used as anchor points to change the winch line direction. Allowing the disabled vehicle or tow truck to increase pulling power. Multiple snatch blocks can even be used for self-extraction. This can be achieved by routing the winch line from the back of the tow truck to several anchored blocks to the front of the tow truck.

\n

Increased Pulling Power

\n

Snatch Blocks can increase pulling power by having a moving vs. fixed snatch block. In this situation, attach a snatch block to the load so it moves with the load as the winch is operated.

The amount of line angle at the moving block determines how much mechanical advantage is gained. Maximum gain is when the input wire rope is parallel, or zero degrees, to the output wire rope. This is called a double line pull.

It comes in handy when your winch is not rated for the amount of weight of your casualty. This setup effectively doubles the capacity of your winch by distributing the load over two lines.

\n

Another situation is when the casualty is heavier than your recovery vehicle. In this instance, the tow truck’s wire rope goes through the snatch block attached to the casualty and back to another fixed snatch block then back to the load. This is a triple line pull and gains a 3:1 advantage. The more lines ran between the tow truck and the casualty, the more the pulling power increases.

\n

Lubrication

\n

When lubricating snatch blocks, use either sodium- or lithium-based grease. Bronze bushed blocks and sheaves generally need to be lubricated after 8 hours of continuous usage or at least every 14 days with intermittent use.

Roller bearing blocks and sheaves can be used for 24 hours continuously before needing lubrication. The same guideline of 14 days applies for intermittent use. Swivels follow the roller bearing lubrication schedule. Always follow your particular manufacturer’s lubrication timeline.

\n

Snatch Block Inspection

\n

Wear is a fact of life and will eventually affect the load a snatch block can handle. This means that regular and frequent inspection is needed. During inspection, keep the following in mind:

\n
    \n
  • Deformation of any part is an indication of overload and the snatch block must be replaced immediately.
  • \n
  • Swivel end-play of more than 1/16\" is a danger sign. Replace the snatch block immediately.
  • \n
  • Spreading side plates are caused by overload and must be repaired or replaced.
  • \n
  • Looseness in the side plates are a sign of loose retaining nuts.
  • \n
  • Sheave alignment issues such as wobbly sheaves are caused by bearing wear.
  • \n
  • Groove wear in the sheave is caused by cable wear and can prematurely reduce wire rope life. Replace grooved sheaves immediately.
  • \n
  • Hook latches are designed to hold loose rigging under slack conditions. Replace any damaged latches.
  • \n
  • Any hook deformation, crack, gouge or distortion needs to be replaced immediately.
  • \n
\n

Having several snatch blocks on your tow truck can provide options when faced with challenging recoveries. Keeping them in proper working order will ensure they are ready when you need them most.

\n

Before using any equipment described, be sure to read, understand and follow all manufacturers instructions and guidelines.

","postEmailContent":"

Snatch blocks are a common tool on almost every tow truck for good reason. Snatch blocks are useful in difficult recovery scenarios as they can increase the pulling force of a winch line.

","postFeaturedImageIfEnabled":"https://48463649.fs1.hubspotusercontent-na1.net/hubfs/48463649/Blog/snatch-blocks.jpg","postListContent":"

Snatch blocks are a common tool on almost every tow truck for good reason. Snatch blocks are useful in difficult recovery scenarios as they can increase the pulling force of a winch line.

","postListSummaryFeaturedImage":"https://48463649.fs1.hubspotusercontent-na1.net/hubfs/48463649/Blog/snatch-blocks.jpg","postRssContent":"

Snatch blocks are a common tool on almost every tow truck for good reason. Snatch blocks are useful in difficult recovery scenarios as they can increase the pulling force of a winch line.

","postRssSummaryFeaturedImage":"https://48463649.fs1.hubspotusercontent-na1.net/hubfs/48463649/Blog/snatch-blocks.jpg","postSummary":"

Snatch blocks are a common tool on almost every tow truck for good reason. Snatch blocks are useful in difficult recovery scenarios as they can increase the pulling force of a winch line.

\n","postSummaryRss":"

Snatch blocks are a common tool on almost every tow truck for good reason. Snatch blocks are useful in difficult recovery scenarios as they can increase the pulling force of a winch line.

","postTemplate":"zips-basic-theme/templates/blog-post.html","previewImageSrc":null,"previewKey":"CpdZlZNm","previousPostFeaturedImage":"https://48463649.fs1.hubspotusercontent-na1.net/hubfs/48463649/truck-lightbar-cleaning.jpg","previousPostFeaturedImageAltText":"truck with clean lightbar","previousPostName":"Explore Lightbar Cleaning Methods & Tips","previousPostSlug":"blog/lightbar-cleaning-methods","processingStatus":"PUBLISHED","propertyForDynamicPageCanonicalUrl":null,"propertyForDynamicPageFeaturedImage":null,"propertyForDynamicPageMetaDescription":null,"propertyForDynamicPageSlug":null,"propertyForDynamicPageTitle":null,"publicAccessRules":[],"publicAccessRulesEnabled":false,"publishDate":1549634400000,"publishDateLocalTime":1549634400000,"publishDateLocalized":{"date":1549634400000,"format":"medium","language":null},"publishImmediately":true,"publishTimezoneOffset":null,"publishedAt":1756217839785,"publishedByEmail":null,"publishedById":76755706,"publishedByName":null,"publishedUrl":"/blog/snatch-blocks-a-better-way-to-winch","resolvedDomain":"www.zips.com","resolvedLanguage":null,"rssBody":"

Snatch blocks are a common tool on almost every tow truck for good reason. Snatch blocks are useful in difficult recovery scenarios as they can increase the pulling force of a winch line.

\n\n

A snatch block is a type of pulley block. It features a swing-open plate. This makes it suitable for short winch line runs and servicing.

\n

When selecting snatch blocks for your truck, verify that the working load limit (WLL) of the winch line and snatch block are compatible. The snatch block must be at least as strong as your winch line.

Verify that the groove in the snatch block’s sheave wheel is sized for the diameter of your winch line. A groove that is too large won’t fully support the winch line and could cause damaging flat spots. A winch line that’s too large can crack the block.

To determine the proper size sheave wheel, use a 12:1 ratio. For example, a 3/8\" winch line dia. multiplied by 12 yields 4.5\" which is the ideal sheave diameter for a 3/8\" wire rope.

\n

Changing Directions.

\n

Another primary use of a snatch block is to change the direction of pull. Blocks are anchored in a fixed position. The wider the angle at the block, the less force the recovery point has to withstand. One of the most common direction changes is attaching a snatch block to your bed. This allows the wire rope to feed straight into the winch. This ensures that it winds properly on the drum, rather than winding to one side.

\n

Snatch blocks are also used as anchor points to change the winch line direction. Allowing the disabled vehicle or tow truck to increase pulling power. Multiple snatch blocks can even be used for self-extraction. This can be achieved by routing the winch line from the back of the tow truck to several anchored blocks to the front of the tow truck.

\n

Increased Pulling Power

\n

Snatch Blocks can increase pulling power by having a moving vs. fixed snatch block. In this situation, attach a snatch block to the load so it moves with the load as the winch is operated.

The amount of line angle at the moving block determines how much mechanical advantage is gained. Maximum gain is when the input wire rope is parallel, or zero degrees, to the output wire rope. This is called a double line pull.

It comes in handy when your winch is not rated for the amount of weight of your casualty. This setup effectively doubles the capacity of your winch by distributing the load over two lines.

\n

Another situation is when the casualty is heavier than your recovery vehicle. In this instance, the tow truck’s wire rope goes through the snatch block attached to the casualty and back to another fixed snatch block then back to the load. This is a triple line pull and gains a 3:1 advantage. The more lines ran between the tow truck and the casualty, the more the pulling power increases.

\n

Lubrication

\n

When lubricating snatch blocks, use either sodium- or lithium-based grease. Bronze bushed blocks and sheaves generally need to be lubricated after 8 hours of continuous usage or at least every 14 days with intermittent use.

Roller bearing blocks and sheaves can be used for 24 hours continuously before needing lubrication. The same guideline of 14 days applies for intermittent use. Swivels follow the roller bearing lubrication schedule. Always follow your particular manufacturer’s lubrication timeline.

\n

Snatch Block Inspection

\n

Wear is a fact of life and will eventually affect the load a snatch block can handle. This means that regular and frequent inspection is needed. During inspection, keep the following in mind:

\n
    \n
  • Deformation of any part is an indication of overload and the snatch block must be replaced immediately.
  • \n
  • Swivel end-play of more than 1/16\" is a danger sign. Replace the snatch block immediately.
  • \n
  • Spreading side plates are caused by overload and must be repaired or replaced.
  • \n
  • Looseness in the side plates are a sign of loose retaining nuts.
  • \n
  • Sheave alignment issues such as wobbly sheaves are caused by bearing wear.
  • \n
  • Groove wear in the sheave is caused by cable wear and can prematurely reduce wire rope life. Replace grooved sheaves immediately.
  • \n
  • Hook latches are designed to hold loose rigging under slack conditions. Replace any damaged latches.
  • \n
  • Any hook deformation, crack, gouge or distortion needs to be replaced immediately.
  • \n
\n

Having several snatch blocks on your tow truck can provide options when faced with challenging recoveries. Keeping them in proper working order will ensure they are ready when you need them most.

\n

Before using any equipment described, be sure to read, understand and follow all manufacturers instructions and guidelines.

","rssSummary":"

Snatch blocks are a common tool on almost every tow truck for good reason. Snatch blocks are useful in difficult recovery scenarios as they can increase the pulling force of a winch line.

\n","rssSummaryFeaturedImage":"https://48463649.fs1.hubspotusercontent-na1.net/hubfs/48463649/Blog/snatch-blocks.jpg","scheduledUpdateDate":0,"screenshotPreviewTakenAt":1770560239760,"screenshotPreviewUrl":"https://cdn1.hubspot.net/hubshotv3/prod/e/0/3d9c44e9-99df-47d6-8d3d-3cd6e1c13dff.png","sections":{},"securityState":"NONE","siteId":null,"slug":"blog/snatch-blocks-a-better-way-to-winch","stagedFrom":null,"state":"PUBLISHED","stateWhenDeleted":null,"structuredContentPageType":null,"structuredContentType":null,"styleOverrideId":null,"subcategory":"normal_blog_post","syncedWithBlogRoot":true,"tagIds":[192169769490,192174528148,192174529697,194719179289,194719586666],"tagList":[{"categoryId":3,"cdnPurgeEmbargoTime":null,"contentIds":[],"cosObjectType":"TAG","created":1751598346713,"deletedAt":0,"description":"","id":192169769490,"label":"Towing & Recovery","language":null,"name":"Towing & Recovery","portalId":48463649,"slug":"towing-recovery","translatedFromId":null,"translations":{},"updated":1751598346713},{"categoryId":3,"cdnPurgeEmbargoTime":null,"contentIds":[],"cosObjectType":"TAG","created":1751601475164,"deletedAt":0,"description":"","id":192174528148,"label":"Automotive","language":null,"name":"Automotive","portalId":48463649,"slug":"automotive","translatedFromId":null,"translations":{},"updated":1751601475164},{"categoryId":3,"cdnPurgeEmbargoTime":null,"contentIds":[],"cosObjectType":"TAG","created":1751602285139,"deletedAt":0,"description":"","id":192174529697,"label":"Construction","language":null,"name":"Construction","portalId":48463649,"slug":"construction","translatedFromId":null,"translations":{},"updated":1751602285139},{"categoryId":3,"cdnPurgeEmbargoTime":null,"contentIds":[],"cosObjectType":"TAG","created":1755545213046,"deletedAt":0,"description":"","id":194719179289,"label":"Industry Knowledge & Updates","language":null,"name":"Industry Knowledge & Updates","portalId":48463649,"slug":"industry-knowledge-updates","translatedFromId":null,"translations":{},"updated":1755545213046},{"categoryId":3,"cdnPurgeEmbargoTime":null,"contentIds":[],"cosObjectType":"TAG","created":1755545331471,"deletedAt":0,"description":"","id":194719586666,"label":"Product Guides","language":null,"name":"Product Guides","portalId":48463649,"slug":"product-guides","translatedFromId":null,"translations":{},"updated":1755545331471}],"tagNames":["Towing & Recovery","Automotive","Construction","Industry Knowledge & Updates","Product Guides"],"teamPerms":[],"templatePath":"","templatePathForRender":"zips-basic-theme/templates/blog-post.html","textToAudioFileId":null,"textToAudioGenerationRequestId":null,"themePath":null,"themeSettingsValues":null,"title":"Snatch Blocks: A Better Way to Winch","tmsId":null,"topicIds":[192169769490,192174528148,192174529697,194719179289,194719586666],"topicList":[{"categoryId":3,"cdnPurgeEmbargoTime":null,"contentIds":[],"cosObjectType":"TAG","created":1751598346713,"deletedAt":0,"description":"","id":192169769490,"label":"Towing & Recovery","language":null,"name":"Towing & Recovery","portalId":48463649,"slug":"towing-recovery","translatedFromId":null,"translations":{},"updated":1751598346713},{"categoryId":3,"cdnPurgeEmbargoTime":null,"contentIds":[],"cosObjectType":"TAG","created":1751601475164,"deletedAt":0,"description":"","id":192174528148,"label":"Automotive","language":null,"name":"Automotive","portalId":48463649,"slug":"automotive","translatedFromId":null,"translations":{},"updated":1751601475164},{"categoryId":3,"cdnPurgeEmbargoTime":null,"contentIds":[],"cosObjectType":"TAG","created":1751602285139,"deletedAt":0,"description":"","id":192174529697,"label":"Construction","language":null,"name":"Construction","portalId":48463649,"slug":"construction","translatedFromId":null,"translations":{},"updated":1751602285139},{"categoryId":3,"cdnPurgeEmbargoTime":null,"contentIds":[],"cosObjectType":"TAG","created":1755545213046,"deletedAt":0,"description":"","id":194719179289,"label":"Industry Knowledge & Updates","language":null,"name":"Industry Knowledge & Updates","portalId":48463649,"slug":"industry-knowledge-updates","translatedFromId":null,"translations":{},"updated":1755545213046},{"categoryId":3,"cdnPurgeEmbargoTime":null,"contentIds":[],"cosObjectType":"TAG","created":1755545331471,"deletedAt":0,"description":"","id":194719586666,"label":"Product Guides","language":null,"name":"Product Guides","portalId":48463649,"slug":"product-guides","translatedFromId":null,"translations":{},"updated":1755545331471}],"topicNames":["Towing & Recovery","Automotive","Construction","Industry Knowledge & Updates","Product Guides"],"topics":[192169769490,192174528148,192174529697,194719179289,194719586666],"translatedContent":{},"translatedFromId":null,"translations":{},"tweet":null,"tweetAt":null,"tweetImmediately":false,"unpublishedAt":0,"updated":1756217839788,"updatedById":76755706,"upsizeFeaturedImage":false,"url":"/blog/snatch-blocks-a-better-way-to-winch","useFeaturedImage":true,"userPerms":[],"views":null,"visibleToAll":null,"widgetContainers":{},"widgetcontainers":{},"widgets":{}},{"ab":false,"abStatus":null,"abTestId":null,"abVariation":false,"abVariationAutomated":false,"absoluteUrl":"/blog/choosing-caring-for-winch-lines","afterPostBody":null,"aifeatures":null,"allowedSlugConflict":false,"analytics":null,"analyticsPageId":"192174269808","analyticsPageType":"blog-post","approvalStatus":null,"archived":false,"archivedAt":0,"archivedInDashboard":false,"areCommentsAllowed":true,"attachedStylesheets":[],"audienceAccess":"PUBLIC","author":null,"authorName":null,"authorUsername":null,"blogAuthor":{"avatar":"","bio":"","cdnPurgeEmbargoTime":null,"cosObjectType":"BLOG_AUTHOR","created":1755539408521,"deletedAt":0,"displayName":"Brittany Bierle","email":null,"facebook":"","fullName":"Brittany Bierle","gravatarUrl":null,"hasSocialProfiles":false,"id":194712519021,"label":"Brittany Bierle","language":"en","linkedin":"","name":"Brittany Bierle","portalId":48463649,"slug":"brittany-bierle","translatedFromId":null,"translations":{},"twitter":"","twitterUsername":"","updated":1755539408521,"userId":null,"username":null,"website":""},"blogAuthorId":194712519021,"blogAuthorIdList":[194712519021],"blogAuthorList":[{"avatar":"","bio":"","cdnPurgeEmbargoTime":null,"cosObjectType":"BLOG_AUTHOR","created":1755539408521,"deletedAt":0,"displayName":"Brittany Bierle","email":null,"facebook":"","fullName":"Brittany Bierle","gravatarUrl":null,"hasSocialProfiles":false,"id":194712519021,"label":"Brittany Bierle","language":"en","linkedin":"","name":"Brittany Bierle","portalId":48463649,"slug":"brittany-bierle","translatedFromId":null,"translations":{},"twitter":"","twitterUsername":"","updated":1755539408521,"userId":null,"username":null,"website":""}],"blogPostAuthor":{"avatar":"","bio":"","cdnPurgeEmbargoTime":null,"cosObjectType":"BLOG_AUTHOR","created":1755539408521,"deletedAt":0,"displayName":"Brittany Bierle","email":null,"facebook":"","fullName":"Brittany Bierle","gravatarUrl":null,"hasSocialProfiles":false,"id":194712519021,"label":"Brittany Bierle","language":"en","linkedin":"","name":"Brittany Bierle","portalId":48463649,"slug":"brittany-bierle","translatedFromId":null,"translations":{},"twitter":"","twitterUsername":"","updated":1755539408521,"userId":null,"username":null,"website":""},"blogPostScheduleTaskUid":null,"blogPublishInstantEmailCampaignId":null,"blogPublishInstantEmailRetryCount":null,"blogPublishInstantEmailTaskUid":null,"blogPublishToSocialMediaTask":"DONE_NOT_SENT","blueprintTypeId":0,"businessUnitId":null,"campaign":null,"campaignName":null,"campaignUtm":null,"category":3,"categoryId":3,"cdnPurgeEmbargoTime":null,"checkPostLevelAudienceAccessFirst":true,"clonedFrom":null,"composeBody":null,"compositionId":0,"contentAccessRuleIds":[],"contentAccessRuleTypes":[],"contentGroup":190096341139,"contentGroupId":190096341139,"contentTypeCategory":3,"contentTypeCategoryId":3,"contentTypeId":null,"created":1751600098317,"createdByAgent":null,"createdById":74657203,"createdTime":1751600098317,"crmObjectId":null,"css":{},"cssText":"","ctaClicks":null,"ctaViews":null,"currentState":"PUBLISHED","currentlyPublished":true,"deletedAt":0,"deletedBy":null,"deletedByEmail":null,"deletedById":null,"domain":"","dynamicPageDataSourceId":null,"dynamicPageDataSourceType":null,"dynamicPageHubDbTableId":null,"enableDomainStylesheets":null,"enableGoogleAmpOutputOverride":false,"enableLayoutStylesheets":null,"errors":[],"featuredImage":"https://48463649.fs1.hubspotusercontent-na1.net/hubfs/48463649/Blog/winch-lines.jpg","featuredImageAltText":"","featuredImageHeight":483,"featuredImageLength":0,"featuredImageWidth":900,"flexAreas":{},"folderId":null,"footerHtml":null,"footerTemplatePath":null,"footerVariantName":null,"freezeDate":1544191200000,"generateJsonLdEnabledOverride":true,"globalBlockOverrides":{},"hasContentAccessRules":false,"hasUserChanges":true,"headHtml":"","header":null,"headerTemplatePath":null,"headerVariantName":null,"htmlTitle":"Choosing & Caring for Winch Lines","id":192174269808,"includeDefaultCustomCss":null,"isCaptchaRequired":true,"isCrawlableByBots":false,"isDraft":false,"isInstantEmailEnabled":false,"isPublished":true,"isSocialPublishingEnabled":false,"keywords":[],"label":"Choosing & Caring for Winch Lines","language":"en","lastEditSessionId":null,"lastEditUpdateId":null,"layoutSections":{},"legacyBlogTabid":null,"legacyId":null,"legacyPostGuid":null,"linkRelCanonicalUrl":"","listTemplate":"","liveDomain":"www.zips.com","mab":false,"mabExperimentId":null,"mabMaster":false,"mabVariant":false,"marketingCampaignGuids":[],"meta":{"html_title":"Choosing & Caring for Winch Lines","public_access_rules":[],"public_access_rules_enabled":false,"use_featured_image":true,"tag_ids":[192169769490,192174528148,192174529697,194719179289,194719586666],"topic_ids":[192169769490,192174528148,192174529697,194719179289,194719586666],"post_summary":"

Understand the different pros and cons of different types of winch lines. Additionally, know how to take care of winch lines correctly.

\n","post_body":"

Understand the different pros and cons of different types of winch lines. Additionally, know how to take care of winch lines correctly.

\n\n

Wire winch lines, commonly called steel wire rope, are the heart vehicle recovery operations. A damaged line is a serious safety issue and a broken one removes a recovery vehicle from service. This article will cover the basics of winch lines, winch line inspection, and how to select a new winch line.

\n

Rope Cores: Rope cores serve as the foundation for the strands. They keep the rope round and strands properly positioned.

There are 3 different core types: fiber core, independent wire core (IWRC) and strand core. Fiber core offers the greatest flexibility. It is commonly made of polypropylene fibers, but natural fiber options are also available.

Independent wire rope core (IWRC) is available in bright, galvanized, and stainless steel configurations. It is the strongest type of core available and has 10-15% higher work load limit than fiber core.

Strand Core is made of stands of wires. It is least flexible of the three types discussed and is mostly used on utility cables.

\n

Rope Grades: The most common rope today is extra improved plow steel (EIP or XIP). It is typically used on winch lines and generally has 15% stronger break strength than improved plow steel grade (IPS). Extra extra improved plow steel grade (EEIP or XXIP) is also available for added strength in higher rated equipment.

\n

Rope Types: Bright wire is un-coated and is the most commonly used winch line. Another option is galvanized wire, which improves corrosion resistance. However, galvanization can reduce a wire’s strength up to 10% compared to bright wire unless the wire is drawn again. 

Stainless steel wire contains chromium and nickel. It is very corrosion resistant and used primarily on yachts or as control cables.

\n

Construction: Construction determines how the wire rope performs. For instance, a 6 x 19 rope will have 6 strands of rope that have between 19 to 26 wires. Each added wire makes for better abrasion resistance. A 6 x 37 construction has 27 to 49 wires and is more flexible, while a 19 x 7 construction is rotation resistant.

\n

Lay: There are two categories of lay, directional lay and lay orientation. Directional lay refers to what direction the strands of the rope face when you are looking down the rope, and lay orientation refers to the direction the wires within the strands are twisted.

Directional lay is either right or left. Lay orientation is either regular or lang. In regular lay, the wires are twisted in one direction while the strands are twisted in the opposite direction. In lang lay, the wires are laid in the same direction as the strand in the rope.

Regular lay ropes are less likely to untwist. They are also less likely to fail because of crushing and distortion; however, they are less flexible than lang lay ropes. Wire winch lines use right regular lay construction.

\n

Design Factors: Design factors are safety factors required by government and industry organizations for wire rope. While they vary depending on application, typical towing winch lines have a 3:1 design factor, while lifting wire ropes have a 5:1 factor.

\n

During a winch line’s “useful life” all wire rope will gradually lose strength due to surface wear and metal fatigue. Metal fatigue is caused by normal use of the winch line but is made worse by excessive bending, which can be caused by a sheave that is too small.

Inspecting your winch lines periodically for damage can save you many headaches on the road. Below is mechanical damage to look for when inspecting your winch line and determining whether to remove it from service.

\n
    \n
  • Hook damage: Look for any cracks or deformation of hooks. If the throat opening has been enlarged by 15% or twisted out of plane by 10%, it needs replacing.
  • \n
  • Broken Wires: Pulling winch lines across edges, fatigue or overload can all break individual wires. If you find five or more broken wires in a single strand or 10 or more in one lay, the wire should be replaced.
  • \n
  • Wear: Dragging a winch line on the ground or loading over the winch line will cause flat areas on individual wires of the cable. If these wires have lost 1/3 or more of the original diameter the line needs to be taken out of service.
  • \n
  • Corrosion/Heat Damage: Any discoloration from rust or lack of lubrication promotes fatigue. If the wire rope is severely pitted or individual wires rusted through, replace the line. Fiber core slings need to stay below 180°F and steel core below 400°F. Exceeding these heats greatly reduce wire rope strength.
  • \n
  • Kinking: Shock loading or forcing the line against an edge causes bent strands. This prevents the rope from rotating properly and greatly reduces its strength, making it necessary to replace the rope. Use load pads to protect the line and prevent this.
  • \n
  • Crushing: A load set on top of a winch line can flatten the cable. This has the same effect as kinking, making it necessary to remove the line from service.
  • \n
\n

When you are inspecting your winch line and have not found any damage that would require replacement, it is an ideal opportunity to lubricate the line to get the maximum service life possible. Be sure to use a lubricant especially made for wire rope. Proper lubrication reduces internal friction within the wires and strands of the wire rope. In addition, it protects the rope from oxidation and corrosion.

\n

When selecting a new winch line it should be based on the diameter, length and type recommended by the winch manufacturer for the model of winch you own. This information can be found on the winch nameplate, otherwise you can contact the winch manufacturer or local supplier.

Beyond making sure your rope is compatible with your winch, there are a few other things you may want to consider. First, swivel hooks will help relieve rotational tension as the rope moves, so you may want to invest in them. Also, keep in mind that imported ropes can provide substantial cost savings without sacrificing quality.

To reduce damage to whatever winch line you choose, use roller guides and tension plates. These aid in the proper winding of wire rope on the winch drum.

\n

Periodic inspections and lubrication of your winch line will save your business money, but more importantly, keep your employees safe and your customers happy. That is the heart of our industry.

\n

See all our Winch Line Products >>

","rss_summary":"

Understand the different pros and cons of different types of winch lines. Additionally, know how to take care of winch lines correctly.

\n","rss_body":"

Understand the different pros and cons of different types of winch lines. Additionally, know how to take care of winch lines correctly.

\n\n

Wire winch lines, commonly called steel wire rope, are the heart vehicle recovery operations. A damaged line is a serious safety issue and a broken one removes a recovery vehicle from service. This article will cover the basics of winch lines, winch line inspection, and how to select a new winch line.

\n

Rope Cores: Rope cores serve as the foundation for the strands. They keep the rope round and strands properly positioned.

There are 3 different core types: fiber core, independent wire core (IWRC) and strand core. Fiber core offers the greatest flexibility. It is commonly made of polypropylene fibers, but natural fiber options are also available.

Independent wire rope core (IWRC) is available in bright, galvanized, and stainless steel configurations. It is the strongest type of core available and has 10-15% higher work load limit than fiber core.

Strand Core is made of stands of wires. It is least flexible of the three types discussed and is mostly used on utility cables.

\n

Rope Grades: The most common rope today is extra improved plow steel (EIP or XIP). It is typically used on winch lines and generally has 15% stronger break strength than improved plow steel grade (IPS). Extra extra improved plow steel grade (EEIP or XXIP) is also available for added strength in higher rated equipment.

\n

Rope Types: Bright wire is un-coated and is the most commonly used winch line. Another option is galvanized wire, which improves corrosion resistance. However, galvanization can reduce a wire’s strength up to 10% compared to bright wire unless the wire is drawn again. 

Stainless steel wire contains chromium and nickel. It is very corrosion resistant and used primarily on yachts or as control cables.

\n

Construction: Construction determines how the wire rope performs. For instance, a 6 x 19 rope will have 6 strands of rope that have between 19 to 26 wires. Each added wire makes for better abrasion resistance. A 6 x 37 construction has 27 to 49 wires and is more flexible, while a 19 x 7 construction is rotation resistant.

\n

Lay: There are two categories of lay, directional lay and lay orientation. Directional lay refers to what direction the strands of the rope face when you are looking down the rope, and lay orientation refers to the direction the wires within the strands are twisted.

Directional lay is either right or left. Lay orientation is either regular or lang. In regular lay, the wires are twisted in one direction while the strands are twisted in the opposite direction. In lang lay, the wires are laid in the same direction as the strand in the rope.

Regular lay ropes are less likely to untwist. They are also less likely to fail because of crushing and distortion; however, they are less flexible than lang lay ropes. Wire winch lines use right regular lay construction.

\n

Design Factors: Design factors are safety factors required by government and industry organizations for wire rope. While they vary depending on application, typical towing winch lines have a 3:1 design factor, while lifting wire ropes have a 5:1 factor.

\n

During a winch line’s “useful life” all wire rope will gradually lose strength due to surface wear and metal fatigue. Metal fatigue is caused by normal use of the winch line but is made worse by excessive bending, which can be caused by a sheave that is too small.

Inspecting your winch lines periodically for damage can save you many headaches on the road. Below is mechanical damage to look for when inspecting your winch line and determining whether to remove it from service.

\n
    \n
  • Hook damage: Look for any cracks or deformation of hooks. If the throat opening has been enlarged by 15% or twisted out of plane by 10%, it needs replacing.
  • \n
  • Broken Wires: Pulling winch lines across edges, fatigue or overload can all break individual wires. If you find five or more broken wires in a single strand or 10 or more in one lay, the wire should be replaced.
  • \n
  • Wear: Dragging a winch line on the ground or loading over the winch line will cause flat areas on individual wires of the cable. If these wires have lost 1/3 or more of the original diameter the line needs to be taken out of service.
  • \n
  • Corrosion/Heat Damage: Any discoloration from rust or lack of lubrication promotes fatigue. If the wire rope is severely pitted or individual wires rusted through, replace the line. Fiber core slings need to stay below 180°F and steel core below 400°F. Exceeding these heats greatly reduce wire rope strength.
  • \n
  • Kinking: Shock loading or forcing the line against an edge causes bent strands. This prevents the rope from rotating properly and greatly reduces its strength, making it necessary to replace the rope. Use load pads to protect the line and prevent this.
  • \n
  • Crushing: A load set on top of a winch line can flatten the cable. This has the same effect as kinking, making it necessary to remove the line from service.
  • \n
\n

When you are inspecting your winch line and have not found any damage that would require replacement, it is an ideal opportunity to lubricate the line to get the maximum service life possible. Be sure to use a lubricant especially made for wire rope. Proper lubrication reduces internal friction within the wires and strands of the wire rope. In addition, it protects the rope from oxidation and corrosion.

\n

When selecting a new winch line it should be based on the diameter, length and type recommended by the winch manufacturer for the model of winch you own. This information can be found on the winch nameplate, otherwise you can contact the winch manufacturer or local supplier.

Beyond making sure your rope is compatible with your winch, there are a few other things you may want to consider. First, swivel hooks will help relieve rotational tension as the rope moves, so you may want to invest in them. Also, keep in mind that imported ropes can provide substantial cost savings without sacrificing quality.

To reduce damage to whatever winch line you choose, use roller guides and tension plates. These aid in the proper winding of wire rope on the winch drum.

\n

Periodic inspections and lubrication of your winch line will save your business money, but more importantly, keep your employees safe and your customers happy. That is the heart of our industry.

\n

See all our Winch Line Products >>

","enable_google_amp_output_override":false,"generate_json_ld_enabled":true,"blog_post_schedule_task_uid":null,"blog_publish_to_social_media_task":"DONE_NOT_SENT","blog_publish_instant_email_task_uid":null,"blog_publish_instant_email_campaign_id":null,"blog_publish_instant_email_retry_count":null,"keywords":[],"composition_id":0,"is_crawlable_by_bots":false,"header":null,"published_at":1756221306204,"head_html":"","footer_html":null,"attached_stylesheets":[],"enable_domain_stylesheets":null,"include_default_custom_css":null,"layout_sections":{},"past_mab_experiment_ids":[],"deleted_by":null,"featured_image_alt_text":"","enable_layout_stylesheets":null,"tweet":null,"tweet_at":null,"campaign_name":null,"campaign_utm":null,"meta_keywords":null,"meta_description":"A detailed guide discussing the differences among winch line types, their core and construction, inspection techniques, safety design factors, and maintenance tips to keep your winch lines safe and long-lasting.","tweet_immediately":false,"publish_immediately":true,"security_state":"NONE","scheduled_update_date":0,"placement_guids":[],"header_template_path":null,"header_variant_name":null,"footer_template_path":null,"footer_variant_name":null,"global_block_overrides":{},"property_for_dynamic_page_title":null,"property_for_dynamic_page_slug":null,"property_for_dynamic_page_meta_description":null,"property_for_dynamic_page_featured_image":null,"property_for_dynamic_page_canonical_url":null,"preview_image_src":null,"legacy_blog_tabid":null,"legacy_post_guid":null,"performable_variation_letter":null,"style_override_id":null,"has_user_changes":true,"css":{},"css_text":"","unpublished_at":0,"published_by_id":76755706,"allowed_slug_conflict":false,"ai_features":null,"link_rel_canonical_url":"","page_redirected":false,"page_expiry_enabled":null,"page_expiry_date":null,"page_expiry_redirect_id":null,"page_expiry_redirect_url":null,"deleted_by_id":null,"state_when_deleted":null,"cloned_from":null,"staged_from":null,"personas":[],"compose_body":null,"featured_image":"https://48463649.fs1.hubspotusercontent-na1.net/hubfs/48463649/Blog/winch-lines.jpg","featured_image_width":900,"featured_image_height":483,"publish_timezone_offset":null,"theme_settings_values":null,"password":null,"last_edit_session_id":null,"last_edit_update_id":null,"created_by_agent":null},"metaDescription":"A detailed guide discussing the differences among winch line types, their core and construction, inspection techniques, safety design factors, and maintenance tips to keep your winch lines safe and long-lasting.","metaKeywords":null,"name":"Choosing & Caring for Winch Lines","nextPostFeaturedImage":"https://48463649.fs1.hubspotusercontent-na1.net/hubfs/48463649/Blog/jump-packs.jpg","nextPostFeaturedImageAltText":"","nextPostName":"Make your Jump-Start Pack Last!","nextPostSlug":"blog/make-your-jump-start-pack-last","pageExpiryDate":null,"pageExpiryEnabled":null,"pageExpiryRedirectId":null,"pageExpiryRedirectUrl":null,"pageRedirected":false,"pageTitle":"Choosing & Caring for Winch Lines","parentBlog":{"absoluteUrl":"/blog","allowComments":true,"ampBodyColor":"#404040","ampBodyFont":"'Helvetica Neue', Helvetica, Arial, sans-serif","ampBodyFontSize":"18","ampCustomCss":"","ampHeaderBackgroundColor":"#ffffff","ampHeaderColor":"#1e1e1e","ampHeaderFont":"'Helvetica Neue', Helvetica, Arial, sans-serif","ampHeaderFontSize":"36","ampLinkColor":"#416bb3","ampLogoAlt":"","ampLogoHeight":0,"ampLogoSrc":"","ampLogoWidth":0,"analyticsPageId":190096341139,"attachedStylesheets":[],"audienceAccess":"PUBLIC","businessUnitId":null,"captchaAfterDays":7,"captchaAlways":false,"categoryId":3,"cdnPurgeEmbargoTime":null,"closeCommentsOlder":0,"commentDateFormat":"medium","commentFormGuid":"a4128401-39db-4c54-a62b-88ff335d3a69","commentMaxThreadDepth":1,"commentModeration":false,"commentNotificationEmails":[],"commentShouldCreateContact":false,"commentVerificationText":"","cosObjectType":"BLOG","created":1747163443999,"createdDateTime":1747163443999,"dailyNotificationEmailId":null,"dateFormattingLanguage":null,"defaultGroupStyleId":"","defaultNotificationFromName":"","defaultNotificationReplyTo":"","deletedAt":0,"description":"","domain":"","domainWhenPublished":"www.zips.com","emailApiSubscriptionId":null,"enableGoogleAmpOutput":true,"enableSocialAutoPublishing":false,"generateJsonLdEnabled":true,"header":null,"htmlFooter":"","htmlFooterIsShared":true,"htmlHead":"","htmlHeadIsShared":true,"htmlKeywords":[],"htmlTitle":"blog","id":190096341139,"ilsSubscriptionListsByType":{},"instantNotificationEmailId":null,"itemLayoutId":null,"itemTemplateIsShared":false,"itemTemplatePath":"zips-basic-theme/templates/blog-post.html","label":"blog","language":"en","legacyGuid":null,"legacyModuleId":null,"legacyTabId":null,"listingLayoutId":null,"listingPageId":190096341141,"listingTemplatePath":"","liveDomain":"www.zips.com","monthFilterFormat":"MMMM yyyy","monthlyNotificationEmailId":null,"name":"blog","parentBlogUpdateTaskId":null,"portalId":48463649,"postHtmlFooter":"","postHtmlHead":"","postsPerListingPage":111,"postsPerRssFeed":10,"publicAccessRules":[],"publicAccessRulesEnabled":false,"publicTitle":"blog","publishDateFormat":"medium","resolvedDomain":"www.zips.com","rootUrl":"/blog","rssCustomFeed":null,"rssDescription":null,"rssItemFooter":null,"rssItemHeader":null,"settingsOverrides":{"itemLayoutId":false,"itemTemplatePath":false,"itemTemplateIsShared":false,"listingLayoutId":false,"listingTemplatePath":false,"postsPerListingPage":false,"showSummaryInListing":false,"useFeaturedImageInSummary":false,"htmlHead":false,"postHtmlHead":false,"htmlHeadIsShared":false,"htmlFooter":false,"listingPageHtmlFooter":false,"postHtmlFooter":false,"htmlFooterIsShared":false,"attachedStylesheets":false,"postsPerRssFeed":false,"showSummaryInRss":false,"showSummaryInEmails":false,"showSummariesInEmails":false,"allowComments":false,"commentShouldCreateContact":false,"commentModeration":false,"closeCommentsOlder":false,"commentNotificationEmails":false,"commentMaxThreadDepth":false,"commentVerificationText":false,"socialAccountTwitter":false,"showSocialLinkTwitter":false,"showSocialLinkLinkedin":false,"showSocialLinkFacebook":false,"enableGoogleAmpOutput":false,"ampLogoSrc":false,"ampLogoHeight":false,"ampLogoWidth":false,"ampLogoAlt":false,"ampHeaderFont":false,"ampHeaderFontSize":false,"ampHeaderColor":false,"ampHeaderBackgroundColor":false,"ampBodyFont":false,"ampBodyFontSize":false,"ampBodyColor":false,"ampLinkColor":false,"generateJsonLdEnabled":false},"showSocialLinkFacebook":true,"showSocialLinkLinkedin":true,"showSocialLinkTwitter":true,"showSummaryInEmails":true,"showSummaryInListing":true,"showSummaryInRss":true,"siteId":null,"slug":"blog","socialAccountTwitter":"","state":null,"subscriptionContactsProperty":null,"subscriptionEmailType":null,"subscriptionFormGuid":null,"subscriptionListsByType":{},"title":null,"translatedFromId":null,"translations":{},"updated":1755110916417,"updatedDateTime":1755110916417,"urlBase":"www.zips.com/blog","urlSegments":{"all":"all","archive":"archive","author":"author","page":"page","tag":"tag"},"useFeaturedImageInSummary":true,"usesDefaultTemplate":false,"weeklyNotificationEmailId":null},"password":null,"pastMabExperimentIds":[],"performableGuid":null,"performableVariationLetter":null,"personalizationStrategyId":null,"personalizationVariantStatus":null,"personas":[],"placementGuids":[],"portableKey":null,"portalId":48463649,"position":null,"postBody":"

Understand the different pros and cons of different types of winch lines. Additionally, know how to take care of winch lines correctly.

\n\n

Wire winch lines, commonly called steel wire rope, are the heart vehicle recovery operations. A damaged line is a serious safety issue and a broken one removes a recovery vehicle from service. This article will cover the basics of winch lines, winch line inspection, and how to select a new winch line.

\n

Rope Cores: Rope cores serve as the foundation for the strands. They keep the rope round and strands properly positioned.

There are 3 different core types: fiber core, independent wire core (IWRC) and strand core. Fiber core offers the greatest flexibility. It is commonly made of polypropylene fibers, but natural fiber options are also available.

Independent wire rope core (IWRC) is available in bright, galvanized, and stainless steel configurations. It is the strongest type of core available and has 10-15% higher work load limit than fiber core.

Strand Core is made of stands of wires. It is least flexible of the three types discussed and is mostly used on utility cables.

\n

Rope Grades: The most common rope today is extra improved plow steel (EIP or XIP). It is typically used on winch lines and generally has 15% stronger break strength than improved plow steel grade (IPS). Extra extra improved plow steel grade (EEIP or XXIP) is also available for added strength in higher rated equipment.

\n

Rope Types: Bright wire is un-coated and is the most commonly used winch line. Another option is galvanized wire, which improves corrosion resistance. However, galvanization can reduce a wire’s strength up to 10% compared to bright wire unless the wire is drawn again. 

Stainless steel wire contains chromium and nickel. It is very corrosion resistant and used primarily on yachts or as control cables.

\n

Construction: Construction determines how the wire rope performs. For instance, a 6 x 19 rope will have 6 strands of rope that have between 19 to 26 wires. Each added wire makes for better abrasion resistance. A 6 x 37 construction has 27 to 49 wires and is more flexible, while a 19 x 7 construction is rotation resistant.

\n

Lay: There are two categories of lay, directional lay and lay orientation. Directional lay refers to what direction the strands of the rope face when you are looking down the rope, and lay orientation refers to the direction the wires within the strands are twisted.

Directional lay is either right or left. Lay orientation is either regular or lang. In regular lay, the wires are twisted in one direction while the strands are twisted in the opposite direction. In lang lay, the wires are laid in the same direction as the strand in the rope.

Regular lay ropes are less likely to untwist. They are also less likely to fail because of crushing and distortion; however, they are less flexible than lang lay ropes. Wire winch lines use right regular lay construction.

\n

Design Factors: Design factors are safety factors required by government and industry organizations for wire rope. While they vary depending on application, typical towing winch lines have a 3:1 design factor, while lifting wire ropes have a 5:1 factor.

\n

During a winch line’s “useful life” all wire rope will gradually lose strength due to surface wear and metal fatigue. Metal fatigue is caused by normal use of the winch line but is made worse by excessive bending, which can be caused by a sheave that is too small.

Inspecting your winch lines periodically for damage can save you many headaches on the road. Below is mechanical damage to look for when inspecting your winch line and determining whether to remove it from service.

\n
    \n
  • Hook damage: Look for any cracks or deformation of hooks. If the throat opening has been enlarged by 15% or twisted out of plane by 10%, it needs replacing.
  • \n
  • Broken Wires: Pulling winch lines across edges, fatigue or overload can all break individual wires. If you find five or more broken wires in a single strand or 10 or more in one lay, the wire should be replaced.
  • \n
  • Wear: Dragging a winch line on the ground or loading over the winch line will cause flat areas on individual wires of the cable. If these wires have lost 1/3 or more of the original diameter the line needs to be taken out of service.
  • \n
  • Corrosion/Heat Damage: Any discoloration from rust or lack of lubrication promotes fatigue. If the wire rope is severely pitted or individual wires rusted through, replace the line. Fiber core slings need to stay below 180°F and steel core below 400°F. Exceeding these heats greatly reduce wire rope strength.
  • \n
  • Kinking: Shock loading or forcing the line against an edge causes bent strands. This prevents the rope from rotating properly and greatly reduces its strength, making it necessary to replace the rope. Use load pads to protect the line and prevent this.
  • \n
  • Crushing: A load set on top of a winch line can flatten the cable. This has the same effect as kinking, making it necessary to remove the line from service.
  • \n
\n

When you are inspecting your winch line and have not found any damage that would require replacement, it is an ideal opportunity to lubricate the line to get the maximum service life possible. Be sure to use a lubricant especially made for wire rope. Proper lubrication reduces internal friction within the wires and strands of the wire rope. In addition, it protects the rope from oxidation and corrosion.

\n

When selecting a new winch line it should be based on the diameter, length and type recommended by the winch manufacturer for the model of winch you own. This information can be found on the winch nameplate, otherwise you can contact the winch manufacturer or local supplier.

Beyond making sure your rope is compatible with your winch, there are a few other things you may want to consider. First, swivel hooks will help relieve rotational tension as the rope moves, so you may want to invest in them. Also, keep in mind that imported ropes can provide substantial cost savings without sacrificing quality.

To reduce damage to whatever winch line you choose, use roller guides and tension plates. These aid in the proper winding of wire rope on the winch drum.

\n

Periodic inspections and lubrication of your winch line will save your business money, but more importantly, keep your employees safe and your customers happy. That is the heart of our industry.

\n

See all our Winch Line Products >>

","postBodyRss":"

Understand the different pros and cons of different types of winch lines. Additionally, know how to take care of winch lines correctly.

\n\n

Wire winch lines, commonly called steel wire rope, are the heart vehicle recovery operations. A damaged line is a serious safety issue and a broken one removes a recovery vehicle from service. This article will cover the basics of winch lines, winch line inspection, and how to select a new winch line.

\n

Rope Cores: Rope cores serve as the foundation for the strands. They keep the rope round and strands properly positioned.

There are 3 different core types: fiber core, independent wire core (IWRC) and strand core. Fiber core offers the greatest flexibility. It is commonly made of polypropylene fibers, but natural fiber options are also available.

Independent wire rope core (IWRC) is available in bright, galvanized, and stainless steel configurations. It is the strongest type of core available and has 10-15% higher work load limit than fiber core.

Strand Core is made of stands of wires. It is least flexible of the three types discussed and is mostly used on utility cables.

\n

Rope Grades: The most common rope today is extra improved plow steel (EIP or XIP). It is typically used on winch lines and generally has 15% stronger break strength than improved plow steel grade (IPS). Extra extra improved plow steel grade (EEIP or XXIP) is also available for added strength in higher rated equipment.

\n

Rope Types: Bright wire is un-coated and is the most commonly used winch line. Another option is galvanized wire, which improves corrosion resistance. However, galvanization can reduce a wire’s strength up to 10% compared to bright wire unless the wire is drawn again. 

Stainless steel wire contains chromium and nickel. It is very corrosion resistant and used primarily on yachts or as control cables.

\n

Construction: Construction determines how the wire rope performs. For instance, a 6 x 19 rope will have 6 strands of rope that have between 19 to 26 wires. Each added wire makes for better abrasion resistance. A 6 x 37 construction has 27 to 49 wires and is more flexible, while a 19 x 7 construction is rotation resistant.

\n

Lay: There are two categories of lay, directional lay and lay orientation. Directional lay refers to what direction the strands of the rope face when you are looking down the rope, and lay orientation refers to the direction the wires within the strands are twisted.

Directional lay is either right or left. Lay orientation is either regular or lang. In regular lay, the wires are twisted in one direction while the strands are twisted in the opposite direction. In lang lay, the wires are laid in the same direction as the strand in the rope.

Regular lay ropes are less likely to untwist. They are also less likely to fail because of crushing and distortion; however, they are less flexible than lang lay ropes. Wire winch lines use right regular lay construction.

\n

Design Factors: Design factors are safety factors required by government and industry organizations for wire rope. While they vary depending on application, typical towing winch lines have a 3:1 design factor, while lifting wire ropes have a 5:1 factor.

\n

During a winch line’s “useful life” all wire rope will gradually lose strength due to surface wear and metal fatigue. Metal fatigue is caused by normal use of the winch line but is made worse by excessive bending, which can be caused by a sheave that is too small.

Inspecting your winch lines periodically for damage can save you many headaches on the road. Below is mechanical damage to look for when inspecting your winch line and determining whether to remove it from service.

\n
    \n
  • Hook damage: Look for any cracks or deformation of hooks. If the throat opening has been enlarged by 15% or twisted out of plane by 10%, it needs replacing.
  • \n
  • Broken Wires: Pulling winch lines across edges, fatigue or overload can all break individual wires. If you find five or more broken wires in a single strand or 10 or more in one lay, the wire should be replaced.
  • \n
  • Wear: Dragging a winch line on the ground or loading over the winch line will cause flat areas on individual wires of the cable. If these wires have lost 1/3 or more of the original diameter the line needs to be taken out of service.
  • \n
  • Corrosion/Heat Damage: Any discoloration from rust or lack of lubrication promotes fatigue. If the wire rope is severely pitted or individual wires rusted through, replace the line. Fiber core slings need to stay below 180°F and steel core below 400°F. Exceeding these heats greatly reduce wire rope strength.
  • \n
  • Kinking: Shock loading or forcing the line against an edge causes bent strands. This prevents the rope from rotating properly and greatly reduces its strength, making it necessary to replace the rope. Use load pads to protect the line and prevent this.
  • \n
  • Crushing: A load set on top of a winch line can flatten the cable. This has the same effect as kinking, making it necessary to remove the line from service.
  • \n
\n

When you are inspecting your winch line and have not found any damage that would require replacement, it is an ideal opportunity to lubricate the line to get the maximum service life possible. Be sure to use a lubricant especially made for wire rope. Proper lubrication reduces internal friction within the wires and strands of the wire rope. In addition, it protects the rope from oxidation and corrosion.

\n

When selecting a new winch line it should be based on the diameter, length and type recommended by the winch manufacturer for the model of winch you own. This information can be found on the winch nameplate, otherwise you can contact the winch manufacturer or local supplier.

Beyond making sure your rope is compatible with your winch, there are a few other things you may want to consider. First, swivel hooks will help relieve rotational tension as the rope moves, so you may want to invest in them. Also, keep in mind that imported ropes can provide substantial cost savings without sacrificing quality.

To reduce damage to whatever winch line you choose, use roller guides and tension plates. These aid in the proper winding of wire rope on the winch drum.

\n

Periodic inspections and lubrication of your winch line will save your business money, but more importantly, keep your employees safe and your customers happy. That is the heart of our industry.

\n

See all our Winch Line Products >>

","postEmailContent":"

Understand the different pros and cons of different types of winch lines. Additionally, know how to take care of winch lines correctly.

","postFeaturedImageIfEnabled":"https://48463649.fs1.hubspotusercontent-na1.net/hubfs/48463649/Blog/winch-lines.jpg","postListContent":"

Understand the different pros and cons of different types of winch lines. Additionally, know how to take care of winch lines correctly.

","postListSummaryFeaturedImage":"https://48463649.fs1.hubspotusercontent-na1.net/hubfs/48463649/Blog/winch-lines.jpg","postRssContent":"

Understand the different pros and cons of different types of winch lines. Additionally, know how to take care of winch lines correctly.

","postRssSummaryFeaturedImage":"https://48463649.fs1.hubspotusercontent-na1.net/hubfs/48463649/Blog/winch-lines.jpg","postSummary":"

Understand the different pros and cons of different types of winch lines. Additionally, know how to take care of winch lines correctly.

\n","postSummaryRss":"

Understand the different pros and cons of different types of winch lines. Additionally, know how to take care of winch lines correctly.

","postTemplate":"zips-basic-theme/templates/blog-post.html","previewImageSrc":null,"previewKey":"vegvYMzA","previousPostFeaturedImage":"https://48463649.fs1.hubspotusercontent-na1.net/hubfs/48463649/Blog/snatch-blocks.jpg","previousPostFeaturedImageAltText":"","previousPostName":"Snatch Blocks: A Better Way to Winch","previousPostSlug":"blog/snatch-blocks-a-better-way-to-winch","processingStatus":"PUBLISHED","propertyForDynamicPageCanonicalUrl":null,"propertyForDynamicPageFeaturedImage":null,"propertyForDynamicPageMetaDescription":null,"propertyForDynamicPageSlug":null,"propertyForDynamicPageTitle":null,"publicAccessRules":[],"publicAccessRulesEnabled":false,"publishDate":1544191200000,"publishDateLocalTime":1544191200000,"publishDateLocalized":{"date":1544191200000,"format":"medium","language":null},"publishImmediately":true,"publishTimezoneOffset":null,"publishedAt":1756221306204,"publishedByEmail":null,"publishedById":76755706,"publishedByName":null,"publishedUrl":"/blog/choosing-caring-for-winch-lines","resolvedDomain":"www.zips.com","resolvedLanguage":null,"rssBody":"

Understand the different pros and cons of different types of winch lines. Additionally, know how to take care of winch lines correctly.

\n\n

Wire winch lines, commonly called steel wire rope, are the heart vehicle recovery operations. A damaged line is a serious safety issue and a broken one removes a recovery vehicle from service. This article will cover the basics of winch lines, winch line inspection, and how to select a new winch line.

\n

Rope Cores: Rope cores serve as the foundation for the strands. They keep the rope round and strands properly positioned.

There are 3 different core types: fiber core, independent wire core (IWRC) and strand core. Fiber core offers the greatest flexibility. It is commonly made of polypropylene fibers, but natural fiber options are also available.

Independent wire rope core (IWRC) is available in bright, galvanized, and stainless steel configurations. It is the strongest type of core available and has 10-15% higher work load limit than fiber core.

Strand Core is made of stands of wires. It is least flexible of the three types discussed and is mostly used on utility cables.

\n

Rope Grades: The most common rope today is extra improved plow steel (EIP or XIP). It is typically used on winch lines and generally has 15% stronger break strength than improved plow steel grade (IPS). Extra extra improved plow steel grade (EEIP or XXIP) is also available for added strength in higher rated equipment.

\n

Rope Types: Bright wire is un-coated and is the most commonly used winch line. Another option is galvanized wire, which improves corrosion resistance. However, galvanization can reduce a wire’s strength up to 10% compared to bright wire unless the wire is drawn again. 

Stainless steel wire contains chromium and nickel. It is very corrosion resistant and used primarily on yachts or as control cables.

\n

Construction: Construction determines how the wire rope performs. For instance, a 6 x 19 rope will have 6 strands of rope that have between 19 to 26 wires. Each added wire makes for better abrasion resistance. A 6 x 37 construction has 27 to 49 wires and is more flexible, while a 19 x 7 construction is rotation resistant.

\n

Lay: There are two categories of lay, directional lay and lay orientation. Directional lay refers to what direction the strands of the rope face when you are looking down the rope, and lay orientation refers to the direction the wires within the strands are twisted.

Directional lay is either right or left. Lay orientation is either regular or lang. In regular lay, the wires are twisted in one direction while the strands are twisted in the opposite direction. In lang lay, the wires are laid in the same direction as the strand in the rope.

Regular lay ropes are less likely to untwist. They are also less likely to fail because of crushing and distortion; however, they are less flexible than lang lay ropes. Wire winch lines use right regular lay construction.

\n

Design Factors: Design factors are safety factors required by government and industry organizations for wire rope. While they vary depending on application, typical towing winch lines have a 3:1 design factor, while lifting wire ropes have a 5:1 factor.

\n

During a winch line’s “useful life” all wire rope will gradually lose strength due to surface wear and metal fatigue. Metal fatigue is caused by normal use of the winch line but is made worse by excessive bending, which can be caused by a sheave that is too small.

Inspecting your winch lines periodically for damage can save you many headaches on the road. Below is mechanical damage to look for when inspecting your winch line and determining whether to remove it from service.

\n
    \n
  • Hook damage: Look for any cracks or deformation of hooks. If the throat opening has been enlarged by 15% or twisted out of plane by 10%, it needs replacing.
  • \n
  • Broken Wires: Pulling winch lines across edges, fatigue or overload can all break individual wires. If you find five or more broken wires in a single strand or 10 or more in one lay, the wire should be replaced.
  • \n
  • Wear: Dragging a winch line on the ground or loading over the winch line will cause flat areas on individual wires of the cable. If these wires have lost 1/3 or more of the original diameter the line needs to be taken out of service.
  • \n
  • Corrosion/Heat Damage: Any discoloration from rust or lack of lubrication promotes fatigue. If the wire rope is severely pitted or individual wires rusted through, replace the line. Fiber core slings need to stay below 180°F and steel core below 400°F. Exceeding these heats greatly reduce wire rope strength.
  • \n
  • Kinking: Shock loading or forcing the line against an edge causes bent strands. This prevents the rope from rotating properly and greatly reduces its strength, making it necessary to replace the rope. Use load pads to protect the line and prevent this.
  • \n
  • Crushing: A load set on top of a winch line can flatten the cable. This has the same effect as kinking, making it necessary to remove the line from service.
  • \n
\n

When you are inspecting your winch line and have not found any damage that would require replacement, it is an ideal opportunity to lubricate the line to get the maximum service life possible. Be sure to use a lubricant especially made for wire rope. Proper lubrication reduces internal friction within the wires and strands of the wire rope. In addition, it protects the rope from oxidation and corrosion.

\n

When selecting a new winch line it should be based on the diameter, length and type recommended by the winch manufacturer for the model of winch you own. This information can be found on the winch nameplate, otherwise you can contact the winch manufacturer or local supplier.

Beyond making sure your rope is compatible with your winch, there are a few other things you may want to consider. First, swivel hooks will help relieve rotational tension as the rope moves, so you may want to invest in them. Also, keep in mind that imported ropes can provide substantial cost savings without sacrificing quality.

To reduce damage to whatever winch line you choose, use roller guides and tension plates. These aid in the proper winding of wire rope on the winch drum.

\n

Periodic inspections and lubrication of your winch line will save your business money, but more importantly, keep your employees safe and your customers happy. That is the heart of our industry.

\n

See all our Winch Line Products >>

","rssSummary":"

Understand the different pros and cons of different types of winch lines. Additionally, know how to take care of winch lines correctly.

\n","rssSummaryFeaturedImage":"https://48463649.fs1.hubspotusercontent-na1.net/hubfs/48463649/Blog/winch-lines.jpg","scheduledUpdateDate":0,"screenshotPreviewTakenAt":1770563705669,"screenshotPreviewUrl":"https://cdn1.hubspot.net/hubshotv3/prod/e/0/355b6b76-278a-446d-9643-775ab35693d1.png","sections":{},"securityState":"NONE","siteId":null,"slug":"blog/choosing-caring-for-winch-lines","stagedFrom":null,"state":"PUBLISHED","stateWhenDeleted":null,"structuredContentPageType":null,"structuredContentType":null,"styleOverrideId":null,"subcategory":"normal_blog_post","syncedWithBlogRoot":true,"tagIds":[192169769490,192174528148,192174529697,194719179289,194719586666],"tagList":[{"categoryId":3,"cdnPurgeEmbargoTime":null,"contentIds":[],"cosObjectType":"TAG","created":1751598346713,"deletedAt":0,"description":"","id":192169769490,"label":"Towing & Recovery","language":null,"name":"Towing & Recovery","portalId":48463649,"slug":"towing-recovery","translatedFromId":null,"translations":{},"updated":1751598346713},{"categoryId":3,"cdnPurgeEmbargoTime":null,"contentIds":[],"cosObjectType":"TAG","created":1751601475164,"deletedAt":0,"description":"","id":192174528148,"label":"Automotive","language":null,"name":"Automotive","portalId":48463649,"slug":"automotive","translatedFromId":null,"translations":{},"updated":1751601475164},{"categoryId":3,"cdnPurgeEmbargoTime":null,"contentIds":[],"cosObjectType":"TAG","created":1751602285139,"deletedAt":0,"description":"","id":192174529697,"label":"Construction","language":null,"name":"Construction","portalId":48463649,"slug":"construction","translatedFromId":null,"translations":{},"updated":1751602285139},{"categoryId":3,"cdnPurgeEmbargoTime":null,"contentIds":[],"cosObjectType":"TAG","created":1755545213046,"deletedAt":0,"description":"","id":194719179289,"label":"Industry Knowledge & Updates","language":null,"name":"Industry Knowledge & Updates","portalId":48463649,"slug":"industry-knowledge-updates","translatedFromId":null,"translations":{},"updated":1755545213046},{"categoryId":3,"cdnPurgeEmbargoTime":null,"contentIds":[],"cosObjectType":"TAG","created":1755545331471,"deletedAt":0,"description":"","id":194719586666,"label":"Product Guides","language":null,"name":"Product Guides","portalId":48463649,"slug":"product-guides","translatedFromId":null,"translations":{},"updated":1755545331471}],"tagNames":["Towing & Recovery","Automotive","Construction","Industry Knowledge & Updates","Product Guides"],"teamPerms":[],"templatePath":"","templatePathForRender":"zips-basic-theme/templates/blog-post.html","textToAudioFileId":null,"textToAudioGenerationRequestId":null,"themePath":null,"themeSettingsValues":null,"title":"Choosing & Caring for Winch Lines","tmsId":null,"topicIds":[192169769490,192174528148,192174529697,194719179289,194719586666],"topicList":[{"categoryId":3,"cdnPurgeEmbargoTime":null,"contentIds":[],"cosObjectType":"TAG","created":1751598346713,"deletedAt":0,"description":"","id":192169769490,"label":"Towing & Recovery","language":null,"name":"Towing & Recovery","portalId":48463649,"slug":"towing-recovery","translatedFromId":null,"translations":{},"updated":1751598346713},{"categoryId":3,"cdnPurgeEmbargoTime":null,"contentIds":[],"cosObjectType":"TAG","created":1751601475164,"deletedAt":0,"description":"","id":192174528148,"label":"Automotive","language":null,"name":"Automotive","portalId":48463649,"slug":"automotive","translatedFromId":null,"translations":{},"updated":1751601475164},{"categoryId":3,"cdnPurgeEmbargoTime":null,"contentIds":[],"cosObjectType":"TAG","created":1751602285139,"deletedAt":0,"description":"","id":192174529697,"label":"Construction","language":null,"name":"Construction","portalId":48463649,"slug":"construction","translatedFromId":null,"translations":{},"updated":1751602285139},{"categoryId":3,"cdnPurgeEmbargoTime":null,"contentIds":[],"cosObjectType":"TAG","created":1755545213046,"deletedAt":0,"description":"","id":194719179289,"label":"Industry Knowledge & Updates","language":null,"name":"Industry Knowledge & Updates","portalId":48463649,"slug":"industry-knowledge-updates","translatedFromId":null,"translations":{},"updated":1755545213046},{"categoryId":3,"cdnPurgeEmbargoTime":null,"contentIds":[],"cosObjectType":"TAG","created":1755545331471,"deletedAt":0,"description":"","id":194719586666,"label":"Product Guides","language":null,"name":"Product Guides","portalId":48463649,"slug":"product-guides","translatedFromId":null,"translations":{},"updated":1755545331471}],"topicNames":["Towing & Recovery","Automotive","Construction","Industry Knowledge & Updates","Product Guides"],"topics":[192169769490,192174528148,192174529697,194719179289,194719586666],"translatedContent":{},"translatedFromId":null,"translations":{},"tweet":null,"tweetAt":null,"tweetImmediately":false,"unpublishedAt":0,"updated":1756221306208,"updatedById":76755706,"upsizeFeaturedImage":false,"url":"/blog/choosing-caring-for-winch-lines","useFeaturedImage":true,"userPerms":[],"views":null,"visibleToAll":null,"widgetContainers":{},"widgetcontainers":{},"widgets":{}},{"ab":false,"abStatus":null,"abTestId":null,"abVariation":false,"abVariationAutomated":false,"absoluteUrl":"/blog/make-your-jump-start-pack-last","afterPostBody":null,"aifeatures":null,"allowedSlugConflict":false,"analytics":null,"analyticsPageId":"192172329043","analyticsPageType":"blog-post","approvalStatus":null,"archived":false,"archivedAt":0,"archivedInDashboard":false,"areCommentsAllowed":true,"attachedStylesheets":[],"audienceAccess":"PUBLIC","author":null,"authorName":null,"authorUsername":null,"blogAuthor":{"avatar":"","bio":"","cdnPurgeEmbargoTime":null,"cosObjectType":"BLOG_AUTHOR","created":1755539408521,"deletedAt":0,"displayName":"Brittany Bierle","email":null,"facebook":"","fullName":"Brittany Bierle","gravatarUrl":null,"hasSocialProfiles":false,"id":194712519021,"label":"Brittany Bierle","language":"en","linkedin":"","name":"Brittany Bierle","portalId":48463649,"slug":"brittany-bierle","translatedFromId":null,"translations":{},"twitter":"","twitterUsername":"","updated":1755539408521,"userId":null,"username":null,"website":""},"blogAuthorId":194712519021,"blogAuthorIdList":[194712519021],"blogAuthorList":[{"avatar":"","bio":"","cdnPurgeEmbargoTime":null,"cosObjectType":"BLOG_AUTHOR","created":1755539408521,"deletedAt":0,"displayName":"Brittany Bierle","email":null,"facebook":"","fullName":"Brittany Bierle","gravatarUrl":null,"hasSocialProfiles":false,"id":194712519021,"label":"Brittany Bierle","language":"en","linkedin":"","name":"Brittany Bierle","portalId":48463649,"slug":"brittany-bierle","translatedFromId":null,"translations":{},"twitter":"","twitterUsername":"","updated":1755539408521,"userId":null,"username":null,"website":""}],"blogPostAuthor":{"avatar":"","bio":"","cdnPurgeEmbargoTime":null,"cosObjectType":"BLOG_AUTHOR","created":1755539408521,"deletedAt":0,"displayName":"Brittany Bierle","email":null,"facebook":"","fullName":"Brittany Bierle","gravatarUrl":null,"hasSocialProfiles":false,"id":194712519021,"label":"Brittany Bierle","language":"en","linkedin":"","name":"Brittany Bierle","portalId":48463649,"slug":"brittany-bierle","translatedFromId":null,"translations":{},"twitter":"","twitterUsername":"","updated":1755539408521,"userId":null,"username":null,"website":""},"blogPostScheduleTaskUid":null,"blogPublishInstantEmailCampaignId":null,"blogPublishInstantEmailRetryCount":null,"blogPublishInstantEmailTaskUid":null,"blogPublishToSocialMediaTask":"DONE_NOT_SENT","blueprintTypeId":0,"businessUnitId":null,"campaign":null,"campaignName":null,"campaignUtm":null,"category":3,"categoryId":3,"cdnPurgeEmbargoTime":null,"checkPostLevelAudienceAccessFirst":true,"clonedFrom":null,"composeBody":null,"compositionId":0,"contentAccessRuleIds":[],"contentAccessRuleTypes":[],"contentGroup":190096341139,"contentGroupId":190096341139,"contentTypeCategory":3,"contentTypeCategoryId":3,"contentTypeId":null,"created":1751604213266,"createdByAgent":null,"createdById":74657203,"createdTime":1751604213266,"crmObjectId":null,"css":{},"cssText":"","ctaClicks":null,"ctaViews":null,"currentState":"PUBLISHED","currentlyPublished":true,"deletedAt":0,"deletedBy":null,"deletedByEmail":null,"deletedById":null,"domain":"","dynamicPageDataSourceId":null,"dynamicPageDataSourceType":null,"dynamicPageHubDbTableId":null,"enableDomainStylesheets":null,"enableGoogleAmpOutputOverride":false,"enableLayoutStylesheets":null,"errors":[],"featuredImage":"https://48463649.fs1.hubspotusercontent-na1.net/hubfs/48463649/Blog/jump-packs.jpg","featuredImageAltText":"","featuredImageHeight":483,"featuredImageLength":0,"featuredImageWidth":900,"flexAreas":{},"folderId":null,"footerHtml":null,"footerTemplatePath":null,"footerVariantName":null,"freezeDate":1540904400000,"generateJsonLdEnabledOverride":true,"globalBlockOverrides":{},"hasContentAccessRules":false,"hasUserChanges":true,"headHtml":"","header":null,"headerTemplatePath":null,"headerVariantName":null,"htmlTitle":"Make your Jump-Start Pack Last!","id":192172329043,"includeDefaultCustomCss":null,"isCaptchaRequired":true,"isCrawlableByBots":false,"isDraft":false,"isInstantEmailEnabled":false,"isPublished":true,"isSocialPublishingEnabled":false,"keywords":[],"label":"Make your Jump-Start Pack Last!","language":"en","lastEditSessionId":null,"lastEditUpdateId":null,"layoutSections":{},"legacyBlogTabid":null,"legacyId":null,"legacyPostGuid":null,"linkRelCanonicalUrl":"","listTemplate":"","liveDomain":"www.zips.com","mab":false,"mabExperimentId":null,"mabMaster":false,"mabVariant":false,"marketingCampaignGuids":[],"meta":{"html_title":"Make your Jump-Start Pack Last!","public_access_rules":[],"public_access_rules_enabled":false,"use_featured_image":true,"tag_ids":[192169769490,192174528148,194719179289,194719586666],"topic_ids":[192169769490,192174528148,194719179289,194719586666],"post_summary":"

Tips for Preserving the Life of Jump-Start Packs

\n","post_body":"

Tips for Preserving the Life of Jump-Start Packs

\n\n

Older car batteries show their age in the cold temperatures with dead batteries. Jump-start packs are an operator’s best friend in these types of conditions. A quick boost will get many customers back on the road and you off to the next call. In order to keep your jump packs working when you need them, here are a few tips.

\n
    \n
  • Keep the jump pack charged according to the manufacturer’s instructions. Yes, this seems like an easy one, but jump packs have different charging techniques.
  • \n
  • Some packs have built-in overcharge protection. This allows them to be plugged in constantly.
  • \n
  • Other packs require charging for a specific period. Afterwards, they must be disconnected from the power source. Constant charging will damage the battery on packs on units without overcharge protectors.
  • \n
  • Jump-start packs require cool-down periods between jumps. The high amperage needed to start a vehicle heats up the internal components of the jump pack. The timeframe varies depending on the manufacturer, but in general, after 6 seconds of trying to jump-start start a vehicle, a pack will need 3 minutes of cool down time.
  • \n
  • Cold temperatures reduce the capacity of the jump-start batteries. Keep the pack warm between uses.
  • \n
  • Train employees on the proper hook-up of the battery hand clamps per manufacturer instructions.
  • \n
  • Use to charge non-frozen lead-acid batteries only.
  • \n
  • Follow any other jump pack maintenance outlined in the owners manual.
  • \n
  • Following these tips will extend the life of your portable jump starters and allow them to operator at peak amps.
  • \n
\n

Browse jump-start pack options here >>

","rss_summary":"

Tips for Preserving the Life of Jump-Start Packs

\n","rss_body":"

Tips for Preserving the Life of Jump-Start Packs

\n\n

Older car batteries show their age in the cold temperatures with dead batteries. Jump-start packs are an operator’s best friend in these types of conditions. A quick boost will get many customers back on the road and you off to the next call. In order to keep your jump packs working when you need them, here are a few tips.

\n
    \n
  • Keep the jump pack charged according to the manufacturer’s instructions. Yes, this seems like an easy one, but jump packs have different charging techniques.
  • \n
  • Some packs have built-in overcharge protection. This allows them to be plugged in constantly.
  • \n
  • Other packs require charging for a specific period. Afterwards, they must be disconnected from the power source. Constant charging will damage the battery on packs on units without overcharge protectors.
  • \n
  • Jump-start packs require cool-down periods between jumps. The high amperage needed to start a vehicle heats up the internal components of the jump pack. The timeframe varies depending on the manufacturer, but in general, after 6 seconds of trying to jump-start start a vehicle, a pack will need 3 minutes of cool down time.
  • \n
  • Cold temperatures reduce the capacity of the jump-start batteries. Keep the pack warm between uses.
  • \n
  • Train employees on the proper hook-up of the battery hand clamps per manufacturer instructions.
  • \n
  • Use to charge non-frozen lead-acid batteries only.
  • \n
  • Follow any other jump pack maintenance outlined in the owners manual.
  • \n
  • Following these tips will extend the life of your portable jump starters and allow them to operator at peak amps.
  • \n
\n

Browse jump-start pack options here >>

","enable_google_amp_output_override":false,"generate_json_ld_enabled":true,"blog_post_schedule_task_uid":null,"blog_publish_to_social_media_task":"DONE_NOT_SENT","blog_publish_instant_email_task_uid":null,"blog_publish_instant_email_campaign_id":null,"blog_publish_instant_email_retry_count":null,"keywords":[],"composition_id":0,"is_crawlable_by_bots":false,"header":null,"published_at":1756221565044,"head_html":"","footer_html":null,"attached_stylesheets":[],"enable_domain_stylesheets":null,"include_default_custom_css":null,"layout_sections":{},"past_mab_experiment_ids":[],"deleted_by":null,"featured_image_alt_text":"","enable_layout_stylesheets":null,"tweet":null,"tweet_at":null,"campaign_name":null,"campaign_utm":null,"meta_keywords":null,"meta_description":"Learn how to extend the life and maintain the effectiveness of your portable jump-start packs with these key tips and best practices. Discover maintenance advice, charging methods, and usage recommendations.","tweet_immediately":false,"publish_immediately":true,"security_state":"NONE","scheduled_update_date":0,"placement_guids":[],"header_template_path":null,"header_variant_name":null,"footer_template_path":null,"footer_variant_name":null,"global_block_overrides":{},"property_for_dynamic_page_title":null,"property_for_dynamic_page_slug":null,"property_for_dynamic_page_meta_description":null,"property_for_dynamic_page_featured_image":null,"property_for_dynamic_page_canonical_url":null,"preview_image_src":null,"legacy_blog_tabid":null,"legacy_post_guid":null,"performable_variation_letter":null,"style_override_id":null,"has_user_changes":true,"css":{},"css_text":"","unpublished_at":0,"published_by_id":76755706,"allowed_slug_conflict":false,"ai_features":null,"link_rel_canonical_url":"","page_redirected":false,"page_expiry_enabled":null,"page_expiry_date":null,"page_expiry_redirect_id":null,"page_expiry_redirect_url":null,"deleted_by_id":null,"state_when_deleted":null,"cloned_from":null,"staged_from":null,"personas":[],"compose_body":null,"featured_image":"https://48463649.fs1.hubspotusercontent-na1.net/hubfs/48463649/Blog/jump-packs.jpg","featured_image_width":900,"featured_image_height":483,"publish_timezone_offset":null,"theme_settings_values":null,"password":null,"last_edit_session_id":null,"last_edit_update_id":null,"created_by_agent":null},"metaDescription":"Learn how to extend the life and maintain the effectiveness of your portable jump-start packs with these key tips and best practices. Discover maintenance advice, charging methods, and usage recommendations.","metaKeywords":null,"name":"Make your Jump-Start Pack Last!","nextPostFeaturedImage":"https://48463649.fs1.hubspotusercontent-na1.net/hubfs/48463649/Blog/amsteel-blue-synthetic-rope-900x483-jan-2018.jpg","nextPostFeaturedImageAltText":"","nextPostName":"Make the switch to synthetics with Zip's","nextPostSlug":"blog/make-the-switch-to-synthetics-with-zips","pageExpiryDate":null,"pageExpiryEnabled":null,"pageExpiryRedirectId":null,"pageExpiryRedirectUrl":null,"pageRedirected":false,"pageTitle":"Make your Jump-Start Pack Last!","parentBlog":{"absoluteUrl":"/blog","allowComments":true,"ampBodyColor":"#404040","ampBodyFont":"'Helvetica Neue', Helvetica, Arial, sans-serif","ampBodyFontSize":"18","ampCustomCss":"","ampHeaderBackgroundColor":"#ffffff","ampHeaderColor":"#1e1e1e","ampHeaderFont":"'Helvetica Neue', Helvetica, Arial, sans-serif","ampHeaderFontSize":"36","ampLinkColor":"#416bb3","ampLogoAlt":"","ampLogoHeight":0,"ampLogoSrc":"","ampLogoWidth":0,"analyticsPageId":190096341139,"attachedStylesheets":[],"audienceAccess":"PUBLIC","businessUnitId":null,"captchaAfterDays":7,"captchaAlways":false,"categoryId":3,"cdnPurgeEmbargoTime":null,"closeCommentsOlder":0,"commentDateFormat":"medium","commentFormGuid":"a4128401-39db-4c54-a62b-88ff335d3a69","commentMaxThreadDepth":1,"commentModeration":false,"commentNotificationEmails":[],"commentShouldCreateContact":false,"commentVerificationText":"","cosObjectType":"BLOG","created":1747163443999,"createdDateTime":1747163443999,"dailyNotificationEmailId":null,"dateFormattingLanguage":null,"defaultGroupStyleId":"","defaultNotificationFromName":"","defaultNotificationReplyTo":"","deletedAt":0,"description":"","domain":"","domainWhenPublished":"www.zips.com","emailApiSubscriptionId":null,"enableGoogleAmpOutput":true,"enableSocialAutoPublishing":false,"generateJsonLdEnabled":true,"header":null,"htmlFooter":"","htmlFooterIsShared":true,"htmlHead":"","htmlHeadIsShared":true,"htmlKeywords":[],"htmlTitle":"blog","id":190096341139,"ilsSubscriptionListsByType":{},"instantNotificationEmailId":null,"itemLayoutId":null,"itemTemplateIsShared":false,"itemTemplatePath":"zips-basic-theme/templates/blog-post.html","label":"blog","language":"en","legacyGuid":null,"legacyModuleId":null,"legacyTabId":null,"listingLayoutId":null,"listingPageId":190096341141,"listingTemplatePath":"","liveDomain":"www.zips.com","monthFilterFormat":"MMMM yyyy","monthlyNotificationEmailId":null,"name":"blog","parentBlogUpdateTaskId":null,"portalId":48463649,"postHtmlFooter":"","postHtmlHead":"","postsPerListingPage":111,"postsPerRssFeed":10,"publicAccessRules":[],"publicAccessRulesEnabled":false,"publicTitle":"blog","publishDateFormat":"medium","resolvedDomain":"www.zips.com","rootUrl":"/blog","rssCustomFeed":null,"rssDescription":null,"rssItemFooter":null,"rssItemHeader":null,"settingsOverrides":{"itemLayoutId":false,"itemTemplatePath":false,"itemTemplateIsShared":false,"listingLayoutId":false,"listingTemplatePath":false,"postsPerListingPage":false,"showSummaryInListing":false,"useFeaturedImageInSummary":false,"htmlHead":false,"postHtmlHead":false,"htmlHeadIsShared":false,"htmlFooter":false,"listingPageHtmlFooter":false,"postHtmlFooter":false,"htmlFooterIsShared":false,"attachedStylesheets":false,"postsPerRssFeed":false,"showSummaryInRss":false,"showSummaryInEmails":false,"showSummariesInEmails":false,"allowComments":false,"commentShouldCreateContact":false,"commentModeration":false,"closeCommentsOlder":false,"commentNotificationEmails":false,"commentMaxThreadDepth":false,"commentVerificationText":false,"socialAccountTwitter":false,"showSocialLinkTwitter":false,"showSocialLinkLinkedin":false,"showSocialLinkFacebook":false,"enableGoogleAmpOutput":false,"ampLogoSrc":false,"ampLogoHeight":false,"ampLogoWidth":false,"ampLogoAlt":false,"ampHeaderFont":false,"ampHeaderFontSize":false,"ampHeaderColor":false,"ampHeaderBackgroundColor":false,"ampBodyFont":false,"ampBodyFontSize":false,"ampBodyColor":false,"ampLinkColor":false,"generateJsonLdEnabled":false},"showSocialLinkFacebook":true,"showSocialLinkLinkedin":true,"showSocialLinkTwitter":true,"showSummaryInEmails":true,"showSummaryInListing":true,"showSummaryInRss":true,"siteId":null,"slug":"blog","socialAccountTwitter":"","state":null,"subscriptionContactsProperty":null,"subscriptionEmailType":null,"subscriptionFormGuid":null,"subscriptionListsByType":{},"title":null,"translatedFromId":null,"translations":{},"updated":1755110916417,"updatedDateTime":1755110916417,"urlBase":"www.zips.com/blog","urlSegments":{"all":"all","archive":"archive","author":"author","page":"page","tag":"tag"},"useFeaturedImageInSummary":true,"usesDefaultTemplate":false,"weeklyNotificationEmailId":null},"password":null,"pastMabExperimentIds":[],"performableGuid":null,"performableVariationLetter":null,"personalizationStrategyId":null,"personalizationVariantStatus":null,"personas":[],"placementGuids":[],"portableKey":null,"portalId":48463649,"position":null,"postBody":"

Tips for Preserving the Life of Jump-Start Packs

\n\n

Older car batteries show their age in the cold temperatures with dead batteries. Jump-start packs are an operator’s best friend in these types of conditions. A quick boost will get many customers back on the road and you off to the next call. In order to keep your jump packs working when you need them, here are a few tips.

\n
    \n
  • Keep the jump pack charged according to the manufacturer’s instructions. Yes, this seems like an easy one, but jump packs have different charging techniques.
  • \n
  • Some packs have built-in overcharge protection. This allows them to be plugged in constantly.
  • \n
  • Other packs require charging for a specific period. Afterwards, they must be disconnected from the power source. Constant charging will damage the battery on packs on units without overcharge protectors.
  • \n
  • Jump-start packs require cool-down periods between jumps. The high amperage needed to start a vehicle heats up the internal components of the jump pack. The timeframe varies depending on the manufacturer, but in general, after 6 seconds of trying to jump-start start a vehicle, a pack will need 3 minutes of cool down time.
  • \n
  • Cold temperatures reduce the capacity of the jump-start batteries. Keep the pack warm between uses.
  • \n
  • Train employees on the proper hook-up of the battery hand clamps per manufacturer instructions.
  • \n
  • Use to charge non-frozen lead-acid batteries only.
  • \n
  • Follow any other jump pack maintenance outlined in the owners manual.
  • \n
  • Following these tips will extend the life of your portable jump starters and allow them to operator at peak amps.
  • \n
\n

Browse jump-start pack options here >>

","postBodyRss":"

Tips for Preserving the Life of Jump-Start Packs

\n\n

Older car batteries show their age in the cold temperatures with dead batteries. Jump-start packs are an operator’s best friend in these types of conditions. A quick boost will get many customers back on the road and you off to the next call. In order to keep your jump packs working when you need them, here are a few tips.

\n
    \n
  • Keep the jump pack charged according to the manufacturer’s instructions. Yes, this seems like an easy one, but jump packs have different charging techniques.
  • \n
  • Some packs have built-in overcharge protection. This allows them to be plugged in constantly.
  • \n
  • Other packs require charging for a specific period. Afterwards, they must be disconnected from the power source. Constant charging will damage the battery on packs on units without overcharge protectors.
  • \n
  • Jump-start packs require cool-down periods between jumps. The high amperage needed to start a vehicle heats up the internal components of the jump pack. The timeframe varies depending on the manufacturer, but in general, after 6 seconds of trying to jump-start start a vehicle, a pack will need 3 minutes of cool down time.
  • \n
  • Cold temperatures reduce the capacity of the jump-start batteries. Keep the pack warm between uses.
  • \n
  • Train employees on the proper hook-up of the battery hand clamps per manufacturer instructions.
  • \n
  • Use to charge non-frozen lead-acid batteries only.
  • \n
  • Follow any other jump pack maintenance outlined in the owners manual.
  • \n
  • Following these tips will extend the life of your portable jump starters and allow them to operator at peak amps.
  • \n
\n

Browse jump-start pack options here >>

","postEmailContent":"

Tips for Preserving the Life of Jump-Start Packs

","postFeaturedImageIfEnabled":"https://48463649.fs1.hubspotusercontent-na1.net/hubfs/48463649/Blog/jump-packs.jpg","postListContent":"

Tips for Preserving the Life of Jump-Start Packs

","postListSummaryFeaturedImage":"https://48463649.fs1.hubspotusercontent-na1.net/hubfs/48463649/Blog/jump-packs.jpg","postRssContent":"

Tips for Preserving the Life of Jump-Start Packs

","postRssSummaryFeaturedImage":"https://48463649.fs1.hubspotusercontent-na1.net/hubfs/48463649/Blog/jump-packs.jpg","postSummary":"

Tips for Preserving the Life of Jump-Start Packs

\n","postSummaryRss":"

Tips for Preserving the Life of Jump-Start Packs

","postTemplate":"zips-basic-theme/templates/blog-post.html","previewImageSrc":null,"previewKey":"HuuhkgmN","previousPostFeaturedImage":"https://48463649.fs1.hubspotusercontent-na1.net/hubfs/48463649/Blog/winch-lines.jpg","previousPostFeaturedImageAltText":"","previousPostName":"Choosing & Caring for Winch Lines","previousPostSlug":"blog/choosing-caring-for-winch-lines","processingStatus":"PUBLISHED","propertyForDynamicPageCanonicalUrl":null,"propertyForDynamicPageFeaturedImage":null,"propertyForDynamicPageMetaDescription":null,"propertyForDynamicPageSlug":null,"propertyForDynamicPageTitle":null,"publicAccessRules":[],"publicAccessRulesEnabled":false,"publishDate":1540904400000,"publishDateLocalTime":1540904400000,"publishDateLocalized":{"date":1540904400000,"format":"medium","language":null},"publishImmediately":true,"publishTimezoneOffset":null,"publishedAt":1756221565044,"publishedByEmail":null,"publishedById":76755706,"publishedByName":null,"publishedUrl":"/blog/make-your-jump-start-pack-last","resolvedDomain":"www.zips.com","resolvedLanguage":null,"rssBody":"

Tips for Preserving the Life of Jump-Start Packs

\n\n

Older car batteries show their age in the cold temperatures with dead batteries. Jump-start packs are an operator’s best friend in these types of conditions. A quick boost will get many customers back on the road and you off to the next call. In order to keep your jump packs working when you need them, here are a few tips.

\n
    \n
  • Keep the jump pack charged according to the manufacturer’s instructions. Yes, this seems like an easy one, but jump packs have different charging techniques.
  • \n
  • Some packs have built-in overcharge protection. This allows them to be plugged in constantly.
  • \n
  • Other packs require charging for a specific period. Afterwards, they must be disconnected from the power source. Constant charging will damage the battery on packs on units without overcharge protectors.
  • \n
  • Jump-start packs require cool-down periods between jumps. The high amperage needed to start a vehicle heats up the internal components of the jump pack. The timeframe varies depending on the manufacturer, but in general, after 6 seconds of trying to jump-start start a vehicle, a pack will need 3 minutes of cool down time.
  • \n
  • Cold temperatures reduce the capacity of the jump-start batteries. Keep the pack warm between uses.
  • \n
  • Train employees on the proper hook-up of the battery hand clamps per manufacturer instructions.
  • \n
  • Use to charge non-frozen lead-acid batteries only.
  • \n
  • Follow any other jump pack maintenance outlined in the owners manual.
  • \n
  • Following these tips will extend the life of your portable jump starters and allow them to operator at peak amps.
  • \n
\n

Browse jump-start pack options here >>

","rssSummary":"

Tips for Preserving the Life of Jump-Start Packs

\n","rssSummaryFeaturedImage":"https://48463649.fs1.hubspotusercontent-na1.net/hubfs/48463649/Blog/jump-packs.jpg","scheduledUpdateDate":0,"screenshotPreviewTakenAt":1770563965082,"screenshotPreviewUrl":"https://cdn1.hubspot.net/hubshotv3/prod/e/0/bcaea7bd-e921-4d51-985d-a66474c95a68.png","sections":{},"securityState":"NONE","siteId":null,"slug":"blog/make-your-jump-start-pack-last","stagedFrom":null,"state":"PUBLISHED","stateWhenDeleted":null,"structuredContentPageType":null,"structuredContentType":null,"styleOverrideId":null,"subcategory":"normal_blog_post","syncedWithBlogRoot":true,"tagIds":[192169769490,192174528148,194719179289,194719586666],"tagList":[{"categoryId":3,"cdnPurgeEmbargoTime":null,"contentIds":[],"cosObjectType":"TAG","created":1751598346713,"deletedAt":0,"description":"","id":192169769490,"label":"Towing & Recovery","language":null,"name":"Towing & Recovery","portalId":48463649,"slug":"towing-recovery","translatedFromId":null,"translations":{},"updated":1751598346713},{"categoryId":3,"cdnPurgeEmbargoTime":null,"contentIds":[],"cosObjectType":"TAG","created":1751601475164,"deletedAt":0,"description":"","id":192174528148,"label":"Automotive","language":null,"name":"Automotive","portalId":48463649,"slug":"automotive","translatedFromId":null,"translations":{},"updated":1751601475164},{"categoryId":3,"cdnPurgeEmbargoTime":null,"contentIds":[],"cosObjectType":"TAG","created":1755545213046,"deletedAt":0,"description":"","id":194719179289,"label":"Industry Knowledge & Updates","language":null,"name":"Industry Knowledge & Updates","portalId":48463649,"slug":"industry-knowledge-updates","translatedFromId":null,"translations":{},"updated":1755545213046},{"categoryId":3,"cdnPurgeEmbargoTime":null,"contentIds":[],"cosObjectType":"TAG","created":1755545331471,"deletedAt":0,"description":"","id":194719586666,"label":"Product Guides","language":null,"name":"Product Guides","portalId":48463649,"slug":"product-guides","translatedFromId":null,"translations":{},"updated":1755545331471}],"tagNames":["Towing & Recovery","Automotive","Industry Knowledge & Updates","Product Guides"],"teamPerms":[],"templatePath":"","templatePathForRender":"zips-basic-theme/templates/blog-post.html","textToAudioFileId":null,"textToAudioGenerationRequestId":null,"themePath":null,"themeSettingsValues":null,"title":"Make your Jump-Start Pack Last!","tmsId":null,"topicIds":[192169769490,192174528148,194719179289,194719586666],"topicList":[{"categoryId":3,"cdnPurgeEmbargoTime":null,"contentIds":[],"cosObjectType":"TAG","created":1751598346713,"deletedAt":0,"description":"","id":192169769490,"label":"Towing & Recovery","language":null,"name":"Towing & Recovery","portalId":48463649,"slug":"towing-recovery","translatedFromId":null,"translations":{},"updated":1751598346713},{"categoryId":3,"cdnPurgeEmbargoTime":null,"contentIds":[],"cosObjectType":"TAG","created":1751601475164,"deletedAt":0,"description":"","id":192174528148,"label":"Automotive","language":null,"name":"Automotive","portalId":48463649,"slug":"automotive","translatedFromId":null,"translations":{},"updated":1751601475164},{"categoryId":3,"cdnPurgeEmbargoTime":null,"contentIds":[],"cosObjectType":"TAG","created":1755545213046,"deletedAt":0,"description":"","id":194719179289,"label":"Industry Knowledge & Updates","language":null,"name":"Industry Knowledge & Updates","portalId":48463649,"slug":"industry-knowledge-updates","translatedFromId":null,"translations":{},"updated":1755545213046},{"categoryId":3,"cdnPurgeEmbargoTime":null,"contentIds":[],"cosObjectType":"TAG","created":1755545331471,"deletedAt":0,"description":"","id":194719586666,"label":"Product Guides","language":null,"name":"Product Guides","portalId":48463649,"slug":"product-guides","translatedFromId":null,"translations":{},"updated":1755545331471}],"topicNames":["Towing & Recovery","Automotive","Industry Knowledge & Updates","Product Guides"],"topics":[192169769490,192174528148,194719179289,194719586666],"translatedContent":{},"translatedFromId":null,"translations":{},"tweet":null,"tweetAt":null,"tweetImmediately":false,"unpublishedAt":0,"updated":1756221565047,"updatedById":76755706,"upsizeFeaturedImage":false,"url":"/blog/make-your-jump-start-pack-last","useFeaturedImage":true,"userPerms":[],"views":null,"visibleToAll":null,"widgetContainers":{},"widgetcontainers":{},"widgets":{}},{"ab":false,"abStatus":null,"abTestId":null,"abVariation":false,"abVariationAutomated":false,"absoluteUrl":"/blog/make-the-switch-to-synthetics-with-zips","afterPostBody":null,"aifeatures":null,"allowedSlugConflict":false,"analytics":null,"analyticsPageId":"192174528631","analyticsPageType":"blog-post","approvalStatus":null,"archived":false,"archivedAt":0,"archivedInDashboard":false,"areCommentsAllowed":true,"attachedStylesheets":[],"audienceAccess":"PUBLIC","author":null,"authorName":null,"authorUsername":null,"blogAuthor":{"avatar":"","bio":"","cdnPurgeEmbargoTime":null,"cosObjectType":"BLOG_AUTHOR","created":1755539408521,"deletedAt":0,"displayName":"Brittany Bierle","email":null,"facebook":"","fullName":"Brittany Bierle","gravatarUrl":null,"hasSocialProfiles":false,"id":194712519021,"label":"Brittany Bierle","language":"en","linkedin":"","name":"Brittany Bierle","portalId":48463649,"slug":"brittany-bierle","translatedFromId":null,"translations":{},"twitter":"","twitterUsername":"","updated":1755539408521,"userId":null,"username":null,"website":""},"blogAuthorId":194712519021,"blogAuthorIdList":[194712519021],"blogAuthorList":[{"avatar":"","bio":"","cdnPurgeEmbargoTime":null,"cosObjectType":"BLOG_AUTHOR","created":1755539408521,"deletedAt":0,"displayName":"Brittany Bierle","email":null,"facebook":"","fullName":"Brittany Bierle","gravatarUrl":null,"hasSocialProfiles":false,"id":194712519021,"label":"Brittany Bierle","language":"en","linkedin":"","name":"Brittany Bierle","portalId":48463649,"slug":"brittany-bierle","translatedFromId":null,"translations":{},"twitter":"","twitterUsername":"","updated":1755539408521,"userId":null,"username":null,"website":""}],"blogPostAuthor":{"avatar":"","bio":"","cdnPurgeEmbargoTime":null,"cosObjectType":"BLOG_AUTHOR","created":1755539408521,"deletedAt":0,"displayName":"Brittany Bierle","email":null,"facebook":"","fullName":"Brittany Bierle","gravatarUrl":null,"hasSocialProfiles":false,"id":194712519021,"label":"Brittany Bierle","language":"en","linkedin":"","name":"Brittany Bierle","portalId":48463649,"slug":"brittany-bierle","translatedFromId":null,"translations":{},"twitter":"","twitterUsername":"","updated":1755539408521,"userId":null,"username":null,"website":""},"blogPostScheduleTaskUid":null,"blogPublishInstantEmailCampaignId":null,"blogPublishInstantEmailRetryCount":null,"blogPublishInstantEmailTaskUid":null,"blogPublishToSocialMediaTask":"DONE_NOT_SENT","blueprintTypeId":0,"businessUnitId":null,"campaign":null,"campaignName":null,"campaignUtm":null,"category":3,"categoryId":3,"cdnPurgeEmbargoTime":null,"checkPostLevelAudienceAccessFirst":true,"clonedFrom":null,"composeBody":null,"compositionId":0,"contentAccessRuleIds":[],"contentAccessRuleTypes":[],"contentGroup":190096341139,"contentGroupId":190096341139,"contentTypeCategory":3,"contentTypeCategoryId":3,"contentTypeId":null,"created":1751601686374,"createdByAgent":null,"createdById":74657203,"createdTime":1751601686374,"crmObjectId":null,"css":{},"cssText":"","ctaClicks":null,"ctaViews":null,"currentState":"PUBLISHED","currentlyPublished":true,"deletedAt":0,"deletedBy":null,"deletedByEmail":null,"deletedById":null,"domain":"","dynamicPageDataSourceId":null,"dynamicPageDataSourceType":null,"dynamicPageHubDbTableId":null,"enableDomainStylesheets":null,"enableGoogleAmpOutputOverride":false,"enableLayoutStylesheets":null,"errors":[],"featuredImage":"https://48463649.fs1.hubspotusercontent-na1.net/hubfs/48463649/Blog/amsteel-blue-synthetic-rope-900x483-jan-2018.jpg","featuredImageAltText":"","featuredImageHeight":483,"featuredImageLength":0,"featuredImageWidth":900,"flexAreas":{},"folderId":null,"footerHtml":null,"footerTemplatePath":null,"footerVariantName":null,"freezeDate":1515506400000,"generateJsonLdEnabledOverride":true,"globalBlockOverrides":{},"hasContentAccessRules":false,"hasUserChanges":true,"headHtml":"","header":null,"headerTemplatePath":null,"headerVariantName":null,"htmlTitle":"Make the switch to synthetics with Zip's","id":192174528631,"includeDefaultCustomCss":null,"isCaptchaRequired":true,"isCrawlableByBots":false,"isDraft":false,"isInstantEmailEnabled":false,"isPublished":true,"isSocialPublishingEnabled":false,"keywords":[],"label":"Make the switch to synthetics with Zip's","language":"en","lastEditSessionId":null,"lastEditUpdateId":null,"layoutSections":{},"legacyBlogTabid":null,"legacyId":null,"legacyPostGuid":null,"linkRelCanonicalUrl":"","listTemplate":"","liveDomain":"www.zips.com","mab":false,"mabExperimentId":null,"mabMaster":false,"mabVariant":false,"marketingCampaignGuids":[],"meta":{"html_title":"Make the switch to synthetics with Zip's","public_access_rules":[],"public_access_rules_enabled":false,"use_featured_image":true,"tag_ids":[192169769490,192174528148,192174529697,194719179289,194719586666],"topic_ids":[192169769490,192174528148,192174529697,194719179289,194719586666],"post_summary":"

The use of this recovery rope will drastically cut down on the overall weight of any truck.

\n","post_body":"

The use of this recovery rope will drastically cut down on the overall weight of any truck.

\n\n

\"AmSteel-Blue

\n

AmSteel-Blue Synthetic Rope is an excellent alternative to steel winch cables! These synthetic winch lines and rope extensions are very durable with extremely low stretch, have superior flex fatigue and are wear resistant. Size-for-size, it is the same strength as steel - yet it floats in water! Learn more about AmSteel-Blue Synthetic Rope now! 

","rss_summary":"

The use of this recovery rope will drastically cut down on the overall weight of any truck.

\n","rss_body":"

The use of this recovery rope will drastically cut down on the overall weight of any truck.

\n\n

\"AmSteel-Blue

\n

AmSteel-Blue Synthetic Rope is an excellent alternative to steel winch cables! These synthetic winch lines and rope extensions are very durable with extremely low stretch, have superior flex fatigue and are wear resistant. Size-for-size, it is the same strength as steel - yet it floats in water! Learn more about AmSteel-Blue Synthetic Rope now! 

","enable_google_amp_output_override":false,"generate_json_ld_enabled":true,"blog_post_schedule_task_uid":null,"blog_publish_to_social_media_task":"DONE_NOT_SENT","blog_publish_instant_email_task_uid":null,"blog_publish_instant_email_campaign_id":null,"blog_publish_instant_email_retry_count":null,"keywords":[],"composition_id":0,"is_crawlable_by_bots":false,"header":null,"published_at":1756221950399,"head_html":"","footer_html":null,"attached_stylesheets":[],"enable_domain_stylesheets":null,"include_default_custom_css":null,"layout_sections":{},"past_mab_experiment_ids":[],"deleted_by":null,"featured_image_alt_text":"","enable_layout_stylesheets":null,"tweet":null,"tweet_at":null,"campaign_name":null,"campaign_utm":null,"meta_keywords":null,"meta_description":"Discover why AmSteel-Blue synthetic rope is a strong, lightweight, and durable alternative to steel winch cables for your truck. Learn more about its benefits and uses.","tweet_immediately":false,"publish_immediately":true,"security_state":"NONE","scheduled_update_date":0,"placement_guids":[],"header_template_path":null,"header_variant_name":null,"footer_template_path":null,"footer_variant_name":null,"global_block_overrides":{},"property_for_dynamic_page_title":null,"property_for_dynamic_page_slug":null,"property_for_dynamic_page_meta_description":null,"property_for_dynamic_page_featured_image":null,"property_for_dynamic_page_canonical_url":null,"preview_image_src":null,"legacy_blog_tabid":null,"legacy_post_guid":null,"performable_variation_letter":null,"style_override_id":null,"has_user_changes":true,"css":{},"css_text":"","unpublished_at":0,"published_by_id":76755706,"allowed_slug_conflict":false,"ai_features":null,"link_rel_canonical_url":"","page_redirected":false,"page_expiry_enabled":null,"page_expiry_date":null,"page_expiry_redirect_id":null,"page_expiry_redirect_url":null,"deleted_by_id":null,"state_when_deleted":null,"cloned_from":null,"staged_from":null,"personas":[],"compose_body":null,"featured_image":"https://48463649.fs1.hubspotusercontent-na1.net/hubfs/48463649/Blog/amsteel-blue-synthetic-rope-900x483-jan-2018.jpg","featured_image_width":900,"featured_image_height":483,"publish_timezone_offset":null,"theme_settings_values":null,"password":null,"last_edit_session_id":null,"last_edit_update_id":null,"created_by_agent":null},"metaDescription":"Discover why AmSteel-Blue synthetic rope is a strong, lightweight, and durable alternative to steel winch cables for your truck. Learn more about its benefits and uses.","metaKeywords":null,"name":"Make the switch to synthetics with Zip's","nextPostFeaturedImage":"https://48463649.fs1.hubspotusercontent-na1.net/hubfs/48463649/Blog/cvt-570-3-boost-pro-jumpstart-in-use.jpg","nextPostFeaturedImageAltText":"","nextPostName":"Portable Power Boosts","nextPostSlug":"blog/portable-power-boosts","pageExpiryDate":null,"pageExpiryEnabled":null,"pageExpiryRedirectId":null,"pageExpiryRedirectUrl":null,"pageRedirected":false,"pageTitle":"Make the switch to synthetics with Zip's","parentBlog":{"absoluteUrl":"/blog","allowComments":true,"ampBodyColor":"#404040","ampBodyFont":"'Helvetica Neue', Helvetica, Arial, sans-serif","ampBodyFontSize":"18","ampCustomCss":"","ampHeaderBackgroundColor":"#ffffff","ampHeaderColor":"#1e1e1e","ampHeaderFont":"'Helvetica Neue', Helvetica, Arial, sans-serif","ampHeaderFontSize":"36","ampLinkColor":"#416bb3","ampLogoAlt":"","ampLogoHeight":0,"ampLogoSrc":"","ampLogoWidth":0,"analyticsPageId":190096341139,"attachedStylesheets":[],"audienceAccess":"PUBLIC","businessUnitId":null,"captchaAfterDays":7,"captchaAlways":false,"categoryId":3,"cdnPurgeEmbargoTime":null,"closeCommentsOlder":0,"commentDateFormat":"medium","commentFormGuid":"a4128401-39db-4c54-a62b-88ff335d3a69","commentMaxThreadDepth":1,"commentModeration":false,"commentNotificationEmails":[],"commentShouldCreateContact":false,"commentVerificationText":"","cosObjectType":"BLOG","created":1747163443999,"createdDateTime":1747163443999,"dailyNotificationEmailId":null,"dateFormattingLanguage":null,"defaultGroupStyleId":"","defaultNotificationFromName":"","defaultNotificationReplyTo":"","deletedAt":0,"description":"","domain":"","domainWhenPublished":"www.zips.com","emailApiSubscriptionId":null,"enableGoogleAmpOutput":true,"enableSocialAutoPublishing":false,"generateJsonLdEnabled":true,"header":null,"htmlFooter":"","htmlFooterIsShared":true,"htmlHead":"","htmlHeadIsShared":true,"htmlKeywords":[],"htmlTitle":"blog","id":190096341139,"ilsSubscriptionListsByType":{},"instantNotificationEmailId":null,"itemLayoutId":null,"itemTemplateIsShared":false,"itemTemplatePath":"zips-basic-theme/templates/blog-post.html","label":"blog","language":"en","legacyGuid":null,"legacyModuleId":null,"legacyTabId":null,"listingLayoutId":null,"listingPageId":190096341141,"listingTemplatePath":"","liveDomain":"www.zips.com","monthFilterFormat":"MMMM yyyy","monthlyNotificationEmailId":null,"name":"blog","parentBlogUpdateTaskId":null,"portalId":48463649,"postHtmlFooter":"","postHtmlHead":"","postsPerListingPage":111,"postsPerRssFeed":10,"publicAccessRules":[],"publicAccessRulesEnabled":false,"publicTitle":"blog","publishDateFormat":"medium","resolvedDomain":"www.zips.com","rootUrl":"/blog","rssCustomFeed":null,"rssDescription":null,"rssItemFooter":null,"rssItemHeader":null,"settingsOverrides":{"itemLayoutId":false,"itemTemplatePath":false,"itemTemplateIsShared":false,"listingLayoutId":false,"listingTemplatePath":false,"postsPerListingPage":false,"showSummaryInListing":false,"useFeaturedImageInSummary":false,"htmlHead":false,"postHtmlHead":false,"htmlHeadIsShared":false,"htmlFooter":false,"listingPageHtmlFooter":false,"postHtmlFooter":false,"htmlFooterIsShared":false,"attachedStylesheets":false,"postsPerRssFeed":false,"showSummaryInRss":false,"showSummaryInEmails":false,"showSummariesInEmails":false,"allowComments":false,"commentShouldCreateContact":false,"commentModeration":false,"closeCommentsOlder":false,"commentNotificationEmails":false,"commentMaxThreadDepth":false,"commentVerificationText":false,"socialAccountTwitter":false,"showSocialLinkTwitter":false,"showSocialLinkLinkedin":false,"showSocialLinkFacebook":false,"enableGoogleAmpOutput":false,"ampLogoSrc":false,"ampLogoHeight":false,"ampLogoWidth":false,"ampLogoAlt":false,"ampHeaderFont":false,"ampHeaderFontSize":false,"ampHeaderColor":false,"ampHeaderBackgroundColor":false,"ampBodyFont":false,"ampBodyFontSize":false,"ampBodyColor":false,"ampLinkColor":false,"generateJsonLdEnabled":false},"showSocialLinkFacebook":true,"showSocialLinkLinkedin":true,"showSocialLinkTwitter":true,"showSummaryInEmails":true,"showSummaryInListing":true,"showSummaryInRss":true,"siteId":null,"slug":"blog","socialAccountTwitter":"","state":null,"subscriptionContactsProperty":null,"subscriptionEmailType":null,"subscriptionFormGuid":null,"subscriptionListsByType":{},"title":null,"translatedFromId":null,"translations":{},"updated":1755110916417,"updatedDateTime":1755110916417,"urlBase":"www.zips.com/blog","urlSegments":{"all":"all","archive":"archive","author":"author","page":"page","tag":"tag"},"useFeaturedImageInSummary":true,"usesDefaultTemplate":false,"weeklyNotificationEmailId":null},"password":null,"pastMabExperimentIds":[],"performableGuid":null,"performableVariationLetter":null,"personalizationStrategyId":null,"personalizationVariantStatus":null,"personas":[],"placementGuids":[],"portableKey":null,"portalId":48463649,"position":null,"postBody":"

The use of this recovery rope will drastically cut down on the overall weight of any truck.

\n\n

\"AmSteel-Blue

\n

AmSteel-Blue Synthetic Rope is an excellent alternative to steel winch cables! These synthetic winch lines and rope extensions are very durable with extremely low stretch, have superior flex fatigue and are wear resistant. Size-for-size, it is the same strength as steel - yet it floats in water! Learn more about AmSteel-Blue Synthetic Rope now! 

","postBodyRss":"

The use of this recovery rope will drastically cut down on the overall weight of any truck.

\n\n

\"AmSteel-Blue

\n

AmSteel-Blue Synthetic Rope is an excellent alternative to steel winch cables! These synthetic winch lines and rope extensions are very durable with extremely low stretch, have superior flex fatigue and are wear resistant. Size-for-size, it is the same strength as steel - yet it floats in water! Learn more about AmSteel-Blue Synthetic Rope now! 

","postEmailContent":"

The use of this recovery rope will drastically cut down on the overall weight of any truck.

","postFeaturedImageIfEnabled":"https://48463649.fs1.hubspotusercontent-na1.net/hubfs/48463649/Blog/amsteel-blue-synthetic-rope-900x483-jan-2018.jpg","postListContent":"

The use of this recovery rope will drastically cut down on the overall weight of any truck.

","postListSummaryFeaturedImage":"https://48463649.fs1.hubspotusercontent-na1.net/hubfs/48463649/Blog/amsteel-blue-synthetic-rope-900x483-jan-2018.jpg","postRssContent":"

The use of this recovery rope will drastically cut down on the overall weight of any truck.

","postRssSummaryFeaturedImage":"https://48463649.fs1.hubspotusercontent-na1.net/hubfs/48463649/Blog/amsteel-blue-synthetic-rope-900x483-jan-2018.jpg","postSummary":"

The use of this recovery rope will drastically cut down on the overall weight of any truck.

\n","postSummaryRss":"

The use of this recovery rope will drastically cut down on the overall weight of any truck.

","postTemplate":"zips-basic-theme/templates/blog-post.html","previewImageSrc":null,"previewKey":"qOrITgek","previousPostFeaturedImage":"https://48463649.fs1.hubspotusercontent-na1.net/hubfs/48463649/Blog/jump-packs.jpg","previousPostFeaturedImageAltText":"","previousPostName":"Make your Jump-Start Pack Last!","previousPostSlug":"blog/make-your-jump-start-pack-last","processingStatus":"PUBLISHED","propertyForDynamicPageCanonicalUrl":null,"propertyForDynamicPageFeaturedImage":null,"propertyForDynamicPageMetaDescription":null,"propertyForDynamicPageSlug":null,"propertyForDynamicPageTitle":null,"publicAccessRules":[],"publicAccessRulesEnabled":false,"publishDate":1515506400000,"publishDateLocalTime":1515506400000,"publishDateLocalized":{"date":1515506400000,"format":"medium","language":null},"publishImmediately":true,"publishTimezoneOffset":null,"publishedAt":1756221950399,"publishedByEmail":null,"publishedById":76755706,"publishedByName":null,"publishedUrl":"/blog/make-the-switch-to-synthetics-with-zips","resolvedDomain":"www.zips.com","resolvedLanguage":null,"rssBody":"

The use of this recovery rope will drastically cut down on the overall weight of any truck.

\n\n

\"AmSteel-Blue

\n

AmSteel-Blue Synthetic Rope is an excellent alternative to steel winch cables! These synthetic winch lines and rope extensions are very durable with extremely low stretch, have superior flex fatigue and are wear resistant. Size-for-size, it is the same strength as steel - yet it floats in water! Learn more about AmSteel-Blue Synthetic Rope now! 

","rssSummary":"

The use of this recovery rope will drastically cut down on the overall weight of any truck.

\n","rssSummaryFeaturedImage":"https://48463649.fs1.hubspotusercontent-na1.net/hubfs/48463649/Blog/amsteel-blue-synthetic-rope-900x483-jan-2018.jpg","scheduledUpdateDate":0,"screenshotPreviewTakenAt":1770564350819,"screenshotPreviewUrl":"https://cdn1.hubspot.net/hubshotv3/prod/e/0/53e8e825-d39a-4fd9-99af-db437019b4af.png","sections":{},"securityState":"NONE","siteId":null,"slug":"blog/make-the-switch-to-synthetics-with-zips","stagedFrom":null,"state":"PUBLISHED","stateWhenDeleted":null,"structuredContentPageType":null,"structuredContentType":null,"styleOverrideId":null,"subcategory":"normal_blog_post","syncedWithBlogRoot":true,"tagIds":[192169769490,192174528148,192174529697,194719179289,194719586666],"tagList":[{"categoryId":3,"cdnPurgeEmbargoTime":null,"contentIds":[],"cosObjectType":"TAG","created":1751598346713,"deletedAt":0,"description":"","id":192169769490,"label":"Towing & Recovery","language":null,"name":"Towing & Recovery","portalId":48463649,"slug":"towing-recovery","translatedFromId":null,"translations":{},"updated":1751598346713},{"categoryId":3,"cdnPurgeEmbargoTime":null,"contentIds":[],"cosObjectType":"TAG","created":1751601475164,"deletedAt":0,"description":"","id":192174528148,"label":"Automotive","language":null,"name":"Automotive","portalId":48463649,"slug":"automotive","translatedFromId":null,"translations":{},"updated":1751601475164},{"categoryId":3,"cdnPurgeEmbargoTime":null,"contentIds":[],"cosObjectType":"TAG","created":1751602285139,"deletedAt":0,"description":"","id":192174529697,"label":"Construction","language":null,"name":"Construction","portalId":48463649,"slug":"construction","translatedFromId":null,"translations":{},"updated":1751602285139},{"categoryId":3,"cdnPurgeEmbargoTime":null,"contentIds":[],"cosObjectType":"TAG","created":1755545213046,"deletedAt":0,"description":"","id":194719179289,"label":"Industry Knowledge & Updates","language":null,"name":"Industry Knowledge & Updates","portalId":48463649,"slug":"industry-knowledge-updates","translatedFromId":null,"translations":{},"updated":1755545213046},{"categoryId":3,"cdnPurgeEmbargoTime":null,"contentIds":[],"cosObjectType":"TAG","created":1755545331471,"deletedAt":0,"description":"","id":194719586666,"label":"Product Guides","language":null,"name":"Product Guides","portalId":48463649,"slug":"product-guides","translatedFromId":null,"translations":{},"updated":1755545331471}],"tagNames":["Towing & Recovery","Automotive","Construction","Industry Knowledge & Updates","Product Guides"],"teamPerms":[],"templatePath":"","templatePathForRender":"zips-basic-theme/templates/blog-post.html","textToAudioFileId":null,"textToAudioGenerationRequestId":null,"themePath":null,"themeSettingsValues":null,"title":"Make the switch to synthetics with Zip's","tmsId":null,"topicIds":[192169769490,192174528148,192174529697,194719179289,194719586666],"topicList":[{"categoryId":3,"cdnPurgeEmbargoTime":null,"contentIds":[],"cosObjectType":"TAG","created":1751598346713,"deletedAt":0,"description":"","id":192169769490,"label":"Towing & Recovery","language":null,"name":"Towing & Recovery","portalId":48463649,"slug":"towing-recovery","translatedFromId":null,"translations":{},"updated":1751598346713},{"categoryId":3,"cdnPurgeEmbargoTime":null,"contentIds":[],"cosObjectType":"TAG","created":1751601475164,"deletedAt":0,"description":"","id":192174528148,"label":"Automotive","language":null,"name":"Automotive","portalId":48463649,"slug":"automotive","translatedFromId":null,"translations":{},"updated":1751601475164},{"categoryId":3,"cdnPurgeEmbargoTime":null,"contentIds":[],"cosObjectType":"TAG","created":1751602285139,"deletedAt":0,"description":"","id":192174529697,"label":"Construction","language":null,"name":"Construction","portalId":48463649,"slug":"construction","translatedFromId":null,"translations":{},"updated":1751602285139},{"categoryId":3,"cdnPurgeEmbargoTime":null,"contentIds":[],"cosObjectType":"TAG","created":1755545213046,"deletedAt":0,"description":"","id":194719179289,"label":"Industry Knowledge & Updates","language":null,"name":"Industry Knowledge & Updates","portalId":48463649,"slug":"industry-knowledge-updates","translatedFromId":null,"translations":{},"updated":1755545213046},{"categoryId":3,"cdnPurgeEmbargoTime":null,"contentIds":[],"cosObjectType":"TAG","created":1755545331471,"deletedAt":0,"description":"","id":194719586666,"label":"Product Guides","language":null,"name":"Product Guides","portalId":48463649,"slug":"product-guides","translatedFromId":null,"translations":{},"updated":1755545331471}],"topicNames":["Towing & Recovery","Automotive","Construction","Industry Knowledge & Updates","Product Guides"],"topics":[192169769490,192174528148,192174529697,194719179289,194719586666],"translatedContent":{},"translatedFromId":null,"translations":{},"tweet":null,"tweetAt":null,"tweetImmediately":false,"unpublishedAt":0,"updated":1756221950404,"updatedById":76755706,"upsizeFeaturedImage":false,"url":"/blog/make-the-switch-to-synthetics-with-zips","useFeaturedImage":true,"userPerms":[],"views":null,"visibleToAll":null,"widgetContainers":{},"widgetcontainers":{},"widgets":{}},{"ab":false,"abStatus":null,"abTestId":null,"abVariation":false,"abVariationAutomated":false,"absoluteUrl":"/blog/portable-power-boosts","afterPostBody":null,"aifeatures":null,"allowedSlugConflict":false,"analytics":null,"analyticsPageId":"192174571424","analyticsPageType":"blog-post","approvalStatus":null,"archived":false,"archivedAt":0,"archivedInDashboard":false,"areCommentsAllowed":true,"attachedStylesheets":[],"audienceAccess":"PUBLIC","author":null,"authorName":null,"authorUsername":null,"blogAuthor":{"avatar":"","bio":"","cdnPurgeEmbargoTime":null,"cosObjectType":"BLOG_AUTHOR","created":1750825727422,"deletedAt":0,"displayName":"Zip's","email":null,"facebook":"","fullName":"Zip's","gravatarUrl":null,"hasSocialProfiles":false,"id":191785406258,"label":"Zip's","language":"en","linkedin":"","name":"Zip's","portalId":48463649,"slug":"zips","translatedFromId":null,"translations":{},"twitter":"","twitterUsername":"","updated":1750825727422,"userId":null,"username":null,"website":""},"blogAuthorId":191785406258,"blogAuthorIdList":[191785406258],"blogAuthorList":[{"avatar":"","bio":"","cdnPurgeEmbargoTime":null,"cosObjectType":"BLOG_AUTHOR","created":1750825727422,"deletedAt":0,"displayName":"Zip's","email":null,"facebook":"","fullName":"Zip's","gravatarUrl":null,"hasSocialProfiles":false,"id":191785406258,"label":"Zip's","language":"en","linkedin":"","name":"Zip's","portalId":48463649,"slug":"zips","translatedFromId":null,"translations":{},"twitter":"","twitterUsername":"","updated":1750825727422,"userId":null,"username":null,"website":""}],"blogPostAuthor":{"avatar":"","bio":"","cdnPurgeEmbargoTime":null,"cosObjectType":"BLOG_AUTHOR","created":1750825727422,"deletedAt":0,"displayName":"Zip's","email":null,"facebook":"","fullName":"Zip's","gravatarUrl":null,"hasSocialProfiles":false,"id":191785406258,"label":"Zip's","language":"en","linkedin":"","name":"Zip's","portalId":48463649,"slug":"zips","translatedFromId":null,"translations":{},"twitter":"","twitterUsername":"","updated":1750825727422,"userId":null,"username":null,"website":""},"blogPostScheduleTaskUid":null,"blogPublishInstantEmailCampaignId":null,"blogPublishInstantEmailRetryCount":null,"blogPublishInstantEmailTaskUid":null,"blogPublishToSocialMediaTask":"DONE_NOT_SENT","blueprintTypeId":0,"businessUnitId":null,"campaign":null,"campaignName":null,"campaignUtm":null,"category":3,"categoryId":3,"cdnPurgeEmbargoTime":null,"checkPostLevelAudienceAccessFirst":true,"clonedFrom":null,"composeBody":null,"compositionId":0,"contentAccessRuleIds":[],"contentAccessRuleTypes":[],"contentGroup":190096341139,"contentGroupId":190096341139,"contentTypeCategory":3,"contentTypeCategoryId":3,"contentTypeId":null,"created":1751601986910,"createdByAgent":null,"createdById":74657203,"createdTime":1751601986910,"crmObjectId":null,"css":{},"cssText":"","ctaClicks":null,"ctaViews":null,"currentState":"PUBLISHED","currentlyPublished":true,"deletedAt":0,"deletedBy":null,"deletedByEmail":null,"deletedById":null,"domain":"","dynamicPageDataSourceId":null,"dynamicPageDataSourceType":null,"dynamicPageHubDbTableId":null,"enableDomainStylesheets":null,"enableGoogleAmpOutputOverride":false,"enableLayoutStylesheets":null,"errors":[],"featuredImage":"https://48463649.fs1.hubspotusercontent-na1.net/hubfs/48463649/Blog/cvt-570-3-boost-pro-jumpstart-in-use.jpg","featuredImageAltText":"","featuredImageHeight":667,"featuredImageLength":0,"featuredImageWidth":1000,"flexAreas":{},"folderId":null,"footerHtml":null,"footerTemplatePath":null,"footerVariantName":null,"freezeDate":1473170400000,"generateJsonLdEnabledOverride":true,"globalBlockOverrides":{},"hasContentAccessRules":false,"hasUserChanges":true,"headHtml":null,"header":null,"headerTemplatePath":null,"headerVariantName":null,"htmlTitle":"Portable Power Boosts","id":192174571424,"includeDefaultCustomCss":null,"isCaptchaRequired":true,"isCrawlableByBots":false,"isDraft":false,"isInstantEmailEnabled":false,"isPublished":true,"isSocialPublishingEnabled":false,"keywords":[],"label":"Portable Power Boosts","language":"en","lastEditSessionId":null,"lastEditUpdateId":null,"layoutSections":{},"legacyBlogTabid":null,"legacyId":null,"legacyPostGuid":null,"linkRelCanonicalUrl":"","listTemplate":"","liveDomain":"www.zips.com","mab":false,"mabExperimentId":null,"mabMaster":false,"mabVariant":false,"marketingCampaignGuids":[],"meta":{"html_title":"Portable Power Boosts","public_access_rules":[],"public_access_rules_enabled":false,"use_featured_image":true,"tag_ids":[192169769490,192174528148,194719179289,194719586666],"topic_ids":[192169769490,192174528148,194719179289,194719586666],"post_summary":"

A dead car battery can leave you stranded. A dead phone battery can leave you without a way to call for help. The solution? Zip’s supplies portable power boosts small enough to carry in your purse or stow in your glove compartment—and strong enough to not only charge large electronics, but jump-start your engine. This means power when you need it most, without the time and trouble of calling for roadside assistance.

\n","post_body":"

A dead car battery can leave you stranded. A dead phone battery can leave you without a way to call for help. The solution? Zip’s supplies portable power boosts small enough to carry in your purse or stow in your glove compartment—and strong enough to not only charge large electronics, but jump-start your engine. This means power when you need it most, without the time and trouble of calling for roadside assistance.

\n\n

Zip’s also carries other impressive power packs in a range of sizes and power voltages, perfect for any member of your family, any time a battery charge is needed.

\n

Learn more about them here.

","rss_summary":"

A dead car battery can leave you stranded. A dead phone battery can leave you without a way to call for help. The solution? Zip’s supplies portable power boosts small enough to carry in your purse or stow in your glove compartment—and strong enough to not only charge large electronics, but jump-start your engine. This means power when you need it most, without the time and trouble of calling for roadside assistance.

\n","rss_body":"

A dead car battery can leave you stranded. A dead phone battery can leave you without a way to call for help. The solution? Zip’s supplies portable power boosts small enough to carry in your purse or stow in your glove compartment—and strong enough to not only charge large electronics, but jump-start your engine. This means power when you need it most, without the time and trouble of calling for roadside assistance.

\n\n

Zip’s also carries other impressive power packs in a range of sizes and power voltages, perfect for any member of your family, any time a battery charge is needed.

\n

Learn more about them here.

","enable_google_amp_output_override":false,"generate_json_ld_enabled":true,"blog_post_schedule_task_uid":null,"blog_publish_to_social_media_task":"DONE_NOT_SENT","blog_publish_instant_email_task_uid":null,"blog_publish_instant_email_campaign_id":null,"blog_publish_instant_email_retry_count":null,"keywords":[],"composition_id":0,"is_crawlable_by_bots":false,"header":null,"published_at":1755718942705,"head_html":null,"footer_html":null,"attached_stylesheets":[],"enable_domain_stylesheets":null,"include_default_custom_css":null,"layout_sections":{},"past_mab_experiment_ids":[],"deleted_by":null,"featured_image_alt_text":"","enable_layout_stylesheets":null,"tweet":null,"tweet_at":null,"campaign_name":null,"campaign_utm":null,"meta_keywords":null,"meta_description":"Explore Zip's lineup of portable power boosts that can charge your car, phone, laptop or tablet—offering essential power on the go, wherever you need it.","tweet_immediately":false,"publish_immediately":true,"security_state":"NONE","scheduled_update_date":0,"placement_guids":[],"header_template_path":null,"header_variant_name":null,"footer_template_path":null,"footer_variant_name":null,"global_block_overrides":{},"property_for_dynamic_page_title":null,"property_for_dynamic_page_slug":null,"property_for_dynamic_page_meta_description":null,"property_for_dynamic_page_featured_image":null,"property_for_dynamic_page_canonical_url":null,"preview_image_src":null,"legacy_blog_tabid":null,"legacy_post_guid":null,"performable_variation_letter":null,"style_override_id":null,"has_user_changes":true,"css":{},"css_text":"","unpublished_at":0,"published_by_id":79766377,"allowed_slug_conflict":false,"ai_features":null,"link_rel_canonical_url":"","page_redirected":false,"page_expiry_enabled":null,"page_expiry_date":null,"page_expiry_redirect_id":null,"page_expiry_redirect_url":null,"deleted_by_id":null,"state_when_deleted":null,"cloned_from":null,"staged_from":null,"personas":[],"compose_body":null,"featured_image":"https://48463649.fs1.hubspotusercontent-na1.net/hubfs/48463649/Blog/cvt-570-3-boost-pro-jumpstart-in-use.jpg","featured_image_width":1000,"featured_image_height":667,"publish_timezone_offset":null,"theme_settings_values":null,"password":null,"last_edit_session_id":null,"last_edit_update_id":null,"created_by_agent":null},"metaDescription":"Explore Zip's lineup of portable power boosts that can charge your car, phone, laptop or tablet—offering essential power on the go, wherever you need it.","metaKeywords":null,"name":"Portable Power Boosts","nextPostFeaturedImage":"https://48463649.fs1.hubspotusercontent-na1.net/hubfs/48463649/Blog/img-1-600x330.png","nextPostFeaturedImageAltText":"","nextPostName":"Ratchet Strap Guide: Set Up, Use and Release","nextPostSlug":"blog/ratchet-strap-guide-set-up-use-and-release","pageExpiryDate":null,"pageExpiryEnabled":null,"pageExpiryRedirectId":null,"pageExpiryRedirectUrl":null,"pageRedirected":false,"pageTitle":"Portable Power Boosts","parentBlog":{"absoluteUrl":"/blog","allowComments":true,"ampBodyColor":"#404040","ampBodyFont":"'Helvetica Neue', Helvetica, Arial, sans-serif","ampBodyFontSize":"18","ampCustomCss":"","ampHeaderBackgroundColor":"#ffffff","ampHeaderColor":"#1e1e1e","ampHeaderFont":"'Helvetica Neue', Helvetica, Arial, sans-serif","ampHeaderFontSize":"36","ampLinkColor":"#416bb3","ampLogoAlt":"","ampLogoHeight":0,"ampLogoSrc":"","ampLogoWidth":0,"analyticsPageId":190096341139,"attachedStylesheets":[],"audienceAccess":"PUBLIC","businessUnitId":null,"captchaAfterDays":7,"captchaAlways":false,"categoryId":3,"cdnPurgeEmbargoTime":null,"closeCommentsOlder":0,"commentDateFormat":"medium","commentFormGuid":"a4128401-39db-4c54-a62b-88ff335d3a69","commentMaxThreadDepth":1,"commentModeration":false,"commentNotificationEmails":[],"commentShouldCreateContact":false,"commentVerificationText":"","cosObjectType":"BLOG","created":1747163443999,"createdDateTime":1747163443999,"dailyNotificationEmailId":null,"dateFormattingLanguage":null,"defaultGroupStyleId":"","defaultNotificationFromName":"","defaultNotificationReplyTo":"","deletedAt":0,"description":"","domain":"","domainWhenPublished":"www.zips.com","emailApiSubscriptionId":null,"enableGoogleAmpOutput":true,"enableSocialAutoPublishing":false,"generateJsonLdEnabled":true,"header":null,"htmlFooter":"","htmlFooterIsShared":true,"htmlHead":"","htmlHeadIsShared":true,"htmlKeywords":[],"htmlTitle":"blog","id":190096341139,"ilsSubscriptionListsByType":{},"instantNotificationEmailId":null,"itemLayoutId":null,"itemTemplateIsShared":false,"itemTemplatePath":"zips-basic-theme/templates/blog-post.html","label":"blog","language":"en","legacyGuid":null,"legacyModuleId":null,"legacyTabId":null,"listingLayoutId":null,"listingPageId":190096341141,"listingTemplatePath":"","liveDomain":"www.zips.com","monthFilterFormat":"MMMM yyyy","monthlyNotificationEmailId":null,"name":"blog","parentBlogUpdateTaskId":null,"portalId":48463649,"postHtmlFooter":"","postHtmlHead":"","postsPerListingPage":111,"postsPerRssFeed":10,"publicAccessRules":[],"publicAccessRulesEnabled":false,"publicTitle":"blog","publishDateFormat":"medium","resolvedDomain":"www.zips.com","rootUrl":"/blog","rssCustomFeed":null,"rssDescription":null,"rssItemFooter":null,"rssItemHeader":null,"settingsOverrides":{"itemLayoutId":false,"itemTemplatePath":false,"itemTemplateIsShared":false,"listingLayoutId":false,"listingTemplatePath":false,"postsPerListingPage":false,"showSummaryInListing":false,"useFeaturedImageInSummary":false,"htmlHead":false,"postHtmlHead":false,"htmlHeadIsShared":false,"htmlFooter":false,"listingPageHtmlFooter":false,"postHtmlFooter":false,"htmlFooterIsShared":false,"attachedStylesheets":false,"postsPerRssFeed":false,"showSummaryInRss":false,"showSummaryInEmails":false,"showSummariesInEmails":false,"allowComments":false,"commentShouldCreateContact":false,"commentModeration":false,"closeCommentsOlder":false,"commentNotificationEmails":false,"commentMaxThreadDepth":false,"commentVerificationText":false,"socialAccountTwitter":false,"showSocialLinkTwitter":false,"showSocialLinkLinkedin":false,"showSocialLinkFacebook":false,"enableGoogleAmpOutput":false,"ampLogoSrc":false,"ampLogoHeight":false,"ampLogoWidth":false,"ampLogoAlt":false,"ampHeaderFont":false,"ampHeaderFontSize":false,"ampHeaderColor":false,"ampHeaderBackgroundColor":false,"ampBodyFont":false,"ampBodyFontSize":false,"ampBodyColor":false,"ampLinkColor":false,"generateJsonLdEnabled":false},"showSocialLinkFacebook":true,"showSocialLinkLinkedin":true,"showSocialLinkTwitter":true,"showSummaryInEmails":true,"showSummaryInListing":true,"showSummaryInRss":true,"siteId":null,"slug":"blog","socialAccountTwitter":"","state":null,"subscriptionContactsProperty":null,"subscriptionEmailType":null,"subscriptionFormGuid":null,"subscriptionListsByType":{},"title":null,"translatedFromId":null,"translations":{},"updated":1755110916417,"updatedDateTime":1755110916417,"urlBase":"www.zips.com/blog","urlSegments":{"all":"all","archive":"archive","author":"author","page":"page","tag":"tag"},"useFeaturedImageInSummary":true,"usesDefaultTemplate":false,"weeklyNotificationEmailId":null},"password":null,"pastMabExperimentIds":[],"performableGuid":null,"performableVariationLetter":null,"personalizationStrategyId":null,"personalizationVariantStatus":null,"personas":[],"placementGuids":[],"portableKey":null,"portalId":48463649,"position":null,"postBody":"

A dead car battery can leave you stranded. A dead phone battery can leave you without a way to call for help. The solution? Zip’s supplies portable power boosts small enough to carry in your purse or stow in your glove compartment—and strong enough to not only charge large electronics, but jump-start your engine. This means power when you need it most, without the time and trouble of calling for roadside assistance.

\n\n

Zip’s also carries other impressive power packs in a range of sizes and power voltages, perfect for any member of your family, any time a battery charge is needed.

\n

Learn more about them here.

","postBodyRss":"

A dead car battery can leave you stranded. A dead phone battery can leave you without a way to call for help. The solution? Zip’s supplies portable power boosts small enough to carry in your purse or stow in your glove compartment—and strong enough to not only charge large electronics, but jump-start your engine. This means power when you need it most, without the time and trouble of calling for roadside assistance.

\n\n

Zip’s also carries other impressive power packs in a range of sizes and power voltages, perfect for any member of your family, any time a battery charge is needed.

\n

Learn more about them here.

","postEmailContent":"

A dead car battery can leave you stranded. A dead phone battery can leave you without a way to call for help. The solution? Zip’s supplies portable power boosts small enough to carry in your purse or stow in your glove compartment—and strong enough to not only charge large electronics, but jump-start your engine. This means power when you need it most, without the time and trouble of calling for roadside assistance.

","postFeaturedImageIfEnabled":"https://48463649.fs1.hubspotusercontent-na1.net/hubfs/48463649/Blog/cvt-570-3-boost-pro-jumpstart-in-use.jpg","postListContent":"

A dead car battery can leave you stranded. A dead phone battery can leave you without a way to call for help. The solution? Zip’s supplies portable power boosts small enough to carry in your purse or stow in your glove compartment—and strong enough to not only charge large electronics, but jump-start your engine. This means power when you need it most, without the time and trouble of calling for roadside assistance.

","postListSummaryFeaturedImage":"https://48463649.fs1.hubspotusercontent-na1.net/hubfs/48463649/Blog/cvt-570-3-boost-pro-jumpstart-in-use.jpg","postRssContent":"

A dead car battery can leave you stranded. A dead phone battery can leave you without a way to call for help. The solution? Zip’s supplies portable power boosts small enough to carry in your purse or stow in your glove compartment—and strong enough to not only charge large electronics, but jump-start your engine. This means power when you need it most, without the time and trouble of calling for roadside assistance.

","postRssSummaryFeaturedImage":"https://48463649.fs1.hubspotusercontent-na1.net/hubfs/48463649/Blog/cvt-570-3-boost-pro-jumpstart-in-use.jpg","postSummary":"

A dead car battery can leave you stranded. A dead phone battery can leave you without a way to call for help. The solution? Zip’s supplies portable power boosts small enough to carry in your purse or stow in your glove compartment—and strong enough to not only charge large electronics, but jump-start your engine. This means power when you need it most, without the time and trouble of calling for roadside assistance.

\n","postSummaryRss":"

A dead car battery can leave you stranded. A dead phone battery can leave you without a way to call for help. The solution? Zip’s supplies portable power boosts small enough to carry in your purse or stow in your glove compartment—and strong enough to not only charge large electronics, but jump-start your engine. This means power when you need it most, without the time and trouble of calling for roadside assistance.

","postTemplate":"zips-basic-theme/templates/blog-post.html","previewImageSrc":null,"previewKey":"fwfDJlte","previousPostFeaturedImage":"https://48463649.fs1.hubspotusercontent-na1.net/hubfs/48463649/Blog/amsteel-blue-synthetic-rope-900x483-jan-2018.jpg","previousPostFeaturedImageAltText":"","previousPostName":"Make the switch to synthetics with Zip's","previousPostSlug":"blog/make-the-switch-to-synthetics-with-zips","processingStatus":"PUBLISHED","propertyForDynamicPageCanonicalUrl":null,"propertyForDynamicPageFeaturedImage":null,"propertyForDynamicPageMetaDescription":null,"propertyForDynamicPageSlug":null,"propertyForDynamicPageTitle":null,"publicAccessRules":[],"publicAccessRulesEnabled":false,"publishDate":1473170400000,"publishDateLocalTime":1473170400000,"publishDateLocalized":{"date":1473170400000,"format":"medium","language":null},"publishImmediately":true,"publishTimezoneOffset":null,"publishedAt":1755718942705,"publishedByEmail":null,"publishedById":79766377,"publishedByName":null,"publishedUrl":"/blog/portable-power-boosts","resolvedDomain":"www.zips.com","resolvedLanguage":null,"rssBody":"

A dead car battery can leave you stranded. A dead phone battery can leave you without a way to call for help. The solution? Zip’s supplies portable power boosts small enough to carry in your purse or stow in your glove compartment—and strong enough to not only charge large electronics, but jump-start your engine. This means power when you need it most, without the time and trouble of calling for roadside assistance.

\n\n

Zip’s also carries other impressive power packs in a range of sizes and power voltages, perfect for any member of your family, any time a battery charge is needed.

\n

Learn more about them here.

","rssSummary":"

A dead car battery can leave you stranded. A dead phone battery can leave you without a way to call for help. The solution? Zip’s supplies portable power boosts small enough to carry in your purse or stow in your glove compartment—and strong enough to not only charge large electronics, but jump-start your engine. This means power when you need it most, without the time and trouble of calling for roadside assistance.

\n","rssSummaryFeaturedImage":"https://48463649.fs1.hubspotusercontent-na1.net/hubfs/48463649/Blog/cvt-570-3-boost-pro-jumpstart-in-use.jpg","scheduledUpdateDate":0,"screenshotPreviewTakenAt":1770061342421,"screenshotPreviewUrl":"https://cdn1.hubspot.net/hubshotv3/prod/e/0/6fe2b121-f019-43cd-b3fc-3ca1a439f5fc.png","sections":{},"securityState":"NONE","siteId":null,"slug":"blog/portable-power-boosts","stagedFrom":null,"state":"PUBLISHED","stateWhenDeleted":null,"structuredContentPageType":null,"structuredContentType":null,"styleOverrideId":null,"subcategory":"normal_blog_post","syncedWithBlogRoot":true,"tagIds":[192169769490,192174528148,194719179289,194719586666],"tagList":[{"categoryId":3,"cdnPurgeEmbargoTime":null,"contentIds":[],"cosObjectType":"TAG","created":1751598346713,"deletedAt":0,"description":"","id":192169769490,"label":"Towing & Recovery","language":null,"name":"Towing & Recovery","portalId":48463649,"slug":"towing-recovery","translatedFromId":null,"translations":{},"updated":1751598346713},{"categoryId":3,"cdnPurgeEmbargoTime":null,"contentIds":[],"cosObjectType":"TAG","created":1751601475164,"deletedAt":0,"description":"","id":192174528148,"label":"Automotive","language":null,"name":"Automotive","portalId":48463649,"slug":"automotive","translatedFromId":null,"translations":{},"updated":1751601475164},{"categoryId":3,"cdnPurgeEmbargoTime":null,"contentIds":[],"cosObjectType":"TAG","created":1755545213046,"deletedAt":0,"description":"","id":194719179289,"label":"Industry Knowledge & Updates","language":null,"name":"Industry Knowledge & Updates","portalId":48463649,"slug":"industry-knowledge-updates","translatedFromId":null,"translations":{},"updated":1755545213046},{"categoryId":3,"cdnPurgeEmbargoTime":null,"contentIds":[],"cosObjectType":"TAG","created":1755545331471,"deletedAt":0,"description":"","id":194719586666,"label":"Product Guides","language":null,"name":"Product Guides","portalId":48463649,"slug":"product-guides","translatedFromId":null,"translations":{},"updated":1755545331471}],"tagNames":["Towing & Recovery","Automotive","Industry Knowledge & Updates","Product Guides"],"teamPerms":[],"templatePath":"","templatePathForRender":"zips-basic-theme/templates/blog-post.html","textToAudioFileId":null,"textToAudioGenerationRequestId":null,"themePath":null,"themeSettingsValues":null,"title":"Portable Power Boosts","tmsId":null,"topicIds":[192169769490,192174528148,194719179289,194719586666],"topicList":[{"categoryId":3,"cdnPurgeEmbargoTime":null,"contentIds":[],"cosObjectType":"TAG","created":1751598346713,"deletedAt":0,"description":"","id":192169769490,"label":"Towing & Recovery","language":null,"name":"Towing & Recovery","portalId":48463649,"slug":"towing-recovery","translatedFromId":null,"translations":{},"updated":1751598346713},{"categoryId":3,"cdnPurgeEmbargoTime":null,"contentIds":[],"cosObjectType":"TAG","created":1751601475164,"deletedAt":0,"description":"","id":192174528148,"label":"Automotive","language":null,"name":"Automotive","portalId":48463649,"slug":"automotive","translatedFromId":null,"translations":{},"updated":1751601475164},{"categoryId":3,"cdnPurgeEmbargoTime":null,"contentIds":[],"cosObjectType":"TAG","created":1755545213046,"deletedAt":0,"description":"","id":194719179289,"label":"Industry Knowledge & Updates","language":null,"name":"Industry Knowledge & Updates","portalId":48463649,"slug":"industry-knowledge-updates","translatedFromId":null,"translations":{},"updated":1755545213046},{"categoryId":3,"cdnPurgeEmbargoTime":null,"contentIds":[],"cosObjectType":"TAG","created":1755545331471,"deletedAt":0,"description":"","id":194719586666,"label":"Product Guides","language":null,"name":"Product Guides","portalId":48463649,"slug":"product-guides","translatedFromId":null,"translations":{},"updated":1755545331471}],"topicNames":["Towing & Recovery","Automotive","Industry Knowledge & Updates","Product Guides"],"topics":[192169769490,192174528148,194719179289,194719586666],"translatedContent":{},"translatedFromId":null,"translations":{},"tweet":null,"tweetAt":null,"tweetImmediately":false,"unpublishedAt":0,"updated":1755718942709,"updatedById":79766377,"upsizeFeaturedImage":false,"url":"/blog/portable-power-boosts","useFeaturedImage":true,"userPerms":[],"views":null,"visibleToAll":null,"widgetContainers":{},"widgetcontainers":{},"widgets":{}}],"offset":0,"total":28,"totalCount":28}; window.filteredContents = articles.objects; window.contents = articles.objects;